Burp Suite for Pentester: Turbo Intruder
Is fuzzing your favourite attack type, but you didn’t enjoy it due to the low speed and high memory usage when you work over with some big dictionaries?
So, in this article, we will explore one of the fastest and most reliable fuzzers — Turbo Intruder. It is a Burp Suite extension that can produce results within minutes, regardless of the number of payloads embedded in the dictionary. Additionally, it is designed to optimize memory usage, making it highly efficient.
Table of Content
- Introduction to Turbo Intruder
- What is Turbo Intruder
- Burp Intruder v/s Turbo Intruder
- Turbo Intruder’s Installation
- Brute Forcing the application’s Passwords
- Via Burp Intruder
- Via Turbo Intruder
- Customizing the Python Scripts
- Fuzz for Multiple parameters
Introduction to Turbo Intruder
What is Turbo Intruder
Turbo Intruder one of the greatest burp suite extensions scripted by “James Kettle” in order to send a large number of HTTP requests and analyzing the results. However, the functionality of this extension is as similar as of the Burp’s Intruder carries. Yes, it is a fuzzer. But as it uses the HTTP-stack thereby some features make it a bit different and faster –
- High speed with least latency during fuzzing
- Low memory usage with a million payloads
- Customizable python scripts for different attack scenarios
- Reliable for Multi-day attacks
Burp Intruder v/s Turbo Intruder
No doubt, the intruder tab is the most powerful part of the burp suite. Whether it’s about to fuzz an application over at a single injection point or multiple, it does it work seamlessly. However, this tool provides whatever we wish to, whether it’s about payloads or the error detections, it is good-to-go. But when it comes to the fuzzing speed or the memory usage it drops it out. If the dictionary exceeds about a lakh payload, the latency and the memory consumption will be at their peak. But why this all happens?
In order to analyze this, we need to understand the mechanism it carries while fuzzing.
All major brute forcers create a TCP handshake for each request and then send the request to the server. The server then waits and sends the response back. Once the tool receives this response, it reads it and repeats the process. However, this handshake process consumes a significant amount of time, and the sending and reading phases introduce substantial latency. As a result, this approach puts a high load on the CPU and consumes a lot of memory, ultimately reducing the fuzzing speed.
But the turbo intruder is different and as its speed is. It works on an old technology i.e., HTTP pipelining which establishes the connection first and shares as many possible requests in one go without worrying about the received responses in order to minimize the latency and server processing time.
Turbo Intruder’s Installation
It’s not difficult to find or install this plugin. Simply navigate to the Extender tab in Burp Suite, then select the BApp Store option. Once you scroll down, you’ll find the plugin right there, with a rating close to 5 stars.

Now simply hit the install button over in the description and there we’re ready to go.

But where it is, it’s not aligned in any of the tabs?
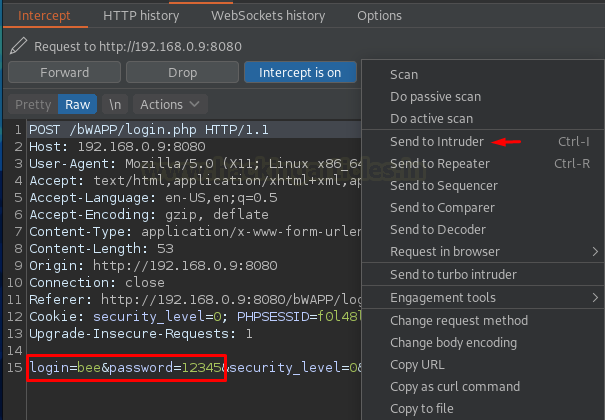
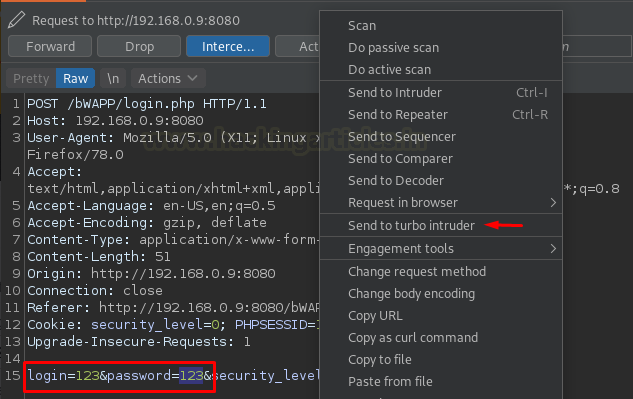
Let’s check out within the Action section, a simple right-click can give us the Send to Turbo Intruder option.

Brute Forcing the application’s Passwords
You might be wondering — aren’t all these concepts already documented on PortSwigger’s webpage or the extension’s GitHub repository? So, what’s new here? And what about the practical exposure? How can we confirm that Turbo Intruder actually fuzzes the application much faster than the basic Burp Intruder?
To confirm this and see it in action, let’s tune into our vulnerable application, bWAPP. We’ll capture the Login Portal’s HTTP request by setting the username to bee and the password to 12345.

Via Burp’s Intruder
Once the Login button got fired up, we got the Request intercepted at our Burp monitor, so let’s first share it with “Intruder”.
However, the Intruder steps are on our tips, so let’s recall them once again. As soon as the Intruder receives the request, our first work is to set the clear out the things and set the injection points over at the position tab.

Now, time to inject our fuzzing lists. Switch to the Payloads tab, right next to Position one, and click the Load button in order to select the desired list. For this section, we’ve modified the 10-million-password-list of Daniel Miessler SecLists Github’s repository and have injected bee & bug within it.
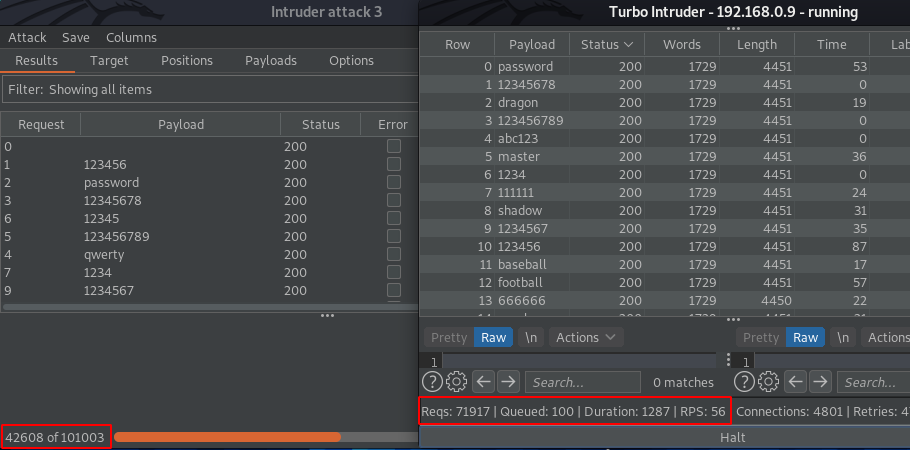
From the below image, you can see that the number of requests is more than 100,000, which is not large but still it could help us to determine the speed.

Now as soon as we hit the Attack button, the fuzzer starts up and it took about 60+ seconds to fuzz about 1700 requests which makes it about 23 requests per second (RPS).

Via Turbo Intruder
Let’s first pause the intruder here and will check what Turbo Intruder dumps out as its speed.
Back into the intercept tab, we’ll select the payload position and will then hit right-click in order to share the request to the Turbo Intruder.

As soon as the “Send to turbo intruder” option got fired up, we got a new window popped in-front of us. Let’s explore what it contains.
The system segregated the window into two sections: the upper part where we embedded our “shared request” and the lower part where we aligned a “snippet of python code.”
Understanding the Turbo Intruder Script
However, over into the Request section, we can see that we converted our injection point into “%s”, representing where the payload will be going to hit.
And at the other section, there is a drop-down list with a python code displayed, which thus could be modified as per the attack scenario.
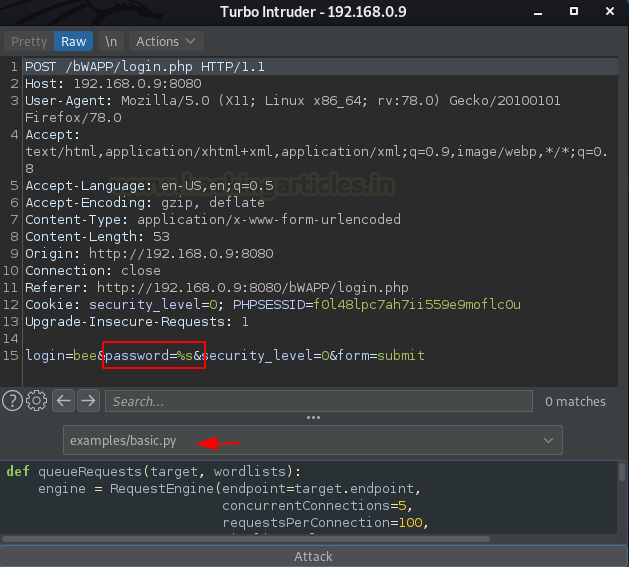
The drop-down list contains a number of attacking python scripts, that we could use accordingly whenever we need.
So, for the time being, let’s use the most common script of the Turbo Intruder i.e. examples/basic.py

Once we select that, the python code within it got displayed on the screen. Let’s see what it says –
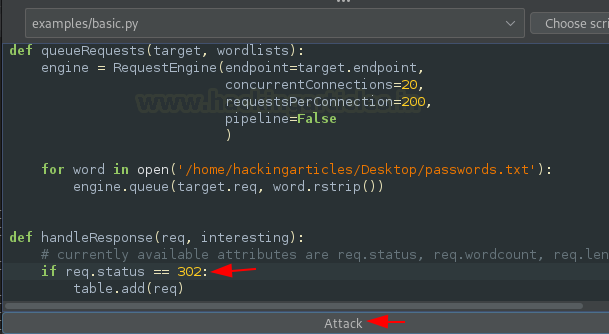
- The script within the first highlighted box is responsible for the fuzzing speed and the number of connections made by the turbo intruder. However, it even carries up the requests made per connection.
- Over in the second box we need to add the dictionary manually by specifying its location.
- The third code snippet is the most highlighted section as it defines which request should be displayed in the output table. Here the code “if req.status != 404:” defines that all the requests will get added to the table leaving the once that are having status code = 404

Modifying the Configuration and Running the Attack
Now, let’s inject our dictionary by defining its path while manipulating the code.

Further, we’ll hit the Attack button in order to initiate our fuzzer. As we do so, within 73 seconds it’s just 1029 requests shared, creating the RPS (Request per Second) count to 14.

You might be wondering like, this needs to be faster than the basic intruder, however, the RPS rate for the Burp Intruder was 23, and it’s just 14.
This slowdown is due to the default configuration in the Python script, where concurrentConnections was set to just 5 and requestsPerConnection was 100. To improve this, let’s modify these settings and restart the attack. To do this, hit the Halt button and configure the values accordingly.
concurrentConnections=20,
requestperConnetction=200,

And as the attack executes up, the RPS rate jumps directly to 94 and within just 3 seconds the fuzzer hit about 280 requests.
Analyzing the Results
Thereby for this attack, we can say it’s about 4 times faster than the Basic Intruder.
However, during the attack, you could find that the retries value is going up, as the fuzzer was initiating. So, is the requests are not hitting?
No, it is an indication that the connection per request value might be too high for the server to handle, making the attack is less optimal, thus we need to cut it down and reduce it to half.

Do you remember, we halted the Intruder’s fuzzing? Let’s resume it and restart our attack over the turbo intruder, and we’ll then wait for a few minutes in order to analyze the output.
From the below image, we can see that Turbo Intruder is ahead with 3000+ hits, displaying the speed it carries within.
Customizing the Python Scripts
Over in the above section, we’ve discussed that we can manipulate the python script as we wish so. However, manipulating it doesn’t require any advanced scripting skills, it’s just that we know what the code wants to say. So, for example –
We want the table to display only the 302 Redirection responses. We don’t want any 200 OK or 404 Error responses. To achieve this, we just need to modify the third code snippet accordingly

Now over here, we’ll change not-equal to (!=) with equal-equal (==) and will modify 404 with 302, Such that the output will only have the redirection requests listed.
From the below image, we can see that within 3 seconds we got our output listed over at the table segmented.

Fuzz for Multiple Parameters
You might have used Cluster Bomb in the basic Intruder tool, which helps fuzz the application with multiple parameters. However, in a similar way, we also have a Python script listed in the drop-down menu. This script provides an option to fuzz in a manner similar to the Cluster Bomb payload type. Let’s check it out.
Back into the Proxy tab let’s select any parameter and hit a right-click in order to navigate to turbo intruder
There, over in the request portion, let’s set “%s” in order to select the injection points.

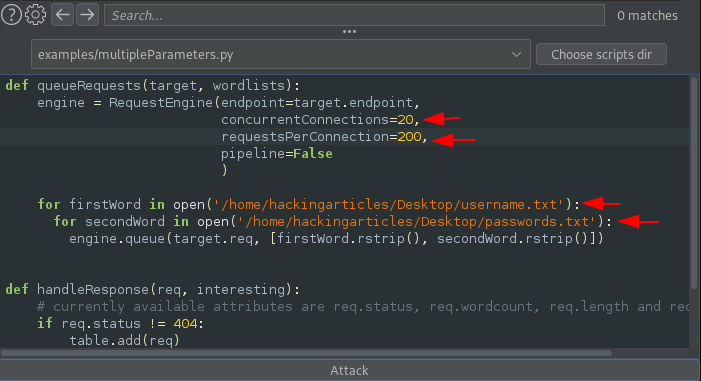
Time to choose the script, click on the bar to check the drop-down menu, and then select examples/multipleParameters.py

Once clicked-on, the script is there for us to get manipulated.

Let’s boost the speed by setting concurrentConnections to 20 and requestsPerConnection to 200. After that, we will set the dictionaries for the first word and the second word.
And there we go, as soon as we hit the Attack button, we shuffled the screen and saw the output table in front of us. Within a few minutes, as we double-clicked the Length section, we got the 302 Redirection with bee/bug.

To learn more about Burp Suite for Pentester. Follow this Link.
Author: Geet Madan is a Certified Ethical Hacker, Researcher and Technical Writer at Hacking Articles on Information Security. Contact here
How do I select a wordlist when I am using windows. I tried pasting the entire path there but noticed it didn’t run, is there something i’m doing wrong pls?
Example:
for word in open(‘C:\Users\eviluser\Desktop\password.txt’)
for word in open(‘C:/Users/abc/Desktop/payloadlist.txt’):
engine.queue(target.req, word.rstrip())
turbo intruder in comunity edtition dont work
Do you know if there’s a way to install python packages through pip and use them in turbo intruder?
Sometimes i am getting null response in table