Windows Persistence: Accessibility Features
Today, we are going to shed some light on a very sticky persistence method in Windows systems. In fact, it is so persistent that it has been around for a long time and isn’t going away anytime soon. Specifically, this method, often referred to as Windows Persistence using Accessibility Features, leverages tools like Sticky Keys to maintain access even after system reboots or user logouts. As a result, this classic technique remains a favorite among attackers for its simplicity and effectiveness. With this in mind, let’s dive in.
Table of Content
- Accessibility Features
- Configurations Used Practical
- Enable RDP
- Metasploit: sticky_keys
- Empire: debugger
- Empire: Enable_rdp
- Logon Backdoor
- PowerShell: stickeykeys.ps1
- Detection
- Mitigation
- References
Accessibility Features
Windows Accessibility Features are a set of tools available on the Windows logon screen, such as Sticky Keys. These tools are designed to be triggered using pre-configured key combinations to assist users. However, these features became widely known when an APT group abused them to backdoor target systems. To exploit this method, you need administrative privileges. This allows you to replace the genuine Windows binary of the tool (sethc.exe, narrator.exe, magnify.exe, etc.) with a cmd.exe.
Some of the Accessibility features and their trigger options and location are:
Accessibility Shortcut Keys
Location: C:\Windows\System32\setc.exe
Trigger: Shift 5 times
Utility Manager
Location: C:\Windows\System32\Utilman.exe
Trigger: Windows key + U
On-Screen Keyboard
Location: C:\Windows\System32\osk.exe
Trigger: Click on On-screen keyboard button
Magnifier
Location: C:\Windows\System32\Magnify.exe
Trigger: Windows Key + =
Narrator
Location: C:\Windows\System32\Narrator.exe
Trigger: Windows Key + Enter
Display Switcher
Location: C:\Windows\System32\DisplaySwitch.exe
Trigger: Windows Key + P
Manages switching of apps between desktop
Location: C:\Windows\System32\AtBroker.exe
Trigger: Have osk.exe, Magnify.exe, or Narrator.exe open the locked computer. AtBroker.exe will be executed upon locking and unlocking
The Assistive Features or as Microsoft likes to call them Assistive Technology (ATs). All of these are registered in the registry under the following registry location:
HKEY_LOCAL_MACHINE\SOFTWARE\Microsoft\Windows NT\CurrentVersion\Accessibility\ATs
Configurations Used Practical
- Attacker Machine
- OS: Kali Linux
- IP Address: 192.168.1.112
- Target Machine
- OS: Windows 10
- IP Address: 192.168.1.106
Enable RDP
Let’s start with enabling RDP on the Target Machine. As most of the attacks that we are going to perform will be targeted on the Accessibility Binaries that are accessible on the login screen when we take the RDP of the system. They are accessible on other locations when we have the access of the machine physically but for the remote-based attack, we need the RDP enabled. This can be done using the built-in script in meterpreter. It is based on Carlos Perez’s getgui script which enables the RDP and creates a user account to log in. Here we are just enabling the RDP with the -e parameter.
run getgui -e

Metasploit: sticky_keys
Metasploit has a post-exploitation module that can create a persistence method to exploit the target by making changes in the Registry. This requires the SYSTEM privilege. So first attack the system. Get a meterpreter session on the target machine then escalate the privileges on the machine and then use this particular post-exploitation module to create a persistence backdoor. Usage of this module is pretty simple. You select the module, set the session if and run the module. It adds makes changes in the registry and then we can exploit the machine by pressing Shift key 5 times and triggering the Sticky Key Accessibility Binary which is now running a Command Prompt with elevated privileges.
use post/windows/manage/sticky_keys
set session 1
exploit

Once the post-exploitation module executes, subsequently, we can use Rdesktop to connect to the target system. At this stage, we can verify that the system is operational. As expected, the login panel greeted us. Afterwards, upon hitting the Shift key, the Command prompt appeared in place of the sticky key prompt. Importantly, the command prompt that we received is the one with Administrative Rights, as shown in the image below.

Empire: debugger
This module allows the attacker to set the “Image File Execution Options” which is also known as the debugger, Hence the name. It does so for many executables that are accessible before logging in on the RDP connection. If used with the default setting it will trigger a command prompt with SYSTEM privileges through the RDP without logging on the machine. This module can be configured to target a different binary by providing the path to the Binary option in the module. We also need to set a Listener for the module.
Currently, the trigger options that are available in the module are:
- persistence/debugger/sethc – It will target the Sticky Key binary.
- persistence/debugger/utilman – It will target the Utility Manager binary.
- persistence/debugger/magnify – It will target the Magnifier binary.
- persistence/debugger/narrator – It will target the Narrator binary.
- persistence/debugger/osk – It will target the On-Screen Keyboard binary.
We decide to use the module with the default permissions. We can see that the debugger module has sethc.exe set to cmd.exe.
usemodule persistence/misc/debugger
execute

Empire: Enable_rdp
Now we need to enable the RDP on the target machine so we can access the machine remotely from our attacker machine. We will be using the enable_rdp module of the PowerShell Empire.
usemodule management/enable_rdp
execute

After enabling the remote desktop on the target machine, we tried to access it through rdesktop. After getting the login panel, we again pressed the Shift key 5 times as we need to trigger the sticky key binary. As soon as we trigger the setc.exe we see that we get the command prompt with administrative rights instead.

Logon Backdoor
While researching for other tools that attack the Accessibility Features, I found this executable that pretty much sums up the practical that we were doing remotely with Kali Linux. It is a pretty simple executable that can be used if you have the physical access of the target system. It provides a simple menu as shown in the image given below. We select the first option that sets the backdoor and it does its job in a matter of seconds.
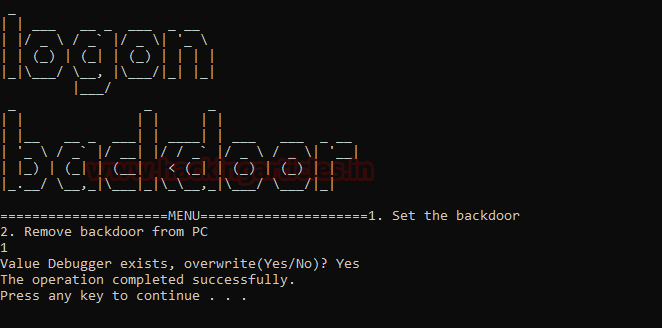
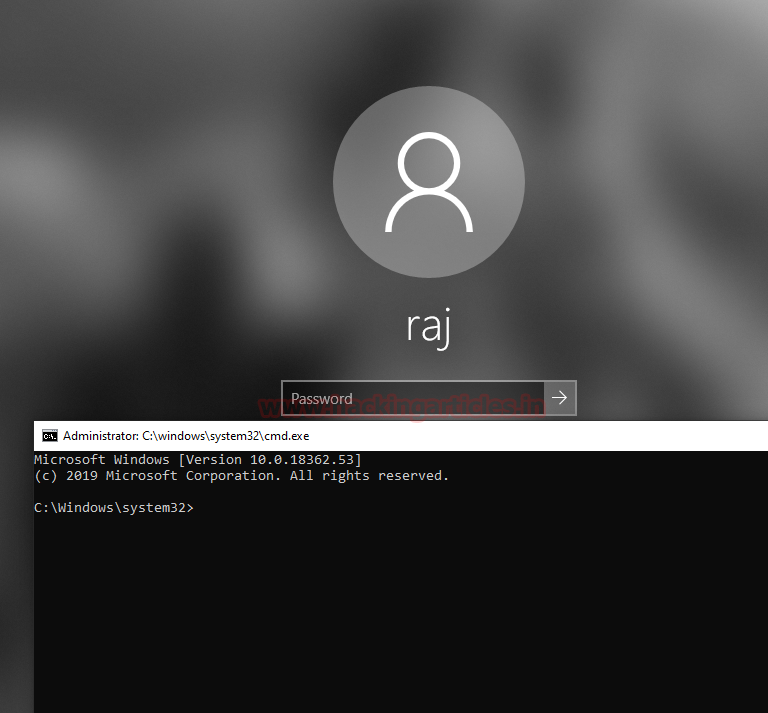
It indicates that the operation has been completed successfully. Now, let’s give it a try. For this practical demonstration, we locked the system and triggered the sticky key binary by pressing the Shift key five times. As a result, we now have a command prompt with administrative privileges, as shown in the image below.
PowerShell: stickykeys.ps1
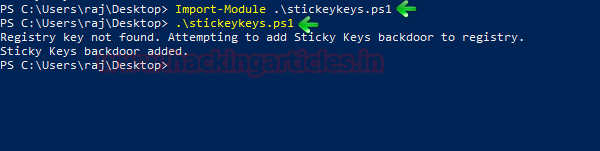
Now that we have explored the remote modules from Metasploit and Empire and the executable, its time to discover the PowerShell script for the same. It is a very simple script that can be download from the link given below. To attack the target machine, we need permission to run scripts on the machine. After getting permission we import the PowerShell script. Then simply running the script as shown in the image will add the backdoor.
Import-Module .\stickykeys.ps1
.\stickykeys.ps1
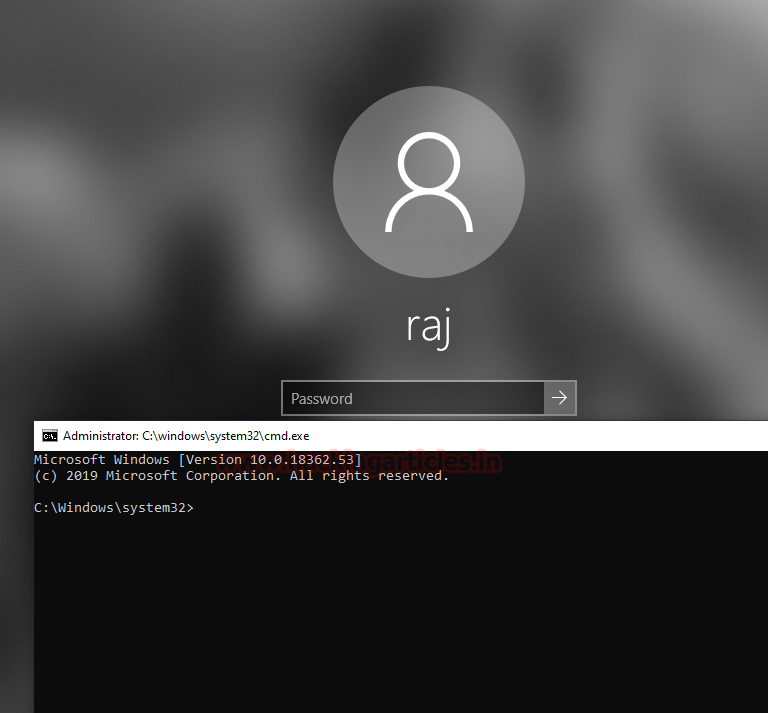
Time to test the working. Since we have added the backdoor it must have replaced the sethc.exe with the cmd.exe. To test it we will press the shift key 5 times as we did in our previous practicals and as seen in the image given below we have the cmd with administrative access.
This tool can also remove the backdoor and fix the problem but it never solves it as Accessibility features are always there to exploit again.
Import-Module .\stickykeys.ps1

Detection
- Delete or replace the affected file
- exe /scannow
- Remove the affected registry entry
Mitigation
- Restrict local administrative access
- Enable Full Disk Encryption
- Network Level Authentication for RDP Connection
- Endpoint monitoring
- Netflow analysis
References
To learn more about Windows Persistence. Follow this Link.
Author: Pavandeep Singh is a Technical Writer, Researcher, and Penetration Tester. Can be Contacted on Twitter and LinkedIn