Web Server Lab Setup for Penetration Testing
In this post, we will discuss how to set up our own web server step by step for creating penetration testing on Ubuntu 20. Ubuntu 20 has been updated with the new features.
Table of Content
- Apache
- PHP
- MySQL
- phpMyAdmin
Web Server Configuration
The Web server is a program that uses HTTP to serve users with files forming web pages in response to requests transmitted by their HTTP clients. Dedicated computers and devices can also be termed Web servers.
There are various types of software to be used as webservers and as per stats 2021 below is a list of the most popular web servers.

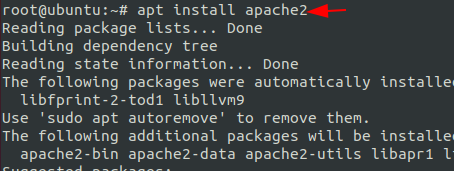
Install Apache
First, we will install the Apache. Apache is the most commonly used Web server on Linux Systems. Web servers are used to serve web pages requested by the client computers. So, let’s first install Apache in ubuntu by the following command-
apt install apache2
We have successfully installed apache2, by default Apache runs on port 80 for HTTP service.
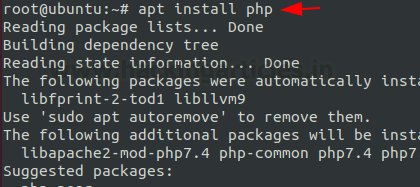
Install PHP
PHP (recursive acronym for PHP: Hypertext Preprocessor) is a widely-used open source general-purpose scripting language that is especially suited for web development and can be embedded into HTML.
Now we will install PHP module for Apache and all its dependencies. For this run the following command in the terminal.
apt install php
As you can see, we are done with php installation with the command mentioned above.
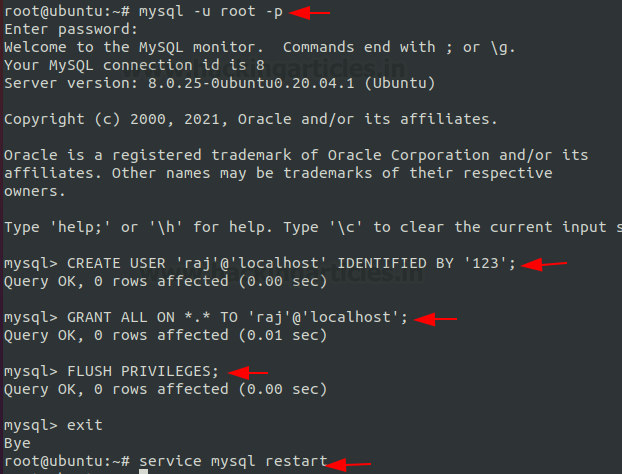
Install MySQL Server
Now comes the next step which is the installation of MySQL server. MySQL is an open-source relational database management system. A relational database stores data in separate tables rather than putting all the data in one big storeroom. The SQL part of “MySQL” stands for “Structured Query Language”. SQL is the most common standardized language used to access databases.
It is very easy to install with the following commands, So, let’s go ahead step by step.
First, we will install MySQL server by the following command-
apt install mysql-server

So, we are done with the installation. Now first we need to create a database user in Mysql and once it is created, then we need to set a password, then grant privilege to the database user. Execute the following commands to follow the instruction.
mysql -u root -p
CREATE USER 'raj'@'localhost' IDENTIFIED BY '123';
GRANT ALL ON *.* TO 'raj'@'localhost';
FLUSH PRIVILEGES;
Great we are done with MySQL server installation, by default it runs on port 3306, now restart MySQL service.
service mysql restart
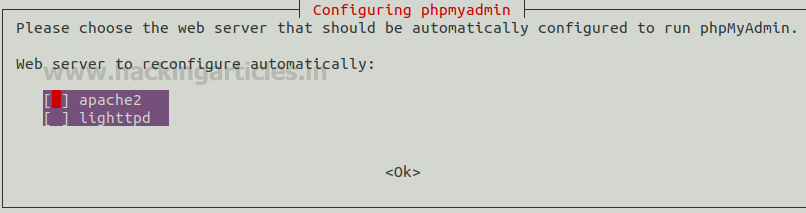
Install phpMyAdmin
Now the next step is the installation of a phpMyAdmin software which is written in PHP and is proposed to handle the administration of MYSQL over the WEB and it also supports a wide range of operations on MYSQL. First, we need to install phpMyAdmin by the following command-
apt install phpmyadmin

After the installation, it will ask you to choose the webserver. Here you need to choose apache2 which will automatically be configured to run phpmyadmin.
Next, you will get a prompt that will open to configure a database for phpmyadmin with dbconfig-common. Here you need to click on yes and then enter.

Again, you will get a prompt that will ask you to submit the password for phpMyAdmin, to register with the database server. Here we have given 123 as the password because it is essential to give it a password now.

Now it would ask you to enter your password for confirmation, so just enter 123 which is my password.

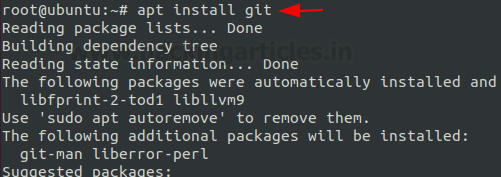
(git installation is optional)
Now our next step is to install git. Git is a free and open-source distributed version control system designed to handle everything from small to very large projects with speed and efficiency. To download git, the command is given below-
apt install git
The next step is the configuration of phpmyadmin under apache, now we need to edit the apache2 conf file by adding two lines at the end of this file:
nano /etc/apache2/apache2.conf
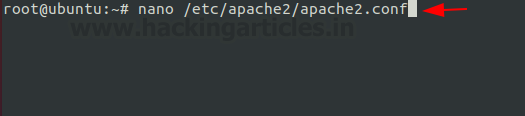
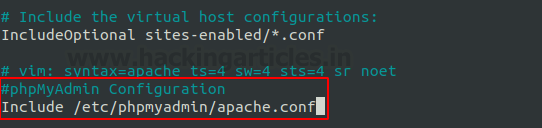
Now once you are inside this file, you need to add these two lines in apache2’s configuration file and then save this file.
#phpMyAdmin Configuration
Include /etc/phpmyadmin/apache.conf
At the last, as shown in the image below and then save it and after the editing; save the file and restart the apache2 service.
service apache2 restart
Now open phpmyadmin in the browser as localhost/phpmyadmin as shown in the image below:

Conclusion: Web server installation get completed after installation of LAMP server (Linux Apache MySQL PHP|PERL|PYTHON), now the developer can configure web application on this server.
Part 2: Web application penetration lab setup from here.
Author: Geet Madan is a Certified Ethical Hacker, Researcher and Technical Writer at Hacking Articles on Information Security. Contact here