Metasploit for Pentester: Database & Workspace
In this series of articles, we are focusing on the various mechanisms of the Metasploit Framework that can be used by Penetration Testers. Today, we are going to learn about the Metasploit Database and Workspace commands of the Metasploit Framework.
Table of Content
- Introduction
- Creating a Workspace
- Hosts Database
- Vulnerabilities Database
- Credentials Database
- Renaming Workspace
- Deleting a Workspace
- Verbose Details of Workspaces
- Exporting Workspace
- Importing Hosts
- Listing Hosts in Database
- Adding Hosts
- Deleting a Host
- Exporting Hosts Database
- Search and Tag Hosts
- Filter Search
- Deleting Services of a Host
- Filter Search
- Exporting Services Database
- Search Services
- Port Specific Vulnerabilities
- Service Specific Vulnerabilities
- Host Specific Vulnerabilities
- Loot Database
- Search Loot
- Type Specific Loot
- Deleting Loot
- Conclusion
Introduction
The database service provided by Metasploit is one of the greatest for keeping a record of your Penetration Testing activity. One of the greatest things about the Metasploit Database and Workspace is the fact that if you have a bigger assessment, you have even more reasons to use the database and its features. It keeps a record of all the hosts that you have tracked and gathered data from. It also records the time and date of when you enumerated and gathered data, so that you can keep track of your activity. To initiate the PostgreSQL database, use the command msfdb init to initialize the database.
msfdb init

After you initialized the database, you can check the status to verify if the database was initialized successfully using the db_status command. For a session you don’t need to initialize the database again.
db_status

Using Workspaces helps you to divide and structure your Penetration Testing assessments. It helps by managing the hosts and data derived from those hosts in a database. Workspaces can be used to logically separate targets and assessments. For example, if you require to create a workspace for each subnet within an organization that you are performing Penetration Testing on. It will restrict the hosts to a specific network in a separate workspace which will be easy to understand and manage.
workspace -h

Creating a Workspace
Now that we have discussed in detail the Database command, the Workspace, and the Metasploit Framework, it is time to begin the demonstration of the various options and actions you can perform using them. When working with the workspace, the default workspace comes enabled by default. Moreover, you can create your own workspace. This can help you collect data based on different projects as a penetration tester. For the demonstration, we will create a workspace by the name of pentest. Simply running the workspace command without any options will list the various workspaces present in the database. A workspace with an asterisk (*) denotes the current workspace.
workspace -a pentest

Database Nmap Scan
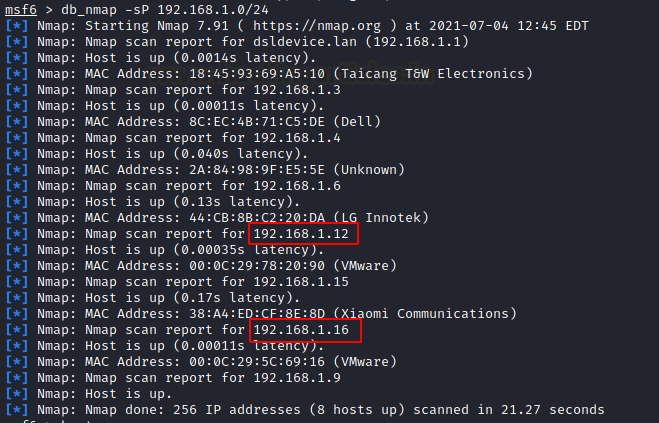
As a part of penetration testing any machine, it is fundamental to perform a port scan. Earlier we used to perform a Nmap port scan and then export the result into a file for future reference. But with the help of workspace, we can perform a Nmap scan and save its result into the workspace database. From the Metasploit shell, we need to run the db_nmap command with the usual Nmap options to run a Nmap scan and save its result into the workspace database. In the demonstration, we performed the Nmap scan against the entire subnet. From all the active machines that have been detected by Nmap, we selected the two targets 192.168.1.12 and 192.168.1.16 for our assessment.
db_nmap -sP 192.168.1.0/24
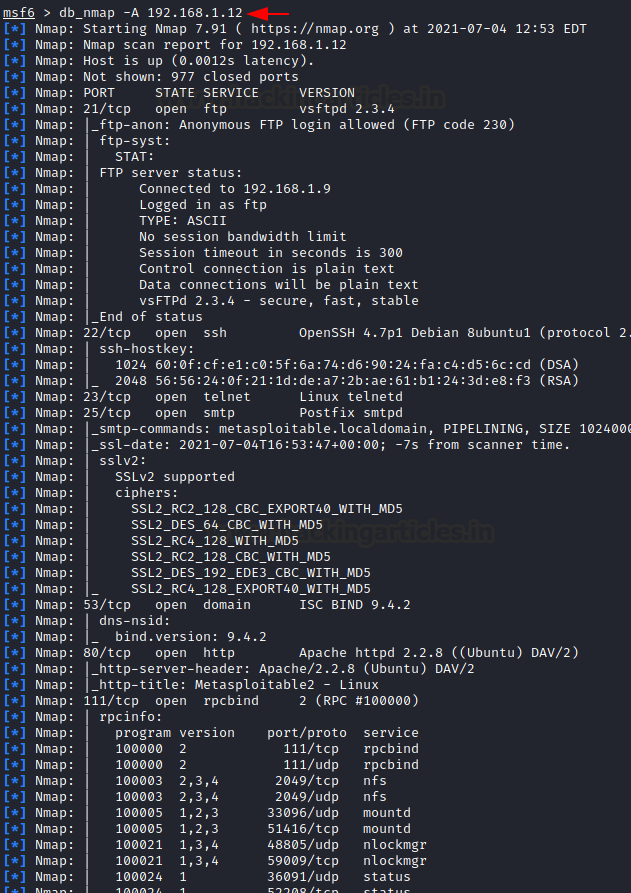
Since we have the selected target, we can perform a focused Aggressive Nmap scan against the target host. In the demonstration, we are targeting the host with the IP Address 192.168.1.12. We see that the options and the results used and generated are quite similar to the ones we normally use. However, the main difference is that all the enumeration we perform gets saved in the workspace database we created earlier.
db_nmap -A 192.168.1.12
Hosts Database
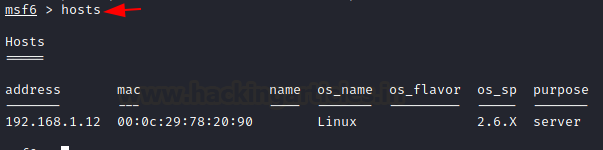
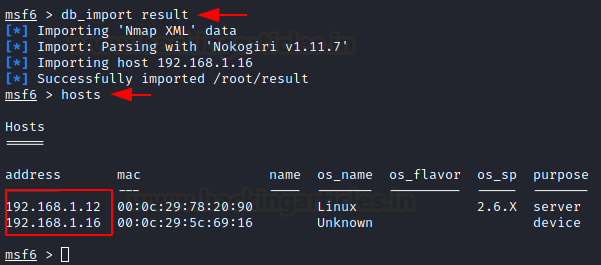
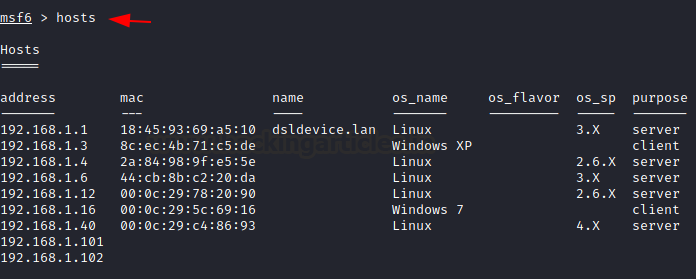
As we used the db_nmap for scanning the host 192.168.1.12, after the conclusion of the scan we can run the hosts command. It will list all the hosts that have been subject to the port scan performed using the db_nmap. We can see that our Nmap scan was able to get the MAC Address, Operating System and Purpose for the targeted host. We can use a list of different scan options and auxiliary tools to enumerate and the data that is collected will automatically be filled inside the table presented.
hosts
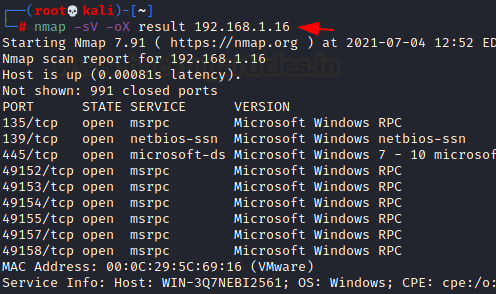
Moving on, the db_nmap command is not the only method to add the data inside the workspace data. There are various specifications of different organisations that demand that the penetration tester uses Nmap and export the scan result into a predefined format. If that is the case with you, it is still possible to use the workspace database. Let’s us demonstrate. First, we will be performing a Version Nmap scan on our other targeted hosts 192.168.1.16 with the -oX option so that the scan result is exported into an XML file.
nmap -sV -oX 192.168.1.16
We have the Nmap scan result saved into an XML file by the name of the result. We will use the db_import command from the Metasploit shell to import the data from the result file. After exporting the data, we ran the hosts command to find that the data from the external Nmap scan is now a part of the Workspace database.
db_import result
hosts
Services Database
Now we have two hosts, 192.168.1.12 and 192.168.1.16. We have performed db_nmap and Nmap scan on them respectively. We saw earlier that we have the information about both machines in the hosts table but we know one of the primary goals of performing a Nmap scan is to enumerate the open ports and running services on the target machine. Since we used the db_nmap scan and imported a Nmap scan, we should have the details about the services running on both machines. We can check them out using the services command as demonstrated. To get a defined result about a particular result uses the IP address of your target as a parameter while running the services command.
services
services 192.168.1.12

Vulnerabilities Database
After the detection of hosts and the running services, we need to find vulnerabilities on the target machine. We will be using the db_nmap to scan the target hosts with a Vulnerability Script scan. It will help to enumerate the target with possible vulnerabilities. We will be targeting the SSH service running on 192.168.1.12.
db_nmap -sV -p22 --script=vuln 192.168.1.12

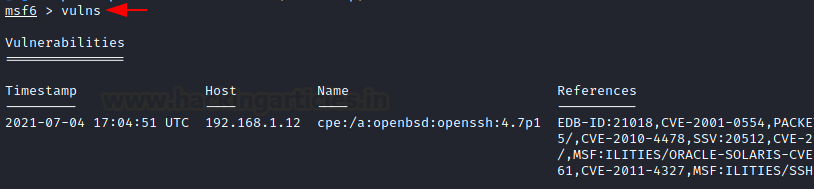
After the completion of the Vulnerability Script scan using the db_nmap, we can check for the vulnerabilities detected using the command vulns as demonstrated below. Here we have a table with the Timestamp when the vulnerability was detected, with the Host on which the vulnerability was detected, the name of the vulnerability and the Reference containing the respective CVEs and EDB details.
vulns
Credentials Database
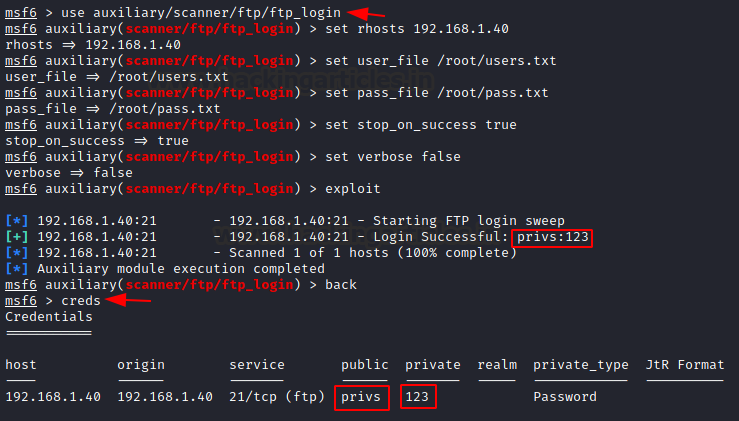
From vulnerabilities, we move on to the extraction of valuable credentials from the target machine and save them to the workspace database. When you use any Metasploit module that extracts or attempts credentials on the target machine, it saves them inside the credentials section. You can view this section by running thecreds command. In the demonstration, we use the ftp_login auxiliary scanner to perform a bruteforce attack on the FTP login of our target machine. As a result, the correct credentials have made an entry inside the Credentials section.
After the brief introduction of the various commands that you can run inside the Metasploit shell, we will now, therefore, focus on the various aspects of them in detail. We will start by exploring Workspace.
Renaming Workspace
Earlier we learnt about creating a workspace but in case you require to rename a Workspace to provide better management it is possible with the help of the -r option. We first use the workspace command to list the various workspace. As we see that there are three workspaces namely default, pentest and ignite. We will use the -r option to rename the pentest workspace to raj. And we can see that we were able to change the name of the said workspace.
workspace
workspace -r pentest raj
workspace

Deleting a Workspace
Now that we renamed a workspace, there might be a workspace that you want to delete from the database. Although keep in mind that deleting the database will delete all the consiquest data as well such as the hosts, vulns and loot from that database. In the scenario presented below, we are shown that there exists three workspaces namely default, raj and ignite. Using the -d option we deleted the ignite workspace.
workspace
workspace -d ignite
workspace

Verbose Details of Workspaces
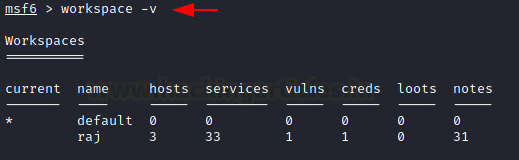
During the penetration testing, there will be a time where you might require to get a quick look at your various workspaces. When you make dedicated workspaces for different projects and need a reference for the data stored inside the workspace such as the hosts detected, services running, vulnerabilities found, credentials scrapped and loots grabbed. Use the -v option to check out all this information at once.
workspace -v
Exporting Workspace
As we discussed earlier that documentation is an important part of penetration testing. While working with workspace it gets easier to sort your data but with the ability to export the data from the workspace into an XML file for creating reports is an underrated feature. Use the db_export command for this task. You will need to provide the format you want to use with the -f option followed by the name of the file as demonstrated below.
db_export -f xml workspace_backup.xml

Deleting all Workspaces
Every once a while there comes a time when even the very structured format of the workspace becomes a mess-making no sense at all. You could always delete the workspace as we previously demonstrated. But in case you have multiple workspaces and now want to use the nuclear option on all of them then -D option comes in handy.
workspace -D

Importing Hosts
Earlier, we exported the data from a workspace into an XML file. We mentioned that this file can be used for references and creating reports. However, this XML file can also serve as a backup for your work. It is highly unlikely that your work gets deleted or corrupted from the workspace database. We even tried to crash the database but were not able to kill it. Furthermore, we restarted the system to check, and all the data still retained inside the workspace. If you want to import the data from your workspace backup, then you can use the db_import command.
db_import workspace_backup.xml
hosts

This completes our testing with the workspace commands. Let’s move on to the different options inside the host’s command.
Listing Hosts in Database
As we saw earlier, when we performed an Nmap scan with the db_nmap command, we populated the hosts table. We can list all the hosts and the data enumerated from the Nmap scan into a structured table. This table contains the IP Address, MAC Address, Name, Operating System, and other details.
hosts
Adding Hosts
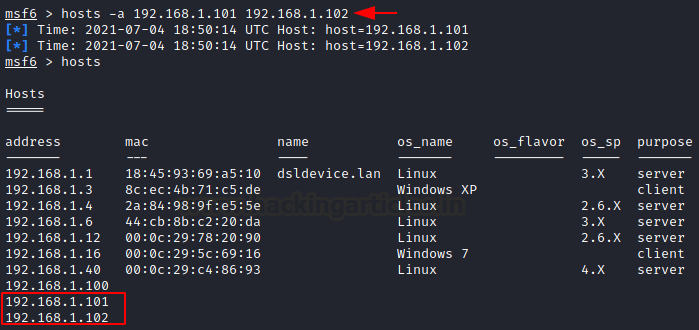
Earlier we used the Nmap scan to enumerate for hosts inside the database. But it is not the only way to do so. We can add hosts using the -a option as well. In scenarios where you want to add particular hosts into your database so that you can perform attacks from the hosts table then you can add hosts as demonstrated below:
hosts -a 192.168.1.101 192.168.1.102
Deleting a host
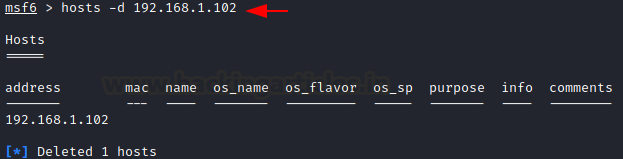
As we can add a host into the database it is also possible to remove or delete any user from the database. This can be achieved using the -d option. Previously we added two IP addresses into the database. Now we will delete one of them.
hosts -d 192.168.1.102
Exporting Hosts Database
As we mentioned before, the most important part of any penetration testing activity is the documentation process. Earlier, we exported the workspace data into an XML file. If you want to populate the hosts table in your database into a manageable CSV file, you can simply use the -o option. Consequently, this CSV file becomes usable for uploading into a scanner or software, as it contains all your targeted IP addresses.
hosts -o demo.csv

Search and Tag Hosts
While working with multiple hosts inside a dense network of machines, it becomes difficult to identify and search for a particular target. Fortunately, the Hosts command, an integral part of the Metasploit Database and Workspace, has the -S option that can help you search for a particular machine based on a keyword such as the Operating System of the machine. In the demonstration, we used the keyword “Windows.” This gave us the two machines that were detected running the Windows Operating System. Similarly, it is also possible to define a tag for your hosts to make them easily identifiable. In the demonstration below, we have tagged the system bearing the IP Address 192.168.1.3 as “raj-pc.” We then can use this tag to search for the device in question.
hosts -S Windows
hosts -t raj-pc 192.168.1.3
hosts -S raj-pc

Filter Search
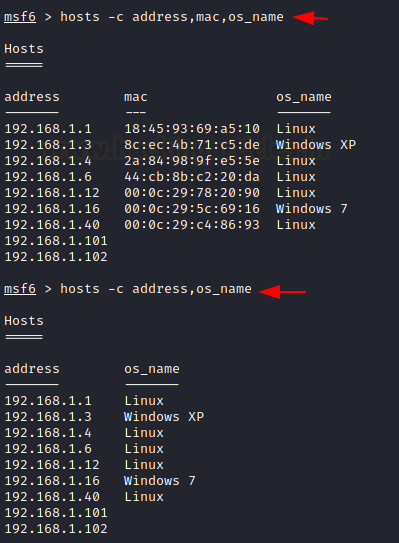
As we observed in the previous steps that the hosts table contains a variety of columns. But it is possible to view only the columns that you desire in your hosts table. It can be done with the help of a filtered search. In the demonstration we used -c option to filter only the address, mac and os_name columns from the hosts table and another example with only IP Address and the Operating System for a clean and readable format.
hosts -c address,mac,os_name
hosts -c address,os_name
Deleting Services of a Host
We introduced the services database earlier. It contained the various services running on the target machines that Nmap enumerated and saved in the services database. We can delete a hosts and all of their services along with it with the -d option as demonstrated below.
services -d 192.168.1.40

Filter Search
The option to filter the columns in a workspace is not limited to the hosts command. We can use the -c option in the services as well. By default there are a bunch of columns visible when we list the services in the database. With the help of -c option, we can filter our columns such as the Host, Port and Name of the Services as demonstrated below. As Host being the primary key in this table, it will display by default.
services -c port,name

Port Specific Services
When we deal with the services, the most common way to recognize and differentiate between them is based on the port numbers. There are default ports for various services, although they can be changed. Nevertheless, if they are not, we can use the -p option to make a list of all the hosts that have a certain service running on a particular port. Additionally, it is not limited to a single port; you can specify multiple ports or even a range of ports as well.
services -p 80

Exporting Services Database
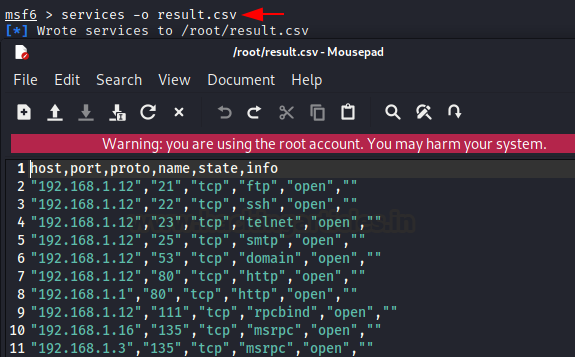
Till now we have exported the complete workspace database and hosts database. But the ability to export the data is not limited to those commands. We can export the data in the services database into a CSV file similarly as we did with the hosts database.
services -o result.csv
Search Services
We can search services based on the hosts, ports, service names, their state and even with the Protocol they are running on. There are services running on the TCP and UDP and other protocols. We can search those services using the -S option. But it is not limited to protocol. You can use any keyword for the search.
services -S udp

Port Specific Vulnerabilities
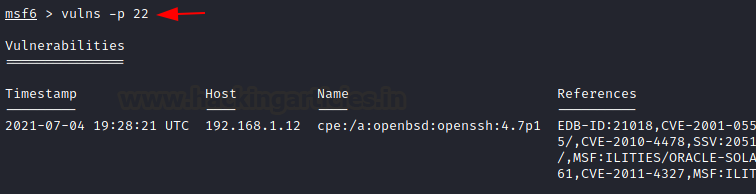
Next, inside the workspace database, we explored the database of the vulnerabilities present in the target machine. These vulnerabilities are enumerated using an Nmap script scan or one of the Metasploit Auxiliary scans. Furthermore, you can search for a specific vulnerability on a service running on a particular port. In the demonstration, we targeted port 22, which is famous for running SSH services. As shown, we detected various probable vulnerabilities inside the References column.
vulns -p 22
Service Specific Vulnerabilities
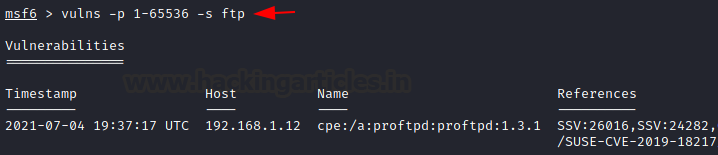
We just listed the Vulnerabilities based on the port number but as we know that services are not always running on their default ports. We can target the particular service that we are looking for with the help of the -s option. Here, we presented all the ports from 1 to 65536 and the FTP as the service and we can see the various Vulnerabilities for the FTP service no matter on what port it is running on.
vulns -p 1-65536 -s ftp
Host Specific Vulnerabilities
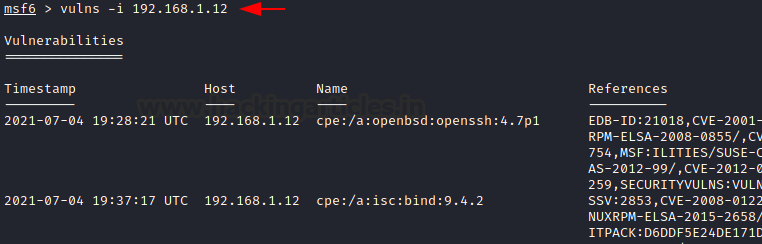
We are not limited to listing the Vulnerabilities data based on port and service alone. Additionally, we can list the vulnerabilities detected on a particular host. This becomes one of the most useful representations. It provides a quick look at the services hosted on the targeted host and the possible vulnerabilities associated with it.
vulns -i 192.168.1.12
Exporting Vulnerabilities Database
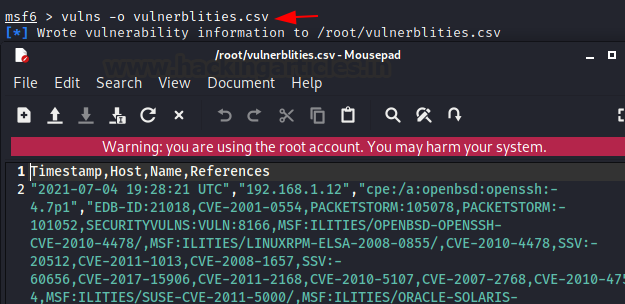
Similar to the hosts, services, and workspace databases, we can also export the data from the Vulnerabilities into a CSV file. Since the Vulnerabilities database table contains the host’s IP Address, services running on the machine, and the possible vulnerabilities, it basically forms a preliminary report. You can use this report effectively during the Penetration Testing assessments.
vulns -o vulnerblities.csv
Loot Database
Up until this point, we have demonstrated and discussed the various types of databases that are provided by the Metasploit Framework. That includes the Workspace database, Hosts database, Services database, and Vulnerabilities database—but we saved this one for the last. It is called the Loot database. The Metasploit Database and Workspace play an important role in systematically organizing and storing the data extracted during assessments, including loot like credentials and sensitive files.
>During any Penetration Testing Assessments, there are times when you are able to exploit a vulnerability and gain access to the target. This is where you start some post-exploitation activities, including enumerating for credentials and hashes. In case you are able to extract those using the Metasploit Post-Exploitation Module, they will be stored inside the workspace that you are working on.
>To demonstrate, we have exploited and gained a session on the Metasploitable Vulnerable Server, and we will be using the enum_configs post-exploitation module to extract configuration files that might contain some passwords or important information stored in them.

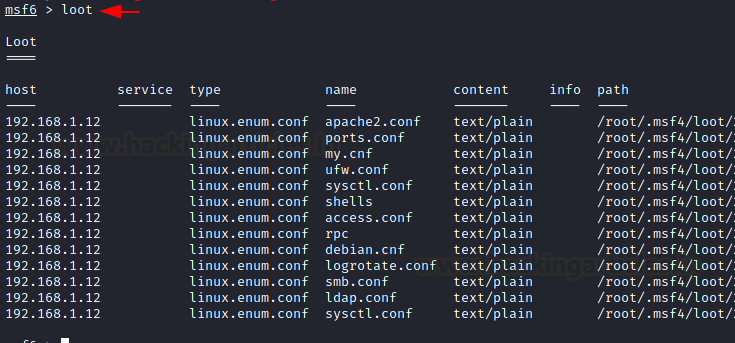
As we can see that the enum_configs grabbed a bunch of config files. Now, when we run the loot command on the Metasploit shell, we see a detailed table. This table displays all the config files along with the hosts they were acquired from and the paths at which they are currently stored.
loot
Search Loot
Since you might work on multiple targets simultaneously, the loot table can quickly populate with too much data. Therefore, managing and searching specific entries inside the workspace database becomes crucial. This can make it difficult to look for a particular loot item when needed. Therefore, you can use the Search option to find a specific loot. In the demonstration, we searched for loot related to ldap.
loot -S ldap

Type Specific Loot
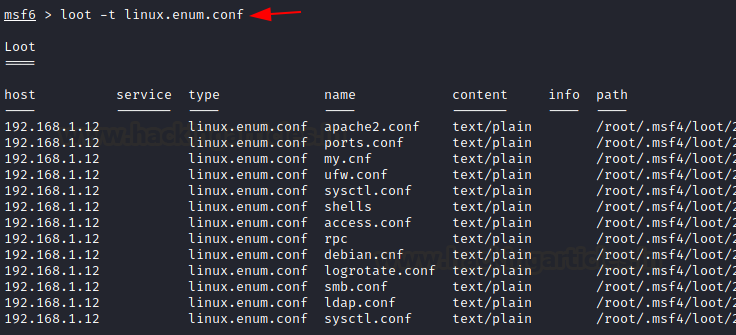
As it is possible to be working on multiple targets, it is also possible that we are able to gather different types of loots based on the method used or exploit used on the target. We can sort and search for a particular type of loot with the help of -t option as demonstrated below.
loot -t linux.enum.conf
Deleting Loot
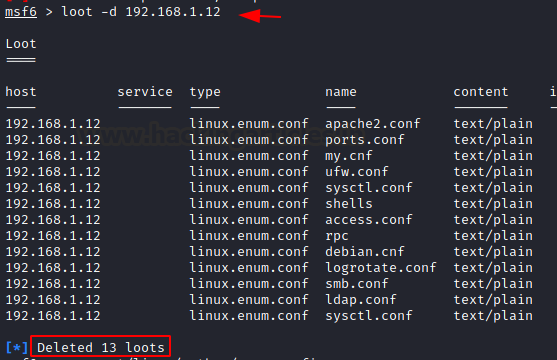
As we did with each and every section and database discussed here, it is possible to delete the loot that you have acquired. To do so we can use the -d option. We will be using the keyword to target specific loot that we want to delete. For example, in case we want to delete the loot of a specific target, then we can provide the IP address of that target and delete all the loot from that source.
loot -d 192.168.1.12
Conclusion
This was a learning experience, as when we start with Penetration Activities, we often tend not to focus on the documentation process or giving our work a proper structure and backup. However, over time, and through incidents where the absence of these qualities proved costly, we recognized their importance. One essential area that highlights this need is the Metasploit Database and Workspace. Although the workspace and database functions of Metasploit are not new features—they have been available for years—their actual usage in real-life penetration testing scenarios remains surprisingly low. This realization inspired us to create this guide, aiming to help more Penetration Testers leverage the Metasploit Database and Workspace effectively and benefit significantly from it.
Author: Pavandeep Singh is a Technical Writer, Researcher, and Penetration Tester. Contact on Twitter and LinkedIn