Comprehensive Guide on Dirb Tool
In this article, we are focusing on the transient directory using Kali Linux tool DIRB and trying to find hidden files and directories within a web server.
A path traversal attack is also known as “directory traversal” aims to access files and directories that are stored outside the web root folder. By manipulating variables with reference files with “dot-dot-slash (…/)” sequences and its variations or by using absolute file paths, it may be possible to access arbitrary files and directories stored on file system including application source code, configuration, and critical system files.
Source: https://www.owasp.org/index.php/Path_Traversal
Requirements
Target- BWAPP Labs, DVWA Labs,
Attacker – Kali Linux
Table of Content
- Introduction to DIRB
- Utilizing Multiple Wordlist for Directory Traversing
- Default working of Dirb
- Enumerating Directory with Specific Extension List
- Save Output to Disk
- Ignore Unnecessary Status-Code
- Default Working Vs Not stop on WARNING messages Working
- Speed delay
- Not recursively (-r)
- Show NOT Existence Pages
- Extension List (-X parameter) Vs Extension Header (-H parameter)
- Not forcing an ending ‘/’ on URLs (-t)
- HTTP Authentication (-u username: password)
What is DIRB?
DIRB is a scanner for web content. It searches for hidden or already-existing Web objects. It essentially operates by attacking a web server using a dictionary and examining the answer.
Although you can use your own custom wordlists, it comes with a collection of preconfigured assault wordlists for convenience. Additionally, DIRB can occasionally be used as a traditional CGI scanner; however, keep in mind that it is a content scanner rather than a vulnerability scanner.
The primary goal is to support expert web application audits. particularly in tests pertaining to security. It fills in some gaps left by traditional online vulnerability scanners. DIRB searches for particular web objects that are not detectable by other generic CGI scanners. It doesn’t scan for vulnerabilities or potentially susceptible site content.
Source: https://tools.kali.org/web-applications/dirb
Tool DIRB is built-in Kali Linux. Open the terminal and type the following command to get an overview of the tools included in the package:
dirb
-a <agent_string> : Specify your custom USER_AGENT.
-c <cookie_string> : Set a cookie for the HTTP request.
-f : Fine tunning of NOT_FOUND (404) detection.
-H <header_string> : Add a custom header to the HTTP request.
-i : Use case-insensitive search.
-l : Print “Location” header when found.
-N <nf_code>: Ignore responses with this HTTP code.
-o <output_file> : Save output to disk.
-p <proxy[:port]> : Use this proxy. (Default port is 1080)
-P <proxy_username:proxy_password> : Proxy Authentication.
-r : Don’t search recursively.
-R : Interactive recursion. (Asks for each directory)
-S : Silent Mode. Don’t show tested words. (For dumb terminals)
-t : Don’t force an ending ‘/’ on URLs.
-u <username:password> : HTTP Authentication.
-v : Show also NOT_FOUND pages.
-w : Don’t stop on WARNING messages.
-X <extensions> / -x <exts_file> : Append each word with this extensions.
-z : Add a milliseconds delay to not cause excessive Flood.

Utilizing Multiple Wordlist for Directory Traversing
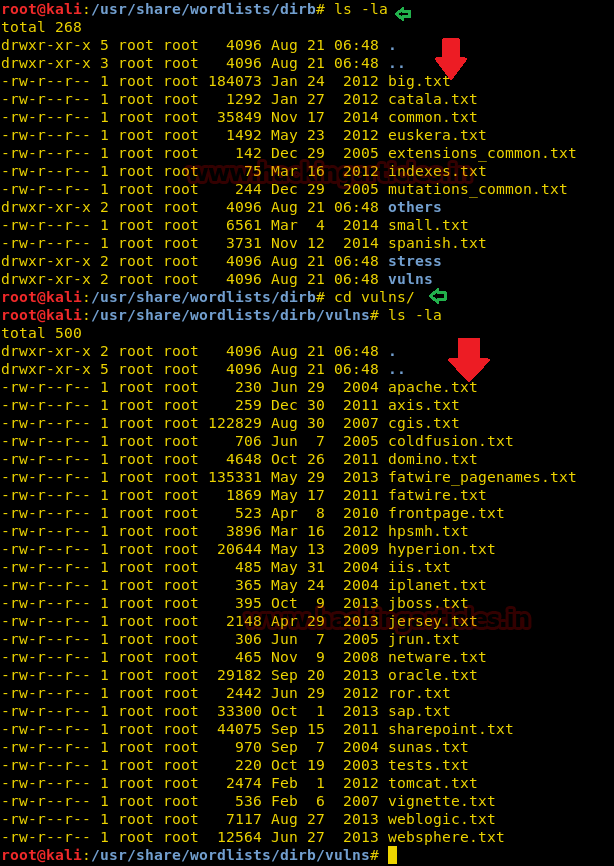
The above attack works by using the default wordlist_files common.txt, but we can change this word list and could select another wordlist for directory traversal. You must follow the following path to view all available wordlists.
cd /usr/share/wordlists/dirb
ls –la
cd /usr/share/wordlists/vulns
ls -la
You can see from the image below that there are so many text files as wordlist; we can use them as required.
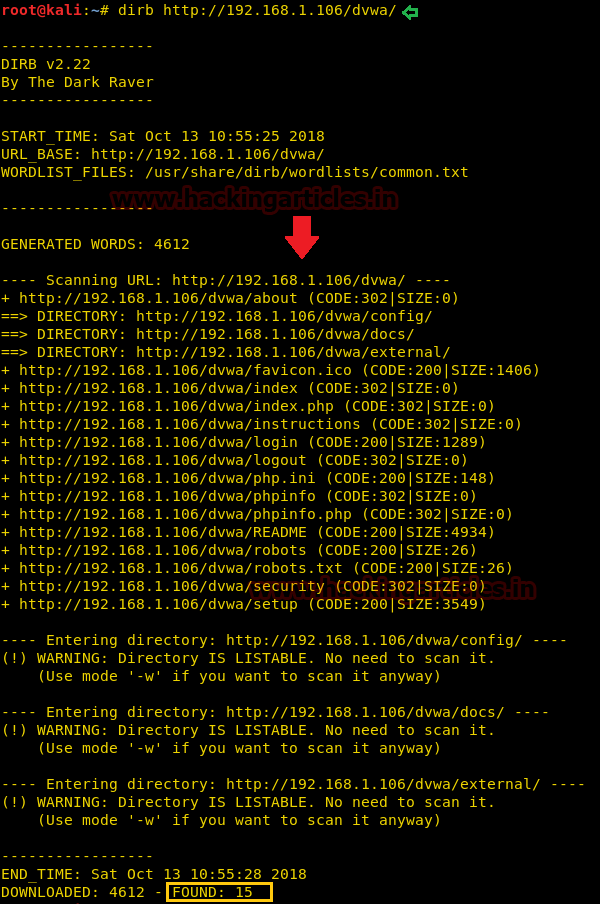
Default working of Dirb
In this attack the common.txt is set as a default word list for directory traversal, the protester can use the following command. Open the terminal and type the following command to start the Brussels Directory attack.
dirb http://192.168.1.106/dvwa/
Using the common.txt file, the DIRB returns the enumerated directories found within the target URL as shown in the below image.
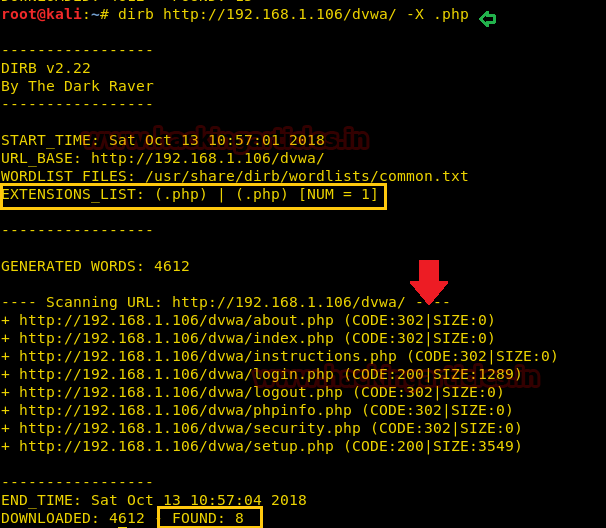
Enumerating Directory with Specific Extension List
There are a lot of situations where we need to extract the directories of a specific extension over the target server, and then we can use the -X parameter of the dirb scan. This parameter accepts the file extension name and then searches the given extension files over the target server or machine.
dirb http://192.168.1.106/dvwa/ -X .php
The above command will extract all directory path related to php extension as shown the following image.
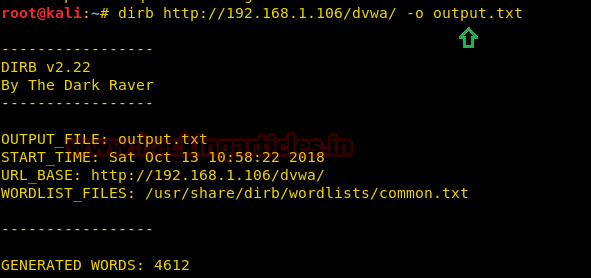
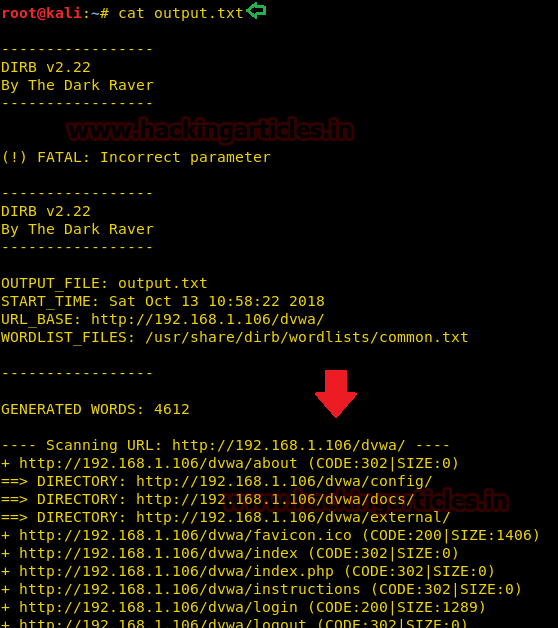
Save Output to Disk
For the purpose of the record maintenance, better readability, and future references, we save the output of the dirb scan onto a file. To this, we will use the parameter -o of the dirb scan we can save the output of the dirb scan in a text file.
dirb http://192.168.1.106/dvwa/ -o output.txt
The above command will generate an output.txt file at the desktop of the enumerated directories.
Now that we have successfully executed the command, now let’s traverse to the location to ensure whether the output has been saved on the file on not. In this case, our location for output is /root/output.txt.
Ignore Unnecessary Status-Code
The Status-Code element is a 3-digit integer where the first digit of the Status-Code defines the class of response and the last two digits do not have any categorization role. In this attack, we are using –N parameter on code 302 as shown below.
dirb http://192.168.1.106/dvwa/ -N 302
As you can grasp from the given screenshot that the dirb scan is ignoring the NOT FOUND code that is., 302.

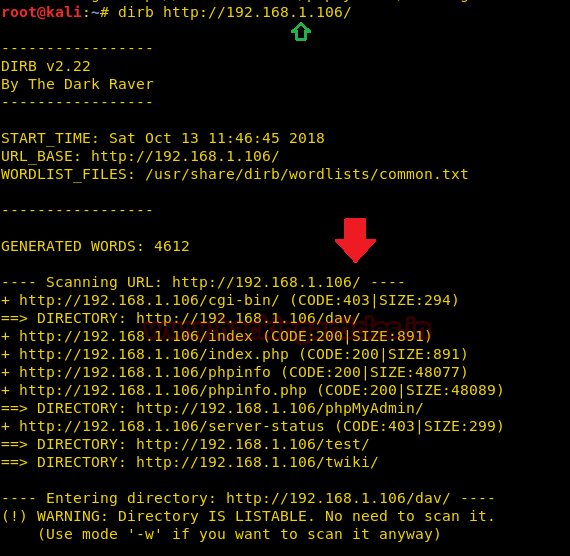
Default Working Vs Nonstop on WARNING messages Working
During the normal dirb scan as shown below, some of the pages generate warnings; the dirb scan skips those directories where it encounters any warnings.
dirb http://192.168.1.106/
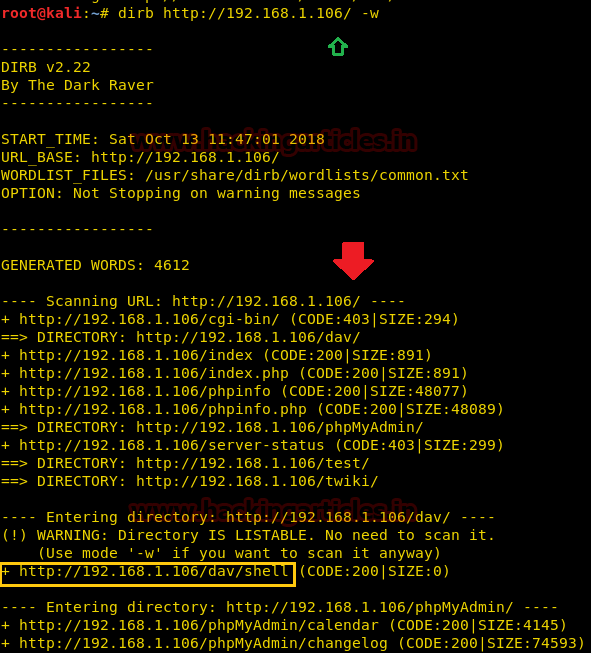
While doing a scan that is to be done very deeply and verbosely, we want that the dirb scan to not avoid these warnings and do an in-depth scan, hence we use the -w parameter of the dirb scan.
dirb http://192.168.1.106/ -w
As you can observe the highlighted directory /dev/shell is enumerated even after warning message which is missing in the default scan.
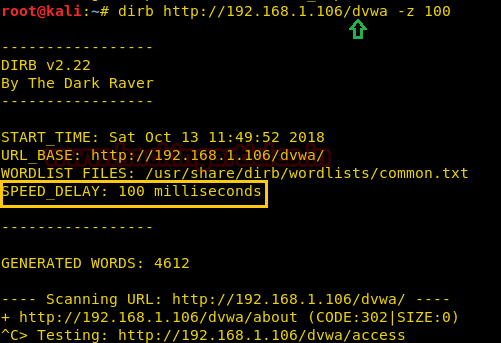
Speed delay
While working in different scenarios, there is some environment we come across that cannot handle the flood created by the dirb scan, so in those environments, it is important that we delay the scan for some time. This can be done easily with the -z parameter of the dirb scan. In this parameter, the time is provided on the scale of milliseconds. Like as shown in our given example, we have given 100 seconds delay to dirb.
dirb http://192.168.1.106/dvwa -z 100
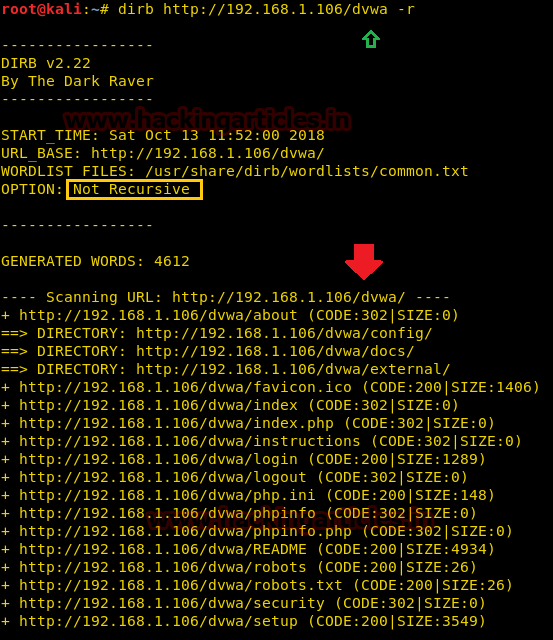
Not recursively (-r)
The dirb scan, by default, scans the directories recursively. It means it scans a directory and then traverses inside that directory to scan for more subdirectories. But in some scenarios, where time is insufficient, we set the dirb to not scan recursively. This can be achieved using the -r parameter.
dirb http://192.168.1.106/dvwa -r
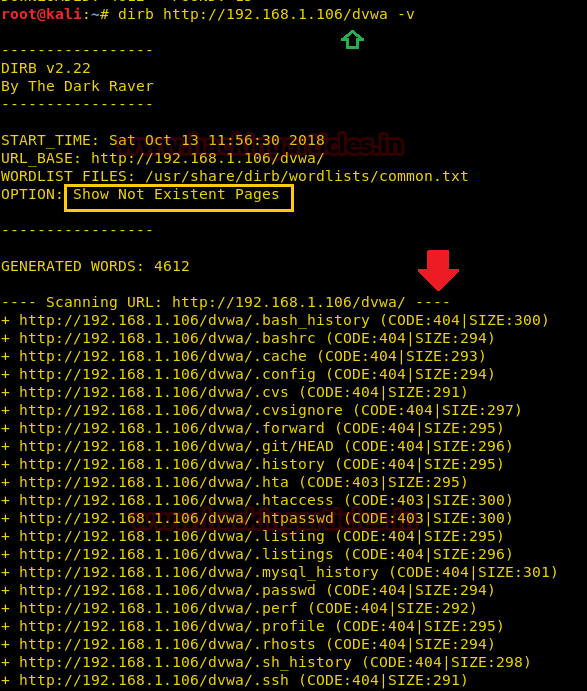
Show NOT Existence Pages
A 404 error is an HTTP status code that means that the page you were trying to reach on a website couldn’t be found on their server. 404 Not Found error messages are frequently customized by individual websites. In some scenarios we need to find the 404 pages too, which dirb skips by default. To find those pages we will use -v parameter.
dirb http://192.168.1.106/dvwa -v
From given below the image you can observe it has also extracted all those directories are relevant to 404 errors.
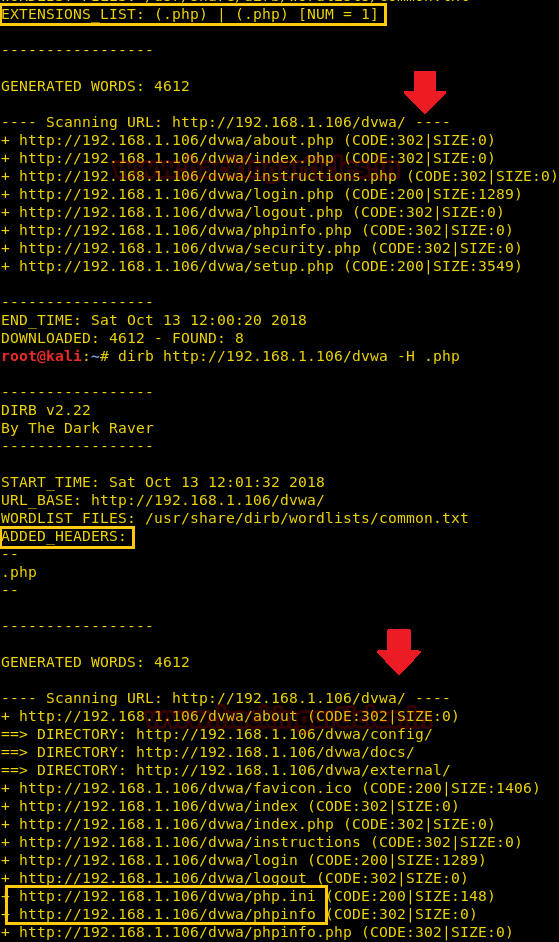
Extension List (-X parameter) Vs Extension Header (-H parameter)
By using the –X parameter along with target URL with a specific extension, for example, .php, it enumerates all file or directory with .php extension, but by using –H parameter with specific extension, for example .php along with target URL it will enumerate all files or directories named with php as shown in the given below image.
dirb http://192.168.1.106/dvwa -H .php
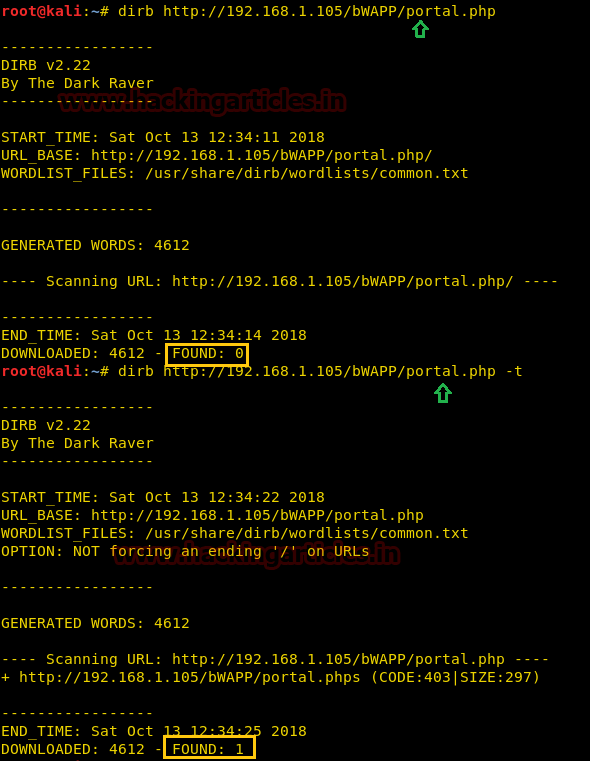
Not forcing an ending ‘/’ on URLs (-t)
To run the dirb tool from the attacks used in the previous situations. We will have to add a forward slash (/) at the end of the URL for dirb to accept it. In order to check that we need to try one attack on URL ending without any forward slash.
dirb http://192.168.1.105/bwapp/portal.php
You will observe that the lack of the forward slash prevents the scan from executing successfully, the importance of which we discussed earlier in this article.
Try this attack once again with the same command with some changes so in order to run that command. We have to add –t in the previous command.
dirb http://192.168.1.105/bwapp/portal.php -t
As now we can observe that the even in the absence of the forward slash. We have successfully executed the dirb scan.
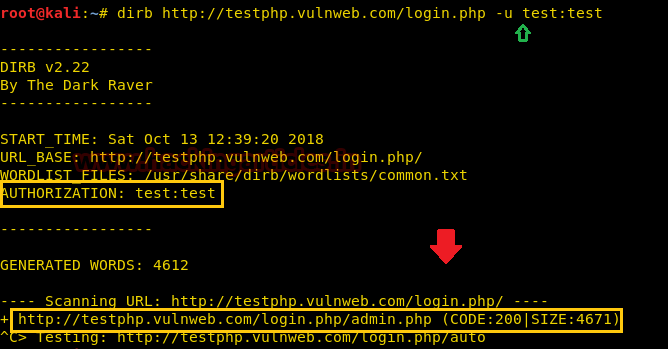
HTTP AUTHORIZATION (-u username: password)
HTTP Authentication/Authentication mechanisms are all based on the use of 401-status code and WWW-Authenticate response header. The most widely used HTTP authentication mechanisms are Basic. The client sends the user name and password as unencrypted base64 encoded text.
So, in order to bypass this kind of authentication with the help of dirb we have used the command below:
dirb http://testphp.vulnweb.com/login.php -u test:test
As a result, it is shown Status –code 200 for the test: test and authorized credential on target URL.
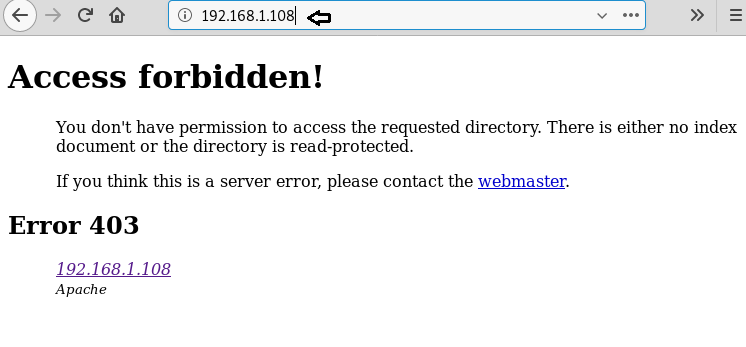
Proxy URL
Using –p option enables proxy URL to be used for all requests, by default it works on port 1080. As you can observe, on exploring target network IP in the web browser it put up “Access forbidden error” which means this web page is running behind some proxy.
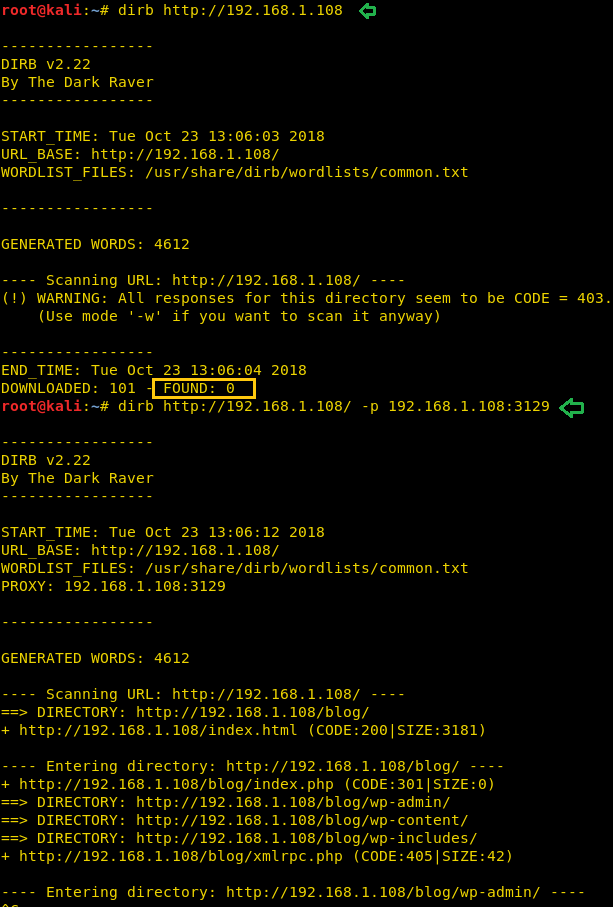
To ensure this prediction, we run the dirb command twice. Firstly on port 80 which is by default and further on port 3129 along with –p option which enables proxy parameter.
dirb http://192.168.1.108
dirb http://192.168.1.108 –p 192.168.1.108:3129
From the given below image, you can take reference for the output result obtained for above commands. Here we haven’t obtained any directory or file on executing the first command where else in the second command executed successfully.
To learn more about Penteration Testing. Follow this Link.
Author: Shubham Sharma is a Technical Writer, Researcher and Penetration tester contact here
What about cookie strings? Can you show an example?