Command & Control: PoshC2
PoshC2 is an open-source remote administration and post-exploitation framework that is publicly available on GitHub. The server-side components of the tool are primarily written in Python, while the implants are written in PowerShell. Although PoshC2 primarily focuses on Windows implantation, it does contain a basic Python dropper for Linux/macOS.
Table of Content
- Introduction
- Features
- Installation
- Enumerate User Information
- Enumerate Computer Information
- Find All Vulnerabilities
- Invoke ARP Scan
- Get Key Strokes
- Get Screenshot
Features of PoshC2
- Highly configurable payloads, including default beacon times, jitter, kill dates, user agents and more.
- A large number of payloads generated out-of-the-box which are frequently updated and are maintained to bypass common Anti-Virus products.
- Auto-generated Apache Rewrite rules for use in C2 proxy, protecting your C2 infrastructure and maintaining good operational security.
- A modular format allowing users to create or edit C#, PowerShell or Python3 modules which are run in-memory by the Implants.
- Notifications on receiving a successful Implant, such as via text message or Pushover.
- A comprehensive and maintained contextual help and an intelligent prompt with contextual auto-completion, history, and suggestions.
- Fully encrypted communications, protecting the confidentiality and integrity of the C2 traffic even when communicating over HTTP.
- Client/Server format allowing multiple team members to utilize a single C2 server.
- The system implements extensive logging to track every action and response. The application timestamps each entry and stores it in a database, capturing all relevant information such as user, host, implant number, and more. Additionally, the system directly logs the C2 server output to a separate file for better organization and analysis.
- Support for Docker, allowing reliable and cross-platform execution
Installation of PoshC2
We can install PoshC2 automatically for Python3 using the curl command. We need an elevated shell to execute this command successfully.
curl -sSL https://raw.githubusercontent.com/nettitude/PoshC2/master/Install.sh | bash
Now that we have installed the PoshC2 from the Github, we need to configure the listener to our IP Address. This can be done by editing the config file using the following command.
posh-config
After the required configurations are done, we need to open 2 instances of the terminals. Running the server and the handler. We need to run the Implant Handler, used to issue commands to the server and implants.
posh
Further, we will run the server which will communicate with the Implants and receive task output.
posh-server

You can use any one of the methods to gain a session from the ones that are depicted in the image above. Know that, as soon as we run the payload on the target machine. It activates an implant in the Implant handler as shown in the image given below.

Enumerate User Information
Now that we have an active implant in our Posh, It’s time to run some inbuilt modules to get some information about the Target System. We are going to start with the User Information, Group Information. This module dumps all the local users, local groups and their membership on the Target Machine. It gathers all the information using the WMI. To initiate this module, we will be using the following command:
get-userinfo

After working a while on the implant, we see that it has successfully enumerated all the user-related information from the target machine. We have information about the local users, local groups, number of local groups.

Enumerate Computer Information
As we already enumerated the user’s information, now its time to get the information about the system. For this, we will use this implant. It is an external implant that is integrated with Posh C2. This is a Windows Powershell Script that runs in the background by the same name. It uses the PSInfo from the Sysinternals to gain the information regarding the Computer Name, Domain, Operating System, OS Architecture and much more.
get-computerinfo

After working for a while on the implant, we see that it has successfully enumerated a lot of System related information from the target machine.

Find All Vulnerabilities
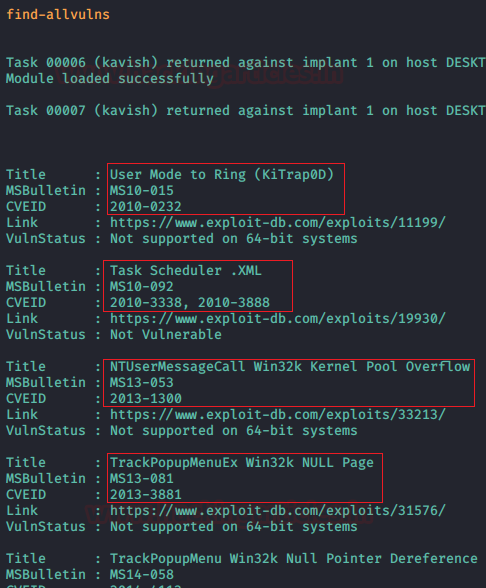
Now, comes the automated implant. This implant enumerates the target machine for a huge range of Local Privilege Escalation methods. It works quite similar to Windows Exploit Suggester. This is another Powershell script just like the previous implant that has been integrated into PoshC2. We can invoke this implant using the command given below:
find-allvulns

After working for a while on the implant, we can see that it successfully enumerated all the possible exploits that can elevate privileges on this machine.
Invoke ARP Scan
We can perform an arp-scan on the implant. This is based on the Powershell ArpScanner and uses C# AssemblyLoad. This scan deploys [DllImport(“iphlpapi.dll”, ExactSpelling=true)] to Export ‘SendARP’; by default, it will loop through all interfaces and perform an arp-scan of the local network based on the IP Address and Subnet mask provided by the network adapter. It can be invoked as shown in the image given below:
invoke-arpscan

Then, we can see that the arp-scan module has worked successfully giving us a list of IP Addresses that are in the same network as the target implant.

Get Key Strokes
Now, we will attempt to capture keystrokes from our target implant. You can accomplish this using the get-keystrokes module. The process divides into two parts. First, we initiate the keystroke capturing, and then we read the captured data. Although developers originally created this module as an external script in PowerShellMafia, they modified it to operate entirely in memory, avoiding any disk interactions. We start capturing the keystrokes using the following command:
get-keystrokes

By default, the keylogger will run for 60 minutes. It has started the sniffing out the keystrokes as shown in the image given below:

Then, to read those keystrokes, we need to run the following command:
Get-KeystrokeData

This will show us all the keystrokes that have been performed by the target implant. This is better than other methods to sniff keystrokes because it also shows the function keys like Ctrl and Shifts key entries which can be quite helpful in some scenarios.

Get Screenshot
Now, it’s time to take a closer look at the target’s system. This can be accomplished using the get-screenshot module. This method is straightforward. We will initiate an implant that captures screenshots of the target’s active screen. This module is particularly useful for gathering evidence or directly observing the target’s activities in real-time. You can start this module by using the following command:
get-screenshot

As shown in the following image, the command executed successfully, and we have captured the live screen of the target.

As mentioned in the image above, you can navigate to the specified location to access the target’s screen. The screenshot captured in this process is displayed below:

To learn more about Command and Control. Follow this Link.
Author: Kavish Tyagi is a Cybersecurity enthusiast and Researcher in the field of WebApp Penetration testing. Contact here