Burp Suite for Pentester – Fuzzing with Intruder (Part 3)
After reading both of our previous articles, you might be wondering, “What about the other features or sections that Burpsuite’s Intruder offers us?” or “How can we use the other payload options rather than the Simple list only?”
So today, in this article, you’ll get all of your questions answered, whether it’s regarding the payload option, the attack type or even the grep match or grep extract values.
Table of Content
- Fuzzing with the Attack Type
- Cluster Bomb
- Battering ram
- Pitchfork
- Fuzzing with the Payload Types
- Brute forcer
- Character Frobber
- Case Modification
- Numbers
- Username Generator
Fuzzing with the Attack Type
Up till now, you might have seen that over in all the attacks scenarios, we’ve used Sniper as an attack type. We did this because sniper uses a single set of payloads and targets a single position in turn with it. But, with this, we can’t set multiple payload positions over in the same Request.
Thereby for such situation, where we need to set different input parameters as injection points, we can use the other attack types offered by Burpsuite.
So, let’s dig somewhat deeper and explore one of the most common attack types i.e. Cluster Bomb, here we’ll try to fuzz the username and password of the users by injecting two different payload lists respectively at the different injection points.
Cluster Bomb
Back with the similar way, let’s capture the ongoing HTTP Request and share it with the Intruder.

Now, let’s configure the payload positions by selecting the input values of login and password fields with the Add $ button. Therewith it, opt the Attack type to Cluster Bomb.

Time to fill the empty box with a list of all possible usernames.

Now, with the usernames, we need some passwords too. So, let’s configure payload 2 positions with all the possible password that can exist for a username.

As soon as we hit the “Attack” button, the fuzzer will start, and we’ll get the output screen having all the combinations of the usernames and passwords.
But wait, let’s first clear the background concept behind this, like how the two different payload lists will work such in order to give a successful 302 Redirection.
Here, in this attack, the first password from the payload list 2 will fuzz all the usernames from payload list 1, similarly, then the second password will fuzz all the usernames again and the attack goes on…. i.e. the next payload(password) from the payload list 2 will fuzz all the payloads(usernames) from payload list 1.
Therefore, the total number of requests generated in this attack is the product of the number of payloads in all defined payload sets.

Battering ram
The Battering ram attack type is most favourite of Bug Bounty Hunters, as it requires a single set of payload lists to hit the vulnerability at multiple positions within the request.
Here, a single list is injected at different payload positions i.e. it used where the same input is to be inserted in multiple places within the request.
Let’s make it more clear by manipulating the attack type to Battering ram within the captured request. Here, we’ll try to find out the accounts that are having their passwords as similar to their usernames.

Now, let’s inject some payloads by typing them at the input field. And then further, let’s start the attack by hitting the “Attack” button.

And there we go, we’re back with an output list. From the below image you can see that the total number of requests are equal to the number of payloads we injected. And with this, I don’t think so, that there is a need to sort the length or the status bars, as the output as “ignite” with 302 Redirection is clear.

Pitchfork
This attack type is completely different from all the other three, although it carries multiple payload sets and different injection points. But, it does not fuzz up the things, i.e. it simply checks the first payload from payload list one with the first payload from the payload list 2, and if they found to be the correct credential, it passes a success.
Let’s try it too, for the above-captured request that we’ve used. Simply manipulate the attack type to “Pitchfork” and mark the payload positions by selecting them and hitting the “Add” button.

Let’s do the same as we did it for Cluster Bomb, select the payload set and inject the payload lists.

In a similar manner, set the corresponding payloads in Payload set 2 for the payloads of list 1 i.e.
bee : 12345
ignite : ignite
raj : 123
mummy : hacking
user : raj

Now as soon as we hit the Attack button, in order to start the fuzz, we’ll be redirected to a new window, where we’ll have the successful login credentials.

Fuzzing with Payload Type
As we’re aware of this fact that the payload type in Burpsuite’s Intruder tab is designed to manage and create payloads as per our convenience. Although we’ve only used the Simple list option within it, there are a number of other lists too that are still hidden from our eyes. Let’s explore them one by one.
Brute forcer
Sometimes, people confuse up with the two terms fuzzing and brute-forcing, thereby in order to segregate the two, burpsuite has an inbuilt payload type as brute forcer, which takes the input string and generates payloads of specified lengths that contain all permutations of a specified input character set.
So, this time, we won’t specify any payload list, but rather we’ll configure burpsuite to make its own payloads and inject them at the mentioned payload positions.
Turn ON your burpsuite monitor and capture the HTTP request made by the Mutillidae’s login portal, and thereby share it to the intruder.

Now with this, we’ll fuzz the password field, as we did earlier select 123 as the injection point and set the attack type to Sniper.

Time to configure the most important thing, from the payload type option select Brute forcer and therewith it, fill up the empty input field.
Character Set – The set of characters that are to be used in payloads.
Min Length – The length of the shortest payload
Max Length – The length of the longest payload
Note :
The total number of payloads will be increased up with the size of the character set and the maximum length.

And at last, hit the Attack button. Sit back and relax because now the burp suite will do its work, it will create and match the payload with the username provided for the correct password.
Great !! From the below image you can see that we got the payload as “aa1” with 302 redirections, seems to be a successful one. Now, navigate at the top of the intruder tab and select Attack, there hit the pause button in order to pause the fuzzer.

Character Frobber
During a penetration test, there are times when we get encountered with such situations where a string is responsible for the application’s response, i.e. if we manipulate the string value with a valid one then the response will get altered. Such situations normally occur when we do an account takeover, where we try to manipulate the user ID with one of a genuine user.
But, if we try to manipulate the characters of the string manually, it may take up to weeks and months to find out a valid request, thereby in order to make our work easy, burpsuite offers an amazing payload type i.e. Character Forbber which modifies the value of each character position on the existing base string by incrementing the ASCII code of a specific character by one.
Now, back into the Mutillidae application, over at the left side of the dashboard, select OWASP 2017 > Broken Authentication & Session Management > Privilege Escalation > Via CBC- Bit Flipping and capture the request.

From the above image, we can see that a string is passing over into the URL, seems like its responsible for the user to have an application ID, User ID and group ID
Now, as soon as we capture the passing HTTP Request, we’ll directly share it to the intruder for further processing.

Let’s set our payload position to this passing string.

Time to opt, choose the payload type to Character frobber and select the operate on option to the “Base value of payload position”

Now, let’s make this attack somewhat more appealing with the use of the “Grep Extract” option, which will thereby help us in order to identify which payload sting is defined to which application ID.
Therefore, at the Options tab, scroll down to the Grep – Extract field, check the “Extract the following items from responses” and click on the “Add” button.

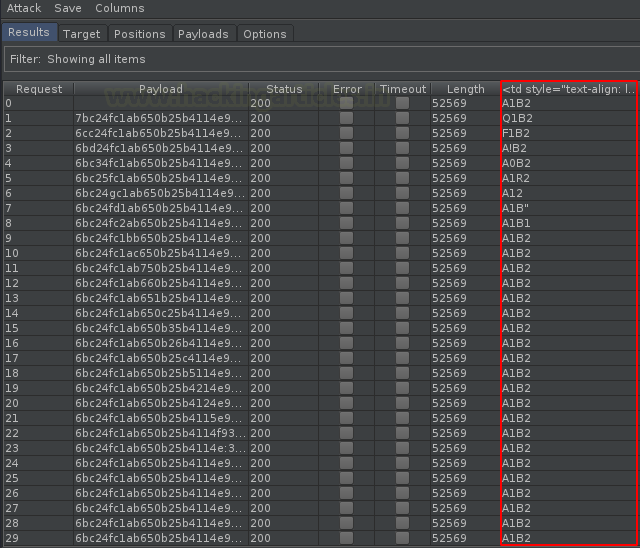
You’ll be redirected to a new window, click the fetch response button and the search for “Application ID” there, further select the output and hit OK, as in our case we’re having “A1B2”.

And there it is!! Hit the “Attack” button and initiate the fuzzer. (Rather than application ID, you can opt the User ID or the Group ID.)

Cool!! From the below image, we can see that we’ve successfully captured all the strings that correspond to a specific application ID.
In the output, you can notice that the payloads are almost similar to one another but there is an increment in the characters one after the other.

Numbers
Similar to the brute forcer, this payload type is specifically designed for the numbers part. Many bug hunters love this payload type as its acts as their helping hand majorly in the OTP Bypass attacks.
Although the method to use this payload is same, whether you use it for OTP bypass or login brute force.
So, let’s understand the working of this payload type by capturing the ongoing HTTP request of a login page.

As soon as we share it to the Intruder, we’ll thus need to set the positions for it, here let’s mark the password field and set the attack type to “Sniper”.

Choose Numbers from the payload type options provided and further configure the following as per your requirement.
From – The fuzzing will start from that payload.
To – The last Payload
Steps – This indicates the iteration, here I’ve set it to “1” i.e. the next payload after 100 will be 101, 102, 103 and so on. And if we set it “2”, then the next payload after 100 will be 102,104,106 with an increment of 2,

As soon as you set all these things, hit the “Attack” button and sit back and wait for the response. Within a few minutes, we’ll get a 302 Redirection at 123.

Case Modification
Sometimes it’s difficult to determine, that in which case the user has set his/her password. Thereby in order to solve this dilemma, burpsuite has a payload type integrated within itself, which adjust the cases (lower & upper) of the base value and create payloads within from that.
However, this is not for the passwords only, there are times when the developer blocks some specific cases for their input field, thereby in order to determine such, we can use this too.
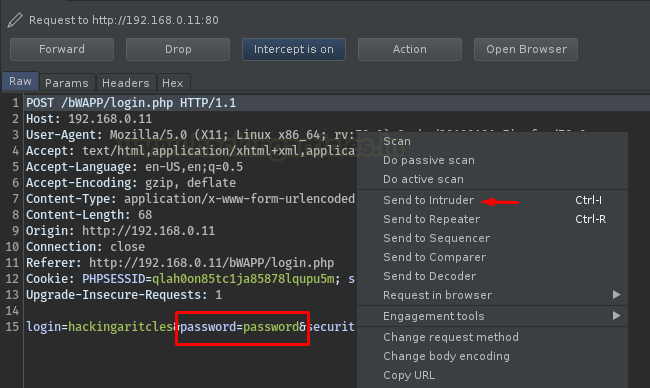
Let’s capture the request and check its practical exposure.

You know what we need to do next, select the payload position and opt Sniper as an Attack type for it.

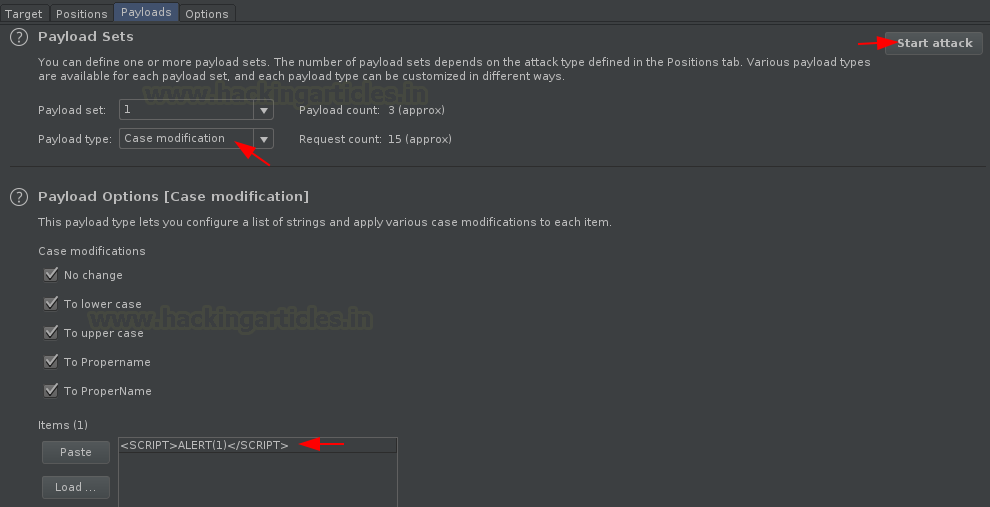
Now, here comes the best past. Opt Case modification from the provided list and configure the same.
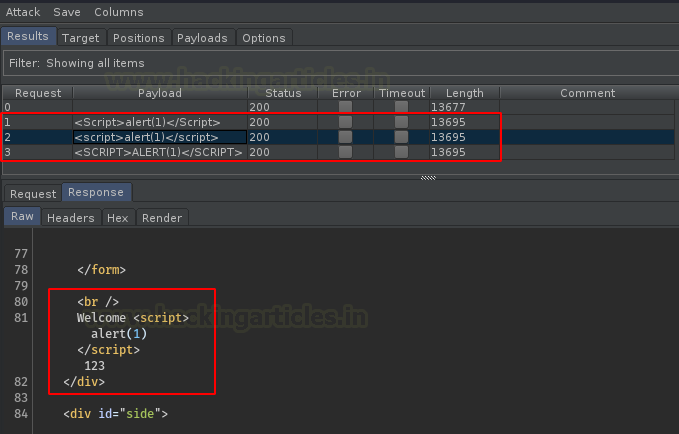
Fill the empty box with an XSS script and hit the Attack button. (Here we’re testing for the XSS vulnerability as many times the developer blocks up “SCRIPT” or “script” keyword. )

Cool!! We got our payload injected at the correct place. Do a right-click, opt “Show Response in Browser” to check the same where Javascript is enabled.

And there we go, we got the pop up reflected with “1”.

Username generator
During a social engineering attack, its simple to gather information about the user whether it is his name or contact number, even there are times we can even guess up the password too, but the most difficult thing is to identify the username he set.
Therefore in order to get out of such situations, burpsuite offers one more great payload type, where we just need to give a specific name and it itself will generate all the possible usernames and check them according to the injected password.
Wonder, how this could be done?? Check out the following scenario.
Capture the Request with a random username and correct password and share it all to the Intruder.

Now, time to set our payload position, select “random” and click the Add button, further opt the attack type to Sniper.

And there we are, select “Username generator”, from the payload type and enter the name you wish for, for the usernames. Here, in our case, we’ve used “Ignite Technologies.”
We can even select the maximum number of payloads i.e. the usernames, here we’ve also set that to 50.

As soon as we hit the Attack button, our fuzzer will starts up and with this, we can see a huge number of usernames are there enrolled into the list, and we got ours as Ignite !!

Author: Geet Madan is a Certified Ethical Hacker, Researcher and Technical Writer at Hacking Articles on Information Security. Contact here
Good article. One question though. What’s the purpose of Pitch fork or the Battering ram? I don’t really get the approach. I understand that we are trying to do brute forcing by guessing the credentials which was accomplished by Cluster bomb, which attempts all the possible combinations with the given payloads.
But it doesn’t make any sense for the Pitchfork or Battering ram. Where Pitchfork only works if the username is same as the password (which could well work for weaker logins with reused credentials) and Battering ram works if the given payload matches username and password which are given in the list, but by us. We don’t really use these features because, if we know the credentials we would just login instead. I get it that it’s just a tutorial but I don’t really see any real-life use case.
Suppose there are 10 username and 10 passwords
with Cluster bomb 10*10=100 Combinations will be tested
with Pitch Fork 10 Combinations will be tested
with Battering ram 10 Combinations will be tested.
manually testing 10 username password combinations is little difficult which will become complex if input credentials available are more. With intuition you will able to reduce he number of attempts. (There is difference in each attack type) however in worst case Clusterbomb will solve the problem with larger testing time) please Correct me if i am wrong .