Burp Suite for Pentester – Configuring Proxy
Burp Suite, you might have heard about this great tool and even used it several times in your bug hunting or penetration testing projects. Though after writing several articles on web-application penetration testing, we’ve decided to write a few on the various options and methods provided by this amazing tool, which thus could help our readers in their further penetration testing analyses.
Today, in this article, you will experience the complete installation and configuration of this Port Swigger’s product from its different editions to setting up proxies for web and android applications.
Table of Content
- Introduction to Burp Suite
- Burp Suite Installation
- Configuring Burp Proxy for Web Applications
- Manual Configuration
- Using Firefox Extension
- Configuring Burp Proxy for Android Applications
Introduction to Burp Suite
Burp Suite, commonly termed as “Burp”, is a Java-based web application penetration testing framework, which is often adopted widely by professional enterprise testers or bug bounty hunters.
Burp Suite is a collection of tools that seamlessly work together to facilitate the entire penetration testing process. It starts with setting up the target and analyzing the application for known vulnerabilities. Additionally, it provides opportunities to find and exploit other security weaknesses within the application.
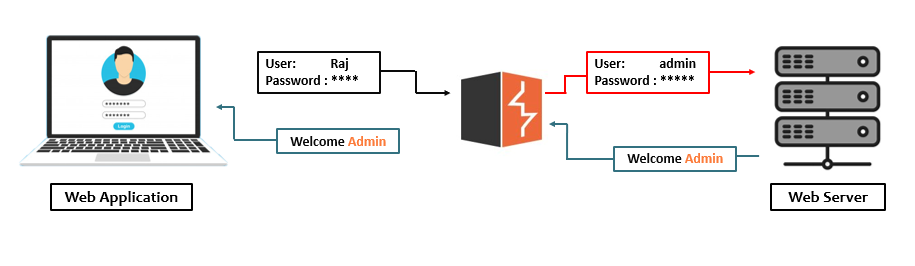
It is an intercepting proxy that acts as a man-in-the-middle between the target web application and the web server. Burp Suite captures the ongoing HTTP requests, allowing penetration testers or bug bounty hunters to pause, replay, and even manipulate the requests before they reach the destination server.
Burp Suite Editions
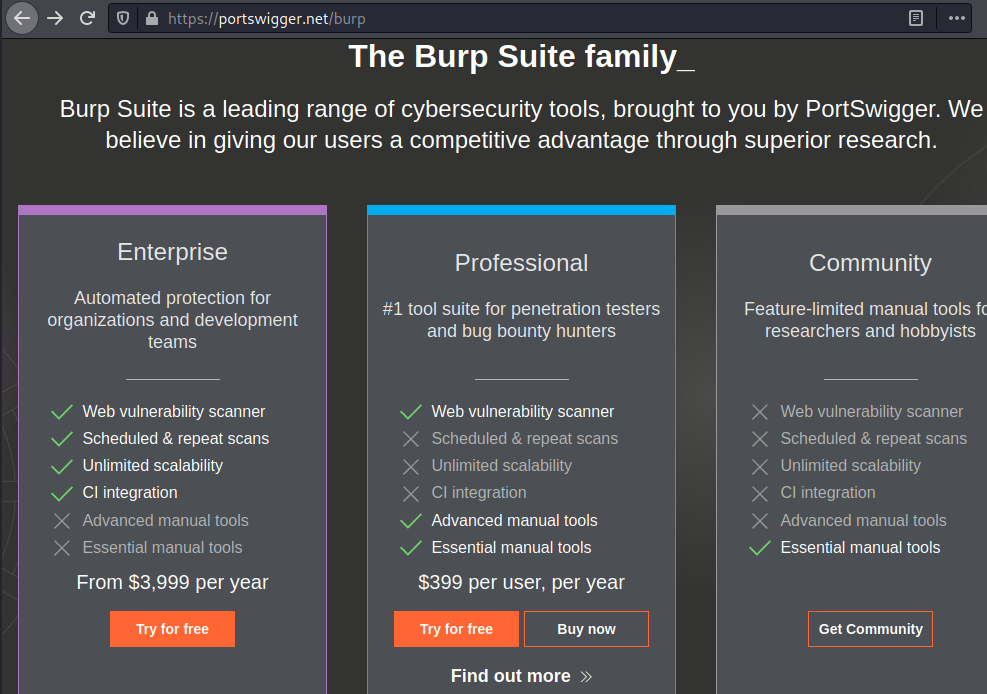
Port Swigger who is thereby responsible for the maintenance and the development of this great tool offers several editions for it i.e. –
- Enterprise
- Professional
- Community
The Community and Professional editions are the most common, so let’s compare these two only, in order to be more precise.
The Community version was once termed as the Burp Suite’s Free Edition, although it doesn’t offer several options, but it carries up everything that we need for the manual penetration testing whether it is capturing the request, crawling, or manipulating the request in the repeater.
However, the Professional edition has all the functionalities enabled, from the passive to active scanning, saving the projects, usage of the bApp Store and many more. All its tools make the testing somewhat faster and effective as it even drops us the opportunity to use the built-in payloads for fuzzing and brute-forcing by increasing the number of threads to make the fuzz faster. Even the professional edition offers some additional tools such as the burp collaborator and many others.
Burp Suite Installation & Configuration
Until now, you might have understood about, what is Burp Suite, how it works and what are the different variants do Port Swigger offers. So, let’s take a deep dive and create an account on Port Swigger and download the Professional edition of this great tool. As we’ve already discussed, most of the options are not available in Burp’s Community edition, so we’ll be using this professional edition in all the next articles. But still, you can opt for the community version to get familiarity with the product before purchasing, or you can choose the trial option for the Professional edition too.
Getting Started
Let’s Start !!
Before initiating the execution, let’s download the prerequisite, i.e., “Java”, its latest version from here.
Now, Burp Suite comes with two modes of execution – one as an executable and the second as Burp at the command line.
However, Burp as an executable is quite simple for Windows users, as it only requires a double-click to start. But for non-Windows users, they need to execute Burp through their command line by using the command: java -jar followed by the Burp Suite’s downloaded JAR file
java -jar burpsuite_pro_2.0.jar
In both the startup sections described, we’ll be welcomed with a splash screen. This splash screen depicts which edition we’re using and thereby drops out the corresponding options for it.
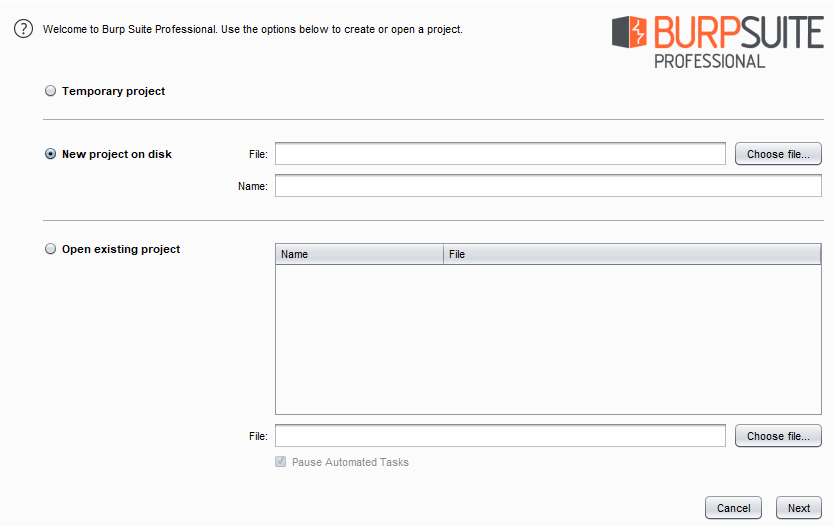
From the above image, you can see that we have several options to begin the project. You can choose to start with a Temporary project, create a New project on disk, or even resume by opening an existing project.
However, in the community edition, we’ll only get the option to start with a temporary project only. So let’s begin with a temporary project for this time.
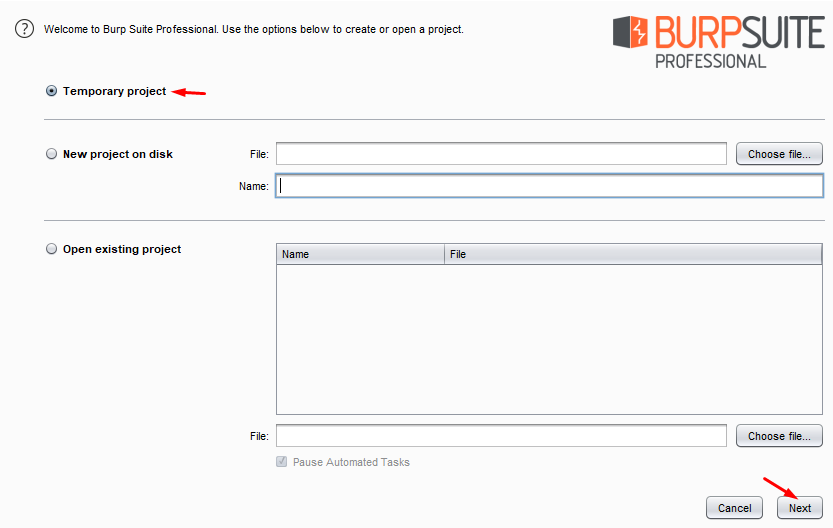
As we hit the next button, we’ll be redirected to the next splash screen asking us for the configuration we would like to use. Although as we’re not having any specific, let’s choose the default one and hit the Start Burp button.

Configuring Burp Proxy for Web Applications
As soon as Burp Suite starts up, we’ll get redirected to its dashboard. We get to see several pre-defined tabs that are developed for a specific purpose.

We’ll check all of these tabs in the later section. Let’s configure the proxy so that Burp Suite can intercept and capture the browser’s requests. To do this, go to the Proxy tab and then move to the Options sub-tab.
Over there, you’ll find the default configuration as – the IP Address bound to 127.0.0.1 and the port with 8080. If you didn’t find such, hit the Add button and configure the same.

Manual Configuration
Now, in order to capture the request, we need to configure our browser with the same configuration. Let’s do it manually with the following simple steps –
- Boot inside your Firefox browser and go to Options.
- There, in the General tab, scroll down to the Network Settings and hit the Settings button.
- Over in the Connection Settings, opt the Manual proxy configuration and type in the IP address as 127.0.0.1 with the port as 8080.
- Select “Also use this proxy for FTP and HTTPS” checkbox:

Capturing HTTP Traffic
Great, we can now capture the HTTP traffic. But wait, what about the HTTPS requests? Even though we’ve configured the proxy for that as well, Burp Suite still won’t intercept the HTTPS requests.
Thereby, in order to capture such traffic, we need to establish trust between Burp, the target’s web application, and the client’s browser. And for this, we need to install PortSwigger’s certificate as a trusted authority within the browser.
- Back in Burpsuite, navigate to the Proxy tab and click on the Intercept section. Check whether the Intercept button is labeled as “On” or “Off.” If it is disabled, enable it to capture further requests.

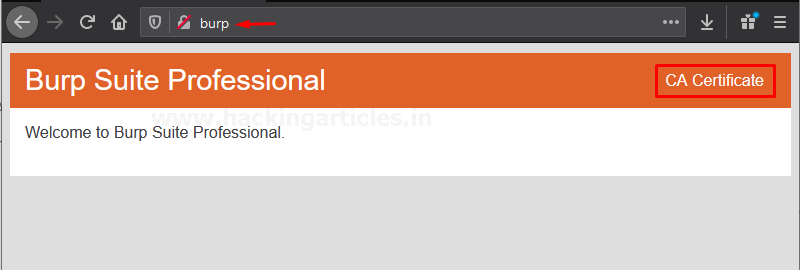
- Open the Firefox browser and navigate to http://burp. There, click on the CA Certificate option to download PortSwigger’s Certificate.
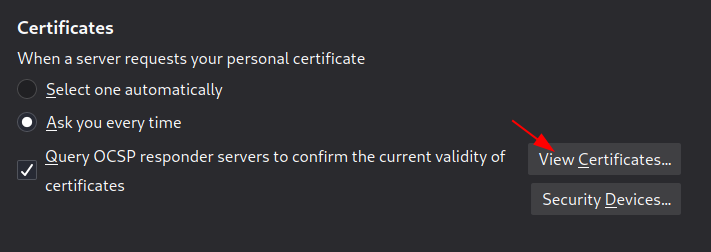
- Back in the options section in Firefox, click Privacy & Security on the left-hand side. Then, scroll down to Certificates and click the View Certificates… button to add the downloaded certificate.
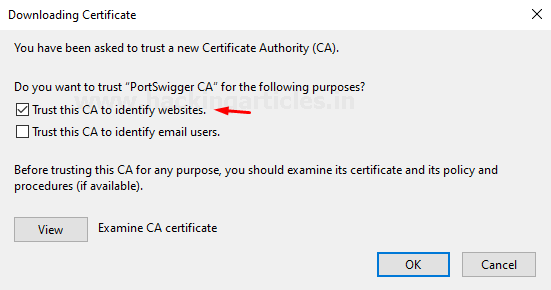
- Move to the Authorities tab, click Import, and then select the downloaded Burp CA certificate file.

- As soon as the certificate loads, a dialogue box will prompt. There, check the Trust this CA to identify websites box and hit the OK button to finish the configuration.
Intercepting HTTPS Traffic
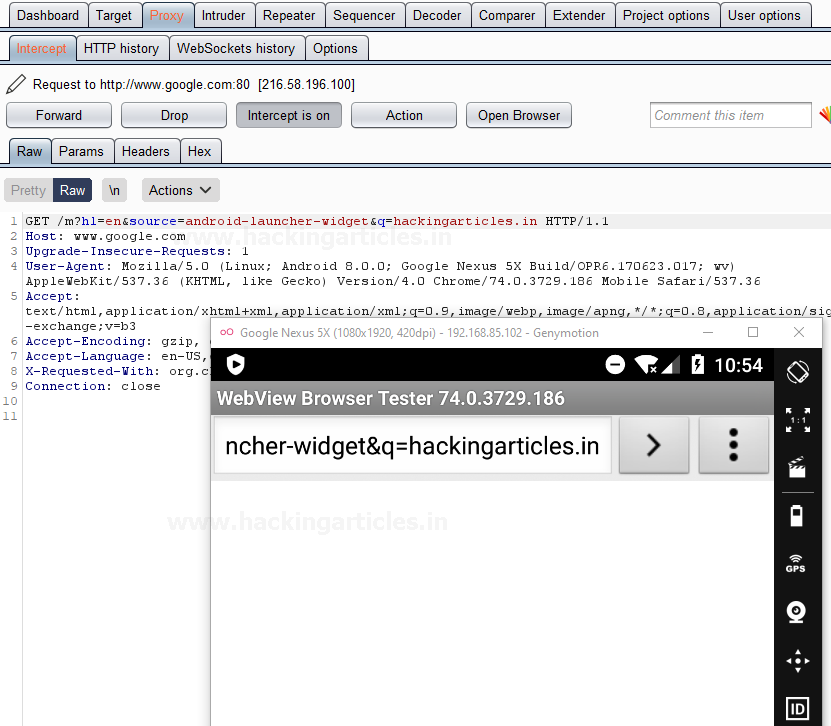
Time to catch up on the ongoing HTTPS requests. With the intercept option turned ON and the proxy enabled in the browser, search for https://www.google.com.
As soon as we hit the search button, our request will get paused at its first checkpoint, i.e., our burpsuite.
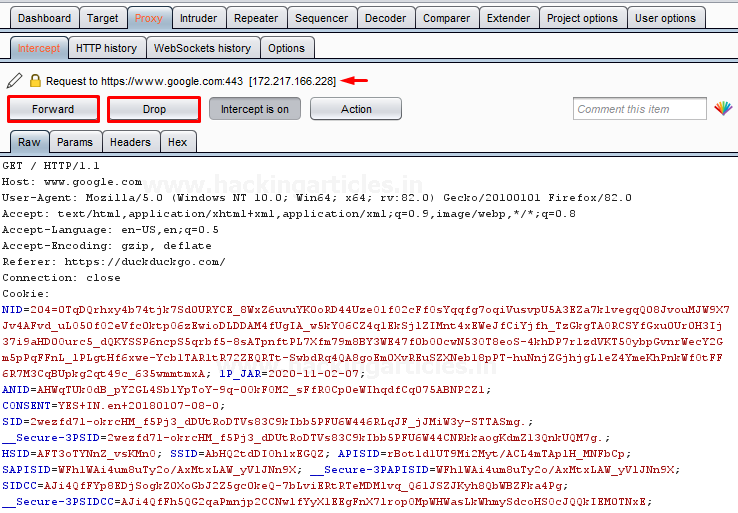
Now, with this setup, it’s our choice what to do with this request. We can either forward it as it is or drop it right here. This means it will never reach the web server for further processing. Additionally, we can also manipulate this request before it reaches the server.
So, for this time, let’s go forward directly. Thereby, with every subsequent successful captured request, we’ll get the same options.

Configuring Using Foxy Proxy
Isn’t the procedure for setting up a proxy in the browser a bit too long? Whenever we need to capture a request, the proxy needs to be enabled. However, if the burpsuite isn’t capturing the request, the proxy should be disabled to surf the internet seamlessly.
Therefore, with the ease of setting up the proxy, we’ll be using one of the greatest Firefox plugins, Foxy Proxy. This will allow us to enable and disable the proxy service whenever we wish, directly from the webpage we’re surfing.
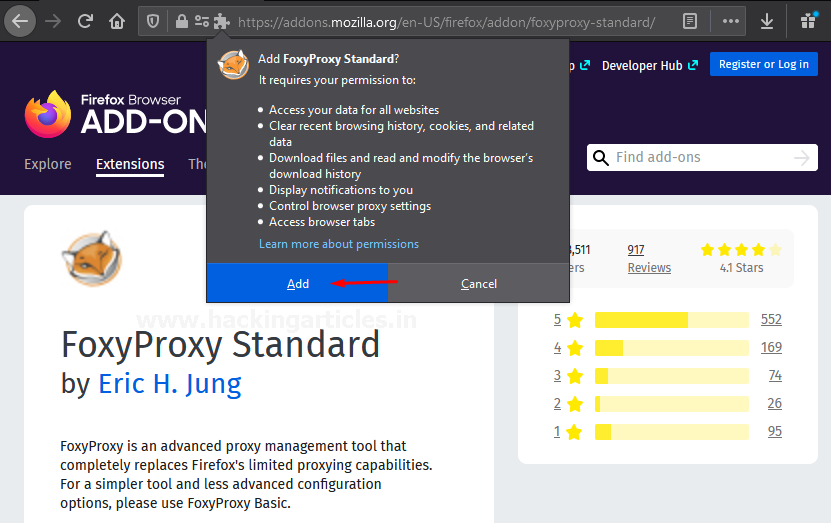
You can simply install and add this plugin from here.
As soon as you hit the Add to Firefox button, a dialog box will pop up asking for confirmation. Again, click on the Add button. Within a few minutes, you’ll get redirected to Foxy Proxy’s about page.
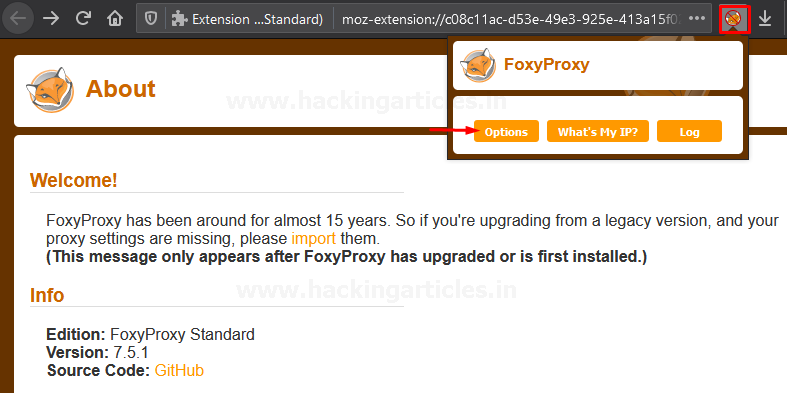
Now, over at the right of the search bar, you’ll be able to see the newly added plugin, click it, and select the options tab.
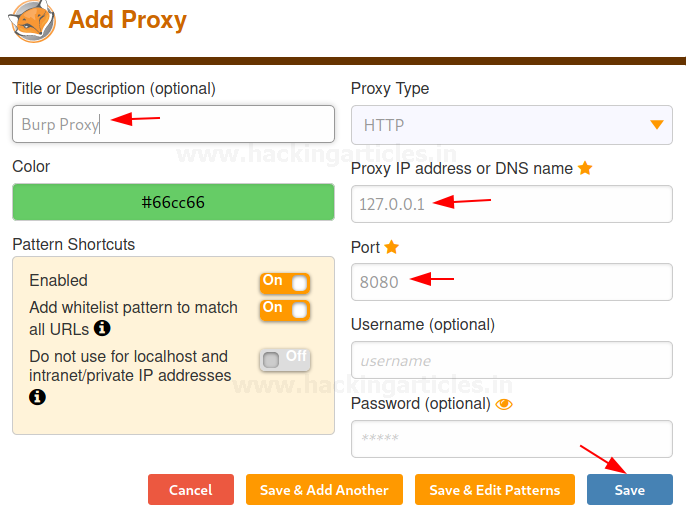
Time to configure the proxy service, we’ll do it as we did it over in the manual proxy setup, set the IP address to 127.0.0.1 and the port to 8080, and with the successful configuration, hit the save button.
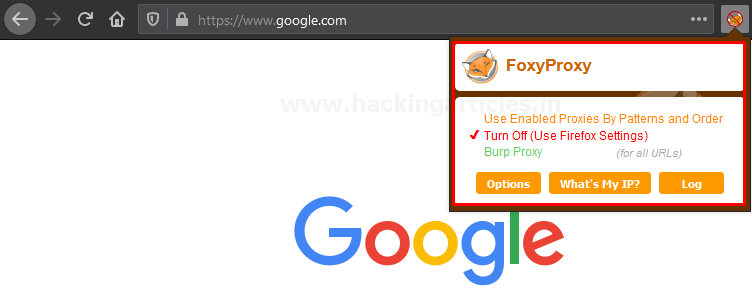
Therefore, with this, we can now enable and disable the proxy service directly from the web application’s homepage. Now enable the foxy proxy and turn ON the intercept option for capturing the HTTP request of the web page as done above.
Configuring Burp Proxy for Android Applications
Android Penetration Testing is the process of analyzing and testing the Android applications to find security issues and loopholes vulnerabilities in them.
However, to test such applications, penetration testers or bug bounty hunters often need to intercept the traveling requests. In such cases, Burp Suite plays a major role.
So, let’s learn how to configure a proxy in the mobile applications to capture the ongoing requests in burpsuite.
Configuring Burp Proxy
For this guide, we’ve used Genymotion (an Android emulator), and there we’ve even installed an Android device within it. You can set up the same from here.
Now, back into Burp Suite, switch to the Proxy tab and hit the Options sub-tab there. Click on the Add button in order to set up a new interface.

As soon as we do so, a dialog box will prompt up asking for the binding Port and the IP Address. Here, I’ve used the port number as 8081 and rather than assigning a specific IP address I’ve initiated it to All interfaces.
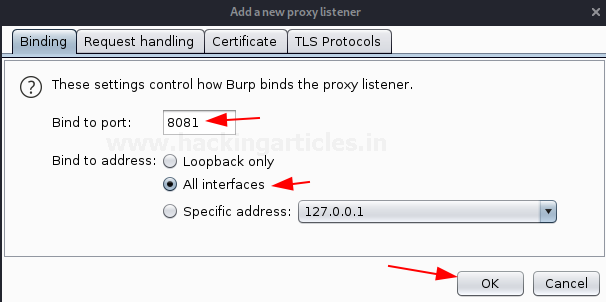
Great, from the below image you can see that our interface has been added up and it is Running.

Now, its time to configure the Android device, such in order to intercept the ongoing requests.
Configuring Android Device Proxy Settings
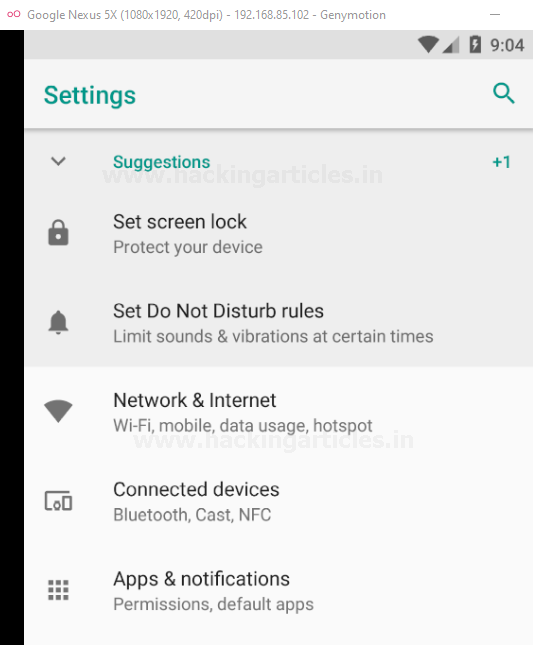
On our Android device, let’s navigate to the “Network and Internet” option in the Settings.
There, at the Wi-Fi option, let’s click on the connected Wi-Fi and hold it until it offers further options for us.

Click on Modify network and over in the Advanced Options, opt the Manual proxy configuration
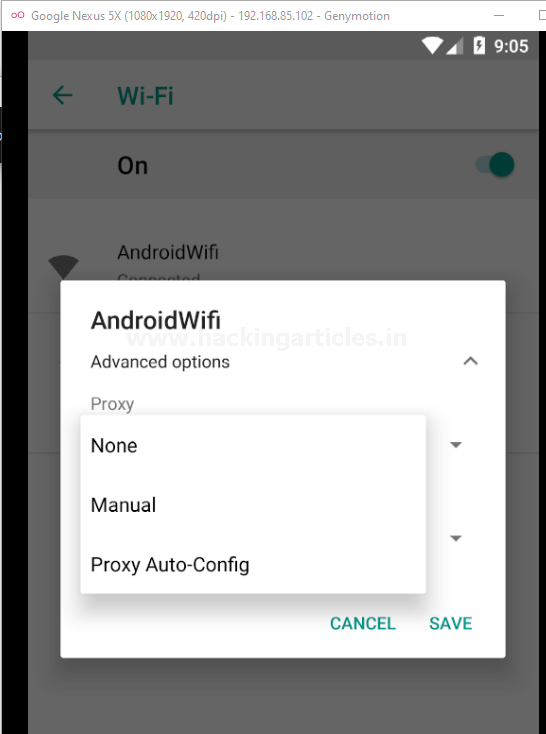
As soon as we hit the Manual option, we’ll get redirected to the proxy configuration section where we need to provide the Proxy hostname and the Proxy port.
Therefore, for the Proxy hostname, you need to check the IP address of your Windows machine (where Burp Suite is running). In our case, it is 192.168.1.9. For the Proxy port, you need to enter the port that you used to bind Burp’s proxy, which in this case is 8081.
Hit the Save button and there we go.

Now, similar to web applications, Burp Suite will only listen to the HTTP requests made. Therefore, to intercept the HTTPS requests, we need to install the certificates into the Android device as well.
Installing Burp Certificate for HTTPS Interception
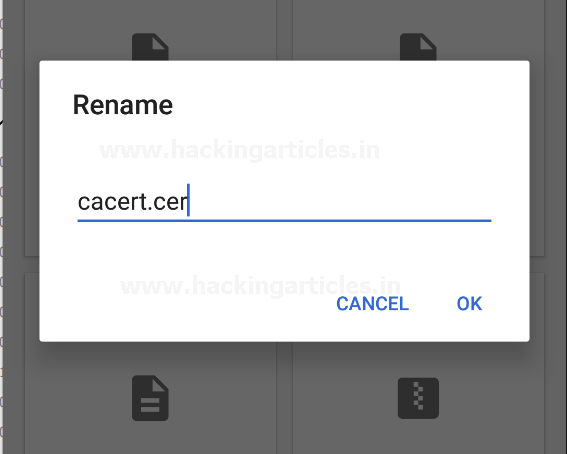
Over with the same option, surf http://burp in order to download the certificate.

Now, for this, we need to rename the certificate file from “cacert.der” to “cacert.cer”.
Cool! Now, back in the device settings, navigate to Security & Location → Encryption & Credentials. From there, hit the Install from SD card option to install the CA certificate.

Follow the path to where your certificate was downloaded, and as soon as you select the file, a pop-up will appear on the screen asking you to name the certificate. In our case, we named it cacert.
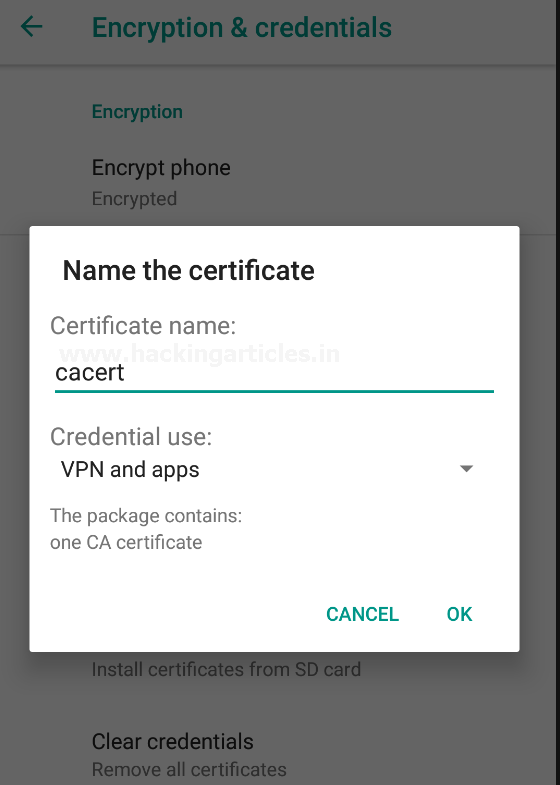
Great!! As soon as we hit the OK button, we’ll thus be able to capture and intercept the HTTPS Requests too over in our Burp Suite.
To learn more about Burp Suite for Pentesters. Follow this Link.
Author: Geet Madan is a Certified Ethical Hacker, Researcher and Technical Writer at Hacking Articles on Information Security. Contact here