A Detailed Guide on httpx
Introduction
httpx is a fast web application reconnaissance tool coded in go by www.projectidscovery.io. With a plethora of multiple modules effective in manipulating HTTP requests and filtering out responses, it is proving to be an effective tool in Bug Bounty Hunter’s arsenal. While tools like curl already exist that can perform almost all the features covered in this tool, httpx has its own place among the analysts because of its speed and ease of access. You can download the source code from here.
Table of content
- Installation of go version 1.17
- Installation of httpx
- Basic usage
- Subdomain enum using subfinder and scanac
- Content probes
- Content comparers
- Content filters
- Rates and timeouts
- Show responses and requests
- Filtering for SQL injections
- Filtering for XSS reflections
- Web page fuzzing
- File output
- TCP/IP customizations
- Post login
- HTTP methods probe
- Routing through proxy
- Conclusion
Installation of go version 1.17
Installation and proper running of httpx tool depends on go version 1.17. You can download, extract, add go in environment variables as follows. I am using Kali on amd64 architecture. Please feel free to download the appropriate package for your system on go.dev/dl
wget https://go.dev/dl/go1.17.8.linux-amd64.tar.gz
tar -C /usr/local/ -xzf go1.17.8.linux-amd64.tar.gz
Please make sure that you add the following lines in ~/.zshrc file:
#go variables
export GOPATH=/root/go-workspace
export GOROOT=/usr/local/go
PATH=$PATH:$GOROOT/bin/:$GOPATH/bin
After you have added the lines, zshrc file can be loaded with the source command and then we’ll be ready to go. If all goes well, the “go version” command will give version 1.17.8 as output.
source ~/.zshrc
go version
Installation of httpx
Installation of the tool is also possible by cloning the github repository and using a makefile to compile but we have an easier alternative. We can use go install to do the same like:
go install -v github.com/projectdiscovery/httpx/cmd/httpx@latest
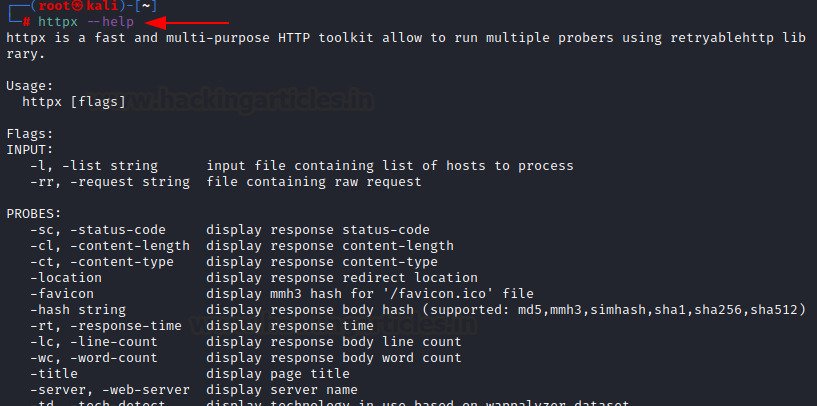
Once done, you can now run the tool. Help menu can be popped up to check the installation success
httpx --help
Basic Usage
Httpx tool accepts STDIN input for scanning. Here, we run a blank scan that only hits the server and does nothing and then the same scan with some basic options.
-title: displays the title of the webpage
-status-code: displays the response code. 200 being valid or OK status while 404 being the code for not found
-tech-detect: detects technology running behind the webpage
-follow-redirects: Enables following redirects and scans the following page too
echo "http://testphp.vulnweb.com" | httpx
echo "http://testphp.vulnweb.com" | httpx -title -status-code -tech-detect -follow-redirects
The same can be run on a list of websites that can be fed to the tool using “-l” option
httpx -l list -title -status-code -tech-detect -follow-redirects
Subdomain enum using subfinder and scan
Subfinder is another tool developed by projectdiscovery.io that enumerates and outputs subdomains. We can feed the STDOUT of subfinder to httpx and scan all the subdomains like so:
subfinder -d vulnweb.com | httpx -title -status-code -tech-detect -follow-redirects
Content probe
There are various modules that can refine how a response is rendered which is called a “probe.” These help us refine scan results. For example,
-sc: show HTTP response status code
-path: a specified path to check if it exists or not
httpx -l list -path /robots.txt -sc
httpx could be run using docker as well. Here, we feed a list of all subdomains as STDIN to httpx:
cat list | docker run -i projectdiscovery/httpx -title -status-code -tech-detect -follow-redirects
There are various other probes that help us render better outputs
-location: website where redirected. Here, observe how http becomes https
-cl: displays the content length of the resulting web page
-ct: content type of the resulting web page. Mostly HTML
echo "http://google.co.in" | httpx -sc -cl -ct -location
Some probes that are helpful for analysts and in-depth analysis
-favicon: fetches mmh3 hash of /favicon.ico file
-rt: shows the response time
-server: displays the server version and build
-hash: shows the webpage’s content’s hash
echo "http://testphp.vulnweb.com" | httpx -favicon -rt -server -hash sha256
-probe: displays the status of a single scan (success/failed)
-ip: displays the IP of the webserver
-cdn: displays the CDN/WAF if present
echo "https://shodan.io" | httpx -probe -ip -cdn
-lc: displays the line count of scanned web page
-wc: displays the word count of scanned web page
echo "http://testphp.vulnweb.com" | httpx -lc -wc
Content comparers
There are various comparers available in the tool that help us shortlist down an output. These are very helpful to trim down a list of unexpected output. For example,
-mc: matches the HTTP response code with the codes supplied in the list
cat list | httpx -mc 200,301,302 -sc
-mlc: matches the line count with input provided
cat list | httpx -mlc 110 -lc
-cl: displays the content length of a webpage
-ml: matches the content length with the input provided and displays only the results matching the content length
cat list | httpx -ml 3563 -cl
-mwc: matches the word count and displays only the results with the same word count
cat list | httpx -mwc 580 -wc
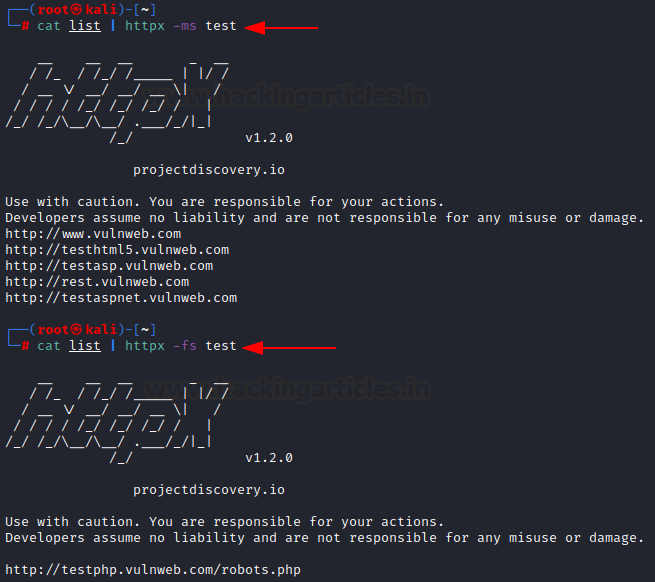
-ms: displays only the results where text on a page matches the provided string. Here, pages with “login” in their text are loaded
cat list | httpx -ms "login"
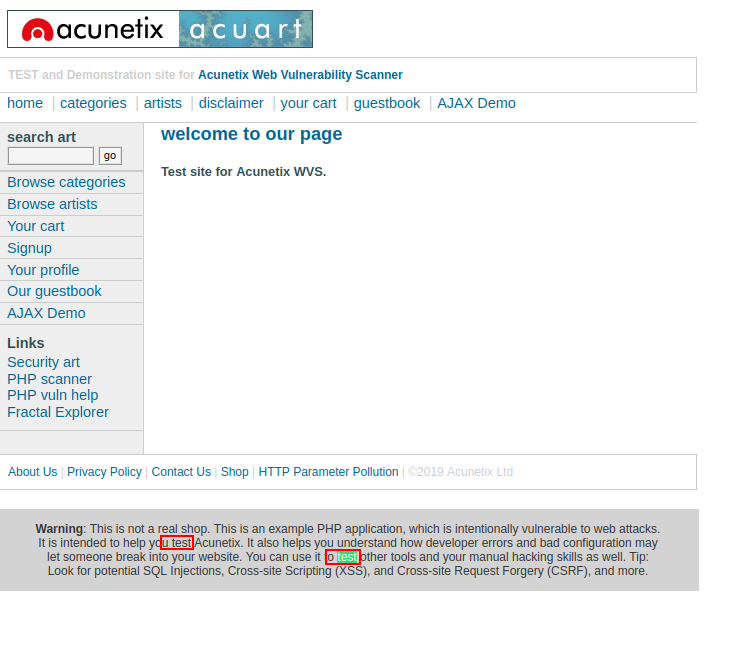
-er: extract regular expressions. Displays only the results where the resulting pages match the regex pattern provided. An example regex is \w which compares the provided string with the resulting page’s output.
echo "http://testphp.vulnweb.com" | httpx -er "\w test"
Here, you can see the output stands like u test, o test. The tool has filtered the following text and displayed it in output:
Content filters
Various filters are available at disposal in the tool that eliminates the results upon matching the criteria/condition provided. For example,
-fc: filters code. Tool only displays status codes not listed by fc (404 here so only 200 is visible)
cat list | httpx -sc
cat list | httpx -sc -fc 404
-fl: filters content length. Here, 16 and 12401 is filtered so all the output except these two are visible
cat list | httpx -cl -fl 16,12401
-fwc: filters the word count. Here, 3 and 580 is filtered so all the output except these two are visible
cat list | httpx -wc -fwc 3,580
-flc: filter line count. Here, 2 and 89 is filtered so all the output except these two are visible
cat list | httpx -lc -flc 2,89
-fs: filter the output with the provided string. Here, “test” is provided, so webpages not containing the string “test” is displayed. This string must only be in the text on the web page.
cat list | httpx -fs test
-ffc: favicon filter. Only the output with favicons that are not “-215994923” is displayed.
cat list | httpx -favicon -ffc -215994923
Rates and Timeouts
There are various modules that let a user play around with the rate of scan and throttle the speed of the same. Some of these options are:
-t: specify the number of threads used for the scan. Can be as high as 150. Default 50.
-rl: specifies the rate limit in requests per second
-rlm: specifies the rate limit in requests per minute
cat list | httpx -sc -probe -t 10 -rl 1 -rlm 600
-timeout: To abort the scan in specified seconds
-retries: Number of retries before aborting the scan
cat list | httpx -sc -probe -threads 50 -timeout 60 -retries 5
Show Responses and Requests
Httpx crafts and sends out http requests in real-time and then post-processes the results. These requests and corresponding responses can be viewed as well. For example,
-debug: it shows requests and responses to a webpage in CLI
echo "http://testphp.vulnweb.com" | httpx -debug
-debug-req: Displays the outgoing HTTP request
-debug-resp: Displays the corresponding HTTP response
-stats: displays the current scan stats including completion percentage
cat list | httpx -stats
Filtering for SQL Injections
As we know that some types of SQL injections are reflected in the code output. We can detect such injections by filtering the output of a web page. In error-based SQLi, an error is thrown which is reflected in the output page. As you can see in the command below we have used -ms filter to compare and find such pages. Ideally, an attacker can give a list of input and find common SQLi vulnerabilities in a similar way. In the output below, where the vuln is found, httpx displays that website’s name.
echo "http://testphp.vulnweb.com" | httpx -path "/listproducts.php?cat=1’" -ms "Error: You have an error in your SQL syntax;"
Filtering for XSS reflections
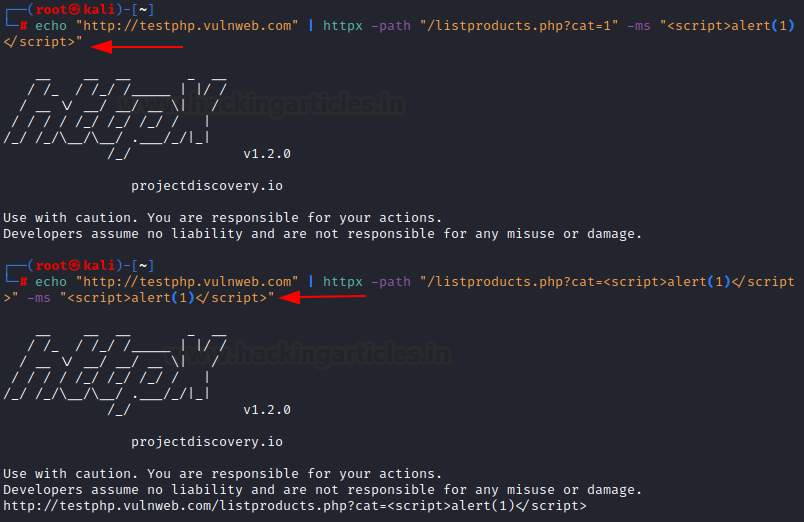
Reflected XSS by definition gets reflected in the web page’s output.
An attacker can input a list of websites and then a list of path to check for reflected XSS in bunches. In the example below, the “-ms” module is used which is supposed to match the output webpage’s text content with the input provided. Since reflected XSS is shown in the output, the tool displays the name of the webpage where this vulnerability (payload output in the code) is observed.
echo "http://testphp.vulnweb.com" | httpx -path "/listproducts.php?cat=<script>alert(1)</script>" -ms "<script>alert(1)</script>"
Web Page Fuzzing
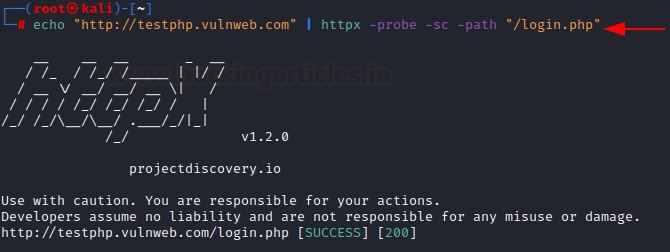
Httpx is a great tool that can be used to fuzz web pages. “-path” module can be used to provide the name of the file to be fuzzed for existence on the server.
-path: path/list of paths to probe
echo "http://testphp.vulnweb.com" | httpx -probe -sc -path "/login.php"
File output
The scan results provided by the tool can also be exported for convenience. The most basic output is a text file with just webpages in every line. This can be useful for a variety of occasions while pentesting. Such modules are:
-o: Saves a result in a text output file
cat list | httpx -sc -o /root/results.txt
cat results.txt
The same results can be saved in other formats too. Like,
-csv: Stores the scan results in CSV format. Default scan includes almost all of the content probes.
cat list | httpx -sc -csv -o /root/results.csv
cat results.csv
-json: Stores the scan results in json format. Default scan includes almost all the content probes
cat list | httpx -sc -json -o /root/results.json
-srd: stores corresponding HTTP responses in custom directory with naming: “URL.txt”
cat list | httpx -sc -o /root/results.txt -srd /root/responses
cat /root/responses/rest.vulnweb.com.txt
TCP/IP customizations
Some filters are available to conduct an in-depth reconnaissance. These filters are extremely helpful in cases where an attacker needs to conduct basic network-level reconnaissance too.
-pa: probes all IPs associated with the same host provided. Often the same website is utilizing multiple IP addresses for different purposes.
echo "http://hackerone.com" | httpx -pa -probe
-p: scans the specified ports either as a list (in the format 80,443) or by providing absolute range (format 1-1023)
echo "http://hackerone.com" | httpx -p 22,25,80,443,3306 -probe
POST Login
Httpx can also be used to send POST requests. It can also be used to log into a page and read responses. For example, the page /userinfo.php is alogin portal and can be logged in with credentials test:test. The corresponding request in the burp suite looks like
To replicate the same request, httpx provides various modules
-x: specify the HTTP request options. GET, POST, PUT etc.
-H: provides custom headers to be sent
-body: specifies the additional data in the body to be sent along with the request
As you can see in the screenshot below, the tool has logged in (200 OK) and displayed the output of the profile page.
echo "http://testphp.vulnweb.com" | httpx -debug-resp -x post -path "/userinfo.php" -H "Cookie: login=test%2Ftest" -body "uname=test&pass=test"
HTTP Methods Probe
The “-x all” option probes all the HTTP OPTIONS (request methods) and displays which options are permitted on the webpage. It is a nifty tool for pentesting. As it is visible, all the options are permitted on the webserver.
echo "http://testphp.vulnweb.com" | httpx -x all -probe
Routing through proxy
HTTP requests can also be routed through custom proxies. For example, if we were to send requests through burp suite, we can use the “-http-proxy” module and specify the destination. Same can be done with socks proxy in the format, “socks5:127.0.0.1:9500”
And as you are able to see, a request is now being captured in the proxy.
echo "http://testphp.vulnweb.com" | httpx -x all -probe -http-proxy http://127.0.0.1:8080
Conclusion
The aim of the article was to serve as a ready reference for the majority of the options available in httpx tool. We have covered almost all the working options as per the date of publishing of this article. Please feel free to check out the official repo for more updated options here. Hope you liked the article. Thanks for reading.
Author: Harshit Rajpal is an InfoSec researcher and left and right brain thinker. Contact here


