Hack the SkyDog Con CTF 2016 – Catch Me If You Can VM
SkyDog is the second VM in CTF series created by James Brower. It is configured with DHCP so the IP will be given to it automatically. This VM is based on Catch me if you can which is a movie about Frank who is a conman. So it is correct to assume that a broad OSINT concept will be used in it. This is an amazing VM as it uses about hacking and forensic skills. The author of this VM has given us hints about all the eight flags as below:
Flag # 1: Don’t go, Home Frank! There’s a Hex on Your House.
Flag # 2: Obscurity or Security?
Flag # 3: Be Careful Agent, Frank Has Been Known to Intercept Traffic Our Traffic.
Flag # 4: A Good Agent is Hard to Find.
Flag # 5: The Devil is in the Details – Or is it Dialogue? Either Way, if it’s Simple, Guessable, or Personal it Goes Against Best Practices
Flag # 6: Where in the World is Frank?
Flag # 7: Frank Was Caught on Camera Cashing Checks and Yelling – I’m The Fastest Man Alive!
Flag # 8: Franks Lost His Mind or Maybe it’s His Memory. He’s Locked Himself inside the Building. Find the Code to Unlock the Door Before He Gets Himself Killed!
Except this, we know that the flags are in MD5 Hash. You can download it from https://www.vulnhub.com/entry/skydog-2016-catch-me-if-you-can,166/.
Penetrating Methodology
- Network Scanning (Netdiscover, Nmap)
- Examine source code of the web page
- Extracting and decoding of hex value for the 1st flag
- Login into SSH for the 2nd flag
- Abusing HTTPS for the 3rd flag
- Intercept the Browser request and Change user-agent (Burp-suite)
- Obtain the 4th flag and follow the clue
- Explore FBI workstation and abuse its source code FBI.txt file
- Decrypt the 5th flag to obtain the credentials
- Download the image after login
- Extract hidden code from inside the image (steghide)
- Open the flag.txt file and capture the 6th flag along with the password.
- Login into SSH and capture the 7th flag
- Download zip file via SCP and unzip
- Forensic Trick-Extract file info to capture the 8th flag (volatility)
WalkThrough
Let us find our target first by using the following command in the terminal of kali :
netdiscover
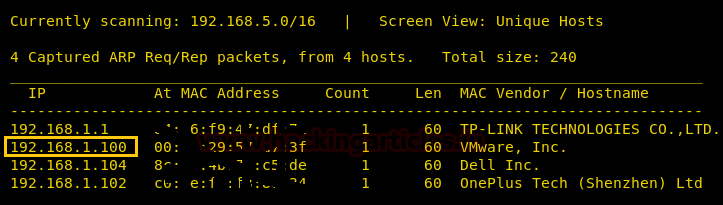
We can clearly see that our target IP is 192.168.1.100. Now as we have identified our target let’s scanning the IP with nmap.
nmap -p- -sV 192.168.1.100
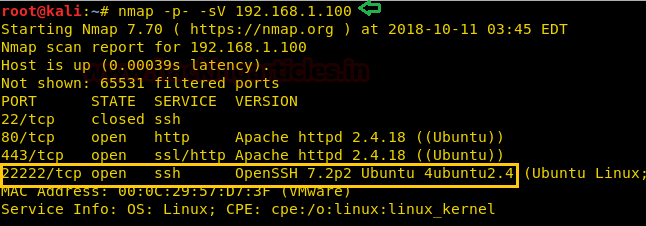
With the assistance of nmap, you can see that the port number 22, 80, 443, and 22222 are working with the service of SSH (closed), HTTP, HTTPS and SSH (open) respectively. Here, you can observe that using port forwarding the service of SSH has been forwarded to the port number 22222 from its default port that is 22. Also, the service is closed on 22 and open on 22222. This is a minor security feature to throw off attackers.
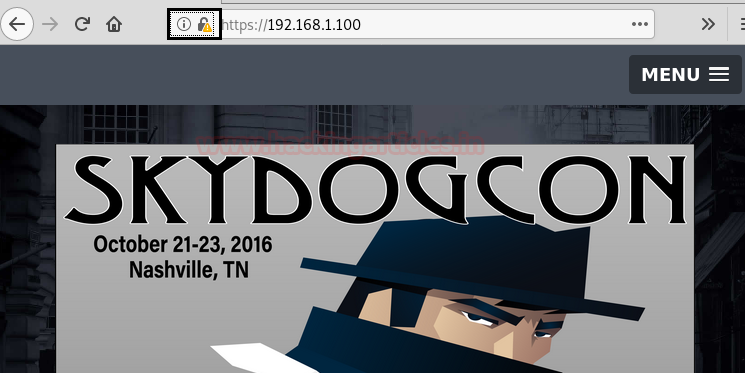
As port 80 is open, along with 443; we can open this IP in a browser.
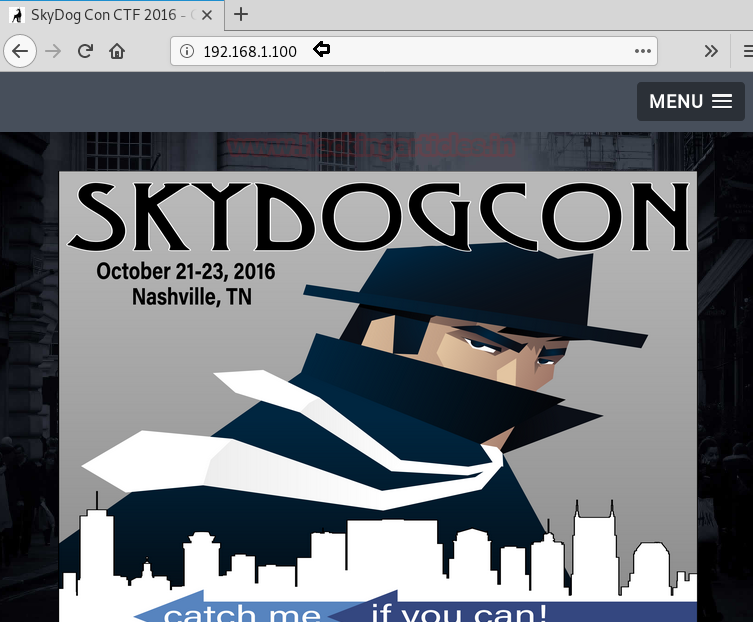
The home page has nothing to go on for us, therefore, we checked its page source.
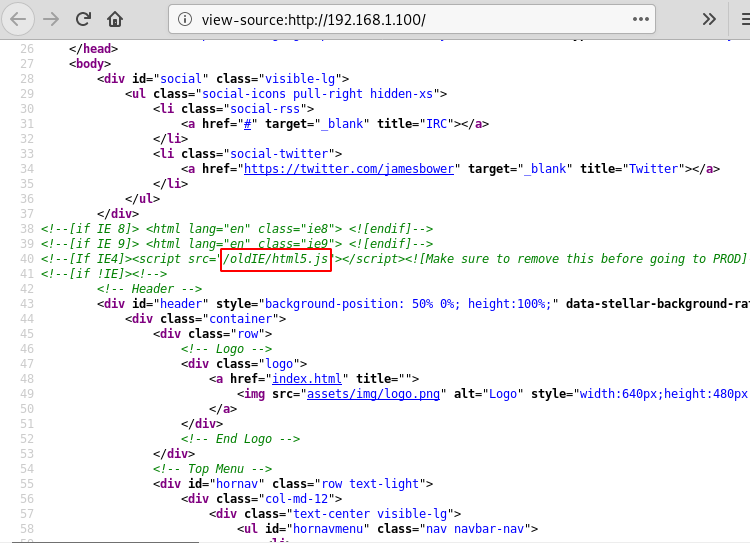
In the page source, you will find a directory. Let’s open it and see what it has got for us.
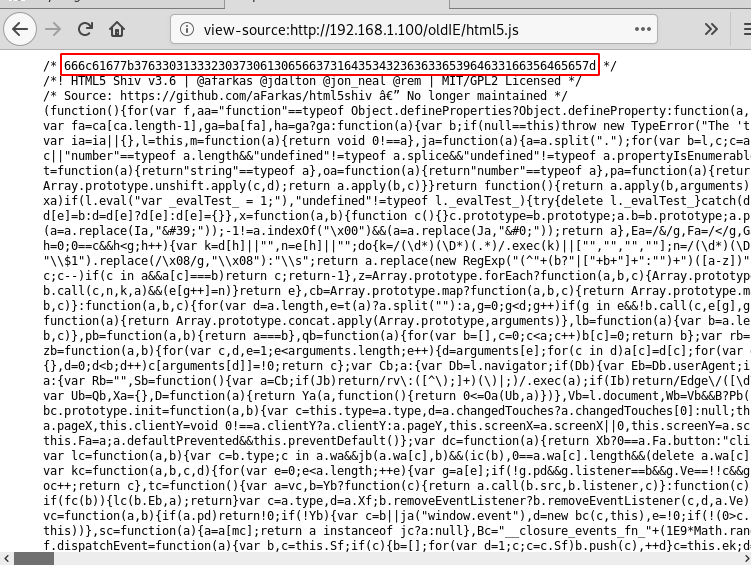
The directory too didn’t have much to go on, so we viewed the page source again and there we found a hex value. Now from the first hint given by the author, which is Flag #1: Don’t go, Home Frank! There’s a Hex on Your House, we can tell that this hex is our first flag. Let’s convert the hex by using the following command in the terminal of kali :
echo | xxd -p -r
Here,
xxd: is used to create a hex dump
-p: is used to the output can be in the plain text
-r: is used to convert the hex

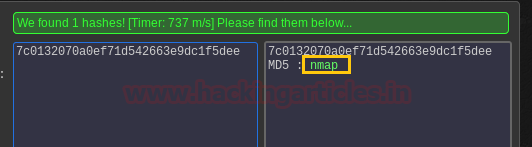
Using the above command the hex is converted as you can see in the image above. And so when we convert this flag from MD5 hash. Hence, the flag is nmap that means our next hint is nmap and that is where we should look.
As explained earlier, the port SSH has been given a security feature in the nmap so we should poke it by typing the following command:
ssh 192.168.1.100 -p22222

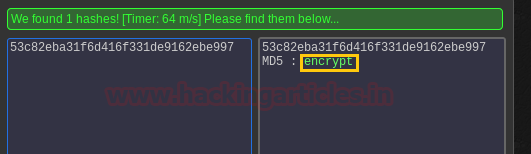
And so we have our next flag; upon de-hashing, it turns out to be encrypted.
We will find our next flag somewhere in the encryption on the webpage. The most basic encryption given to the webpage is a security certificate. Let’s check that out.
Click on the highlight area as shown in the above picture. The following dialogue box will open.

Click on the security tab as shown in the above image. And then click on View Certificate button. In the certificate you will find the third flag as shown below:
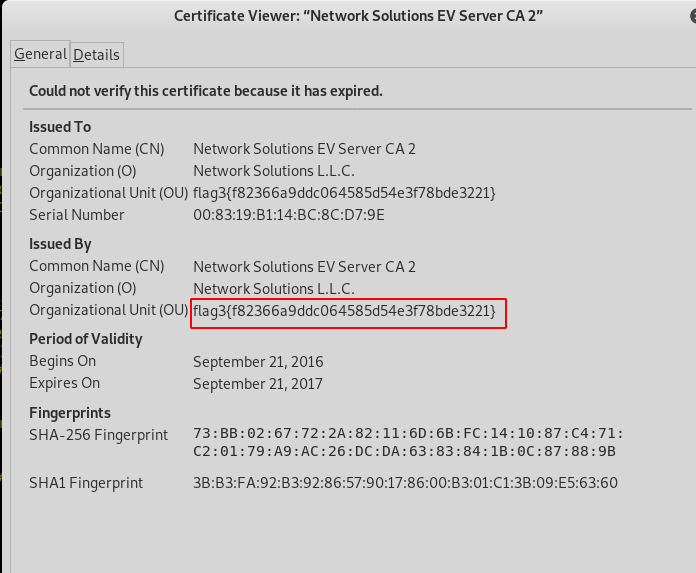
When converted; our next flag turns out to be personnel.

I had assumed “personne1” as a directory, so let’s open it in a browser.
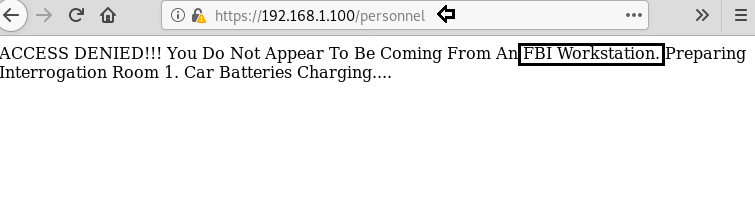
As shown, the directory says that “you do not appear to be from an FBI workstation” that means there is somewhere FBI workstation. I looked back through every page source we had and found that we need internet explorer 4 for the FBI workstation.

Now, reload the personal directory and capture its cooking using burpsuite; which will help you change the browser.

In the burpsuite, once you have captured the cookies change user-agent from “Linux x86_64” to “MSIE 4.0” as shown in the images.

And once you forward the request from burp-suite and the personal directory page will load. There you will find you’re next flag and a hint with that flag i.e. we have to add a prefix ‘new’ to whatever the flag we have after decrypting hash value.
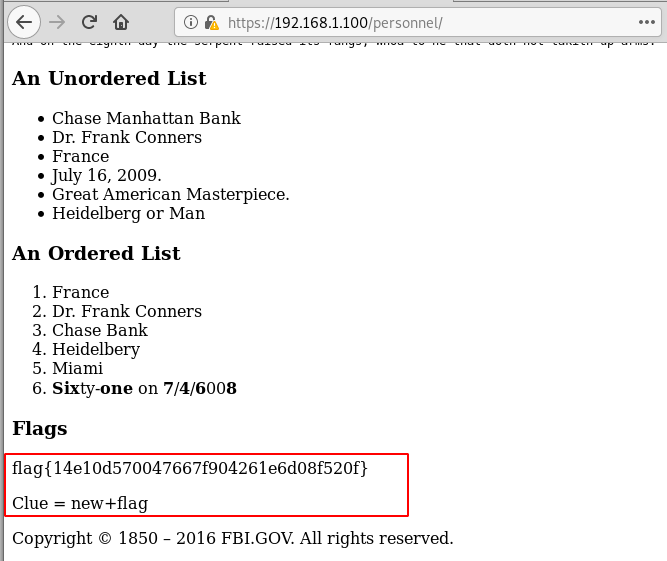
Upon converting our flag is evidence. So adding the prefix new our flag becomes newevidence.

Now the directory /newevidence takes us to the FBI login portal.
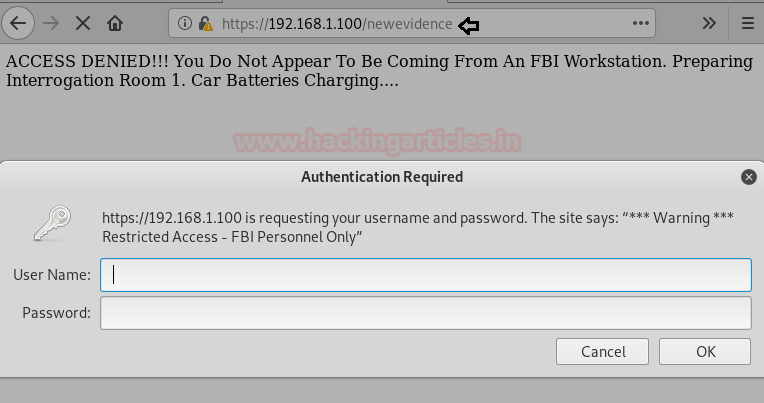
Now we don’t have any username and password and no clue about it too. So I explored its page source.

In the page source there we found two important things i.e. evidence.txt When opened, evidence.txt gave us our next flag.
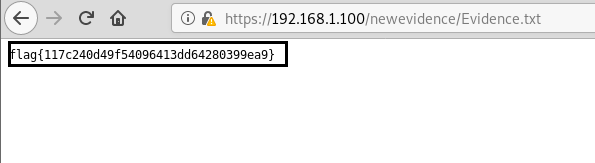
Once converted the flag is panam.

Now let’s open newevidence which we found in the previous flag.
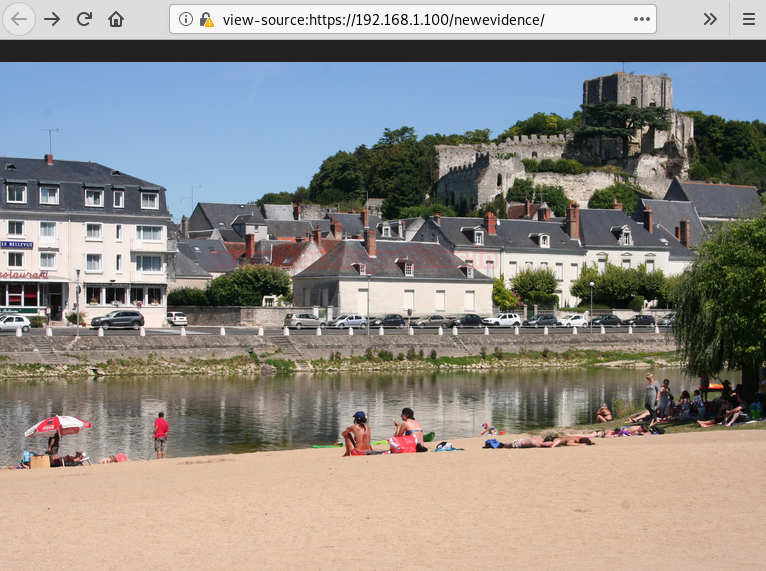
It shows us an image. There must be a stegnographed message in the image. Therefore, use the following command to see it :
steghide extract -sf newevidence.jpeg

The hidden file was flag.txt to read the flag, type :
cat flag.txt
By de-hashing the flag we get ILoveFrance. And we also have a clue i.e. iheartbrenda. This flag and clue are both important, make its note.

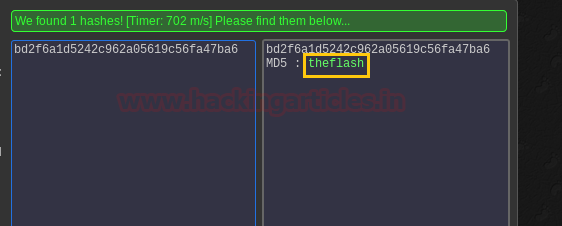
For our seventh flag, we have the hint — Flag # 7: Frank Was Caught on Camera Cashing Checks and Yelling – I’m The Fastest Man Alive! In this hint, it says “I am the fastest man alive” this is the introductory dialogue of The Flash. And even in the movie, Frank uses a fake name Barry Allen, the original name of the flash.
Therefore, Barry Allen can be our username. Let’s log in through SSH port using BarrAllenen username. When it asked for the password I tried both ILoveFrance and iheartbrenda and fortunately, iheartbrenda was the correct password.

Once we were logged in, we used the following commands to find our flag :
ls à to see all the list of all the files
cat flag.txt à to read the flag
And so, we have our next flag. Once de-hashed the flag was the flash
As we have both password and username for the login of SSH; here we can use scp service commands. You can use SCP (the scp command) to securely copy files and directories between remote hosts without starting an FTP session or logging into the remote systems explicitly.
scp -P 22222 barryallen@192.168.1.100:/home/barryallen/security-system.data /root/Desktop/file
Once you have the file, unzip it and for that type:
unzip file
Now by using the following command, we complete our CTF challenge.
volatility –f security-system.data notepad
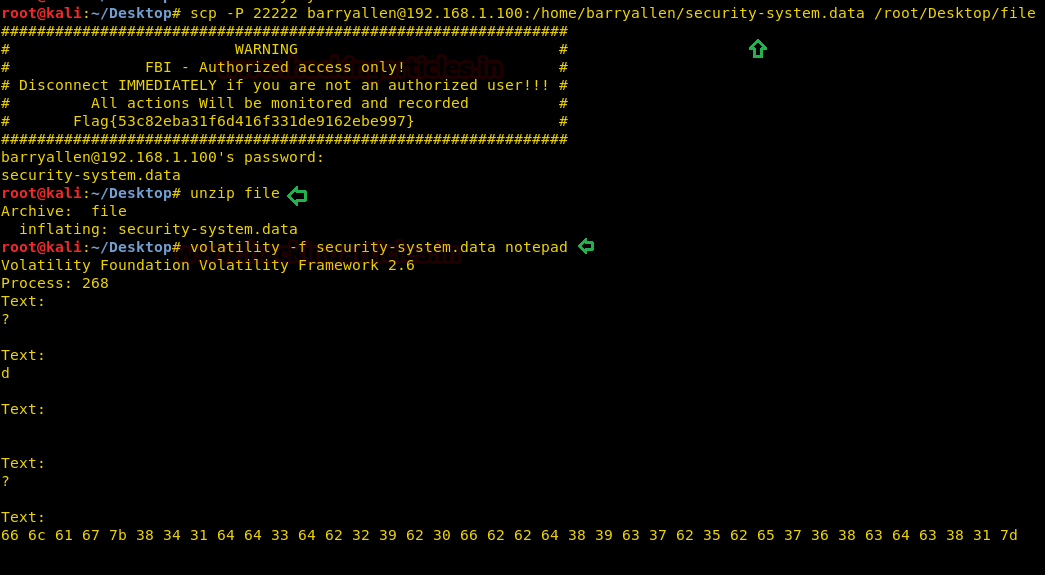
YAY! Once again, we have completed a CTF challenge successfully.
Author: Yashika Dhir is a passionate Researcher and Technical Writer at Hacking Articles. She is a hacking enthusiast. contact here