TCP & UDP Packet Crafting with CatKARAT
Hello friends ! in our previous article we had described packet crafting using colasoft packet builder. Again we are going to use a new tool “Cat KARAT” for packet crafting to test our network by crafting various kind of network packet.
Cat Karat Packet Builder is a is a handy, easy to use IP4, IP6, IP4/IP6 tunnels, PPPoE, TCP, UDP, ICMPv4, ICMPv6, VRRP, IGMP, ARP, DHCP , OAM, VLAN (Q in Q), MPLS, Spanning tree BPDU and LLDP packet generation tool that allows to build custom packets for firewall or target testing and has integrated scripting ability for automated testing.
This Packet Builder enables the user to specify the entire contents of the packet from the GUI. In addition to building packets. Packet Builder also supports saving packets to packet files and sending packets to the network. It can be used at all kinds of network areas like traffic generator, packet generator or protocol simulator.
This project also provides a packet capture tool. It is designed for use by anyone who wants to inject packets into a network and/or observe packets exiting a network. Usually, packet operation by following a protocol stack is limited to command line interface. With this tool, all user have to do is click the screen, which almost everybody can do
From: http://packetbuilder.net
You can download it from given link above.
Let’s start!!
As we had discussed in our previous article that there is 4 mode of operation in packet crafting.
- Packet Assembly
- Packet Editing
- Packet Playing
- Packet Analysis
Let start from the first phase is “Packet Assembly” where you need to decide the type of packet and network you want to create among TCP, IP, ICMP, and UDP.
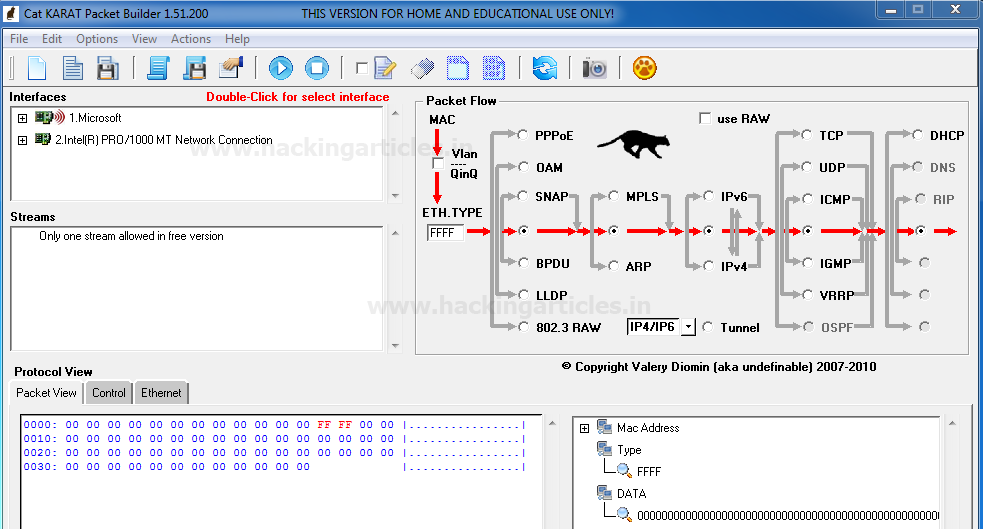
Now when you will run the installed application “Cat KARAT” you will observe three important sections “Interfaces”, “Packet flow” and Packet view which in their default state as shown in given below image.
TCP-SYN Packet Crafting
So as we know in Packet Assembly phase we need to decide protocol for crafting any packet, which is quite easy to select with this tool. Only enable the radio button for selecting protocol and direction flow of packet. Here I had enabled radio buttons for “IPv4” and “TCP” without disturbing remaining default packet flow as shown given below image.

Next, we need to select the interface which you can select from the second sections of Interfaces by double-Click on it.

Now next is packet Editing phase where you need to specify the source IP address such as 192.168.1.11 from which packet will be sent and Destination IP address such as 192.168.1.12 on which packet is received. Moreover, you can also make some changes in your packet such as Time to live (TTL), Data length and also can go with packet fragmentation.
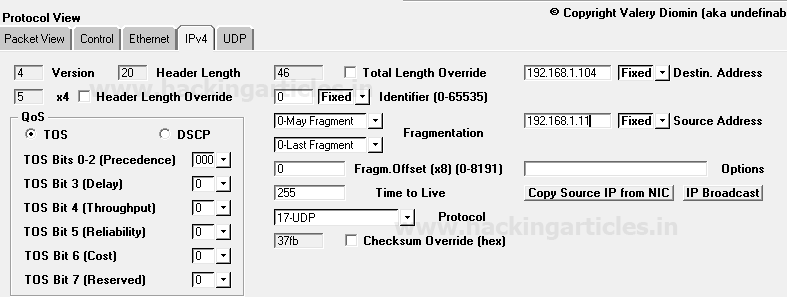
From given below image you can observe I had added source and destination IP in the packet under the third section protocol view -> Ipv4

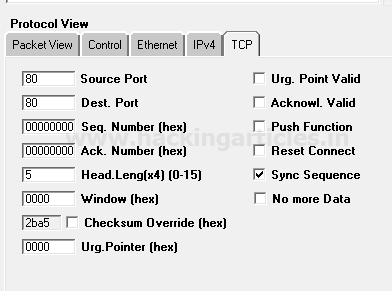
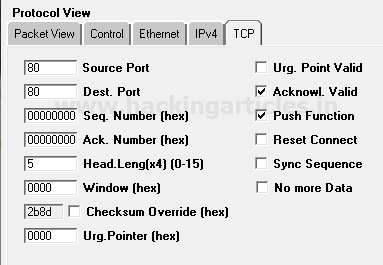
As we know TCP protocol uses TCP-flag for communication to established connection with Destination IP. Therefore we are crafting TCP-SYN packet under the third section protocol view -> TCP by enabling sync sequence option which flows from source port 80 to destination port 80.
Once everything is edited then your packet is ready to send on the target network.
Click on play button given in menu bar for sending the packet on target’s network.
As we know after finishing packet editing operation we need to send it on target network which is known as “Packet Playing” in this mode we actually test packet Assembly and packet Editing mode if show packet is sent successfully else again we send a packet in packet Editing mode for modification.
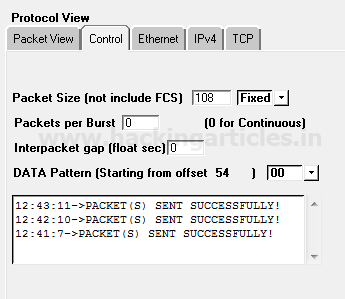
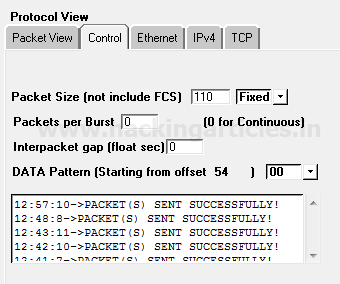
From given below image you can observe the result “Packet sent successfully”
The last phase is the Packet Analysis mode where the received packet is analysis using packet analysis tool. Here we had to use Wireshark for capturing incoming traffic. Hence from given below image, you can observe that Wireshark has captured exactly the same information which we had a bind in the packet during packet Assembly and packet Editing modes such as TCP protocol and TCP-SYN packet.

TCP-RST Packet Crafting
So the Packet Assembly phase and Packet Editing phase for TCP–RST packet crafting is almost the same as above only the difference is made in change TCP-Flag through which connection will be established with target network.
Since we want to send traffic through only reset packets for establishing a connection with the target network, therefore, enable the checkbox of Reset connect.

Click on play button given in menu bar for sending the packet on target’s network which is part of Packet playing mode.
From given below image you can observe the result “Packet sent successfully”

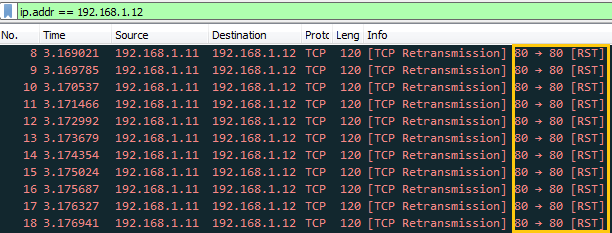
Hence from given below image, you can observe that Wireshark has captured exactly the same information which we had a bind in the packet during packet Assembly and packet Editing modes such as TCP protocol and TCP-RST packet.
TCP-PSH/ACK Packet Crafting
So the Packet Assembly phase and Packet Editing phase for TCP–PSH/ACK packet crafting is almost same as above only the difference is made in change TCP-Flag through which connection will be established with target network.
Since we want to send traffic through only Push with Acknowledgement packets for establishing a connection with the target network, therefore, enable the checkbox of PUSH Function and Acknowledgement.
Click on play button given in menu bar for sending the packet on target’s network which is part of Packet playing mode.
From given below image you can observe the result “Packet sent successfully”
Hence from given below image, you can observe that Wireshark has captured exactly the same information which we had a bind in the packet during packet Assembly and packet Editing mode such as TCP protocol and TCP-PSH/ACK packet.

UDP Packet Crafting
Similarly as above in Packet Assembly phase, we need to decide protocol for crafting UDP packet, enable the radio button for selecting protocol and direction flow of packet. Here I had enabled radio buttons for “IPv4” and “UDP” without disturbing remaining default packet flow as shown given below image.

Move into Protocol view section for Packet Editing and enter source and destination IP. I had added source and destination IP in the packet under the third section protocol view -> Ipv4 as done above.
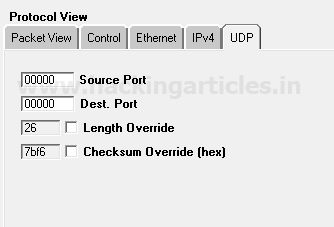
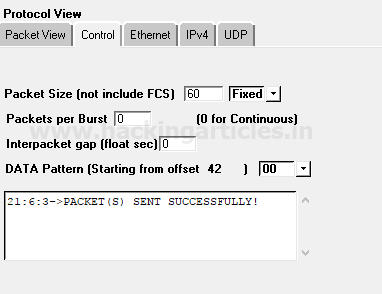
Now explore the UDP tab for design UDP packets as per your requirement, from given below image you can observe default setting details.
Source port: 00000
Destination port: 00000
Now the UDP traffic will flow from source port 0 to destination port 0.
Click on play button given in menu bar for sending the packet on target’s network which is part of Packet playing mode.
From given below image you can observe the result “Packet sent successfully”
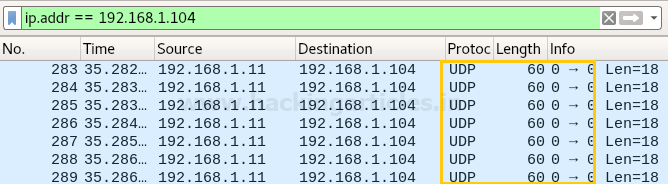
From given below image you can observe that Wireshark has captured exactly same information which we had a bind in the packet during packet Assembly and packet Editing mode such as UDP protocol and from source port 0 to destination 0 of 60 lengths.
Author: Rahul Virmani is a Certified Ethical Hacker and the researcher in the field of network Penetration Testing (CYBERSECURITY). Contact Here